Table of Contents
Advertisement
Quick Links
Download this manual
See also:
User Manual
UC485
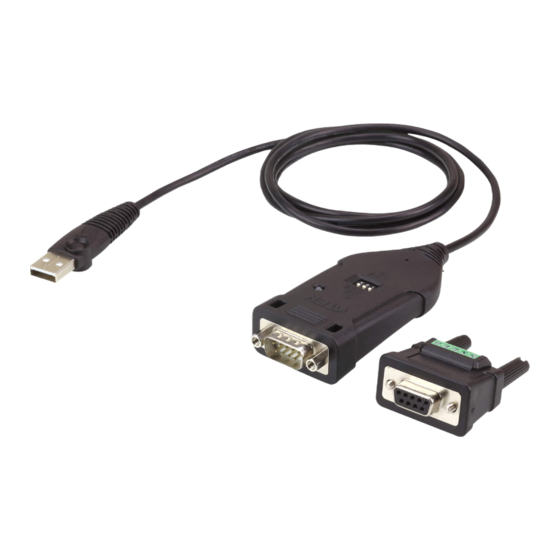
USB to RS-422/485 Adapter
Quick Start Guide
© Copyright 2017 ATEN
®
International Co., Ltd.
ATEN and the ATEN logo are trademarks of ATEN International Co., Ltd. All rights reserved. All
other trademarks are the property of their respective owners.
This product is RoHS compliant.
Part No. PAPE-1223-I60G
Printing Date: 07/2017
UC485 USB to RS-422/485 Adapter
A
Hardware Review
Front View
1
USB Connector
Serial Connector
2
3
Connector Nut
4
Power LED
Mode Selector
5
6
Terminal Connectors
Adapter Connector (Female)
7
Connector Screws
8
B
Hardware Installation
To install the UC485, do the following:
Connect the USB plug to the computer and allow the drivers to install.*
1
2
Plug the RS-422/485 connector to a serial device.
Adaptateur USB vers RS-422/485 UC485
A
Aperçu du matériel
Vue de devant
1
Connecteur USB
2
Connecteur série
Écrou du connecteur
3
4
LED d'alimentation
Sélecteur de mode
5
Connecteurs de bornes
6
7
Connecteur de l'adaptateur (Femelle)
Vis du connecteur
8
B
Installation du matériel
Pour installer l'UC485, procédez comme suit :
1
Connectez la prise USB à l'ordinateur et laissez les pilotes s'installer.*
Branchez le connecteur RS-422/485 à un appareil série.
2
USB-zu-RS-422/485-Netzteil UC485
A
Hardwareübersicht
Ansicht von vorne
1
USB-Anschluss
Serieller Anschluss
2
3
Anschlussmutter
4
Betriebsanzeige-LED
Modusauswahl
5
6
Terminalanschlüsse
Netzteilanschluss (Buchse)
7
Anschlussschrauben
8
B
Hardwareinstallation
Gehen Sie zur Installation des UC485 wie folgt vor:
Verbinden Sie den USB-Stecker mit dem Computer und erlauben Sie die
1
Installation der Treiber.*
Package Contents
A
Hardware Review
1 UC 485 USB to RS-422/485 Adapter
1 Terminal Adapter
1 User Instructions
2
6
3
4
8
5
7
Mode Selector
Switch
Name
Position
Description
No Term
No Term /
The Terminator resistor is disabled.
1
(Default)
Term
Term
The Terminator resistor is enabled.
Echo
The data transmitted is echoed back.
Echo /
2
No Echo
No Echo
No data is echoed back.
(Default)
485
RS-485 2-Wire Mode
3
485 / 422
(Default)
422
RS-422 4-Wire Mode
1
www.aten.com
(Optional) If you are using terminal connectors, plug the Terminal Adapter
3
included with this package to the RS-422/485 Serial Connector and use the
Terminal Block Table to wire the connections.
Use the mode selector to confi gure the connection type.
4
5
Power on the serial devices.
*If you are using an older computer that doesn't contain the drivers for this
device, please go to our website to download the UC485 drivers and install
them before setting up the hardware.
www.aten.com
3
(Optionnel) Si vous utilisez des connecteurs de bornes, branchez l'adaptateur
de bornes inclus avec cet emballage au connecteur série RS-422/485 et utilisez
le tableau du bornier pour câbler les connexions.
Utilisez le sélecteur de mode pour confi gurer le type de connexion.
4
5
Mettez sous tension les appareils série.
*Si vous utilisez un ordinateur plus ancien qui ne contient pas les pilotes pour
cet appareil, veuillez vous rendre sur notre site Web pour télécharger les pilotes
UC485 et les installer avant de confi gurer le matériel.
www.aten.com
Verbinden Sie den RS-422/485-Anschluss mit einem seriellen Gerät.
2
3
(Optional) Wenn Sie Terminalanschlüsse verwenden, stecken Sie den
mitgelieferten Terminaladapter in den seriellen Anschluss (RS-422/485) und
verwenden Sie die Anschlussblocktabelle zur Verkabelung.
4
Konfi gurieren Sie mit dem Moduswähler den Verbindungstyp.
Schalten Sie die seriellen Geräte ein.
5
*Falls Sie einen älteren Computer benutzen, der keine Treiber für dieses Gerät
enthält, rufen Sie bitte unsere Webseite auf, laden Sie die UC485-Treiber
herunter und installieren Sie diese, bevor Sie die Hardware einrichten.
B
Hardware Installation
To RS-422/485
1
Serial Port
To USB port
1234
5
Male DB9
67 89
DB9 Pin Assignment
Pin
RS-422 (4-wire)
RS-485 (2-wire)
or
1
TxD-(A)
Data-
2
TxD+(B)
Data+
3
RxD+(B)
-
4
RxD-(A)
-
5
GND
GND
6
RTS-
-
7
RTS+
-
8
CTS+
-
3
9
CTS-
-
Adaptador USB a RS-422/485 UC485
A
Resumen de hardware
Vista frontal
1
Conector USB
Conector serie
2
3
Tuerca de conector
4
LED de alimentación
Selector de modo
5
6
Conectores del terminal
Conector del adaptador (hembra)
7
Tornillos del conector
8
B
Instalación del hardware
Para instalar el adaptador UC485, realice el siguiente procedimiento:
Conecte el enchufe USB al equipo y deje que se instalen los controladores.*
1
2
Enchufe el conector RS-422/485 a un dispositivo serie.
Adattatore USB-RS-422/485 UC485
A
Descrizione hardware
Vista anteriore
1
Connettore USB
2
Connettore seriale
Dado connettore
3
4
LED Power (Alimentazione)
Selettore modalità
5
Connettori terminali
6
7
Connettore adattatore (femmina)
Viti connettore
8
B
Installazione dell'hardware
Per installare l'UC485, agire come segue:
1
Collegare la spina USB al computer e consentire l'installazione dei driver.*
Collegare il connettore RS-422/485 ad un dispositivo seriale.
2
UC485 Адаптер USB - RS-422/485
A
Обзор аппаратного обеспечения
Вид спереди
1
Разъем USB
Последовательный разъем
2
Гайка разъема
3
4
Индикатор питания
Селектор режимов
5
6
Разъемы клеммной колодки
Разъем адаптера (гнездо)
7
Винты разъема
8
B
Установка аппаратного обеспечения
Для установки UC485 выполните следующие действия.
Подключите вилку USB к компьютеру и подождите, пока завершится
1
установка драйверов.*
Support and Documentation Notice
All information, documentation, fi rmware, software utilities, and
specifi cations contained in this package are subject to change without
prior notifi cation bythe manufacturer.
To reduce the environmental impact of our products, ATEN
documentation and software can be found online at
http://www.aten.com/download/
Technical Support
Camera
www.aten.com/support
Control
EMC Information
FEDERAL COMMUNICATIONS COMMISSION INTERFERENCE
or
2
STATEMENT:
This equipment has been tested and found to comply with
Alarm
the limits for a Class A digital device, pursuant to Part 15
of the FCC Rules. These limits are designed to provide
reasonable protection against harmful interference when
the equipment is operated in a commercial environment.
or
This equipment generates, uses, and can radiate radio
frequency energy and, if not installed and used in accordance with the instruction manual, may
cause harmful interference to radio communications. Operation of this equipment in a residential
area is likely to cause harmful interference in which case the user will be required to correct the
Sensor
interference at his own expense.
FCC Caution: Any changes or modifi cations not expressly approved by the party responsible for
compliance could void the user's authority to operate this equipment.
Warning: Operation of this equipment in a residential environment could cause radio interference.
Terminal Block Table
Suggestion: Shielded twisted pair (STP) cables must be used with the unit to ensure compliance
with FCC & CE standards.
Pin
RS-422 (4-wire)
RS-485 (2-wire)
1
TxD-(A)
Data-(A)
This device complies with Part 15 of the FCC Rules. Operation is subject to the following two
2
TxD+(B)
Data+(B)
conditions:(1) this device mat not cause harmful interference, and(2) this device must accept any
interference received, including interference that may cause undesired operation.
3
RxD+(B)
-
4
RxD-(A)
-
5
GND
GND
이 기기는 업무용(A급) 전자파적합기기로서 판매자 또는 사용자는 이 점을 주의하시기 바라며,
가정외의 지역에서 사용하는 것을 목적으로 합니다.
(Opcional) Si utiliza conectores de terminal, enchufe el adaptador de terminal
3
incluido con este paquete al conector serie RS-422/485 y utilice la tabla de
bloque de terminales para cablear las conexiones.
Utilice el selector de modo para confi gurar el tipo de conexión.
4
5
Encienda los dispositivos serie.
*Si utiliza un equipo antiguo que no contenga los controladores para este
dispositivo, vaya a nuestro sitio web para descargar los controladores del
adaptador UC485 e instálelos antes de confi gurar el hardware.
3
(Opzionale) Se si utilizzano connettori terminali, collegare l'adattatore
terminale incluso in questa confezione al connettore seriale RS-422/485 e
utilizzare la Tabella morsettiera per collegare i connettori.
Utilizzare il selettore modalità per confi gurare il tipo di collegamento.
4
5
Accendere i dispositivi seriali.
*Se si utilizza un computer meno recente che non contiene i driver per questo
dispositivo, visitare il nostro sito web per scaricare i driver dell'UC485 e installarli
prima di confi gurarer l'hardware.
Подключите устройство с последовательным интерфейсом к разъему
2
RS-422/485.
(Дополнительно) Если используются разъемы клеммной колодки,
3
подключите входящий в комплект поставки терминальный адаптер
к последовательному разъему RS-422/485 и соедините провода,
руководствуясь таблицей разъемов клеммной колодки.
Настройте тип подключения, используя селектор режимов.
4
5
Включите питание устройств с последовательным интерфейсом.
* Если используется компьютер старой модели, на котором отсутствуют
драйверы для данного устройства, зайдите на веб-сайт компании,
загрузите драйверы UC485 и установите их перед установкой
аппаратного обеспечения.
Scan for
more information
www.aten.com
www.aten.com
www.aten.com
Advertisement
Table of Contents

Related Manuals for ATEN UC485


Summary of Contents for ATEN UC485
- Page 1 Suggestion: Shielded twisted pair (STP) cables must be used with the unit to ensure compliance No Echo ATEN and the ATEN logo are trademarks of ATEN International Co., Ltd. All rights reserved. All No Echo No data is echoed back.
- Page 2 Сполучувач USB USB 커넥터 * Якщо ви користуєтеся старим комп'ютером, що не має драйверів для Послідовний сполучувач 시리얼 커넥터 цього пристрою, завантажте з нашого веб-сайту драйвери UC485 і Гайка сполучувача 커넥터 너트 встановіть їх перед налаштуванням апаратних засобів. Світлодіод живлення...
Need help?
Do you have a question about the UC485 and is the answer not in the manual?
Questions and answers