THERA-Trainer THERA-vital Instructions For Use Manual
Hide thumbs
Also See for THERA-vital:
- User manual (116 pages) ,
- Supplement manual (36 pages) ,
- Operation instructions manual (20 pages)
Table of Contents
Advertisement
Advertisement
Table of Contents

Related Manuals for THERA-Trainer THERA-vital


Summary of Contents for THERA-Trainer THERA-vital
- Page 1 Instructions for Use Models: THERA-vital THERA-live...
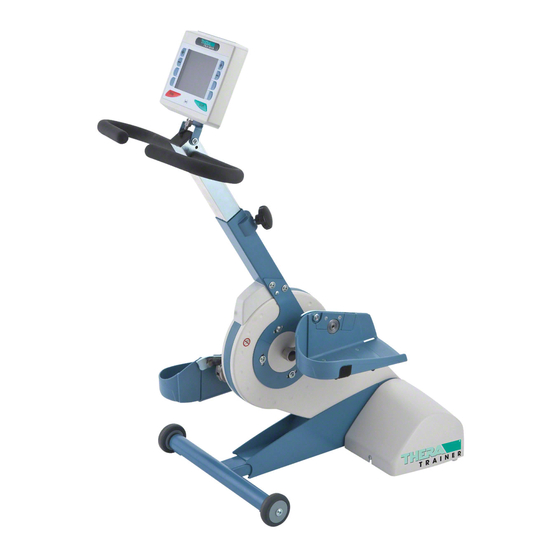
- Page 2 * Illustration shows optional equipment THERA-live basic version | 2 |...
- Page 3 GmbH will be only too pleased to help. 10 Upper torso exerciser (optional feature) Enjoy exercising and stay active with your THERA-Trainer. 11 Therapy grips 12 Control pad with touchscreen display (optional feature, THERA-vital only) 13 USB interface (THERA-vital) 14 Knurled-handle screw for height adjustment/upper torso exerciser...
-
Page 4: Table Of Contents
(optional feature) .........21 10.1 Printing out session data......39 Safety.............7 7.14 THERA-assist exercising software (optional feature for THERA-vital only) 21 Motor power ........40 Notes on exercise therapy ....9 7.15 Printer for exercising data (optional General observations ......9 Technical specifications ....41 feature on THERA-vital only) ....22... -
Page 5: Exerciser Options
It handlebar provides optimum support and stabil- prevents the wheelchair from tipping over when The basic version of the THERA-vital can be ity, especially when exercising actively. the patient is exercising with the THERA-Trainer. used for passive (driven by the exerciser) and... -
Page 6: Symbols Used
Symbols used Intended use Symbol Meaning Static discharge damage warn- The symbols used in this instruction manual and, The THERA-Trainer is suitable for use in the ing: connections marked with if applicable, on the trainer are intended to draw home, in hospitals, care institutions and medical this symbol must not be your attention to possible dangers when using practices. -
Page 7: Safety
(see page 12). If the THERA-vital is to be used by a patient in length option 4 must be used. a wheelchair, and if it is not possible to be ... - Page 8 The exerciser is only completely discon- During upper torso exercising sessions using nected from the electrical power supply when forearm rests on a THERA-vital with 10.4" the plug is removed from the power outlet screen, make sure that the patient's digits –...
-
Page 9: Notes On Exercise Therapy
Notes on exercise therapy Correct posture Using the THERA-Trainer as an upper torso exerciser: The patient sits on a chair or Always make sure that the patient’s posture wheelchair. The THERA-Trainer stands on General observations when exercising with the THERA-Trainer is in the floor in front of the patient. -
Page 10: Exercise Programme Planning
Therefore, only general guidance on page 24). exercise programme planning can be given at The THERA-vital offers the patient a number of this point. options for active exercising: Regular exercising with the THERA-Trainer is Resistance demand: the patient exercises extremely important if improvements in mobility, against a set resistance level (see page 24). -
Page 11: Muscle Hypertonia/Spasms
If However, in our many years of experience, we THERA-vital: Submenu, Spasticity program, this is combined with an upright sitting position know of virtually no side effects occurring. -
Page 12: Transporting And Commissioning
That is evident from the socket using the power cord. The exerciser is display: then ready for operation. You can start it from the On the THERA-vital, the screen backlighting control pad. switches off. On the THERA-live the backlighting on the control pad switches off and the display shows three lines. -
Page 13: Operation
Velcro straps provided. To do so, pull the ▶ Do not wear shoes with laces. The ▶ Tip the THERA-vital on its rear bottom edge. Velcro strap over the top of the foot to the outer shoe laces could become caught in... -
Page 14: Infinitely Variable Crank Length (Optional Feature)
Infinitely variable crank length Foot fixings (optional feature) ▶ Adjust the opposite crank in the same way. (optional feature) Make sure that both cranks are set to the The foot fixings allow the feet to be secured in the same length (the cranks are marked with a If the exerciser has the optional infinitely adjusta- footrests quickly, safely and in many cases by scale to facilitate adjustment). -
Page 15: Calf Rests (Optional Feature)
Calf rests (optional feature) To undo the foot fixing: ▶ press the retainer strap down slightly while The calf rests help to secure the legs in cases of pressing the locking button on the foot fixing. paralysis. They are connected to the footrests by a pivoting joint so as not to impair movement of ▶... -
Page 16: Adjusting The Handlebar (Optional Feature On Thera-Live)
▶ Take the weight off the locating pin by lifting ▶ Allow the locating pin to snap into position and the handlebar upwards. tighten the knurled-handle screw by turn- ing it clockwise. Do not withdraw the handlebar out of ▶ If you wish to adjust the handlebar horizon- the handlebar/upper torso exerciser tally, you must slightly loosen the eight screws support tube any further than the mini-... -
Page 17: Upper Torso Exerciser (Optional Feature)
Upper torso exerciser (optional Adjusting the reach Risk of crushing: feature) The ideal reach setting for the upper torso exer- When sliding the tubes together, it is ciser is one at which the arms are not quite fully possible for your hand to become Before exercising with the upper torso straightened when the exerciser grips are at their trapped. - Page 18 7.8.2 Adapter handles for upper torso 7.8.3 Therapy grips for upper torso exer- To use the upper torso exerciser with exerciser ciser adapter handles as a handlebar, the The adapter handles convert the upper torso cranks must be locked by means of the The therapy grips offer a variety of holding positions exerciser into an upper section with handlebars in arrester knob (see following section).
-
Page 19: Forearm Rests (Optional Feature)
During upper torso exercising sessions Forearm rest with knob grip Wrist band for forearm rest on a THERA-vital with 10.4" screen, make sure that the patient's digits – especially the thumbs – cannot strike the screen. ▶ If necessary, hold the thumbs in place with the Velcro strap. -
Page 20: Wrist Supports (Optional Feature)
7.10 Wrist supports (optional fea- 7.11 Adjustable legs (optional fea- ture) ture) If the patient’s hand is paralysed, the wrist sup- The adjustable legs enable the THERA-Trainer to port allows it to be quickly and easily secured to be adjusted to the height of the patient's the handlebar, therapy grip or special Tetra-grip. -
Page 21: Stabiliser Chocks (Optional Feature)
▶ Press down the red lever on the first inertia The stabiliser chocks prevent the wheelchair belt reel and at the same time pull the belt out The THERA-vital (software version 01.04.00 or from tipping over when the patient is exercising with the hook. -
Page 22: Printer For Exercising Data (Optional Feature On Thera-Vital Only)
THERA-vital must last at least one minute. ▶ Slightly moisten the inside of the chest-band and strap it around the chest (close to the... -
Page 23: Thera-Vital: Control Pad With Colour Screen
7.17 THERA-vital: Control pad with 9 10 11 colour screen All important settings and exercising session data are always visible on the colour screen. The basic start screen view shows the following infor- mation: 1 START button (see page 24). - Page 24 A required cadence (pedalling speed) is set that power output. Pressing the STOP button twice during an ongo- is then held constant by the THERA-vital through- ing exercising session ends the session. The dis- Power setting in watts (Ortho/Cardio mode): out the exercising session.
- Page 25 If the set motor power (factory setting 10 Nm) is very severe changes in the pattern of While an exercising session is in progress or if exceeded, the THERA-vital reacts in the same motion (locking of the cranks, extreme there is no upper torso exerciser fitted, the button way as if it had detected a spasm.
- Page 26 + and – are not shown. cancels the assisted entry function. When using the THERA-vital with 5.7" screen, the exercising mode is indicated but there are no buttons for quickly changing it. Instead, you must open the submenu to change the exercising mode (see page 32).
- Page 27 7.17.11 Opening the submenu ▶ Simultaneously press the STOP button and the left minus button ▶ The submenu button can be activated on both control pads in the System/Configuration set- tings. It enables quick access to the sub- menu. The factory setting is for the button not to be visible.
-
Page 28: Thera-Live: Control Pad
7.18 THERA-live: Control pad 7.18.1 START/STOP traffic-light function Automatic cycling of the display between the exercising parameters can be deactivated. To do When in stand-by so, press the button. The exercising mode, the THERA- parameter currently displayed flashes. To revert live is activated by to automatic cycling between the parameters, pressing any button. - Page 29 7.18.5 Duration 7.18.8 Assisted entry 7.18.9 Right/left symmetry display If the + or – button is used to set the You can use the Assisted entry function to move The symmetry display only appears when length of the exercising session, the each pedal to a low position for easily getting the using the leg exerciser.
- Page 30 7.18.10 Spasticity detection 7.18.11 Saving exercising settings The spasticity detection function on the THERA- You can make your own individual exerciser set- live protects spastic patients or those with sensi- tings by defining the following parameters before tive bones or joints from undue stresses. starting an exercising session: ...
- Page 31 7.18.12 Permanently changing factory set- ▶ Set the spasticity program parameters as tings desired using the button. The screen shows the setting as follows: You can permanently change some settings. The “Arrow pointing up” (forwards): always altered settings will then remain stored even after restart forwards after detecting a spasm switching off the power.
-
Page 32: Submenu (Thera-Vital Only, For Experienced Users)
Submenu (THERA-vital only, for experienced users) Navigating the submenu The THERA-vital has a number of exercising pro- 1 Cancel/Discard changes grams that are based on the needs of typical This button takes you back up to the next ▶ Simultaneously press the STOP button and patient groups. -
Page 33: Menu Structure
Menu structure The parameters of the exercising programmes and system settings are arranged in the following menu structure: 1st Level 2nd Level Possible settings and functions Factory setting See page Neuro Duration 1 to 180 minutes 15 min Forw/backw auto On/Off Bio-feedback Symmetry bars/road, Passive, Off... -
Page 34: Description Of Exerciser Functions On Submenu
In Cardio exercising mode, a heart rotation every four minutes when the patient is rate limit is set. The THERA-vital reduces the Neuro exercising passively. resistance as soon as the patient’s heart rate ... -
Page 35: Spasticity Detection
Backwards: always restart backwards after detecting a spasm (recommended for This setting is used to specify the threshold at The THERA-vital reduces the resistance level as patients with tendency to suffer flexion which the THERA-vital sensors detect a spastic soon as the preset heart rate limit is reached. -
Page 36: Microphone Sensitivity
If you wish to reset the THERA-vital to the factory the microphone fitted in the control pad or switch- Bio-feedback for leg exerciser... - Page 37 Symmetry bars Symmetry road Bio-feedback for muscle tightness The bar diagram shows the distribution of power With the road diagram, a bicycle moves to the left When the patient is exercising passively, the output between the two sides. The total of the two or right on the road according to the distribution of colour screen shows a bar representing the bars always adds up to 100 %.
-
Page 38: Bio-Feedback For Upper Torso Exerciser
Bio-feedback for upper torso Changing the crank length has a substantial exerciser effect on this Bio-feedback display. The percent- age figures from two different exercising ses- The upper torso exerciser Bio-feedback function sions are only comparable if the crank length and is intended to provide the patient with feedback the maximum motor power (submenu) settings as to how well his/her arms are working together... -
Page 39: Analysis Of Session Data (Thera- Vital Only)
When a printer is connected (see page 22), a calculated if the session has lasted for at least to the THERA-vital. The number of calories printer symbol appears at the top right that... -
Page 40: Motor Power
The motor power for the upper torso exerciser is approx. 30% of the power of the leg exerciser. ▶ On the THERA-vital you can set the maximum motor power limit on the 10 11 12 13 14 15 16 17 18 19 20 21 22 submenu (see page 34). -
Page 41: Technical Specifications
Technical specifications THERA-vital THERA-live Basic exerciser 74 cm 54 cm Length 46 cm 46 cm Width 100-110 cm 46 cm (101 cm with handlebar) Height 32 kg 25 kg (28.5 kg with handlebar) Weight With upper torso exerciser 70-80 cm 70-80 cm Length... -
Page 42: Cleaning And Disinfection
Cleaning and disinfection Replacing the fuse Recycling ▶ Unplug the power cord from the exerciser. THERA-Trainers are high-quality and durable Make absolutely sure the mains power products that offer long service, are environmen- ▶ Using a small screwdriver, remove the power cord is unplugged from the power outlet tally friendly and recyclable. -
Page 43: Tips And Tricks
Be certain to consult your therapist to make sure your joints and ten- dons are not being overstressed. The resistance is too high for active exercising. If exercising in Neuro mode, reduce the resistance level (THERA-vital Page 24 only). In Ortho or Cardio exercising mode, reduce the power setting Page 24 (THERA-vital only). - Page 44 Select the correct exerciser (arm or leg). Page 25 Unlock the upper torso exerciser. Page 18 Exercising session analysis is not displayed (THERA-vital Exercise for at least 1 minute. only). Safety voice deactivation doesn’t respond (THERA-vital Set higher microphone sensitivity.
-
Page 45: Notes On Electromagnetic Comlypatibility
Notes on electromagnetic 18.5 Interference emission comlypatibility Guidance and manufacturer’s declaration on electromagnetic emissions 18.1 Electrical leads, lead lengths THERA-Trainers are intended for operation in the electromagnetic environment specified below. The and accessories THERA-Trainer owner or user should ensure that the apparatus is used in such an environment. The THERA-Trainers may only be operated with Emission measurements Compliance... -
Page 46: Interference Immunity
18.6 Interference immunity Guidance and manufacturer’s declaration on electromagnetic interference immunity THERA-Trainers are intended for operation in the electromagnetic environment specified below. The THERA-Trainer owner or user should ensure that the apparatus is used in such an environment. Interference immunity test IEC 60601 testing level Compliance levels Guidance on electromagnetic environment... - Page 47 Guidance and manufacturer’s declaration on electromagnetic interference immunity THERA-Trainers are intended for operation in the electromagnetic environment specified below. The THERA-Trainer owner or user should ensure that the apparatus is used in such an environment. Interference immunity test IEC 60601 testing level Compliance levels Guidance on electromagnetic environment Conducted high-frequency inter-...
-
Page 48: Recommended Safe Distances Between Portable And Mobile Equipment, High-Frequency Telecommunications Equipment And Thera-Trainers
18.7 Recommended safe distances between portable and mobile equipment, The theoretical field strength of fixed transmit- high-frequency telecommunications equipment and THERA-Trainers ters such as radio telephone and mobile agri- cultural radio equipment base stations, THERA-Trainers are intended for operation in the electromagnetic environment specified below. The amateur radio transmitters, AM and FM radio THERA-Trainer owner or user can help to prevent electromagnetic interference by observing the min- and TV transmitters cannot be precisely... -
Page 49: Index
Control pad Exercising level ........24 Arm/Upper torso exerciser THERA-live ........28 Exercising parameters ......28 locking/unlocking......18 THERA-vital ........23 extension spasms ......31, 35 Assisted entry ........26, 29 Controls............ 3 Automatic speed adjustment....35 Correct posture ........9 Factory setting ......... - Page 50 Handlebar ..........16 Neuro ............. 33 Safety voice deactivation ....... 36 Heart rate ..........23 Notes on electromagnetic compatibility . 45 Sensitivity of spasticity detection ... 35 Heart rate limit......33, 34, 35 Notes on exercise therapy ....... 9 Servicing ..........42 Heart rate monitor (Cardio-Pulse set) ..
- Page 51 Technical specifications ......41 THERA-assist exercising software..21 Therapy grips ......... 18 Tips and tricks........43 Transporting........... 12 Upper torso exerciser......17 locking/unlocking......18 Upper torso exercising ......18 Uses............9 Voice deactivation........36 Wrist supports ........20 | 51 |...
Need help?
Do you have a question about the THERA-vital and is the answer not in the manual?
Questions and answers