
Summary of Contents for Xonix NX-Vario
- Page 1 It’s rough, but it works! J Device, its firmware and this manual made by Iliushenko Andrei (nuclear_XONIX) DIGITAL VARIOMETER NX-Vario User’s manual...
-
Page 2: Specifications
Variometer NX-Vario is the beginner’s device. It has all necessary functions for paragliding and hang gliding. Hardware is implemented on the Arduino platform. Specifications · Dimensions: 94x94x35mm; · Main board – Arduino Nano (ATMEGA328P); · Sensor BMP180; · LCD screen 16x2 (white symbols, blue background);... -
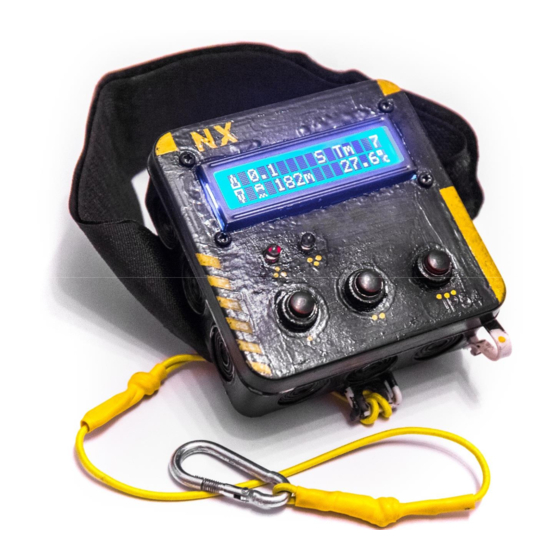
Page 3: Front Panel
Features · Reliable height measurement in the range: 0-9999 meters; · Accuracy of altimeter: 1 meter; · Three independent nullable heights: absolute, relative to start point, relative additional; · Possibility of manual entering pressure at sea level (QNH) to set the correct absolute altitude;... -
Page 4: Key Assignment
Key Assignment ON/OFF button. • Located on the left side of the front of the device. To switch on the device, press the button until it clicks and locks in the lower position. Press again to switch off; Button 1. •... -
Page 5: Main Screen
There will be a boot and a self-test. During booting, the device will consistently display the welcome screen ("nx-Vario; baro-sensor-test") and the initial value screen of the pressure at the sea level ("def.pres, 760.00"). Also at boot time, the relative to start altitude and the additional relative altitude are set to zero. - Page 6 Description of the main screen symbols The CLIMB/DESCENT indicator (up and down arrows) is located in the left corner of the main screen. This indicator reflects the current state of the aircraft. If the vertical velocity is zero, then two contour arrows are displayed one above the other .
- Page 7 Max altitudes screen Absolute altitude value Additional relative altitude Altitude relative to the start point Switch to the maximal altitudes screen by short pressing "Button 3" in the "Main screen". Zeroing of the maximal altitudes can be done by long pressing "Button 3". Max and min vario screen Maximal vario value Minimal vario value...
-
Page 8: Description Of Menu Items
Description of menu items Entering the "MENU" mode is done by short pressing "Button 1". Switching through the menu items is made by short pressing "Button 2". Changing the values of the selected menu items is done by short press of "Button 3" (except for "MENU 1", see below). To exit the "MENU"... - Page 9 MENU 4 Turn the variometer LED indication ON/OFF to duplicate or replace the beeper. The ON/OFF value is selected by briefly pressing the "Button 3". Use. This option is useful for the motored flights, when the sound of the engine muffles the beeper of the variometer.
- Page 10 MENU 7 Turn ON/OFF the falling alarm test mode. Initially, the option was included in the menu for setting up this mode. But in the future it was decided to leave it, so that the pilot could independently turn on the alarm, get acquainted with its screens and memorize the sound and light signals.
-
Page 11: Additional Information
Use. The function will be useful for pilots flying with a winch and participating in competitions. Often during the competition, the winch acts as a conveyor, and it is desirable to minimize the tightening time of each wing. This function allows you to give a long beep after passing certain, determined in advance by the rules of the competition height threshold on climb, and do not waste time on an extra lift. - Page 12 From the author I started flying the paraglider pretty long time ago, somewhere in the beginning of 2008. And quite quickly I understood that I need a variometer. But at that time it was unrealizable, as prices were heavily biting (however, since that moment the situation with prices has not changed at all).
- Page 13 The assembly of elements looks like this:...
- Page 14 After the assembly of the circuit and loading the firmware in the controller, the device must turn on and show you the welcome screen. If something went wrong, check the connection diagram! P.S. If, or more correctly, when the device shows up bugs, throw me a description on my E-mail (xonix2004@list.ru), or you can find me in VK or Facebook for more convenient communication.
- Page 15 Bug records...
- Page 16 Changes in firmware...
Need help?
Do you have a question about the NX-Vario and is the answer not in the manual?
Questions and answers