
Subscribe to Our Youtube Channel
Related Manuals for Maico MedRx Otowave 102


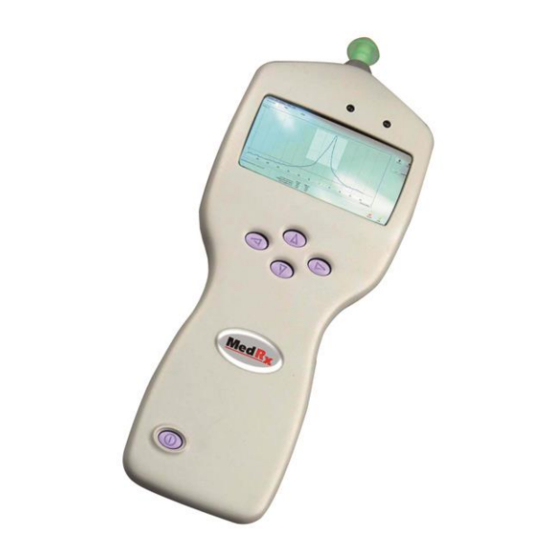
Summary of Contents for Maico MedRx Otowave 102
- Page 1 MedRx Otowave 102 Hand Held Portable Tympanometer Operating Manual (Applies from serial number 37400 onwards) 853497_OM001-14 Otowave 102 Operating Manual Page 1...
-
Page 2: Table Of Contents
CONTENTS Introduction..................4 1.1. Intended applications................. 4 1.2. Features .................... 4 1.3. Unpacking..................4 1.4. Standard contents ................5 1.5. Optional accessories ................. 5 1.6. Warranty card ..................5 1.7. Guarantee..................5 Important Safety Instructions ............6 2.1. Precautions..................6 2.2. - Page 3 Data Management ................24 9.1. List records ..................25 9.2. Print records ..................25 9.3. Send records to a computer ............25 9.4. Delete records ................. 26 Performing Daily Checks .............. 26 Routine Maintenance ..............27 11.1. Cleaning the Otowave ..............27 11.2.
-
Page 4: Introduction
1. Introduction Thank you for purchasing a MedRx Otowave 102, a hand-held, portable tympanometer that will give many years of reliable service if treated with care. This operating manual covers product variants 102-1 & 102-4. 1.1. Intended applications The MedRx Otowave is designed for use by audiologists, general practitioners, hearing aid dispensers and child health professionals. -
Page 5: Standard Contents
1.4. Standard contents MedRx Otowave 102 Tympanometer 4 x 1.5V ‘AA’ Batteries (UK only) 4 in 1 test cavity assembly Set of disposable ear-tips Carrying case Operating manual Calibration certificate Warranty card 1.5. Optional accessories NOAH impedance module Portable thermal printer... -
Page 6: Important Safety Instructions
2. Important Safety Instructions The Otowave 102 instrument must be used only by practitioners qualified to perform tympanometric tests. It is intended for transient use as a screening and diagnostic tool; however no surgical or medical procedure should be undertaken solely on the basis of results obtained from the instrument. -
Page 7: Electromagnetic Compatibility (Emc) Considerations
Thermal paper printouts fade with exposure to light or heat. Photocopying the patient record test results will ensure a more permanent record is kept. Do not drop or otherwise impact this instrument. If the instrument is dropped or damaged, return it to the manufacturer for repair and/or calibration. -
Page 8: Tympanogram
compliance calculated from the result. In line with normal audiometric practice compliance is displayed as an equivalent volume of air in ml. 3.2. Tympanogram To record the tympanogram the compliance is measured while the air pressure in the ear canal is varied from +200daPa to -400daPa by means of a small pump. -
Page 9: Installing & Replacing Batteries
4.1. Installing & replacing batteries The Otowave may be powered from Alkaline ‘AA’ batteries or rechargeable Nickel-Metal Hydride (NiMH) batteries (see Section 14). Four batteries are required. Do not mix battery types or old and new batteries. If the Otowave is to be used infrequently we recommend alkaline cells are fitted. - Page 10 Press the right navigation key ► to accept a menu choice or go to the next step. Press the left navigation key ◄ to cancel an operation or go back to the previous step. The function of the left and right keys is usually shown on the bottom line of the display.
-
Page 11: The Probe
4.4. The probe Boss Probe Tip Seal Nose Cone The small holes through the Otowave probe tip must be kept clear. If these become blocked a warning message will be displayed. The tip must be removed and cleaned or replaced. To remove the tip, unscrew the nose cone and pull the tip off the probe boss. -
Page 12: Taking Measurements
MAIN MENU NEW TEST VIEW THE LAST TEST DAILY CHECK Select 5. Taking measurements Ensure that the appropriate settings have been made before carrying out a test. See below and the CONFIGURATION options in Section 12.2 5.1. Prior to testing and Ambient conditions A qualified health care professional should perform a thorough otoscopic examination to establish that the condition of the ear is suitable for the test options selected and that no contraindications are present. -
Page 13: Performing A Test
5.3. Performing a test Other than remaining still, no specific action is required by the patient during the automatic test. A typical tympanogram measurement and reflex test is carried out as follows. From the MAIN MENU select NEW TEST: MAIN MENU NEW TEST VIEW THE LAST TEST DAILY CHECK... - Page 14 Present the ear tip to the ear and obtain a seal. If a good seal has been detected the following sequence of messages will be seen TESTING LEFT EAR “Equalising Pressure” Cancel TESTING LEFT EAR “Pressure Settling” Cancel TESTING LEFT EAR ...
- Page 15 TESTING LEFT EAR Seal Obtained Taking Tympanogram Seeking Reflex 1000 Hz 80 dB Cancel When the measurement is complete the tympanogram will be displayed: The display shows: The peak compliance, in ml (Pk) The pressure which gave the peak compliance in daPa ...
- Page 16 The display shows: The frequency of the measurement. “PASS” if a reflex was found, else “NR” (No Response). The level of the tone for which a reflex was first found. A plot of compliance against time. If the reflex test was performed at more than one frequency use the ▲...
-
Page 17: Ear Seal Check
If you chose to test both ears the test sequence will now be repeated for the right ear: TESTING RIGHT EAR INSERT PROBE Cancel Skip Press ► to skip testing of the right ear and view results for the left ear. Press ◄... -
Page 18: Reflex Options
However if difficulty is experienced in using the eartips to create a seal the alternative THOROUGH option may be helpful. This checks that a range of pressures will be available before starting a test by means of a visual indication of the quality of the seal: TESTING LEFT EAR “Obtaining ear seal”... -
Page 19: Error Messages
Reflex threshold Use the keys to choose the change in compliance that determines that a reflex has been detected (0.01ml to 0.5ml). Press the ► key to confirm the selection. Reflex autostop By default the reflex test at each frequency will stop at the lowest level of stimulus that produces a response. - Page 20 menu that is displayed on completion of a test. This menu can also be found by selecting VIEW THE LAST TEST from the main menu. You will be asked to enter a three character identifier for the record. We suggest using the patient’s initials. As the tympanometer uses a combination of this identifier, the date and time to identify saved tests you may reuse the same identifier for different tests if you wish.
-
Page 21: Irda Communications
DELETE OLDEST will overwrite the oldest record in memory with the results being saved. Cancel will return you to the previous menu. 7. IrDA Communications The Otowave 102 can send test results to a designated printer or a suitably-equipped computer via an infra-red link. If the computer does not have an infra-red port a suitable infra-red adapter will be required. -
Page 22: Transferring The Results
Once the data transfer process has timed-out the resulting error message can be cleared and the data re-sent; if the data is still corrupted select Cancel on the Otowave and then send the data again 8. Transferring the Results 8.1. Sending the results to a printer Two designated thermal printers (the Able AP1300 or the Martel MCP8830) are available as options and only these printers should be used. - Page 23 Please refer to the operating manual for the NOAH Impedance module to ensure that all of the necessary software is correctly installed on the computer. To send the results of the last test select SEND TO COMPUTER from the PROCESS RESULTS menu on completion of the test. The same option is available through the VIEW THE LAST TEST and DATA MANAGEMENT options in the main menu.
-
Page 24: Data Management
The IrDA adapter on the computer is compatible with the Otowave Turn the Otowave off and on again before trying to send the data again If communication is lost while sending the data the message “Link was unreliable” will be displayed. Press ◄ to cancel sending the data and start the operation again. -
Page 25: List Records
9.1. List records LIST RECORDS shows the saved tests, 6 at a time, most recent first: Records Stored: 5/30 ABC 02/01/06 14:15 DEF 31/12/10 09:43 1SF 20/12/05 11:54 MJL 17/10/05 15:48 AS- 17/10/05 14:22 BBC 12/10/05 10:24 Back Select Each entry shows: ... -
Page 26: Delete Records
have not already been sent. Refer to Section 8.2 for more general information. 9.4. Delete records DELETE RECORDS allows you to delete a group of records. You can choose to delete all records, all records that have been printed or all records that have been sent to a computer. -
Page 27: Routine Maintenance
Remove the probe and repeat the test with the three remaining test cavities. The display should show the volume of the 0.2ml and 0.5ml test cavities to within ± 0.1ml. The 5.0ml test cavity should be within ± 0.25ml. When the checks have been completed press ◄ to return to main menu. 11. -
Page 28: Menu Summary
The instrument should be returned to the manufacturer for service & repair. There are no user-serviceable parts within it. When packing the instrument for shipping, please use the original shipping carton and packing materials. Place the instrument in a plastic bag before packing to prevent dirt and dust getting into the probe. - Page 29 DATA LIST RECORDS Lists the test results stored in the MANAGEMENT internal database. Allows individual records to be viewed, printed, sent to a computer or deleted. DELETE Delete stored records. Select: RECORDS “ALL PRINTED RECORDS” – Delete all records that have been printed.
- Page 30 REFLEX Select when reflexes will be SELECTION measured: “ALWAYS MEASURE” – Reflexes are always measured “NEVER MEASURE” – Reflexes are never measured. “ONLY IF PEAK FOUND” – Reflexes will be measured only if the Otowave detects a peak on the tympanogram.
-
Page 31: Error Messages & Fault Conditions
POWER-OFF The time before the unit turns off DELAY automatically if no key is pressed. Select 90 or 180 seconds Change the display contrast. 0 – 15. LCD CONTRAST Default 7. Select “QUICK” or “THOROUGH”. EAR SEAL CHECK See Section 5.4. Select “PRINT CAL. - Page 32 Message Meaning / Action PROBE NOT CLEAR Examine the probe tip for Please ensure the probe is not blocked blockages. If necessary or obstructed remove it and clean or replace it, see Section 4.4. If the PUMP ERROR. problem persists, contact your Unknown pump fault.
-
Page 33: Technical Specification
Check before making new tests CONFIGURATION settings before taking any measurements. If the error persists, contact your MedRx service centre. ERROR The Otowave was unable to Transfer failed send data to the computer. See No device found or Link was unreliable Section 8 for details. - Page 34 Pressure limits (safety cutout) +600 to -800 daPa Number of samples stored 100 per tympanogram Reflex measurements Measurement modes Ipsilateral Reflex tone levels and accuracy 102-1: 1kHz 102-4: 500Hz, 1kHz, 2kHz, 4kHz Frequency +/-2%, configurable over range 70dB to100dB HL (4kHz restricted to 95dBHL) +/-2dB, referenced to 2ml calibration volume;...
- Page 35 Display mode Records listed in reverse chronological order (latest first), with indication of data stored as described above Real Time Clock Time stamps Time and date stamp applied to all recordings, and to the last calibration date Backup power supply >...
-
Page 36: Equipment Classification
Dimensions 190mm long x 80mm wide x 40mm high excluding probe 210mm long including probe Weight (without batteries) 285 g Weight (with batteries) 380 g Environmental Operating temperature range C to +35 Operating humidity range 30% to 90% RH, non-condensing Operating atmospheric pressure 980 to 1040 mb (see Section 2) range... -
Page 37: Ordering Consumables And Accessories
Definition: Refer to instruction manual (mandatory). 15. Ordering Consumables and Accessories To order consumables, additional accessories and to replace detachable parts that have been damaged, please contact MedRx for current prices and delivery charges under medrx-sales@maico.biz. 853497_OM001-14 Otowave 102 Operating Manual Page 37... -
Page 38: Emc Guidance & Manufacturer's Declaration
16. EMC Guidance & Manufacturer’s Declaration Guidance and manufacturer’s declaration – electromagnetic emissions The Otowave 102 Tympanometer is intended for use in the electromagnetic environment specified below. The customer or user of the Otowave 102 Tympanometer should assure that it is used in such an environment. - Page 39 Guidance and manufacturer’s declaration – electromagnetic immunity The Otowave 102 Tympanometer is intended for use in the electromagnetic environment specified below. The customer or user of the Otowave 102 Tympanometer should assure that it is used in such an environment. Immunity test IEC 60601 Compliance...
- Page 40 Voltage dips, <5% U Not applicable Not applicable short (>95% dip in interruptions and ) for 0.5 voltage variations cycle on power supply input lines 40% U (60% dip in ) for 5 IEC 61000-4-11 cycles 70% U (30% dip in ) for 25 cycles <5% U...
- Page 41 Guidance and manufacturer’s declaration – electromagnetic immunity (2) The Otowave 102 Tympanometer is intended for use in the electromagnetic environment specified below. The customer or user of the Otowave 102 Tympanometer should assure that it is used in such an environment. Immunity IEC 60601 Compliance...
- Page 42 Guidance and manufacturer’s declaration – electromagnetic immunity (2) vicinity of equipment marked with the following symbol: NOTE 1 At 80MHz and 800MHz, the higher frequency range applies. NOTE 2 These guidelines may not apply in all situations. Electromagnetic propagation is affected by absorption and reflection from structures, objects and people.
- Page 43 Recommended separation distances between portable and mobile RF communications equipment and the Otowave 102 Tympanometer The Otowave 102 Tympanometer is intended for use in an electromagnetic environment in which radiated RF disturbances are controlled. The customer or the user of the Otowave 102 Tympanometer can help prevent electromagnetic interference by maintaining a minimum distance between portable and mobile RF communications equipment (transmitters) and the Otowave 102 Tympanometer as recommended below, according to the...
-
Page 44: Use With Non-Medical Electrical Equipment
16 of IEC 60601-1:2005 are met. The MedRx Otowave 102 tympanometer uses an industry-standard infra- red means of communication (an IrDA port - as described in Section 7) in order to reduce any potential hazard associated with the use of mains- powered equipment connecting to this interface. - Page 45 Diagram 1: Otowave 102 used with the supplied printer Mains Outlet Printer via IrDA Link Printer Power Supply Otowave 102 Tympanometer 853497_OM001-14 Otowave 102 Operating Manual Page 45...
- Page 46 Diagram 2: Otowave 102 used with a computer & IrDA Link Mains Outlet Computer via IrDA Link Computer Power Supply Otowave 102 Tympanometer Page 46 Otowave 102 Operating Manual 853497_OM001-14...
Need help?
Do you have a question about the MedRx Otowave 102 and is the answer not in the manual?
Questions and answers