Advertisement
Quick Links
Advertisement

Related Manuals for Bissell 2261 SERIES


Summary of Contents for Bissell 2261 SERIES
- Page 1 POWERFORCE ® HELIX TURBO REWIND Vacuum ___________ USER GUIDE 2261 SERIES...
-
Page 2: Safety Instructions
» Do not pull or carry by cable, use cable as a handle, close door on cable, or pull cable around sharp edges or corners. SAVE THESE INSTRUCTIONS FOR OPERATION ON A 220-240 VOLT A.C. 50-60 HZ POWER SUPPLY ONLY. This model is for household use only. www.BISSELL.com.au... -
Page 3: Table Of Contents
Thanks for buying a BISSELL vacuum! We love to clean and we’re excited to share one of our innovative products with you. We want to make sure your vacuum works as well in one year as it does today, so this guide has tips on using (page 6-7), maintaining (pages 7-10), and if there is a problem, troubleshooting (page 10). -
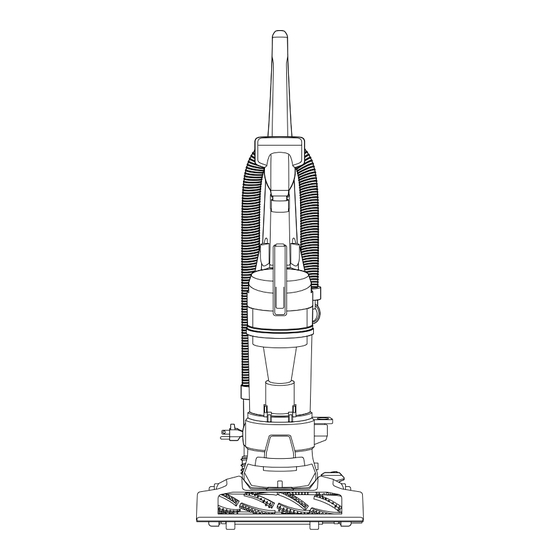
Page 4: Product View
Wand Base Washable Pre-Motor Filter Power Cord Dirt Container Hose Wand Dirt Container Empty Button Power Switch Pedal Washable Post-Motor Filter Handle Recline Pedal Automatic Cord Rewind Button Foot Hose 10 Cord Hook 20 Product Rating Label & Serial Number www.BISSELL.com.au... -
Page 5: Assembly
(with Crevice Tool inside) back onto vacuum. NOTE: The crevice tool can be found inside the extension wand. You can remove it to use it and put it back to store it neatly out of your way when you’re finished. www.BISSELL.com.au... - Page 6 Never place your fingers under the cleaner when it is running. Never place the powerfoot on furniture or uneven surfaces. Do not place vacuum cleaner close enough to objects to pull them into rotating brush. www.BISSELL.com.au...
- Page 7 You’re ready to clean base boards, floor cleaning jobs easier. Just put your curtains, upholstery and much more. www.BISSELL.com.au...
- Page 8 WARNING Do not operate the vacuum with damp or wet filters, without filters in place or with the dirt container missing. Allow components to dry before reassembling the Dirt Container. www.BISSELL.com.au...
- Page 9 If paddle wheel gets The faceplate will not appears then separate dislodged, align the two close properly if all faceplate. Carefully clips on each side and parts are not aligned remove brush, replace pop into place. correctly. belt and brush if needed. www.BISSELL.com.au...
- Page 10 If necessary, remove the it to the left. Remove Remove the bottom cover and screw from the foot hose any debris that may the brush. Remove any debris. and check for clogs. have gotten clogged. www.BISSELL.com.au...
-
Page 11: Troubleshooting
Floor brush bristles worn Replace floor brush Floor brush jammed Remove floor brush and clean debris from brush and ends. Check drive belt for any damage Cord will not Power cord is knotted or Follow instructions on page 6 retract twisted www.BISSELL.com.au... -
Page 12: Service
BISSELL Consumer Care or contact your local distributor. BISSELL DOES NOT EXCLUDE OR LIMIT IN ANY WAY ITS LIABILITY FOR (A) DEATH OR PERSONAL INJURY CAUSED BY OUR NEGLIGENCE OR THE This Guarantee is given to the original purchaser of the product from NEGLIGENCE OF OUR EMPLOYEES, AGENTS OR SUBCONTRACTORS;...
Need help?
Do you have a question about the 2261 SERIES and is the answer not in the manual?
Questions and answers