
Subscribe to Our Youtube Channel
Related Manuals for Bissell SMARTCLEAN 2229F


Summary of Contents for Bissell SMARTCLEAN 2229F
-
Page 1: User Guide
SMARTCLEAN ® USER GUIDE 2229F More of a video person? Find instructional videos for all sections with this icon at www.BISSELL.com/ videos... -
Page 2: Safety Instructions
» If your appliance has a motorised Brush Roll, do not leave machine running in the same spot without the handle fully upright. » To reduce the risk of a leaking condition, do not store unit where freezing may occur. Damage to internal components may result. www.BISSELL.com.au... -
Page 3: Table Of Contents
Thanks for buying a BISSELL® vacuum! We love to clean and we’re excited to share one of our innovative products with you. We want your vacuum to work like new for the years to come, so this guide has tips on how to use, maintain and, if there’s a problem, troubleshoot. -
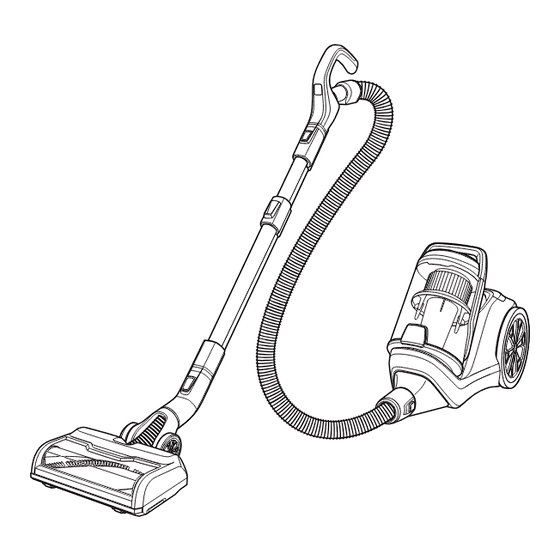
Page 4: Product View
Product View 2-Position Handle 2. Extension Wand 3. Foot 4. Motorized Nozzle with Tangle-Free Brush Roll 5. Dirt Tank 6. Base Unit 7. Hose Connector www.BISSELL.com.au... -
Page 5: Assembly
(+) or Press Auto Button on back of unit for automatic floor minus (-) symbol on type sensing. The SmartClean canister will detect your them depending on the floor type and adjust suction as necessary. level of power you want. www.BISSELL.com.au... -
Page 6: Maintenance & Care
Both filters can be rinsed Replace both filters making Replace lid and turn to clean. Leave to dry for sure the flat felt filter is clockwise to lock in 24 hours before replacing. inserted first. place. www.BISSELL.com.au... - Page 7 Let dry 4 tabs are aligned with for 24 hours before their slots in the filter. replacing. Replace back cover of the unit by pressing the tabs Replace pleated filter. inward to lock in place. www.BISSELL.com.au...
- Page 8 Replace sole plate to the to the foot, place the left foot. Replace screws and side of the Brush Roll use coin to turn them Use a screwdriver to under the belt before clockwise into place. replace belt. pushing down into place. www.BISSELL.com.au...
-
Page 9: Clearing A Clog
Storing the Vacuum Connect T-shaped hook on the Foot to Connect T-shaped hook on the Foot to the T-shaped slot on the bottom of the the T-shaped slot on the unit for in-use unit for long term storage positioning. storage positioning. www.BISSELL.com.au... -
Page 10: Troubleshooting
There is a crack or hole in the If there is a crack or hole, order a hose. new hose from BISSELL.com Dirt Tank is full. Empty the tank. Dirt is Filters are missing or dirty. -
Page 11: Guarantee
Any personal data will be handled pursuant to BISSELL’s Privacy Policy, which can be found at www.BISSELL.eu. Consumer Care If your BISSELL® product should require service or to claim under our limited guarantee, please contact us as follows: Website and Email: Write: www.BISSELL.com.au... - Page 12 ©2019 BISSELL Inc. Grand Rapids, Michigan All rights reserved. Printed in China Part Number 161-6748 01/19...
Need help?
Do you have a question about the SMARTCLEAN 2229F and is the answer not in the manual?
Questions and answers