Table of Contents
Advertisement
Quick Links
Advertisement
Table of Contents

Subscribe to Our Youtube Channel
Related Manuals for GeoMax Zenith15


Summary of Contents for GeoMax Zenith15
- Page 1 GeoMax Zenith15/25 Pro Series Quick Guide Version 1.2...
- Page 3 Quick Guide Quick Guide Guía Rápida Guide abrégé Guida rapida pt-br Guia Rápido Краткое руководство Korte handleiding...
- Page 5 GeoMax Zenith15/25 Pro Series Quick Guide Version 1.2...
- Page 6 Important Information about your Instrument Important Information about your Instrument Read and follow the User Manual on the accompanying data storage device before using the product. ☞ Keep for future reference! Intended use Computing with software. • Recording measurements. • Carrying out measurement tasks using various GNSS measuring tech- •...
- Page 7 Hereby, GeoMax AG, declares that the radio equipment type • Zenith15/25 Pro is in compliance with the essential requirements and other relevant provisions of Directive 2014/53/EC and other applicable European Directives. The declaration of conformity can be consulted at http://www.geomax-positioning.de/Downloads.htm.
- Page 8 Important Information about your Instrument Class 2 equipment according European Directive 2014/53/EC (RED) for which following EEA Member States apply restrictions on the placing on the market or on the putting into service or require authorisation for use: France • Italy •...
- Page 9 ☞ GeoMax has developed Guidelines on “How to carry GeoMax products” and “How to ship GeoMax products” with Lithium bat- teries. Before any transportation of a GeoMax product, we ask you to consult these guidelines on our web page (http:// www.geomax-positioning.com/dgr) to ensure that you are in...
-
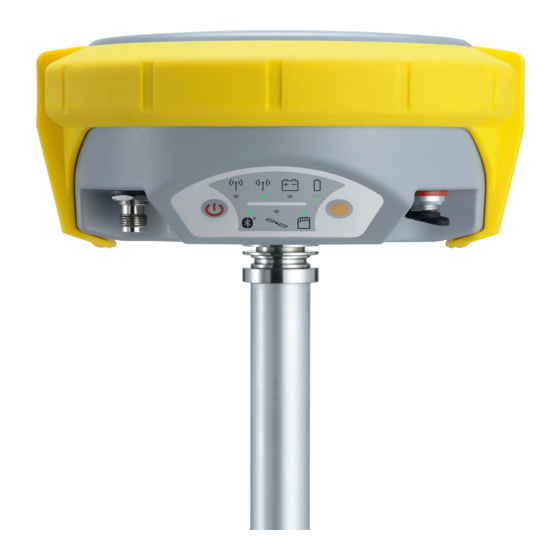
Page 10: Instrument Components
Instrument Components Instrument Components Zenith15/25 Pro TNC-connector for external UHF components antenna, only for models with UHF radio Battery compartment with microSD and SIM card slot Keyboard with LEDs, ON/OFF but- ton and Function button Serial, USB and power port... - Page 11 ON/OFF button Button Function ON/OFF If Zenith15/25 Pro is off: Turns on Zenith15/25 Pro when held for 2 s. ☞ While the Zenith15/25 Pro is booting the two Power LEDs flash. If Zenith15/25 Pro is already on: Turns off Zenith15/25 Pro when held for 2 s.
- Page 12 Press and hold button for 3 s. Updates the base position coordinates when Zenith15/25 Pro is in base mode. The RTK base LED flashes for 2 s. When no position is available, the LED flashes red. Press and hold button for 5 s.
-
Page 13: Environmental Specifications
Environmental specifications Environmental Temperatures (°C): specifications Instrument: -40 to +65 (opera- -40 to +80 (storage) tion) ZBA201 battery: -20 to +55 (opera- -40 to +70 (storage) tion) Protection: IP68 (IEC 60529) Vibration: Vibration test according to ISO 9022-36-05 Environmental specifications... - Page 14 Environmental specifications Shock: Withstands a 2 m (6.6 ft) pole topple over onto hard surface. Humidity: 100% condensing The effects of condensation are to be effectively counteracted by periodi- cally drying out the instrument.
- Page 15 For products for which no container is available use the original packaging or its equivalent. Shipping When transporting the product by rail, air or sea, always use the complete original GeoMax packaging, transport container and cardboard box, or its equivalent, to protect against shock and vibration. Transport...
- Page 16 Transport Shipping, trans- When transporting or shipping batteries, the person responsible for the port of batteries product must ensure that the applicable national and international rules and regulations are observed. Before transportation or shipping, contact your local passenger or freight transport company.
-
Page 17: Operation
Operation ☞ The battery must be charged before using it for the first time. Change battery step-by-step 004583_001 Operation... - Page 18 Operation ☞ The battery is inserted in the bottom part of the instrument. Push the slide fastener of the battery compartment in the direc- tion of the arrow with the open-lock symbol. Remove the cover from the battery compartment. With the battery contacts facing upwards, slide the battery into the cover of the battery compartment.
- Page 19 Insert a microSD card step-by- step 004584_001 ☞ Removing the microSD card while the instrument is turned on can cause loss of data. Only remove the microSD card or unplug connecting cables when the instrument is switched off. Operation...
- Page 20 Operation ☞ The microSD card is inserted into a slot inside the battery com- partment of the instrument. Push the slide fastener of the battery compartment in the direc- tion of the arrow with the open-lock symbol. Remove the cover from the battery compartment. Press the latch of the SIM/microSD card cover and remove the cover.
- Page 21 Inserting a SIM card step-by- step 004585_001 ☞ Inserting/removing the SIM card while the Zenith15/25 Pro is turned on can result in permanent damage to the card. Only insert/remove the SIM card when the Zenith15/25 Pro is switched off. ☞...
- Page 22 Operation Push the slide fastener of the battery compartment in the direc- tion of the arrow with the open-lock symbol. Remove the cover from battery compartment. Press the latch of the SIM/microSD card cover and remove the cover. Push the SIM card holder in the direction of the OPEN arrow and flip it up.
- Page 24 827821-1.2.0en Original text (827821-1.2.0en) © 2018 GeoMax AG, Widnau, Switzerland GeoMax AG www.geomax-positioning.com...
- Page 25 GeoMax Zenith15/25 Pro Serie Quick Guide Version 1.2...
- Page 26 Wichtige Informationen über Ihr Instrument Wichtige Informationen über Ihr Instrument Lesen und befolgen Sie die Gebrauchsanweisung auf dem beigefügten Datenträger, bevor Sie das Produkt verwenden. ☞ Sorgfältig aufbewahren! Verwendungs- Berechnung mit Software. • zweck Aufzeichnen der Messungen. • Durchführung von Messaufgaben mit verschiedenen GNSS Messtech- •...
- Page 27 FCC Teil 15 (gültig in den USA) • nationalen Vor- schriften Hiermit erklärt GeoMax AG, dass die Funkausrüstung des Typs • Zenith15/25 Pro den grundlegenden Anforderungen und anderen wichtigen Bestimmungen der Richtlinie 2014/53/EG und anderer anwendbarer Europäischer Richtlinien entspricht. Die Konformitäts- erklärung kann unter...
- Page 28 Wichtige Informationen über Ihr Instrument In folgenden Mitgliedsstaaten des EWR gelten für Geräte der Klasse 2 entsprechend der Europäischen Richtlinie 2014/53/EG (RED) Einschränkungen bei der Vermarktung oder bei der Inbe- triebnahme oder es wird eine Genehmigung für den Betrieb benötigt: Frankreich •...
- Page 29 ☞ GeoMax has developed Guidelines on “How to carry GeoMax products” and “How to ship GeoMax products” with Lithium bat- teries. Before any transportation of a GeoMax product, we ask you to consult these guidelines on our web page (http:// www.geomax-positioning.com/dgr) to ensure that you are in...
- Page 30 Instrumentenkomponenten Instrumentenkomponenten Zenith15/25 Pro TNC-connector for external UHF components antenna, only for models with UHF radio Battery compartment with mic- roSD and SIM card slot Keyboard with LEDs, ON/OFF but- ton and Function button Serial, USB and power port 004573_001...
- Page 31 ON/OFF button Button Function ON/OFF If Zenith15/25 Pro is off: Turns on Zenith15/25 Pro when held for 2 s. ☞ While the Zenith15/25 Pro is booting the two Power LEDs flash. If Zenith15/25 Pro is already on: Turns off Zenith15/25 Pro when held for 2 s.
- Page 32 Press and hold button for 3 s. Updates the base position coordinates when Zenith15/25 Pro is in base mode. The RTK base LED flashes for 2 s. When no position is available, the LED flashes red. Press and hold button for 5 s.
- Page 33 Umweltspezifikationen Umweltspezifika- Temperaturen (°C): tionen Instrument: -40 bis +65 (Betrieb) -40 bis +80 (Lage- rung) ZBA201 Batterie: -20 bis +55 (Betrieb) -40 bis +70 (Lage- rung) Schutz: IP68 (IEC 60529) Vibration: Vibrationstest entsprechend ISO 9022-36-05 Umweltspezifikationen...
- Page 34 Umweltspezifikationen Schlag: Hält Umkippen aus 2 m (6.6 ft) Höhe am Lotstock auf harte Oberflächen stand. Feuchtigkeit: 100% Kondensation Den Auswirkungen von Kondensation sollte durch periodisches Austrock- nen des Instrumentes entgegengewirkt werden.
- Page 35 Always carry the product in its container and secure it. For products for which no container is available use the original packaging or its equivalent. Versand Verwenden Sie beim Versand per Bahn, Flugzeug oder Schiff immer die komplette GeoMax Originalverpackung mit Transportbehälter und Versand- Transport...
- Page 36 Transport karton, bzw. entsprechende Verpackungen. Die Verpackung sichert das Pro- dukt gegen Schläge und Vibrationen. Versand bzw. Beim Transport oder Versand von Batterien / Akkus hat der Betreiber Transport von sicherzustellen, dass die entsprechenden nationalen und internationalen Batterien / Gesetze und Bestimmungen beachtet werden. Kontaktieren Sie vor dem Akkus Transport oder Versand Ihr lokales Personen- oder Frachttransportunter- nehmen.
-
Page 37: Bedienung
Bedienung ☞ Die Batterie muss vor der Erstverwendung geladen werden. Change battery step-by-step 004583_001 Bedienung... - Page 38 Bedienung ☞ The battery is inserted in the bottom part of the instrument. Push the slide fastener of the battery compartment in the direc- tion of the arrow with the open-lock symbol. Remove the cover from the battery compartment. With the battery contacts facing upwards, slide the battery into the cover of the battery compartment.
- Page 39 Insert a microSD card step-by- step 004584_001 ☞ Removing the microSD card while the instrument is turned on can cause loss of data. Only remove the microSD card or unplug connecting cables when the instrument is switched off. Bedienung...
- Page 40 Bedienung ☞ The microSD card is inserted into a slot inside the battery com- partment of the instrument. Push the slide fastener of the battery compartment in the direc- tion of the arrow with the open-lock symbol. Remove the cover from the battery compartment. Press the latch of the SIM/microSD card cover and remove the cover.
- Page 41 ☞ Inserting/removing the SIM card while the Zenith15/25 Pro is turned on can result in permanent damage to the card. Only insert/remove the SIM card when the Zenith15/25 Pro is swit- ched off. ☞ The SIM card is inserted into a slot inside the battery compart- ment.
- Page 42 Bedienung Push the slide fastener of the battery compartment in the direc- tion of the arrow with the open-lock symbol. Remove the cover from battery compartment. Press the latch of the SIM/microSD card cover and remove the cover. Push the SIM card holder in the direction of the OPEN arrow and flip it up.
- Page 44 827821-1.2.0de Originaltext (827821-1.2.0en) © 2018 GeoMax AG, Widnau, Schweiz GeoMax AG www.geomax-positioning.com...
- Page 45 GeoMax Zenith15/25 Pro Series Guía Rápida Versión 1.2...
- Page 46 Información importante de su instrumento Información importante de su instrumento Antes de utilizar el producto, lea y siga las instrucciones del manual de uso que se encuentra en el dispositivo de almacenamiento de datos adjunto. ☞ ¡Conservar para futuras consultas! Utilización Cálculo con software.
- Page 47 FCC Parte 15 (aplicable en EE. UU.) • regulaciones nacionales Por el presente, GeoMax AG, declara que el tipo de equipo de radio • del Zenith15/25 Pro cumple con los requerimientos básicos y otras disposiciones importantes de la Directiva 2014/53/EC y otras direc- tivas europeas aplicables.
- Page 48 Información importante de su instrumento Equipo de Clase 2 según la Directiva Europea 2014/53/EC (R&TTE) según la cual los siguientes estados miembros de la EEE aplican restricciones para ofrecerlo en el mercado o se requiere de autorización para la puesta en servicio: Francia •...
- Page 49 ☞ GeoMax has developed Guidelines on “How to carry GeoMax products” and “How to ship GeoMax products” with Lithium bat- teries. Before any transportation of a GeoMax product, we ask you to consult these guidelines on our web page (http:// www.geomax-positioning.com/dgr) to ensure that you are in...
-
Page 50: Componentes Del Instrumento
Componentes del instrumento Componentes del instrumento Zenith15/25 Pro TNC-connector for external UHF components antenna, only for models with UHF radio Battery compartment with microSD and SIM card slot Keyboard with LEDs, ON/OFF but- ton and Function button Serial, USB and power port... - Page 51 ON/OFF button Button Function ON/OFF If Zenith15/25 Pro is off: Turns on Zenith15/25 Pro when held for 2 s. ☞ While the Zenith15/25 Pro is booting the two Power LEDs flash. If Zenith15/25 Pro is already on: Turns off Zenith15/25 Pro when held for 2 s.
- Page 52 Press and hold button for 3 s. Updates the base position coordinates when Zenith15/25 Pro is in base mode. The RTK base LED flashes for 2 s. When no position is available, the LED flashes red. Press and hold button for 5 s.
-
Page 53: Especificaciones Ambientales
Especificaciones ambientales Especificaciones Temperaturas (°C): ambientales Instrumento: -40 a +65 (opera- -40 a +80 (almacena- ción) miento) Batería ZBA201: -20 a +55 (opera- -40 a +70 (almacena- ción) miento) Protección: IP68 (IEC 60529) Vibración: Prueba de vibración según la norma ISO 9022-36-05 Especificaciones ambientales... - Page 54 Especificaciones ambientales Golpes: Soporta caídas de 2 m (6.6 ft) desde el bastón sobre una superficie rígida. Humedad: 100% condensante Los efectos de la condensación se pueden contrarrestar en forma efec- tiva secando periódicamente el instrumento.
- Page 55 For products for which no container is available use the original packaging or its equivalent. Envío Para transportar el producto en tren, avión o barco utilizar siempre el embalaje original de GeoMax completo (estuche de transporte y caja de Transporte...
- Page 56 Transporte cartón) u otro embalaje adecuado, para proteger el instrumento frente a golpes y vibraciones. Envío y trans- Para el transporte o envío de baterías, el encargado del producto debe ase- porte de las gurarse que se observa la legislación nacional e internacional correspon- baterías diente.
- Page 57 Funcionamiento ☞ Cargue la batería antes de usarla por primera vez. Change battery step-by-step 004583_001 Funcionamiento...
- Page 58 Funcionamiento ☞ The battery is inserted in the bottom part of the instrument. Push the slide fastener of the battery compartment in the direc- tion of the arrow with the open-lock symbol. Remove the cover from the battery compartment. With the battery contacts facing upwards, slide the battery into the cover of the battery compartment.
- Page 59 Insert a microSD card step-by- step 004584_001 ☞ Removing the microSD card while the instrument is turned on can cause loss of data. Only remove the microSD card or unplug connecting cables when the instrument is switched off. Funcionamiento...
- Page 60 Funcionamiento ☞ The microSD card is inserted into a slot inside the battery com- partment of the instrument. Push the slide fastener of the battery compartment in the direc- tion of the arrow with the open-lock symbol. Remove the cover from the battery compartment. Press the latch of the SIM/microSD card cover and remove the cover.
- Page 61 ☞ Inserting/removing the SIM card while the Zenith15/25 Pro is turned on can result in permanent damage to the card. Only insert/remove the SIM card when the Zenith15/25 Pro is swit- ched off. ☞ The SIM card is inserted into a slot inside the battery compart- ment.
- Page 62 Funcionamiento Push the slide fastener of the battery compartment in the direc- tion of the arrow with the open-lock symbol. Remove the cover from battery compartment. Press the latch of the SIM/microSD card cover and remove the cover. Push the SIM card holder in the direction of the OPEN arrow and flip it up.
- Page 64 827821-1.2.0es Traducción de la versión original (827821-1.2.0en) © 2018 GeoMax AG, Widnau, Switzerland GeoMax AG www.geomax-positioning.com...
- Page 65 GeoMax Zenith15/25 Pro Series Guide abrégé Version 1.2...
- Page 66 Informations importantes sur l'instrument Informations importantes sur l'instrument Avant l'emploi du produit, lire et respecter le manuel de l'utilisateur chargé sur le périphérique de stockage de données fourni. ☞ A conserver pour une consultation ultérieure ! Utilisation pré- Calculs au moyen de logiciels. •...
- Page 67 FCC partie 15, applicable aux États-Unis • les prescriptions nationales GeoMax AG déclare par la présente que le produit de type • Zenith15/25 Pro est conforme aux exigences fondamentales de la directive européenne 2014/53/CE et d'autres directives européen- nes applicables. La déclaration de conformité est consultable sur : http://www.geomax-positioning.de/Downloads.htm.
- Page 68 Informations importantes sur l'instrument Équipement de classe 2 selon la directive européenne 2014/53/CE (RED) pour lequel les pays membres de l'EEE sui- vants appliquent des restrictions à la commercialisation, à la mise en service ou demandent une autorisation pour son utilisa- tion : France •...
- Page 69 ☞ GeoMax has developed Guidelines on “How to carry GeoMax products” and “How to ship GeoMax products” with Lithium bat- teries. Before any transportation of a GeoMax product, we ask you to consult these guidelines on our web page (http:// www.geomax-positioning.com/dgr) to ensure that you are in...
- Page 70 Informations importantes sur l'instrument ☞ Damaged or defective batteries are prohibited from being car- ried or transported onboard any aircraft. Therefore, ensure that the condition of any battery is safe for transportation.
-
Page 71: Composants De L'instrument
Composants de l'instrument Zenith15/25 Pro TNC-connector for external UHF components antenna, only for models with UHF radio Battery compartment with microSD and SIM card slot Keyboard with LEDs, ON/OFF but- ton and Function button Serial, USB and power port 004573_001... - Page 72 ON/OFF button Button Function ON/OFF If Zenith15/25 Pro is off: Turns on Zenith15/25 Pro when held for 2 s. ☞ While the Zenith15/25 Pro is booting the two Power LEDs flash. If Zenith15/25 Pro is already on: Turns off Zenith15/25 Pro when held for 2 s.
- Page 73 Press and hold button for 3 s. Updates the base position coordinates when Zenith15/25 Pro is in base mode. The RTK base LED flashes for 2 s. When no position is available, the LED flashes red. Press and hold button for 5 s.
- Page 74 Environnement Environnement Environnement Températures (°C) : Instrument : De -40 à +65 (ser- De -40 à +80 (stoc- vice) kage) Batterie ZBA201 : De -20 à +55 (ser- De -40 à +70 (stoc- vice) kage) Protection : IP68 (CEI 60529) Vibrations : Test de vibrations selon ISO 9022-36-05...
- Page 75 Chocs : Résiste à une chute d'une hauteur de 2 m (6,6 ft) sur une surface dure. Humidité : 100 % avec condensa- tion Il convient de neutraliser les effets de la condensation par un séchage complet périodique de l'instrument. Environnement...
- Page 76 For products for which no container is available use the original packaging or its equivalent. Expédition Utilisez l'emballage d'origine de GeoMax, le coffret de transport et le carton d'expédition ou équivalent pour tout transport par train, avion ou bateau. Il sera ainsi protégé des chocs et des vibrations.
- Page 77 Expédition, Lors du transport ou de l'expédition de batteries, le responsable du produit transport de bat- doit s'assurer du respect des lois et réglementations nationales et interna- teries tionales applicables. Avant le transport ou l'expédition, contacter la société locale de transport de personnes ou de marchandises. Transport...
- Page 78 Utilisation Utilisation ☞ Veillez à charger la batterie avant la première utilisation. Change battery step-by-step 004583_001...
- Page 79 ☞ The battery is inserted in the bottom part of the instrument. Push the slide fastener of the battery compartment in the direc- tion of the arrow with the open-lock symbol. Remove the cover from the battery compartment. With the battery contacts facing upwards, slide the battery into the cover of the battery compartment.
- Page 80 Utilisation Insert a microSD card step-by- step 004584_001 ☞ Removing the microSD card while the instrument is turned on can cause loss of data. Only remove the microSD card or unplug connecting cables when the instrument is switched off.
- Page 81 ☞ The microSD card is inserted into a slot inside the battery com- partment of the instrument. Push the slide fastener of the battery compartment in the direc- tion of the arrow with the open-lock symbol. Remove the cover from the battery compartment. Press the latch of the SIM/microSD card cover and remove the cover.
- Page 82 ☞ Inserting/removing the SIM card while the Zenith15/25 Pro is turned on can result in permanent damage to the card. Only insert/remove the SIM card when the Zenith15/25 Pro is swit- ched off. ☞ The SIM card is inserted into a slot inside the battery compart-...
- Page 83 Push the slide fastener of the battery compartment in the direc- tion of the arrow with the open-lock symbol. Remove the cover from battery compartment. Press the latch of the SIM/microSD card cover and remove the cover. Push the SIM card holder in the direction of the OPEN arrow and flip it up.
- Page 84 827821-1.2.0fr Traduction de la version originale (827821-1.2.0en) © 2018 GeoMax AG, Widnau, Suisse GeoMax AG www.geomax-positioning.com...
- Page 85 Serie GeoMax Zenith15/25 Pro Guida rapida Versione 1.2...
- Page 86 Importanti informazioni sullo strumento Importanti informazioni sullo strumento Prima di utilizzare il prodotto, leggere e seguire le indicazioni del Manuale Utente contenuto nel dispositivo di memoria in dotazione. ☞ Da conservare per futura consultazione. Uso previsto Esecuzione di calcoli mediante software. •...
- Page 87 FCC parte 15 (in vigore negli Stati Uniti) • legislazione nazionale GeoMax AG dichiara che l'apparecchiatura radio di tipo Zenith15/25 • Pro è conforme ai requisiti essenziali e alle altre disposizioni perti- nenti della direttiva 2014/53/CE oltre che alle altre direttive euro- pee in vigore.
- Page 88 Importanti informazioni sullo strumento Apparecchiatura di classe 2 ai sensi della direttiva europea 2014/53/CE (RED) per la quale i seguenti stati membri del SEE prevedono limitazioni alla commercializzazione e alla messa in esercizio o per il cui utilizzo richiedono autorizzazioni: Francia •...
- Page 89 ☞ GeoMax has developed Guidelines on “How to carry GeoMax products” and “How to ship GeoMax products” with Lithium bat- teries. Before any transportation of a GeoMax product, we ask you to consult these guidelines on our web page (http:// www.geomax-positioning.com/dgr) to ensure that you are in...
-
Page 90: Componenti Dello Strumento
Componenti dello strumento Componenti dello strumento Zenith15/25 Pro TNC-connector for external UHF components antenna, only for models with UHF radio Battery compartment with microSD and SIM card slot Keyboard with LEDs, ON/OFF but- ton and Function button Serial, USB and power port... - Page 91 ON/OFF button Button Function ON/OFF If Zenith15/25 Pro is off: Turns on Zenith15/25 Pro when held for 2 s. ☞ While the Zenith15/25 Pro is booting the two Power LEDs flash. If Zenith15/25 Pro is already on: Turns off Zenith15/25 Pro when held for 2 s.
- Page 92 Press and hold button for 3 s. Updates the base position coordinates when Zenith15/25 Pro is in base mode. The RTK base LED flashes for 2 s. When no position is available, the LED flashes red. Press and hold button for 5 s.
-
Page 93: Specifiche Ambientali
Specifiche ambientali Specifiche Temperature (°C): ambientali Strumento: Da -40 a +65 (fun- Da -40 a +80 (stoc- zionamento) caggio) Batteria ZBA201: Da -20 a +55 (fun- Da -40 a +70 (stoc- zionamento) caggio) Protezione: IP68 (IEC 60529) Vibrazione: Test vibrazioni secondo ISO 9022-36-05 Specifiche ambientali... - Page 94 Specifiche ambientali Urto: Resistente a una caduta di 2 m dalla palina (6.6 ft) su superficie dura. Umidità: 100% condensante Gli effetti della condensa si possono contrastare in modo efficace asciu- gando periodicamente lo strumento.
- Page 95 Spedizione Quando si spedisce lo strumento per mezzo di treni, aerei o navi usare l'im- ballaggio originale GeoMax, il contenitore o il cartone per il trasporto, o un altro imballaggio idoneo che protegga lo strumento da colpi e vibrazioni. Trasporto...
- Page 96 Trasporto Spedizione e tra- Per il trasporto o la spedizione delle batterie, la persona responsabile del sporto delle bat- prodotto deve verificare il rispetto di leggi e regolamenti nazionali e inter- terie nazionali applicabili. Prima di trasportare o spedire le batterie, contattare il proprio spedizioniere o società...
-
Page 97: Funzionamento
Funzionamento ☞ Caricare la batteria prima di utilizzarla per la prima volta. Change battery step-by-step 004583_001 Funzionamento... - Page 98 Funzionamento ☞ The battery is inserted in the bottom part of the instrument. Push the slide fastener of the battery compartment in the direc- tion of the arrow with the open-lock symbol. Remove the cover from the battery compartment. With the battery contacts facing upwards, slide the battery into the cover of the battery compartment.
- Page 99 Insert a microSD card step-by- step 004584_001 ☞ Removing the microSD card while the instrument is turned on can cause loss of data. Only remove the microSD card or unplug connecting cables when the instrument is switched off. Funzionamento...
- Page 100 Funzionamento ☞ The microSD card is inserted into a slot inside the battery com- partment of the instrument. Push the slide fastener of the battery compartment in the direc- tion of the arrow with the open-lock symbol. Remove the cover from the battery compartment. Press the latch of the SIM/microSD card cover and remove the cover.
- Page 101 ☞ Inserting/removing the SIM card while the Zenith15/25 Pro is turned on can result in permanent damage to the card. Only insert/remove the SIM card when the Zenith15/25 Pro is swit- ched off. ☞ The SIM card is inserted into a slot inside the battery compart- ment.
- Page 102 Funzionamento Push the slide fastener of the battery compartment in the direc- tion of the arrow with the open-lock symbol. Remove the cover from battery compartment. Press the latch of the SIM/microSD card cover and remove the cover. Push the SIM card holder in the direction of the OPEN arrow and flip it up.
- Page 104 827821-1.2.0it Traduzione dal testo originale (827821-1.2.0en) © 2018 GeoMax AG, Widnau, Switzerland GeoMax AG www.geomax-positioning.com...
- Page 105 GeoMax Série Zenith15/25 Pro Guia Rápido Versão 1.2...
- Page 106 Informações importantes sobre o instrumento Informações importantes sobre o instrumento Leia e siga o Manual do Usuário gravado no dispositivo de armazenamento de dados antes de usar o produto. ☞ Manter para referência futura! Pretenção de uso Cálculo com software. •...
- Page 107 FCC Parte 15 (aplicável nos EUA) • com os regula- mentos nacionais Pela presente, a GeoMax AG declara que o equipamento de rádio • tipo Zenith15/25 Pro está em conformidade com os requisitos pt-br essenciais e outras disposições relevantes da Diretiva 2014/53/CE e outras diretivas europeias aplicáveis.
- Page 108 Informações importantes sobre o instrumento Equipamento classe 2 de acordo com a Diretriz Europeia 2014/53/CE (RED) para os quais seguintes os Estados membros do EEA aplicam restrições à colocação no mercado ou à colocação em serviço, ou ainda sujeitas à autorização para uso: França •...
- Page 109 ☞ GeoMax has developed Guidelines on “How to carry GeoMax products” and “How to ship GeoMax products” with Lithium bat- teries. Before any transportation of a GeoMax product, we ask you to consult these guidelines on our web page (http:// www.geomax-positioning.com/dgr) to ensure that you are in...
-
Page 110: Componentes Do Instrumento
Componentes do Instrumento Componentes do Instrumento Zenith15/25 Pro TNC-connector for external UHF components antenna, only for models with UHF radio Battery compartment with microSD and SIM card slot Keyboard with LEDs, ON/OFF but- ton and Function button Serial, USB and power port... - Page 111 ON/OFF button Button Function ON/OFF If Zenith15/25 Pro is off: Turns on Zenith15/25 Pro when held for 2 s. ☞ While the Zenith15/25 Pro is booting the two Power LEDs flash. If Zenith15/25 Pro is already on: Turns off Zenith15/25 Pro when held for 2 s.
- Page 112 Press and hold button for 3 s. Updates the base position coordinates when Zenith15/25 Pro is in base mode. The RTK base LED flashes for 2 s. When no position is available, the LED flashes red. Press and hold button for 5 s.
-
Page 113: Especificações Ambientais
Especificações ambientais Especificações Temperaturas (°C): ambientais Instrumento: -40 to +65 (opera- -40 to +80 (armaze- ção) namento) Bateria ZBA201 -20 to +55 (opera- -40 to +70 (armaze- ção) namento) pt-br Proteção: IP68 (IEC 60529) Vibração: Vibração de acordo com ISO 9022-36-05 Especificações ambientais... - Page 114 Especificações ambientais Choque Resistente ao tombo de bastão de 2 m sobre superfície dura Humidade: 100% condensável Os efeitos da condensação são eficazmente neutralizados através de secagem periódica do instrumento. pt-br...
- Page 115 For products for which no container is available use the original packaging or its equivalent. Remessa O transporte do aparelho por via férrea, aérea ou marítima deve ser sem- pre efetuada com a embalagem original completa da GeoMax, estojo de Transporte...
- Page 116 Transporte transporte e caixa de papel cartão (ou outro meio equivalente) de modo a proteger o equipamento contra os choques e vibrações. Remessa, trans- Durante o transporte ou remessa das baterias, a pessoa responsável pelo porte das bate- produto deve assegurar que as regras aplicáveis e regulamentos nacionais rias e internacionais sejam observados.
- Page 117 Operação ☞ A bateria deve ser carregada antes de utilizá-la pela primeira vez. Change battery step-by-step pt-br 004583_001 Operação...
- Page 118 Operação ☞ The battery is inserted in the bottom part of the instrument. Push the slide fastener of the battery compartment in the direc- tion of the arrow with the open-lock symbol. Remove the cover from the battery compartment. With the battery contacts facing upwards, slide the battery into the cover of the battery compartment.
- Page 119 Insert a microSD card step-by- step pt-br 004584_001 ☞ Removing the microSD card while the instrument is turned on can cause loss of data. Only remove the microSD card or unplug connecting cables when the instrument is switched off. Operação...
- Page 120 Operação ☞ The microSD card is inserted into a slot inside the battery com- partment of the instrument. Push the slide fastener of the battery compartment in the direc- tion of the arrow with the open-lock symbol. Remove the cover from the battery compartment. Press the latch of the SIM/microSD card cover and remove the cover.
- Page 121 ☞ Inserting/removing the SIM card while the Zenith15/25 Pro is turned on can result in permanent damage to the card. Only insert/remove the SIM card when the Zenith15/25 Pro is swit- ched off. ☞ The SIM card is inserted into a slot inside the battery compart- ment.
- Page 122 Operação Push the slide fastener of the battery compartment in the direc- tion of the arrow with the open-lock symbol. Remove the cover from battery compartment. Press the latch of the SIM/microSD card cover and remove the cover. Push the SIM card holder in the direction of the OPEN arrow and flip it up.
- Page 124 827821-1.2.0pt-br Traduzido do texto original (827821-1.2.0en) © 2018 GeoMax AG, Widnau, Suíça GeoMax AG www.geomax-positioning.com...
- Page 125 GeoMax Zenith15/25 Pro Краткое руководство Версия 1.2...
- Page 126 Важная информация о Вашем Инструменте Важная информация о Вашем Инструменте Перед использованием инструмента ознакомьтесь с Руководством пользова- теля. ☞ Сохраняйте документацию для использования в дальнейшем в качестве спра- вочника! • Штатное использо- Вычисления при помощи ПО. • вание Запись измерений. •...
- Page 127 FCC, часть 15 (применяется в США) национальным нормам • Настоящим компания GeoMax AG заявляет , что радиооборудование Zenith15/25 Pro соответствует основным требованиям и прочим приме- нимым положениям Директивы 2014/53/EC и других применимых евро- пейских директив. Полный текст декларации соответствия доступен на странице http://www.geomax-positioning.de/Downloads.htm.
- Page 128 Важная информация о Вашем Инструменте Следующие страны-участницы ЕЭС, согласно европейской Дирек- тиве о радиооборудовании 2014/53/EC, накладывают ограничения по выводу на рынок и эксплуатации или требуют разрешения на исполь- зование оборудования класса 2: • Франция • Италия • Норвегия (при использовании в радиусе 20 км от центра города Ню-Олесунн) •...
- Page 129 ☞ GeoMax has developed Guidelines on “How to carry GeoMax products” and “How to ship GeoMax products” with Lithium batteries. Before any transportation of a GeoMax product, we ask you to consult these guidelines on our web page (http://www.geomax-positioning.com/dgr) to...
-
Page 130: Составляющие Инструмента
Составляющие инструмента Составляющие инструмента Zenith15/25 Pro TNC-connector for external UHF components antenna, only for models with UHF radio Battery compartment with microSD and SIM card slot Keyboard with LEDs, ON/OFF button and Function button Serial, USB and power port 004573_001... - Page 131 Power LEDs flash. If Zenith15/25 Pro is already on: Turns off Zenith15/25 Pro when held for 2 s. Function button ☞ All functions described assume the Zenith15/25 Pro is already on. Button Function Function Press and hold button for <1 s.
- Page 132 Press and hold button for 5 s. Connects to the configured RTK base station or NTRIP server when the Zenith15/25 Pro is in rover mode. The RTK rover LED flashes for 2 s. No action if a rover mode is not...
-
Page 133: Эксплуатационные Характеристики
Эксплуатационные характеристики Эксплуатационные Диапазон температур (°C): характеристики Приемник: -40 до +65 (диапазон -40 до +80 (диапазон рабочих температур) температур хранения) Аккумулятор ZBA201: -20 до +55 (диапазон -40 до +70 (диапазон рабочих температур) температур хранения) °ровень защиты: IP68 (IEC 60529) Вибрации: Соответствие... - Page 134 Эксплуатационные характеристики °дары: Выдерживает опрокидывание с вехи 2,0 м на твердую поверхность. Влажность: 100% Влияние конденсации влаги успешно устраняется периодической протиркой и просушкой инструмента.
- Page 135 For products for which no container is available use the original packaging or its equivalent. Транспортировка При транспортировке по железной дороге , на судах или самолетах обязательно используйте полный комплект GeoMax для упаковки и транспортировки, либо аналогичные средства для защиты тахеометра от ударов и вибрации. Транспортировка...
- Page 136 Транспортировка Транспортировка и При транспортировке или перевозке аккумуляторов лицо, ответственное за перевозка аккуму- оборудование , должно убедиться, что при этом соблюдаются все национальные ляторов и ме ждународные требования к таким действиям. Перед транспортировкой обо- рудования обязательно свяжитесь с представителями компании-перевозчика.
- Page 137 Работа с инструментом ☞ Батарея должна быть заряжена перед первым использованием инструмента. Change battery step-by-step 004583_001 Работа с инструментом...
- Page 138 Работа с инструментом ☞ The battery is inserted in the bottom part of the instrument. Push the slide fastener of the battery compartment in the direction of the arrow with the open-lock symbol. Remove the cover from the battery compartment. With the battery contacts facing upwards, slide the battery into the cover of the battery compartment.
- Page 139 Insert a microSD card step-by-step 004584_001 ☞ Removing the microSD card while the instrument is turned on can cause loss of data. Only remove the microSD card or unplug connecting cables when the instrument is switched off. ☞ The microSD card is inserted into a slot inside the battery compartment of the instrument.
- Page 140 Работа с инструментом Push the slide fastener of the battery compartment in the direction of the arrow with the open-lock symbol. Remove the cover from the battery compartment. Press the latch of the SIM/microSD card cover and remove the cover. Slide the microSD card with the logo facing upwards firmly into the slot until it clicks into position.
- Page 141 Inserting a SIM card step-by-step 004585_001 ☞ Inserting/removing the SIM card while the Zenith15/25 Pro is turned on can result in permanent damage to the card. Only insert/remove the SIM card when the Zenith15/25 Pro is switched off. ☞ The SIM card is inserted into a slot inside the battery compartment.
- Page 142 Работа с инструментом Remove the cover from battery compartment. Press the latch of the SIM/microSD card cover and remove the cover. Push the SIM card holder in the direction of the OPEN arrow and flip it up. Place the SIM card into the SIM card holder, the chip facing the connectors inside the slot - as shown on the SIM/microSD card cover.
- Page 144 827821-1.2.0ru Перевод исходного текста (827821-1.2.0en) © 2018 GeoMax AG, Виднау , Швейцария GeoMax AG www.geomax-positioning.com...
- Page 145 GeoMax Zenith15/25 Pro-serie Korte handleiding Versie 1.2...
- Page 146 Belangrijke informatie over uw instrument Belangrijke informatie over uw instrument Lees de gebruikershandleiding en volg de aanwijzingen op de meegeleverde gegevensopslag voordat u het product in gebruik neemt. ☞ Bewaren ter referentie! Beoogd gebruik Het rekenen met software. • Het vastleggen van metingen. •...
- Page 147 Hierbij verklaart GeoMax AG dat de radioapparatuur, van type • Zenith15/25 Pro, voldoet aan de essentiële vereisten en overige relevante bepalingen van Richtlijn 2014/53/EG en andere toepasse- lijke Europese Richtlijnen. De conformiteitsverklaring kan worden geraadpleegd via http://www.geomax-positioning.de/Downloads.htm.
- Page 148 Belangrijke informatie over uw instrument Klasse 2-apparatuur volgens Europese Richtlijn 2014/53/EG (RED), waarvoor de onderstaande EU-lidstaten beperkingen toe- passen voor verkoop en gebruik, of autorisatie vereisen voor gebruik: Frankrijk • Italië • Noorwegen (indien gebruikt in het geografische gebied bin- •...
- Page 149 In bepaalde omstandigheden kunnen lithiumbatterijen oververhit raken en ontbranden. ☞ Indien u het GeoMax-product met lithiumbatterijen vervoert of verzendt via een commercieel vliegtuig, moet u dit doen in over- eenstemming met de IATA Wetgeving Gevaarlijke Goede- ren.
- Page 150 Belangrijke informatie over uw instrument ☞ In elk vliegtuig is het verboden beschadigde of defecte batte- rijen te vervoeren. Zorg er daarom voor dat de conditie van alle batterijen veilig is voor transport.
- Page 151 Instrumentcomponenten Zenith15/25 TNC-connector voor externe UHF- Pro-componen- antenne, alleen voor modellen met UHF-radio Batterijcompartiment met microSD-sleuf en simkaartsleuf Toetsenbord met LED-statuslamp- jes, aan/uit-toets en functietoets Seriële, USB- en voedingspoort 004573_001 Referentievlak antenne (ARP) is het punt vanaf waar de instru-...
- Page 152 Instrumentcomponenten Aan/uit-toets Toets Functie AAN/UIT Als Zenith15/25 Pro uit is: Schakelt de Zenith15/25 Pro in na 2 sec ingedrukt houden. ☞ Terwijl de Zenith15/25 Pro opstart, gaan de twee voedingslampjes knipperen. Als de Zenith15/25 Pro al aan staat: Schakelt de Zenith15/25 Pro uit na 2 sec ingedrukt houden.
- Page 153 Houd de toets gedurende 3 sec ingedrukt. Werkt de coördinaten van de basispositie bij wanneer de Zenith15/25 Pro in de basismodus staat. Het LED- statuslampje van de RTK-basis knippert gedurende 2 sec. Wanneer er geen positie beschikbaar is, knip- pert het LED-statuslampje rood.
- Page 154 Instrumentcomponenten Toets Functie Maakt verbinding met het geconfigureerde RTK-basis- station of de NTRIP-server wanneer de Zenith15/25 Pro in de rovermodus staat. Het LED-statuslampje van de RTK-rover knippert gedurende 2 sec. Er gebeurt niets als de rovermodus niet is geconfigu- reerd.
- Page 155 Omgevingsspecificaties Omgevingsspeci- Temperaturen (°C): ficaties Instrument: -40 tot +65 (in -40 tot +80 (opslag) gebruik) ZBA201-batterij: -20 tot +55 (in -40 tot +70 (opslag) gebruik) Bescherming: IP68 (IEC 60529) Trillingen: Trillingstest in overeenstemming met ISO 9022-36-05 Omgevingsspecificaties...
- Page 156 Omgevingsspecificaties Schokken: Bestand tegen een val van 2 m, gemonteerd op een loodstaaf, op een hard oppervlak. Vochtigheid: 100% condenserend De effecten van condensatie kunnen worden tegengegaan door periodiek goed drogen van het instrument.
- Page 157 Vervoer Vervoer in het Bij vervoer van de apparatuur in het veld, er altijd zorg voor dragen dat u: veld het instrument draagt in de originele transportkoffer, • of het statief draagt met de benen gespreid over uw schouders, • onderwijl het instrument rechtop houdend.
- Page 158 Vervoer GeoMax of een gelijkwaardige verpakking om het te beschermen tegen schokken en trillingen. Verschepen, ver- Als accu's worden vervoerd of getransporteerd, dan moet de persoon die voer van accu's verantwoordelijk is voor het product, er op toezien dat aan de vigerende nationale en internationale regels en wetgeving wordt voldaan.
- Page 159 Bediening ☞ De accu moet worden geladen, voordat deze voor de eerste keer wordt gebruikt. Batterij vervan- gen, stap voor stap 004583_001 Bediening...
- Page 160 Bediening ☞ De batterij wordt in het onderste gedeelte van het instrument geplaatst. Duw de schuifvergrendeling op het batterijcompartiment in de richting van de pijl met het open-slotsymbool. Verwijder het deksel van het batterijcompartiment. Schuif de batterij in de behuizing van het batterijcompartiment met de contactpunten naar boven gericht.
- Page 161 Verwijder de batterij. Een microSD- kaart plaatsen, stap voor stap 004584_001 Bediening...
- Page 162 Bediening ☞ Het verwijderen van de microSD-kaart terwijl het instrument nog ingeschakeld is, kan leiden tot verlies van gegevens. Verwijder de microSD-kaart en de aangesloten kabels alleen als het instru- ment is uitgeschakeld. ☞ De microSD-kaart wordt in een sleuf in het batterijcompartiment van het instrument geplaatst.
- Page 163 004585_001 ☞ Het plaatsen/verwijderen van de simkaart, terwijl de Zenith15/25 Pro is ingeschakeld, kan de kaart permanent beschadigen. Plaats/verwijder de simkaart alleen als de Zenith15/25 Pro is uit- geschakeld. ☞ De simkaart wordt in een sleuf in het batterijcompartiment geplaatst.
- Page 164 Bediening Duw de schuifvergrendeling op het batterijcompartiment in de richting van de pijl met het open-slotsymbool. Verwijder het deksel van het batterijcompartiment. Druk op de grendel van het deksel van de sim-/microSD-kaart en verwijder het deksel. Duw de simkaarthouder in de richting van de OPEN-pijl en klap hem omhoog.
- Page 166 827821-1.2.0nl Vertaling van de originele tekst (827821-1.2.0en) © 2018 GeoMax AG, Widnau, Zwitserland GeoMax AG www.geomax-positioning.com...
- Page 168 827821-1.2.0multilingual Original text (827821-1.2.0en) © 2018 GeoMax AG, Widnau, Switzerland GeoMax AG www.geomax-positioning.com...
Need help?
Do you have a question about the Zenith15 and is the answer not in the manual?
Questions and answers