
Related Manuals for GeoMax Zenith15


Summary of Contents for GeoMax Zenith15
-
Page 1: Installation Guide
GeoMax GNSS Zenith15/25 Pro Series Installation Guide Version 3.00 English - 1 - Zenith15/25 GNSS Series Installation Guide © 2017 GeoMax AG, Widnau, Switzerland... -
Page 2: Table Of Contents
Tablet of Contents NTRODUCTION ENERAL REPARATION Copy Zenith15/25 Firmware on MicroSD card Battery Charging GNSS REPARATION OF THE RECEIVER Connecting to the PC Receiver connection with GeoMax Assistant Checking the receiver firmware version Changing the UHF radio settings Antenna Management... -
Page 3: Introduction
Zenith15/25 Pro components, please refer to the respective User Manuals. The User Manual for the GNSS receiver is available from the Zenith15/25 Pro CD and also from the GeoMax Partner Area. The Getac PS336 User Manual can be downloaded from Getac’s website, at http://en.getac.com/support/downloads.html. -
Page 4: General Preparation
15/25 F ENITH IRMWARE ON ICRO CARD Visit GeoMax Downloads to check for the current versions of both System and GNSS firmware’s. Download the files and store them on the provided MicroSD card in the SYSTEM folder 2.2 B ATTERY HARGING Before using the receiver, the included ZBA201 batteries should be charged. -
Page 5: Preparation Of The Gnss Receiver
When connecting the cable to a USB port of the PC, the cable drivers will au tomatically be installed. If the Windows Found New Hardware Wizard starts, click the Close button. Download the USB cable driver installer CP210xVCPInstaller_x86.exe from GeoMax Downloads. -
Page 6: Receiver Connection With Geomax Assistant
Once connected with Assistant, the installed firmware’s can be seen when selecting Information from the side menu. If the firmware is older as the one downloaded from the GeoMax download Area it is recommended to perform an update. To update the receiver firmware, download the... -
Page 7: Changing The Uhf Radio Settings
*.FW files, copy to the SYSTEM directory on a MicroSD card and insert it into the Zenith15/25 receiver. Select Sensor Firmware from the side menu. The contents of the SYSTEM directory are displayed. Choose the required file and click Upgrade to install the firmware onto the receiver. -
Page 8: Antenna Management
NTENNA ANAGEMENT If you have a Base-Rover setup all available GeoMax GNSS antennas (except Zenith35/Zenith35 Pro) are currently supported in the antenna management by default. To make sure you get the correct results when you are using as base a Zenith35/Zenith35 Pro or any other antenna you need to add this specific antenna manually. -
Page 9: Installation Of Licences
These options are activated by means of a NovAtel licence key file that would have been emailed to you at delivery of the Zenith15/25. The included Auth Code always consists of only one number, even if several options are to be activated. -
Page 10: Disconnecting From The Pc
GPS, GLONASS, BeiDou tracking at 20Hz* * Not applicable to Zenith15 The licence key file can be installed onto the receiver by using GeoMax Assistant. With the receiver connected to Assistant, select Upload Key from the side menu. Select the key file (for example L_xxx.key where xxx is the receiver serial number) and click Upload. -
Page 11: Installation Of Fieldgenius/ Layout Pro
FieldGenius/ Layout Pro software. Follow the instructions of the Windows installation wizard. At the Device Selection window, select the data collector type as Windows Mobile 6. - 11 - Zenith15/25 GNSS Series Installation Guide © 2017 GeoMax AG, Widnau, Switzerland... -
Page 12: Registration Of Fieldgenius/ Layout Pro
The displayed Device ID together with the GUID (Global Unique IDentity) is used to obtain the key. The GUID can be found on the printed FieldGenius card that was supplied together with your Zenith15/25 equipment. - 12 - Zenith15/25 GNSS Series Installation Guide ©... - Page 13 Apply Key. Note: Please make certain that the Device ID is entered correctly first time, since an activation key cannot be generated again with a different ID. - 13 - Zenith15/25 GNSS Series Installation Guide © 2017 GeoMax AG, Widnau, Switzerland...
-
Page 14: Connection To The Gnss Receiver
Save the name and then tap Edit to configure the profile. To ensure that measured heights are computed correctly, it is important to define the receiver type. At the Antenna Height panel, choose the Model as Zenith15/25. The Measured Height is the default length of the telescopic pole. - Page 15 At the Model & Communication panel, select the Make as GeoMax, Model as Zenith15/25 and Port as Bluetooth. Tap Bluetooth Search to find all available devices and choose the required receiver by its serial number. Once a connection has been made, you will be prompted for a PIN which is 0000.
- Page 16 For further information on using FieldGenius/ Layout Pro for GNSS measurements, refer to the FieldGenius/ Layout Pro instruction manual in the GPS REFERENCE chapter. - 16 - Zenith15/25 GNSS Series Installation Guide © 2017 GeoMax AG, Widnau, Switzerland...
-
Page 17: Equipment Setup
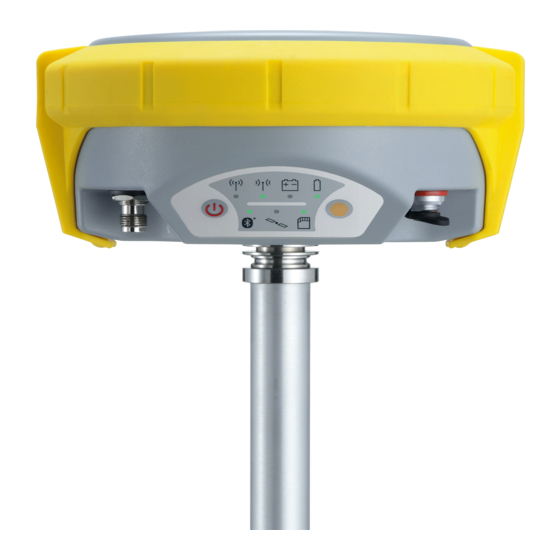
5.1 R OVER SETUP For a RTK rover, the Zenith15/25 equipment can be setup on a pole as shown below. To use as a network rover, a SIM card needs be inserted into the slot located in the battery compartment. -
Page 18: Base Setup
5.2 B ASE SETUP The Zenith15/25 equipment can also be setup as a base station for the transmission of RTK corrections as shown below. Attach the UHF radio antenna to the 760275 ZAR200 antenna arm. The arm has a 5/8”...
Need help?
Do you have a question about the Zenith15 and is the answer not in the manual?
Questions and answers