Cradlepoint IBR600 Installation Manual
Hide thumbs
Also See for IBR600:
- Product manual (249 pages) ,
- User manual (211 pages) ,
- Installation manual (9 pages)
Advertisement
Quick Links
Download this manual
See also:
User Manual
The Cradlepoint IBR600 router will be delivered to site with SIM card installed and router pre-
configured. The router is administered through a cloud-based portal. The installing technician will not
need to make any configuration changes to the CP
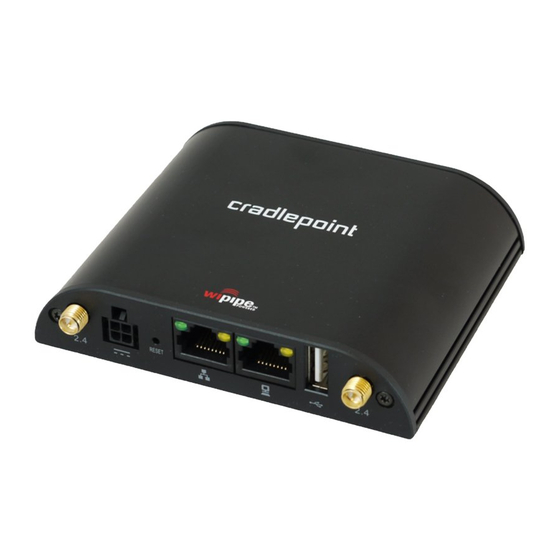
1. Connect power supply to electrical outlet and plug connector into CP
2. Connect WiFi and modem antennas (finger tight only). The paddle-shaped antennas for the
cellular modem are marked 4G and go on the side of the Cradlepoint with the SIM card door.
The thinner WiFi antennas go on the side with the LAN ports
3. Connect the power supply to the IBR600 and switch the power on. Test internet connectivity by
connecting a laptop to the LAN port on the router. Use the port on the left, next to the Reset
button)
IBR600 Installation Guide
Advertisement

Related Manuals for Cradlepoint IBR600


Summary of Contents for Cradlepoint IBR600
- Page 1 2. Connect WiFi and modem antennas (finger tight only). The paddle-shaped antennas for the cellular modem are marked 4G and go on the side of the Cradlepoint with the SIM card door. The thinner WiFi antennas go on the side with the LAN ports 3.
- Page 2 WRN wall plate 5. If the location does not have a WRN monitor, or the Cradlepoint needs to be located elsewhere for reasons such as poor cell reception in the waiting room, you must notify PatientPoint and get approval 6.
- Page 4 7. For some installations, the Cradlepoint will also serve as a WiFi hotspot. There are 2 options - (they can be turned on individually or simultaneously) a. Free WiFi network for patients i. SSID is PatientPoint Welcome ii. No password required. User must accept Terms and Conditions to access the internet b.
- Page 5 Connecting PPT Signs to a Hidden WiFi Network Windows XP (WRN & PWR) 1. Choose Control Panel from the Start menu - Control Panel window appears 2. Click the Network Connections icon - Network Connections window appears 3. Right-click the wireless network connection's icon and choose Properties from the pop-up menu 4.
- Page 6 On the Connection tab, check the box “Connect when this network is in range” 8. Click OK At this point, the network should show up as available in the list. You can then connect to it by clicking its name. You may need to click “Refresh Network List”...
- Page 7 Windows 7 (IXR) Open the Network and Sharing Center. Go to Start Menu -> Control Panel -> Network and Internet -> Network and Sharing Center. Click on 'Set up a new connection or network' The 'Set Up a Connection or Network' wizard will now start. From the list of available options, select 'Manually connect to a wireless network' and click on Next...
- Page 8 Complete all the fields shown in this window Network name - type the name of the hidden wireless network – typically the 7-digit location ID Security type - select WPA2-Personal. Encryption type - AES Security key DxW!E5fA6U!&nc7K...
- Page 9 Windows 7 will automatically connect to the hidden wireless network. Also, the wireless network icon in the taskbar will change as shown below...
- Page 10 Windows 8 (WRN & PWR) Access the Network and Sharing Center There are a number of ways to enter the Network and Sharing Center. The fastest method on the Desktop is to right-click the networking icon in the system tray and click "Open Network and Sharing Center"...
- Page 11 Enter the security information for your network 1. Enter the SSID in the network name field (typically 7-digit PPT location ID) 2. In the security type field choose WPA2-Personal 3. In the security key field, enter the password used by the wireless network DxW!E5fA6U!&nc7K 4.
- Page 12 You are notified that Windows has successfully added the wireless network. Press Close If the network is in the area, Windows automatically connects to it. Check your network icon in the system tray. It should depict a series of full bars to show your connection strength...
Need help?
Do you have a question about the IBR600 and is the answer not in the manual?
Questions and answers