Table of Contents
Advertisement
Quick Links
Advertisement
Table of Contents

Related Manuals for Audicus Oro


Summary of Contents for Audicus Oro
- Page 1 Instruction Manual Alto...
- Page 3 Thank you for choosing Audicus! We are excited for you to experience our hearing aids! The Oro is our most powerful hearing aid. It offers high quality sound processing, wireless features, and an ergonomic shell design. In addition, it has: •...
-
Page 5: Table Of Contents
Contents What’s Inside 6 Getting Started with Remote Adjusting to the Hearing Aid 8 Remote Programs / Volume Batteries 10 Remote Troubleshooting On/Off 14 Maintenance and Use Wearing the Hearing Aid 15 Technical Information Volume Adjustment 21 Returns and Warranty Cleaning 19 FDA Information Replacing the Wax Guard... -
Page 6: What's Inside
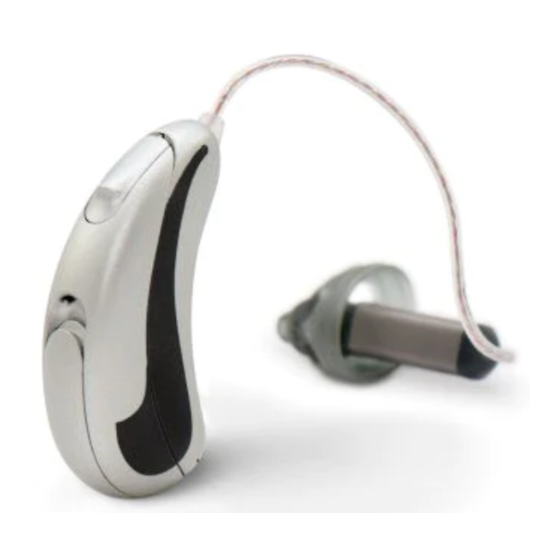
What’s Inside? Red = Right Ear Microphone Blue = Left Ear Receiver Wire Push Button Dome Retention Guard Battery Door Receiver & Wax Guard Component Function Microphone Picks up sound for the system to process Receiver Amplifies the outgoing sound Push Button Changes volume Receiver Wire... - Page 7 What’s Inside? ( Magnetic end for extracting batteries) Instruction Manual Brush Manual Clam Shell * Number of domes will vary depending on your hearing loss Ear Domes Size 312 Wax Guard & Replacement Tool Batteries...
-
Page 8: Adjusting To The Hearing Aid
Adjusting to the Hearing Aid Fit Experience in the First Two Weeks The first two weeks of owning your hearing aid are a crucial time for getting accustomed to the fit of your device. We recommend the following: 1. Find the right size Dome for YOU: •... - Page 9 2. Reprogramming • Audicus offers free adjustments for the life of the hearing aid. Most people don’t require an adjustment, but it can help the sound clarity or amplification of the device . Give us a call if you feel your hearing aid...
-
Page 10: Batteries
Batteries Battery Use When not in use (e.g., when asleep) open the battery compartment completely to preserve battery power. Please remove battery completely if the hearing aid will not be used for an extended period of time as it may leak and damage the device. -
Page 11: Inserting The Battery
Batteries Inserting the Battery 1. The Oro uses size 312 batteries. Place battery into battery compartment, with the sticker facing up. Please wait as long as 15 minutes for for battery to begin working after the sticker is removed. - Page 12 Batteries Inserting the Battery 2. Take off the sticker from the new battery. This activates the battery. Please wait as long as 5 minutes for battery to develop full output. 3. Close the battery compartment completely. Your hearing aid is now ON. Peel off the Sticker...
- Page 13 Batteries Battery Safety Batteries contain harmful substances • Keep batteries away from sources that pollute the environment: of high temperature. • Do not dispose of batteries in • Keep batteries away from household trash. children and pets. • Dispose of batteries according to •...
-
Page 14: On/Off
On/Off Switching Your Hearing aid ON / OFF The Oro can be switched ON or OFF through its battery compartment. When the battery door is closed, the hearing aid is ON. When the battery door is fully open, the hearing aid is OFF. -
Page 15: Wearing The Hearing Aid
Wearing the Hearing Aid The Oro can be inserted in 3 steps: 2. Push the dome into your ear until 1. Place the hearing aid over the it sits comfortably in the canal and top of your ear, so that the hard... - Page 16 Wearing the Hearing Aid 3. Place the retention guard into the bowl of your ear. If retention guard is too long, remove dome and pull it off/cut it. Tuck in the Retention Guard To remove your hearing aid hold the wire and gently pull the dome out of your ear canal.
- Page 17 Do not use broken domes. If a dome becomes lodged in your ear, contact a medical professional for removal. If you feel physical discomfort or experience irritation, contact Audicus and/or a hearing professional. Sizing: Must Seal the Canal = whistling 1.
- Page 18 2-3 months. the hearing aid if proper care is taken. The receiver has a one year • Insert the receiver with the dome manufacturer warranty. The receiver carefully and not too far into the ear. can only be replaced by Audicus.
- Page 19 Wearing the Hearing Aid To Remove the Dome: Pinch where the Pull with some force Flip the dome meets the tube...
- Page 20 Wearing the Hearing Aid To Attach the Dome: 1. Place new dome over the receiver. 2. Press until the dome attaches onto the receiver. 3. Make sure that the ear dome is securely fastened. You should be able to tug it slightly without removing it.
-
Page 21: Volume Adjustment
After the loudest step, your Oro returns to default volume. If you have a pair of Oro’s you can go up 5 steps in volume with the right push button from the baseline and down 10 steps with the left push button. -
Page 22: Cleaning
Do not submerge it in water or cleaning solution. Hearing-aid-safe wipes are available for purchase at Audicus.com Audicus provides a Clean & Care service available at Audicus.com Never use domes worn by someone else or if dirty, torn, or disfigured. Only use... -
Page 23: Replacing The Wax Guard
Replacing the Wax Guard For proper functioning of the hearing aid, clean the wax guard with the enclosed brush. Replace wax guard as needed every 2-3 months. You will occasionally have to change the wax guard when the hearing aid appears to be dead or weak. Identify the receiver and wax guard replacement tool. - Page 24 Replacing the Wax Guard To Replace the Wax Guard 1. Insert the Removal End (-) of the tool into the used wax guard. 2. Pull the wax guard out.
- Page 25 Replacing the Wax Guard Inserting the new Wax Guard: 1. Insert the new wax guard on the replacement end (+) of the tool into the receiver. The tool may not fit if there is excessive wax buildup. Please replace every 2-3 months. 2.
- Page 26 Volume Remote Volume Remote The Oro hearing aid can be controlled by a remote to enhance the way you use and experience your hearing aids. Audicus offers two remotes: A Basic Volume Remote or a more advanced Bluetooth Remote (Bluetooth is only available for the Enhanced Clarity Oro).
-
Page 27: Basic Volume Remote Overview
Basic Volume Remote Overview Volume Buttons LED Indicator Light Program Button Power Switch Home Button Feature Function Power Switch Turns remote on or off Volume Buttons Increases or decreases volume Program Button Cycle through programs upward Home Button Default to program 1 LED Indicator Light Indicates status of remote... -
Page 28: Getting Started With Remote
Getting Started with the Remote Your remote takes a single AAA battery. Turn on your remote by sliding the switch up. To turn off, slide the switch down. LED Indicator Light Status Green Battery OK Low battery (<10%) Green for two seconds after Ready to use switching on No light after pressing button... -
Page 29: Remote Programs / Volume
Remote Programs / Volume Changing Programs The Oro has four programs: Smart Everyday, Speech in Noise, TV & Loop. If you have a remote you can press the “P” button on your remote control to access each program. The number of beeps you hear upon pressing the “P”... - Page 30 This pairing allows your hearing aid(s) to amplify sounds streamed directly from the venue. Audicus can also swap out additional programs, such as a Music program to listen to music, Outdoor program, or other environmental programs, to help in specific situations.
-
Page 31: Remote Troubleshooting
Remote Troubleshooting Issue Cause Remote is off Light not illuminating Dead battery Battery inserted incorrectly Remote is out of range Hearing aids do not respond Hearing aid battery is dead NEVER connect the remote to USB cable. The USB port is used with a proprietary software used to pair it with the hearing system. -
Page 32: Maintenance And Use
Maintenance and Use your Oro If the hearing aid becomes wet, If properly maintained hearing aid will operate for many remove the battery and ensure the years. Here are some tips to help aid is dry before using it again. - Page 33 Do not leave your hearing aid Keep your hearing aid away from exposed to direct sunlight for an children and pets. extended period of time. Consider purchasing a UV Dry Box for storage from Audicus.com...
- Page 34 Maintenance and Use Other Do not alter or attempt any repairs on the hearing aid, as it will void the Do not allow others to use your warranty. hearing aid. Do not place your hearing aid in the Do not wear a hearing aid during an microwave.
-
Page 35: Technical Information
Technical Information The Oro is manufactured by Hansaton Akustik GmbH Germany and distributed in USA by Audicus. FCC-ID: WU7-WL002BTE Operating frequencies: Fc = 3.28 MHz Changes or modifications not expressly approved by the party responsible for compliance could void the user’s authority to operate the equipment. -
Page 36: Returns And Warranty
Returns and Warranty The Audicus 100% Happiness Guarantee If for any reason you are not satisfied with your Audicus hearing aid, you may return it within 45 days after ship date for a full refund of the original purchase price. -
Page 37: Fda Information
FDA Information Use your hearing aid all day long The best way to ensure better hearing is to practice listening with your hearing aids until you are able to wear them comfortably all day. Generally, infrequent use of the hearing aid does not provide you with the full benefit of amplification. - Page 38 FDA Information Warning to Hearing Care Professionals (continued): (i) Visible congenital or traumatic deformity of the ear. (ii) History of active drainage from the ear within the previous 90 days. (iii) History of sudden or rapidly progressive hearing loss within the previous 90 days. (iv) Acute or chronic dizziness.
- Page 39 FDA Information If you have reservations about your ability to adapt to amplification, you should inquire about the availability of a trial-rental or purchase-option program. Many hearing care professionals now offer programs that permit you to wear a hearing aid for a period of time for a nominal fee after which you may decide if you want to purchase the hearing aid.
-
Page 40: Warnings And Side Effects
Audicus so that they can be synchronized. equipment/devices. The performance of Bi-com/i-com 2 (the coupling technology) may be affected by electromagnetic interference, e.g., from a computer monitor or... - Page 41 Other Warnings Hearing aids should be used only as directed and adjusted by your trained hearing aid professional. Audicus hearing aids are intended to improve hearing of hearing impaired persons. Diagnosis of A hearing aid may stop functioning, e.g., if the hearing loss and prescription of hearing aid must battery goes dead.
-
Page 43: Contact Us
Contact Us Audicus, Inc. 40 Exchange Place Suite 1820 New York, NY 10005 Tel: 844 616 7284 Email: contact@audicus.com www.audicus.com... - Page 44 Rev. 18A...
Need help?
Do you have a question about the Oro and is the answer not in the manual?
Questions and answers