Table of Contents
Advertisement
Quick Links
Advertisement
Table of Contents

Subscribe to Our Youtube Channel
Related Manuals for Audicus ALTO


Summary of Contents for Audicus ALTO
- Page 1 Instruction Manual Alto...
- Page 2 Thank you for choosing Audicus! We are excited for you to experience our hearing aids. If you have any questions, feel free to contact us at 888-979-6918 or help@audicus.com.
-
Page 3: Table Of Contents
Contents Introduction 4 Cleaning Overview 5 Replacing the Wax Guard What’s Inside 6 Maintenance and Use Batteries 8 Technical Information On/Off 13 Returns and Warranty Standby Mode 14 Serial Identification Wearing the Hearing Aid 15 FDA Information Memory Programs 22 Warnings and Side Effects Volume Adjustments 23 Contact Us... -
Page 4: Introduction
Introduction The Alto is our most powerful hearing aid. It offers high quality sound processing, wireless features, and an ergonomic body design. In addition, it has: 1. Receiver-in-Canal 2. Improved speech recognition 3. Superior feedback and noise reduction 4. Sleek, award-winning design 5. -
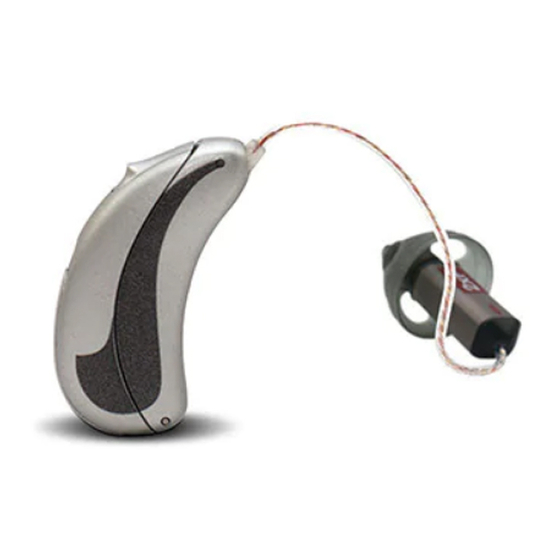
Page 5: Overview
Overview Alto Red = Right Ear Blue = Left Ear Receiver Wire Microphones Dome Battery Door Speaker Component Function Microphone picks up sound for the system to process Speaker amplifies the outgoing sound Push Button changes listening programs Wire connects the speaker to the system... -
Page 6: What's Inside
What’s Inside? Alto Hearing Aid Clam Shell (Opened) Ear Domes Clam Shell (Closed) - Page 7 What’s Inside? ( Magnetic end for extracting batteries) Instruction Manual Canto Manual Brush Size 312 Batteries Earwax Replacement Tool...
-
Page 8: Batteries
Batteries Battery Compartment The battery compartment is at the back of the hearing aid, as indicated. Gently pull the tab on the battery door until it snaps open. Inserting the Battery 1. Open the battery compartment. When opening and closing the battery door you should never have to exert force. - Page 9 Batteries Inserting the Battery 2. The Alto uses size 312 batteries. Place battery into battery compartment, with the sticker facing up.
- Page 10 Batteries Inserting the Battery 3. Take off the sticker from the new battery. This activates the battery. Please wait a few minutes for battery to develop full output. Peel off the Sticker...
-
Page 11: Low Battery Warning
Batteries Inserting the Battery Battery Use 4. Close the battery compartment When you are not using your completely. Your hearing aid hearing aid (e.g. when you go to should now be switched ON. sleep) we recommend opening the battery compartment completely to preserve battery power. - Page 12 Batteries Battery Safety Batteries contain harmful substances • Keep batteries away from sources that pollute the environment: of high temperature. • Do not dispose of batteries in • Keep batteries away from household trash. children and pets. • Dispose of batteries according to •...
-
Page 13: On/Off
On/Off Switching Your Hearing aid ON / OFF The Alto can be switched “ON” “On” or “OFF” through its battery compartment. When the battery door is closed, the hearing aid is switched “ON.” When the battery door is fully open, the hearing aid is “OFF.”... -
Page 14: Standby Mode
Standby Mode Standby Mode The standby mode is another way of deactivating your hearing aid. Just press button for more than four seconds until the hearing aid goes into standby. To re-activate the hearing aid, simply hold the push button for more than four seconds. -
Page 15: Wearing The Hearing Aid
Wearing the Hearing Aid The Alto can be inserted in 3 easy steps: 1. Place the hearing aid over the top of your ear, so that the hard casing is behind your ear and the wire is in front. - Page 16 Wearing the Hearing Aid 2. Push the dome into your ear until it sits comfortably in the canal and the wire lies flat against the side of your head. The dome should be just inside the ear canal. You should not see it if placed correctly.
- Page 17 Wearing the Hearing Aid 3. Place the retention guard into the bowl of your ear. If retention guard is too long, remove dome and pull it off. See page 20 for instructions on how to remove the dome. Tuck in the Retention Guard To remove your hearing aid, hold the wire and gently pull the dome out of your ear canal.
- Page 18 Do not use broken domes. If a dome becomes lodged in your ear, contact a medical professional for removal. If you feel physical discomfort or experience irritation, contact Audicus and/or a hearing professional. Sizing: Must Seal the Canal 1. Dome too small 2.
- Page 19 - Insert the receiver unit with the dome taken. The receiver has a 1 year carefully and not too deeply into the manufacturer warranty. The receiver ear. can only be replaced by Audicus.
- Page 20 Wearing the Hearing Aid To Remove the Dome: 1. Flip the dome upside down. 2. Identify where the end of dome (white ring) meets the receiver. 3. Insert your fingernails between the dome and receiver, then pinch. 4. Pull the dome off. Pull with some force Gently Pull Flip the dome...
- Page 21 Wearing the Hearing Aid To Attach the Dome: 1. Place new dome over the receiver. 2. Press until the dome snaps onto the receiver. 3. Make sure that the ear dome is securely fastened. You should be able to tug it slightly without removing it.
-
Page 22: Memory Programs
Memory Programs The Alto comes with a Smart Program. You only need one program for all environments. The Smart Program auto-detects your environments and ren- ders the correct amplification and hearing support. You can request custom programs if you are a musician or if you need a special noise reduction program. -
Page 23: Volume Adjustments
Volume Adjustment The Alto has enabled volume control. Depending on your configuration, you can control volume as shown: Configuration Increase Volume Decrease Volume Single Alto Press Button Volume Rotates Up Pair of Alto’s Press Right Alto’s Button Press Left Alto’s Button If you have a remote control, the above configuration will still apply. -
Page 24: Cleaning
Use receiver unit and dome/receiver mold only in the manner described in the user guide. Never use domes worn by someone else or if dirty, torn, or disfigured. Only use original domes and receivers provided by Audicus. Domes and receivers are easily damaged when handled incorrectly. -
Page 25: Replacing The Wax Guard
Replacing the Wax Guard For proper functioning of the hearing aid, clean the Wax Guard with the enclosed brush. Replace wax guard as needed. You will occasionally have to change the Wax Guard when the hearing aid appears to be dead or weak. Identify the Receiver and Wax Guard Tool. - Page 26 Replacing the Wax Guard To Replace the Wax Guard 1. Insert the Removal End (-) of the tool into the used wax guard. 2. Rotate the tool clockwise about 6 times. 3. Pull the wax guard out.
- Page 27 Replacing the Wax Guard Inserting the new Wax Guard: 1. Insert the new Wax Guard on the Replacement End (+) of the tool into the receiver. 2. Once firmly inside the receiver, tilt the tool to leave the wax guard inside the receiver.
-
Page 28: Maintenance And Use
Maintenance and Use Your Alto is a very durable hearing If the hearing aid becomes wet, aid, if handled with care. Therefore, remove the battery and ensure the be particularly careful in the aid is dry before using it again. - Page 29 Maintenance and Use Temperature Storage Keep your hearing aid away from Always remove the battery from sources of high temperature at all the hearing aid when not in use for times. extended periods. Always store your hearing hearing Keep it away from fires, stoves, aid in its case, in a clean and dry heating systems, boilers or other environment.
- Page 30 Maintenance and Use Other Do not place your hearing aid in the microwave. Do not allow others to use your instrument. In some countries, restrictions on the use of wireless equipment may Do not wear a hearing aid when apply; consult local authorities for conducting an X-ray or MRI scan or more information.
-
Page 31: Technical Information
Technical Information The Alto is manufactured by Hansaton Akustik GmbH Germany and distributed in USA by Audicus. FCC-ID: WU7-WL002BTE Operating frequencies: Fc = 3.28 MHz Changes or modifications not expressly approved by the party responsible for compliance could void the user’s authority to operate the equipment. -
Page 32: Returns And Warranty
Returns and Warranty The Audicus 100% Happiness Guarantee If for any reason you are not satisfied with your Audicus hearing aid, you may return it within 45 days after ship date for a full refund of the original purchase price. -
Page 33: Serial Identification
Serial Identification You can find your serial number inside the hearing aid. If you open the battery door, you will see a series of numbers. 00000... -
Page 34: Fda Information
FDA Information Use your hearing aid all day long The best way to ensure better hearing is to practice listening with your hearing aids until you are able to wear them comfortably all day. Generally, infrequent use of the hearing aid does not provide you with the full benefit of amplification. - Page 35 FDA Information Warning to Hearing Care Professionals (continued): (i) Visible congenital or traumatic deformity of the ear. (ii) History of active drainage from the ear within the previous 90 days. (iii) History of sudden or rapidly progressive hearing loss within the previous 90 days. (iv) Acute or chronic dizziness.
- Page 36 FDA Information If you have reservations about your ability to adapt to amplification, you should inquire about the availability of a trial-rental or purchase-option program. Many hearing care professionals now offer programs that permit you to wear a hearing aid for a period of time for a nominal fee after which you may decide if you want to purchase the hearing aid.
-
Page 37: Warnings And Side Effects
CD, smartphone screens, purchase, you must send the aid(s) back to video and audio discs, and other electronic Audicus so that they can be synchronized. equipment/devices. The performance of Bi-com/i-com 2 (the coupling technology) may be affected by electromagnetic interference, e.g. - Page 38 Warnings and Side Effects Other Warnings Audicus hearing aids are intended to improve the Hearing aids should be used only as directed and hearing of the hearing impaired persons. Diagno- adjusted by your trained hearing aid professional. sis of hearing loss and prescription of hearing aid must be performed by a hearing health specialitst A hearing aid may stop functioning, e.g.
-
Page 39: Contact Us
Contact Us Audicus, Inc. 40 Exchange Place. Suite 1820 New York, NY 10005 Tel: 888 979 6918 Email: help@audicus.com www.audicus.com...
Need help?
Do you have a question about the ALTO and is the answer not in the manual?
Questions and answers