Table of Contents
Advertisement
Quick Links
Advertisement
Table of Contents

Related Manuals for Audicus Solo


Summary of Contents for Audicus Solo
- Page 1 Instruction Manual Solo...
- Page 2 Thank you for choosing Audicus! We are excited for you to experience our products. If you have any questions, feel free to contact us at 888-979-6918 or help@audicus.com.
-
Page 3: Table Of Contents
5 Dome Sizing What’s Inside 6 Dome Considerations Batteries 8 Listening Environments On/Off 13 Cleaning Standby Mode 14 Maintenance Wearing the Solo 14 Returns and Warranty Getting the Right Dome Fit 17 Additional Information Attaching the Dome 18 Contact Us... -
Page 4: Introduction
4. Environment preferences 5. Moisture Resistance The Solo is not a hearing aid and is not intended to assist with hearing loss. If you think you may have hearing loss, please visit an ear, nose, and throat doctor or an audiologist for a diagnosis. -
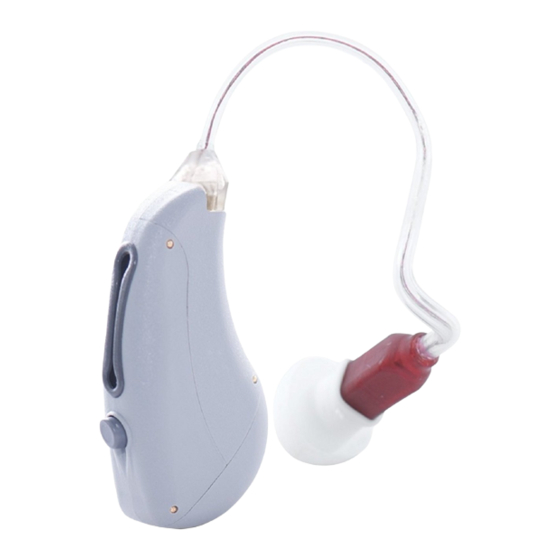
Page 5: Overview
Overview Solo Red Speaker = Right Ear Wire Blue Speaker = Left Ear Microphone Speaker Push Button Dome Component Function Microphone picks up sound for the system to process Speaker amplifies the outgoing sound Push Button changes listening programs Wire... -
Page 6: What's Inside
What’s Inside? Solo Solo Case (Opened) Ear Domes Case (Closed) - Page 7 What’s Inside? ( Magnetic end for extracting Instruction Manual batteries) Canto Manual Brush Size 312 Batteries...
-
Page 8: Batteries
Batteries Battery Compartment The battery compartment is at the back of the Solo, as indicated. Gently pull the tab on the battery door until it snaps open. Inserting the Battery 1. Open the battery compartment. When opening and closing the battery door you should never have to... - Page 9 Batteries Inserting the Battery 2. The Solo uses size 312 batteries. Place battery into battery compartment, with the sticker facing up. You can also use the magnetic tool to insert the battery.
- Page 10 Batteries Inserting the Battery 3. Take off the sticker from the new battery. This activates the battery. Please wait a few minutes for battery to develop full output. peel off sticker...
-
Page 11: Low Battery Warning
Leaking batteries damage the Solo. Please remove battery when the Solo is not in use for a prolonged period of time. Low Battery Warning When your battery runs low, the Solo will emit continuous beeps. - Page 12 Batteries Battery Safety Batteries contain harmful substances • Keep batteries away from sources that pollute the environment: of high temperature. • Do not dispose of batteries in • Keep batteries away from household trash. children and pets. • Dispose of batteries according to •...
-
Page 13: On/Off
When the battery door is closed, the Solo is switched “ON.” When the battery door is fully open, the Solo is “OFF.” “Off” When the Solo is not in use, we recommend opening the battery compartment in order to preserve battery power. -
Page 14: Wearing The Solo
Wearing the Solo The Solo can be inserted in 3 easy steps: 1. Place the Solo over the top of your ear, so that the hard casing is behind your ear and the wire is in front. - Page 15 Wearing the Solo 2. Push the dome into your ear until it sits comfortably in the canal and the wire lies flat against the side of your head. The dome should be just inside the ear canal. You should not see it if placed correctly.
- Page 16 If retention guard is too long, remove dome and pull it off. See page 20 for instructions on how to remove the dome. Tuck in the Retention Guard To remove your Solo, hold the wire and gently pull the dome out of your ear canal.
-
Page 17: Getting The Right Dome Fit
Getting the Right Dome Fit Function Dome fit is just as important as the technology and design of the Solo. The dome serves a dual purpose: 1. To keep the speaker stable and in place inside the ear canal. 2. To prevent sound leakage and ensure sound reaches the ear drum. -
Page 18: Attaching The Dome
Attaching the Dome To Attach the Dome: 1. Place new dome over the speaker. 2. Press until the dome snaps onto the speaker. 3. Make sure that the ear dome is securely fastened. You should be able to tug it slightly without removing it. -
Page 19: Removing The Dome
Removing the Dome To Remove the Dome: 1. Flip the dome upside down. 2. Identify where the end of dome (white ring) meets the speaker. 3. Insert your fingernails between the dome and speaker, then pinch. 4. Pull the dome off. Pull with some force Flip the dome Pinch where dome... -
Page 20: Dome Sizing
If the dome is smaller than your ear canal, you will experience sound leakage and feedback, in addition to instability of the Solo. See below. 1. Dome too small 2. Dome fits, but still 3. -
Page 21: Dome Considerations
Audicus when speaker unit. replacement is needed. Replace every 2-3 months. The Solo domes are designed to prevent earwax from clogging the The speaker may last the life of the speaker. However, keep domes clean Solo if proper care is taken. - Page 22 Dome Considerations Considerations Handle your Solo with care when placing it in your ear. If it does not feel comfortable, do not attempt to alter the shape of the wire or casing. Always wear the Solo with the dome fully attached.
-
Page 23: Listening Environments
Phone (Automatically activates) To change programs: Press the push button. The Solo cycles back to Setting 1 after Setting 3. Setting 4 activates when placing a phone near your ear. If you used the Solo Tuner, all settings will be based on your prese- lections and not on the information provided on this page. - Page 24 Listening Environments The Solo can be used in many environments where you need a boost, such as: Phone Conversations Speech Live Speakers...
- Page 25 Listening Environments Sporting Events Music Dinner Conversations...
-
Page 26: Cleaning
Clean domes and speaker right after removing the Solo from your ears . This way, earwax cannot dry and harden. Remove earwax with a soft tissue. If neccessary, moisten the tissue with a earwax solvent. Keep Solo dry and clean at all times. Do not submerge it in water or cleaning solution. - Page 27 Moisture In areas of high humidity, periodically remove the Solo and put it in a warm place to dry out. The Solo is moisture resistant. It has nanocoating to protect it from Note: Your Solo is sensitive to moisture, earwax, and corrosions.
- Page 28 Keep your Solo from children and Do not wear your Solo when using a pets. hair dryer. Do not leave your Solo exposed to direct sunlight for an extended...
-
Page 29: Maintenance
WARNING: Choking hazard –small parts. Handle the Solo over a flat surface, such as a table, to avoid dropping it. Do not alter or attempt any repairs on the Solo, as it will void the warranty. -
Page 30: Returns And Warranty
If your Solo stops functioning correctly and you believe you have a guarantee case, please see repair instructions on www.audicus.com. Loss, Damage and Repairs If you lose or damage your Solo, contact us for a discount on your next pair. Also, feel free to contact us if you think your Solo needs repair. -
Page 31: Additional Information
Additional Information Smart Personal Amplifier Personal Sound Amplifiers (or PSAs), such as the Audicus Solo, is not intend- ed to diagnose, treat, cure any disease or alter the structure or function of the body. It will not restore normal hearing and will not prevent or improve a hearing impairment resulting from organic conditions. - Page 32 4 in (10 cm) of pacemaker. volume based. See page 23. Keep magnets away from children; if swallowed The Solo is not a hearing aid and is not meant seek medical attention immediately. to correct for hearing loss. The Solo is a...
-
Page 33: Contact Us
Contact Us Audicus, Inc. 40 Exchange Place Suite 1820 New York, NY 10005 Tel: 888 979 6918 Email: help@audicus.com...
Need help?
Do you have a question about the Solo and is the answer not in the manual?
Questions and answers