Table of Contents
Advertisement
Advertisement
Table of Contents

Subscribe to Our Youtube Channel
Related Manuals for Workzone CDY190FLA2


Summary of Contents for Workzone CDY190FLA2
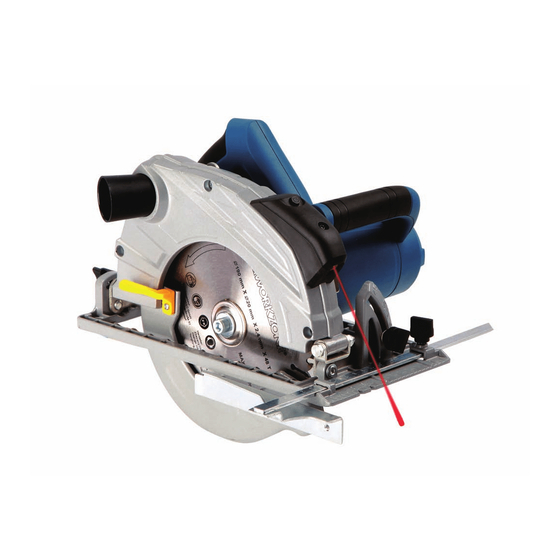
- Page 1 User Manual Spend a little Live a lot CIRCULAR HAND SAW ID: #05007...
- Page 2 QR codes take you where you want to go quickly and easily Whether you require product information, spare parts or accessories, de- tails on warranties or aftersales services, or if you want to watch a product demonstration video, our QR codes will take you there in no time at all. What is a QR code? A QR code (QR = Quick Response) is a type of matrix that can be read with a smartphone camera and that contains a link to a website or contact details,...
-
Page 3: Table Of Contents
Contents Overview ................4 Scope of delivery/device parts ...........6 General information ............7 Reading and storing the user manual ........7 Explanation of symbols ............7 Safety ...................8 Proper use ................. 8 Safety notes ................9 Preparation and assembly ..........19 Checking the circular hand saw and package contents .............. -
Page 6: Scope Of Delivery/Device Parts
Scope of delivery/device parts On/off switch Sawdust outlet Laser guide on/off switch Inner flange Secondary handle Inner washer Battery compartment cover Saw blade (2x) Mitre scale Clamping disk Mitre angle locking knob Outer washer Parallel fence locking knob Blade retaining screw Parallel fence openings Allen wrench Parallel fence... -
Page 7: General Information
General information General information Reading and storing the user manual This user manual accompanies this Circular Hand Saw and contains im- portant information on setup and handling. To improve readability, the Circular Hand Saw will be referred to only as “the saw.” Before using the saw, read the user manual carefully. -
Page 8: Safety
Safety Laser radiation. Do not look into the laser beam. Declaration of Conformity (see chapter “Declaration of Conformity”): Products labelled with this symbol meet all applicable provisions of the European Economic Area. Wear ear protection. The impact of noise can cause damage to hearing. -
Page 9: Safety Notes
Safety The saw is only intended for private use and not suitable for commercial purposes. Only use the saw as described in this user manual. Any other use is considered im- proper and may result in damage to property. The manufacturer or vendor cannot be held liable for damages incurred through im- proper or incorrect use. - Page 10 Safety b) Avoid body contact with earthed or grounded surfaces, such as pipes, radiators, ranges and refrigerators. There is an increased risk of electric shock if your body is earthed or grounded. c) Do not expose power tools to rain or wet conditions. Water entering a power tool will increase the risk of electric shock d) Do not abuse the cord.
- Page 11 Safety power tool on. A wrench or a key left attached to a rotating part of the power tool may result in personal injury. e) Do not overreach. Keep proper footing and balance at all times. This enables better control of the power tool in unexpected situations.
- Page 12 Safety f) Keep cutting tools sharp and clean. Properly maintained cutting tools with sharp cutting edges are less likely to bind and are easier to control. g) Use the power tool, accessories and tool bits etc. in accordance with these instructions, taking into account the working conditions and the work to be performed.
- Page 13 Safety e) When ripping always use a rip fence or straight edge guide. This improves the accuracy of cut and reduces the chance of blade binding. f) Always use blades with correct size and shape (diamond versus round) of arbour holes. Blades that do not match the mounting hardware of the saw will run eccentrically, causing loss of control.
- Page 14 Safety less in the material until the blade comes to a complete stop. Never attempt to remove the saw from the work or pull the saw backward while the blade is in motion or kickback may occur. Investigate and take corrective actions to eliminate the cause of blade binding.
- Page 15 Safety must be serviced before use. Lower guard may operate slug- gishly due to damaged parts, gummy deposits, or a build-up of debris. c) Lower guard should be retracted manually only for spe- cial cuts such as “plunge cuts” and “compound cuts”. Raise lower guard by retracting handle and as soon as blade en- ters the material, the lower guard must be released.
- Page 16 Safety i) Before the using saw blades, make sure that all protective de- vices are properly fastened. j) Before use, make sure that the saw blade meets the technical requirements of this electrical power tool and is securely fas- tened. k) Only use the included saw blade for cutting wood;...
- Page 17 Safety Safety WARNING! Dust generated during grinding, sawing, sanding, drilling and other work may contain chemicals that can cause cancer, birth defects or other reproductive harm. Some examples of these chemicals are: − Lead from lead-based paint − Crystalline silicate from bricks and cement as well as other ma- sonry components −...
-
Page 18: Residual Risks
Safety Safety instructions for batteries a) Do not charge non-rechargeable batteries. b) Keep batteries out of the reach of children. c) Do not throw batteries into fire. d) Do not short-circuit batteries. e) Immediately remove used batteries from the saw and dispose of them properly. -
Page 19: Preparation And Assembly
Preparation and assembly Preparation and assembly Before you use the saw, prepare it and any accessories as described in the following chapters. Checking the circular hand saw and package contents 1. Take the saw out of the packaging and check whether the saw or the individual parts exhibit damages. - Page 20 Preparation and assembly NOTICE! Risk of damage Only use saw blades that fit the dimensions and maximum permis- sible speed for this saw. Never use grinding wheels with this saw. To remove a saw blade, proceed as follows: 1. Loosen the parallel fence locking knob and remove the parallel fence .
-
Page 21: Fitting And Removing The Parallel Fence
Preparation and assembly Fitting and removing the parallel fence The parallel fence is used to saw in a straight line parallel to the edge of the workpiece. To fit the parallel fence, proceed as follows: 1. Loosen the parallel fence locking knob 2. -
Page 22: Using The Saw
Using the saw CAUTION! Risk of injury! While using the saw, sharp splinters may be ejected from the work piece. − Always connect the saw to a dust extraction device. To attach the dust extraction adapter, proceed as follows: (see figure D). 1. -
Page 23: Setting The Cutting Depth
Using the saw Setting the cutting depth We recommend picking a cutting depth that exceeds the material thickness by about 3 mm. A deeper cutting depth leads to a cleaner cut. To set the cutting depth, proceed as follows: 1. Loosen the cutting depth adjustment lever and select the desired cutting depth using the marks on the cutting depth scale (see figure B). -
Page 24: Sawing
Using the saw Sawing The saw has an “Intelligent Power Control.” The Intelligent Power Control ensures a constant speed independent of the load on the motor from feed pressure or material strength. 1. Turn the saw on as described above and, without the workpiece touching the ro- tating saw blade, place the front edge of the base plate against the material to be sawed. -
Page 25: Cleaning, Maintenance, And Storage
Cleaning, maintenance, and storage Cleaning, maintenance, and storage Cleaning CAUTION! Risk of injury! The saw can unintentionally start and cause injury. − Disconnect the saw from the mains and allow it to cool before changing saw blades, cleaning, or carrying out maintenance of any kind. -
Page 26: Maintenance
Cleaning, maintenance, and storage Maintenance CAUTION! Risk of shock! Tampering with the saw may result in damaging it and electric shock, and will void the warranty. − Never make any unauthorized modifications to the saw. − To ensure the safety of the saw, only have it repaired by quali- fied personnel and only using original parts. -
Page 27: Technical Data
Technical data Technical data Model: CDY190FLA2 Power supply: 230 V~ / 50 Hz Class 2 laser EN 60825-1: 2007 P<1 mW; λ = 650 nm Rated power 1500 W 5000 / min No-load speed n Maximum woodcutting depth 63 mm with 90° bevel 40 mm with 45°... -
Page 28: Disposal
Disposal Disposal Disposing of the packaging Sort the packaging before you dispose of it. Dispose of paperboard and cardboard with the recycled paper service and wrappings with the appropriate collection service. Disposing of the saw (Applicable in the European Union and other European countries with separate col- lection systems of recyclable materials). -
Page 29: Declaration Of Conformity
Disposal AFTER SALES SUPPORT support@coreservice.co.uk 0190 472 0501 0190 226 05... -
Page 30: Exploded View Drawing
Disposal AFTER SALES SUPPORT support@coreservice.co.uk 0190 472 0501 0190 226 05... -
Page 31: Spare Parts List
Spare parts list Spare parts list Depth adjustment screw Saw blade Clamping disk Outer washer Blade retaining screw Cutting depth adjustment lever Depth adjustment rod Washer 6mm Saw blade guard lever Parallel fence Vacuum adapter Allen wrench Laser guide batteries AFTER SALES SUPPORT support@coreservice.co.uk 0190 472 0501... - Page 32 Spare parts list AFTER SALES SUPPORT support@coreservice.co.uk 0190 472 0501 0190 226 05...
-
Page 33: Warranty
01904 727501 support@coreservice.co.uk faulty product please return the 0190 226 05 completed warranty card together MODELL: CDY190FLA2 PRODUCT CODE: 92499 09/2015 with it. Phone lines available Unit A&B Monday to Friday, 8am Escrick Business Park - 6pm. -
Page 34: Warranty Conditions
Spare parts list Warranty conditions Dear Customer, The ALDI warranty offers you extensive benefits. Warranty period: 3 years from date of purchase. 6 months for wear parts and consumables under normal and proper conditions of use (e.g. rechargeable batteries). Costs: Free repair/exchange. - Page 35 PRODUCED IN CHINA FOR: ALDI STORES LTD. PO BOX 26, ATHERSTONE WARWICKSHIRE, CV9 2SH ALDI STORES (IRELAND) LTD. PO BOX 726, NAAS, CO. KILDARE. visit us at www.aldi.com AFTER SALES SUPPORT 01904 727501 support@coreservice.co.uk 019022605 YEARS MODEL: CDY190FLA2 PRODUCT CODE: 92499 09/2015 WARRANTY...
Need help?
Do you have a question about the CDY190FLA2 and is the answer not in the manual?
Questions and answers
Where can I obtain replacement carbon brushes for circular saw CDY190FLA2
You can find replacement carbon brushes for the Workzone circular saw CDY190FLA2 by contacting after-sales support at support@coreservice.co.uk or calling GB 0190 472 0501 or IRE 0190 226 05.
This answer is automatically generated