Table of Contents
Advertisement
Quick Links
Advertisement
Table of Contents

Subscribe to Our Youtube Channel
Related Manuals for Precisa EM 120-HR


Summary of Contents for Precisa EM 120-HR
- Page 1 EM 120-HR EXECUTIVE PRO Operating Instructions 350-8161-000 c1...
- Page 2 Precisa EM 120-HR with infrared radiator, halogen radiator or dark radiator Mark applied EU Directive Standards 2004/108/EC EN61326 2006/95/EC EN61010 Date: 29.06.2015 Signature: R. Grolimund R & D Manager Precisa Gravimetrics AG , Moosmattstrasse 32 , Postfach 352 , CH-8953 Dietikon 350-7579-004...
-
Page 3: Customer Service
These operating instructions are protected by copyright. All rights reserved. No part of the operating instructions may be reproduced, processed, duplicated or published in any form by photocopying, microfilming, reprinting or other process, in particular electronic means, without the written agreement of Precisa Gravimetrics AG. © Precisa Gravimetrics AG, 8953 Dietikon, Switzerland, 2015. -
Page 4: Overview
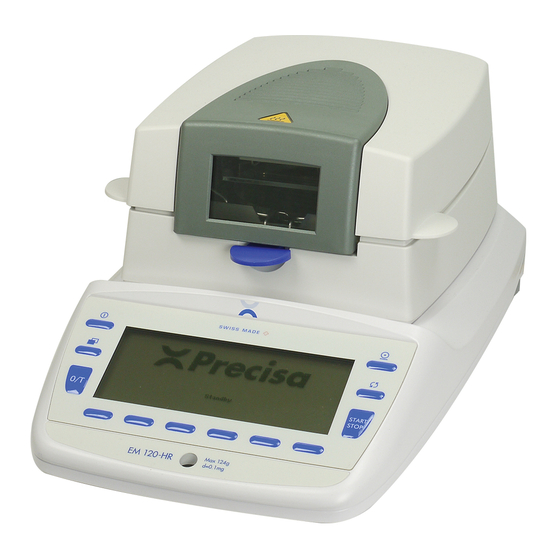
■ 1 Overview Overview 24 25 START STOP... - Page 5 1 Overview ■ Description Description Heater Soft keys PT100 temperature sensor Print key Sample pan Rotate key Draftshield Start / Stop key Sample pan holder Dryer mode and status 12-key control panel Drying parameters Levelling bubble Method name Display Dryer status Adjustable feet Secondary display Serial interface, DB9 Female socket...
-
Page 6: Inspection And Assembly
■ 2 Inspection and assembly Inspection and assembly Inspect delivery for complete supply immediately on unpacking all components. Components supplied • Sample pans • Sample pan holder • Pan holder • Draft shield • Moisture analyser • Mains cord • Manual •... - Page 7 3 Accessories ■ Accessorie Article number Data cable DB9 Male / DB25 Male (Printer), 1.5m 350-8673 Temperature sensor plate (Sensor - type K) 350-8580 Temperature calibration set (Senosr - type K) 350-8585 with certificate Temperature calibration set (Senosr - type K) without certificate 350-8584 50 g adjustment weight 350-8241...
-
Page 8: Table Of Contents
■ Contents Overview ........ 2 Application ........31 10.2 Functions of the Keys if Operated in a Menu Inspection and assembly ... 4 10.2.1 Soft Key Functions for Navigation and Data Accessories ......4 Entry..........32 10.2.2 Soft Keys and Soft Key Assignments . 32 Safety Instructions and Conformity 10.3 The Display (as it appears during a running... - Page 9 Contents ■ 15.1 Connection scheme ......66 15.2 Remote control-commands ....67 15.2.1 Examples for the remote control..67 Maintenance and Servicing ..68 16.1 Utility program .........68 16.2 Adjustment........68 16.2.1 External adjustment ......68 16.2.2 External adjustment with Freely Selectable Weight..........69 16.2.3 Internal adjustment ......69 16.2.4 Automatic adjustment.......69 16.3...
-
Page 10: Safety Instructions And Conformity
• Do not exceed the maximum permissible load of the dryer. • When using the moisture analyser in combination with other appliances made by Precisa as well as with appliances produced by other manufacturers, the current regulations for the safe use of the relevant at- tachments and their application in accordance with instructions must always be observed •... - Page 11 4 Safety Instructions and Conformity ■ CAUTION Some of the parts, like the heating element and the viewing window, may become considerably hotter while it is in operation. Only touch the instrument using the handles provided. Take care when you remove the sample. The actual sample, the heating unit and sample pans used may still be very hot.
-
Page 12: Setup
( 5.3 "Storage"). • Read through these operating instructions, even if you already have experience with Precisa equipment, before you work with the moisture analyser and pay attention to the safety recommendations ( 4 "Safety Instructions and Conformity"). -
Page 13: Choosing A Suitable Location
5 Setup ■ Choosing a Suitable Location The dryer location must be chosen in such a way as to guarantee perfect operation of your instrument, so that the allowable ambient conditions and prerequisites are met and maintained: • Put the moisture analyser on a solid, firm and preferably vibration-proof, horizontal base •... -
Page 14: Levelling
■ 5 Setup Levelling To function properly, the moisture analysermust be precisely horizontal. The instrument is fitted with one spirit level and two adjustable feet for level-control, with the aid of which it is possible to compensate for small height differences and/or unevennesses in the surface on which the moisture analyser is standing. -
Page 15: First Measurement
6 First Measurement ■ First Measurement Once the moisture analyser is successfully up and running, you can perform an initial measurement to familiarize yourself with the new instrument and to test it for any malfunctions. Switch the instrument on using the «ON/OFF» key. The instrument performs a self-diagnostics test to check the main functions. - Page 16 ■ 6 First Measurement • Start the measurement by pressing the «START/STOP» key. The heating element heats up the chamber to 105°C, and the fan starts to cool. • The standard screen is displayed START STOP • Press «ROTATE» to calls up the measurement screen (You can press «PRINT»...
- Page 17 6 First Measurement ■ • The drying has ended, an audio signal sounds, and the heating is switched off. The fan keeps running until the temperature in the sample chamber drops below 40°C. • Open the hood • Carefully remove the weighing pan, only gripping the sample holder by the handle.
-
Page 18: Determining Moisture Levels
■ 7 Determining moisture levels Determining moisture levels The moisture analyser is used as a quick and reliable means of determining the moisture content in powders and liquids by the thermogravimetric process. Fundamental principles The term moisture does not just relate to water, it also encompasses all substances which evaporate when they are heated. -
Page 19: Preventing Samples Being Encrusted
7 Determining moisture levels ■ Solids: • Distribute powder samples evenly on the weighing pan. • Make course samples smaller using a mortar or grinder. Do not expose the sample to any heat while you are grinding it as this will lead to a loss of moisture. Liquids: •... -
Page 20: Create A New Method
■ 8 Create a new Method Create a new Method Methods are arranged in groups to facilitate the organisation. Methods and groups can be identified by name and number. Create a method with NEW method or by editing an existing method. Create the First Method with NEW Switch-on the moisture analyser: Press «ON/OFF»... - Page 21 8 Create a new Method ■ NOTE Executing text data entries, numbers put in with the soft key functions {12345} and {67890} act as cara- cters, not as numeric values. Is the text data entry completed • Press { } to finish and save your input •...
-
Page 22: Interval
■ 8 Create a new Method Dryer Control: • Autostart: Analysis starts as soon as the lid is closed (no pressing of start key) • Quickstart: Initial weight is taken as soon as the start key is pressed or in case of autostart the lid is closed without waiting for stable weight. - Page 23 8 Create a new Method ■ If stop time and stop mode are OFF you will be allerted: No stop mode defined Unit: Set the calcuation and unit of the result. Explanation of the variables used: – DW: Dry weight (weight value at the end of the interval or measurment) –...
-
Page 24: Checkweigher
■ 8 Create a new Method 8.1.2 Checkweigher With the aid of the «Checkweigher», you can weigh the sample exactly to check that it matches a defined reference value plus/minus permissible deviations. "+", "–" and " " are active in the display. !II"... -
Page 25: Edit An Existing Method With Fast Access
8 Create a new Method ■ Method group - DAIRY Cheese # Milk Milkpouwder Edit " • Keep pressing {!} until the method of your choice is selected • Press {Edit} • Define your method going through all parameters • Change the name (and number) to store as new method. If the name of the method is not changed the old one is overwritten and all collected data are deleted. -
Page 26: Measurement
■ 9 Measurement Measurement Open an existing method from the method list Switch-on the moisture analyser: Press «ON/OFF» Select the method: • Press the soft key «Method» Method group Corn (5) # Dairy (3) Juice (6) Edit Select " • Keep pressing {!} until the method group of your choice is selected •... -
Page 27: Open Method With Quick Access
9 Measurement ■ • (Press {MethodInfo} to see all settings of the chosen method, scroll down within the window) Open method with Quick Access A quick access with soft keys for the four most frequently used methods is possible. • Choose the methods for quick access in 12.1 "Method management". •... -
Page 28: Display
■ 9 Measurement • Standard screen: • Measurement screen: scroll down within the windows: (You can press «PRINT» at any time to have a printout of this information) • Graphic screen: Information on the screen: ICON Designation Function in a Menu •... -
Page 29: Results, Data Handling And Statistik
9 Measurement ■ ICON Designation Function in a Menu • Temperature set and actual temperature Temperature • (temperature below 40 °C are displayed as --- °C) Duration • actual time of analysis Slope • stop mode set and actual slop running •... - Page 30 ■ 9 Measurement Graphic screen Zoom with „Zoom-“ and „Zoom+“ in steps of 10 % NOTE Press «0/T» to close the measurement. Press «ROTATE» to get to the measurement information screen. You do have access to the statistic and the last measurement information.
-
Page 31: Measurement With Calculation Of Ash Residue
9 Measurement ■ Delete single measurements or all measurements Measurement delete 10.03.11/12:43:47 10.03.11/12:55:35 Delete all " LastMsg Information on the last measurement Measurement with calculation of ash residue. • Open the drying method ( Ash residue has to be set ON in this method) Display (Soft )key Step... - Page 32 ■ 9 Measurement Display (Soft )key Step Pan-Residual, <Assume> Place the vessel with the ash residue on the balance. With <assume> the value is stored and the result calcula- Next Change to the next sample to read the first residual resp.
-
Page 33: Operation
10 Operation ■ Operation Even though your new dryer allows you a very easy and highly intuitive working, you should read through the following operating instructions at full length to tap the full potential of the wide variety of features the moisture analyser disposes to facilitate your daily work. -
Page 34: Functions Of The Keys If Operated In A Menu
■ 10 Operation 10.2 Functions of the Keys if Operated in a Menu Designation Function in a Menu «ON/OFF» • Turns the moisture moisture analyser on and off. «PRINT» • Not functional. • Pressing leaves a menu. «MENU» • Holding leads to the home screen from any point. •... -
Page 35: The Display (As It Appears During A Running Measurement)
10 Operation ■ 10.3 The Display (as it appears during a running measurement) Name of Display Section Description • Icons shows if the moisture analyser is heating, if standby tem- Status of dryer perature or refill is activated in the actual method is activated. Parameter •... -
Page 36: Info Pages And Info Fields
■ 10 Operation 10.3.1 Info Pages and Info Fields There is a screen section called „Info Page Area“ to display application specific information. Each info page has 4 info fields: top left, bottom left, top right and bottom right. In an application, holding the «ROTATE» key calls up the next info page and continuously holding it scrolls cyclically all info pages. -
Page 37: The Home Screen
11 The Home Screen ■ The Home Screen The home screen provides access to the various menues of the moisture analyser, which are listed in the white headline, just the part which displays the currently selected position is black (either User or Settings). 11.1 The User Menu The user menu provides access to up to 8 different password protected user profile settings. - Page 38 ■ 11 The Home Screen For particular information about all setting options, see the correspondent chapters 13 "The Configuration" and 14 "The Administrator and User Profiles".
-
Page 39: Context Menu
12 Context Menu ■ Context Menu Navigating in the context menu: • Press {MENU} to open the context menu (The headline names the menu and the function bar provides us with the needed navigation functions.) • Keep pressing {!} until the menu item of you choice is selected the left column names the single items, while the right one allows us to select and define them one by one. -
Page 40: Method Management
■ 12 Context Menu 12.1 Method management Dryer - Method management [Quick access 1] [Quick access 2] [Quick access 3] [Quick access 4] Delete method managment Properties Show " Quick Access 1-4: Off, Method Only available if more then one method has been defined . Define the 4 most often used methods for quick access. -
Page 41: Protocol
Text line 5 " The free text of the header may act as heading or a title: Text line 1: ___ Defines free text line 1, e.g.: „Precisa Gravimetrics AG“ Text line 2: ___ Defines free text line 2, e.g.: „Moosmattstrasse 32“... - Page 42 ■ 12 Context Menu Text line 3: ___ Defines free text line 3, e.g.: „CH-8953 Dietikon“ Text line 4: ___ Defines free text line 4, e.g.: „SWITZERLAND“ Text line 5: ___ Defines free text line 5, e.g.: „***************************************“ Protocol - Footer - Free text lines Text line 1 #___ Text line 2...
- Page 43 Name and Brief Information Header Application *************** Dryer *************** Shows the application „Dryer“ Header Device type Device EM 120-HR Names the device type Header Device ID Device ID Names the device identifica- tion, e.g. „AA1“, see chap- ter 13.6 "Configuration - Device settings"...
-
Page 44: Proctocol - Method
■ 12 Context Menu Header & Footer Date/Time Date/Time 18.01.11 19:15:02 Prints out the actual Date and Time, see chapter 13.7 "Configuration - Date/Time" Header & Footer User User Administrator Names the user, learn more in chapter 14.1 "The Admi- nistrator Menu"... - Page 45 12 Context Menu ■ Protocol - Method -Position Position 43 Position 44 Position 45 Position 46 All position OFF #Set Set default settings " How it Looks in the Printout (example) Name and Brief Information Name Milk Names the method name Number Number Names the method number...
-
Page 46: Protocol - Measurement
■ 12 Context Menu 12.3.3 Protocol - Measurement Define the measurement information on the protocol Dryer - Protocol - Measurement Measurment #Off Postion Define Printrate Define Intermediate result " Measurement: On, Off Prints results during analysis (-> Printrate) Postion: Define Prints results during analysis (->... - Page 47 12 Context Menu ■ 12.3.3.1 Protocol -Mesasurement - Printrate Dryer - Protocol - Measuremen - Printratet Printrate Time 0:05 min Mode Standard Value positon Define " Printrate: Off, On Prints results on timebase Time: 0:05 Define the timebase Mode: Standard, Tabulator Tabulator (for data export): values are separated by tabulators Value position: Define Defines the measurement information on the print out...
-
Page 48: Protocol - Result
■ 12 Context Menu 12.3.4 Protocol - Result Dryer - Protocol - Header/Footer Result Free text lines Define Free HEX lines Define Position Define " Result On, Off Result is enabled in printout Free text lines: Define Defines text lines Free Hex lines: Define Defines hexadecimal output Position: Define... -
Page 49: Screen Settings
12 Context Menu ■ Corr factor Corr factor 1 1.600 Corr factor 1/2/3 Correction factor for result Correction Correction 1 159.79 % D Correction 1/2/3 Corrected result LastWeight Cal LastWeight Cal 21.01.11/06:04:44 Last Temp. Cal Last Temp. Cal 22.01.11/07:12:05 ID - ID1/2/3/4/5/6 Prints out the defined IDs Text line 1 ... -
Page 50: Soft Key
■ 12 Context Menu Dryer- Identification * ID 1 #Define * ID 2 Define Define ID 5 Define ID 6 Define Autoscan Define " Dryer- Identification - ID 1 ID 1 Name ID 1 Datatype Alphanumeric " ID: Off, On Name: Enter the name of the identification: e.g. -
Page 51: Info Fields
12 Context Menu ■ Dryer- Soft key Placeholder 4 #Off Placeholder 5 All Soft deys OFF Set default settings " Quick access 1-4 Assine the methods you have chosen for quick access in „method managemen“ to the soft keys. Method fast edit Direct access to edit the actual method. - Page 52 ■ 12 Context Menu Correction (1/2/3) Corrected result of interval Duration (1/2/3) Duration of interval Tare Gross CheckW.TU under limit CheckW.TO over limit CheckW.Nominal Nominal weight ID- ID 1-6 Identification...
-
Page 53: The Configuration
13 The Configuration ■ The Configuration This section explains the structure of the configuration menu and its functions. The basic adjustment of the moisture analyser is defined in the configuration. NOTE Angle quoted menu items do not appear, unless in cooperation with particular settings. 13.1 Setup Configuration Menu 13.1.1 The Setup Configuration Menu •... -
Page 54: Configuration - Weighing Parameters
■ 13 The Configuration 13.2 Configuration - Weighing parameters Configuration - Weighing parameters Refresh rate normal Environment normal Autostandby time Autozero Quicktare " Refresh rate: fast, normal, slow, extra slow The value set defines the period after which each new measurement is displayed. For the definition of this period, the quality of the moisture analyser location is crucial. -
Page 55: Configuration - Protocol
13 The Configuration ■ [Weight ID:] ____ (only available in Adjustment Mode External Def.-Weight) Sets an alphanumeric identification to the external calibration weight [Automatic Mode:] Time & Temperature, Temperature, Time (only available in Adjustment Mode Automatic) - Automatic adjustment on time and temperature - Automatic adjustment on temperature - Automatic adjustment on time [Temperature:] 2 C... -
Page 56: Configuration - Protocol - Autostart
■ 13 The Configuration 13.4.1 Configuration - Protocol - Autostart Configuration - Protocaol - Autostart Autostart #Off Delay 0.0 s Limit 0.000g " Autostart: On, Off Starts the printout automatically [Delay:] 0.0 s (only available with Autostart On) Delaytime to start the automatic printout [Limit:] 0.000 g (only available with Autostart On) Minimal weight to start the automatic printout... - Page 57 13 The Configuration ■ Value format: Standard, User defined - Standard format for weight value - User defined format for weight value [Spacing:] Define (only available with Value format user defined) Defines the space holders in the user defined format [Value:] Define (only available with Value format user defined) Defines the value format in the user definied format...
- Page 58 ■ 13 The Configuration Sign: -xxx.yy, -____xxx.yy, -/+xxx.yy, -/+____xxx.yy - Left oriented, with negative sign only - Right oriented, with negative sign only - Left oriented, with negative and positive sign - Right oriented, with negative and positive sign Length: 9 Lenght of value, e.g: 9 digits Decimals: 0 Decimal places of value, e.g: 0 decimals places...
-
Page 59: Configuration - Protocol - Header/Footer
" The free text of the header may act as heading or a title: Text line 1: ___ Defines free text line 1, e.g.: „Precisa Gravimetrics AG“ Text line 2: ___ Defines free text line 2, e.g.: „Moosmattstrasse 32“ Text line 3: ___ Defines free text line 3, e.g.: „CH-8953 Dietikon“... - Page 60 ■ 13 The Configuration Text line 5: ___ Defines free text line 5, e.g.: „***************************************“ Configuration - Protocol - Footer - Free text lines Text line 1 #___ Text line 2 Text line 3 Text line 4 Text line 5 "...
- Page 61 Name and Brief Information Header Application *************** Dryer *************** Shows the application „Dryer“ Header Device type Device EM 120-HR Names the device type Header Device ID Device ID Names the device identifica- tion, e.g. „AA1“, see chap- ter 13.6 "Configuration - Device settings"...
-
Page 62: Configuration - Interface
■ 13 The Configuration Header & Footer HEX Line 1 ... 4 „Free HEX Line“ Prints out the content of the corresponding choosen free Hex line (1 ... 4), see chap- ter 13.4.4.2 "Configuration - Protocol - Header/Footer - Free HEX lines" Header &... -
Page 63: Configuration - Date/Time
13 The Configuration ■ Language: English, Deutsch, Française Selects a language Key tone: On, Off Activates the key tone Advice tone: On, Off Activates an sound for events like end of measurement Display contrast: low, medium, high Adjusts the level of the display contrast Display backlight: 20%, 40%, 60%, 80%, 100% Adjusts the level of the display backlight Headline: Device info, Date/Time... -
Page 64: The Administrator And User Profiles
■ 14 The Administrator and User Profiles The Administrator and User Profiles It is possible to save one administrator profile and 7 different user profiles. A profile consists of all the con- figuration and application settings. 14.1 The Administrator Menu •... - Page 65 14 The Administrator and User Profiles ■ User 1/2/3/4/5/6/7: Define Defines the user 1/2/3/4/5/6/7 Disable all users: Set Disables all users Clear all user profiles: Set Clears all user profiles 14.1.1.1 Administrator - Define user - User 1/2/3/4/5/6/7 Administrator - Define user - User 1/2/3/4/5/6/7 User profile #Off Name...
-
Page 66: Administrator - Define Administrator
■ 14 The Administrator and User Profiles For the protection the following optios are availble: - Protection Off: no password required for changes - Protection User: User password required for changes - Protection Admin.: Administrator password required for changes Configuration menu: Protection Off, User, Admin. Protect the settings of the Configuration Menu Context menu: Protection Off, User, Admin. -
Page 67: Resetting To The Factory Configuration
14 The Administrator and User Profiles ■ Code **** " Theft protection: Off, On Disables/enables the theft protection Password: **** Enter a new anti-theft code In the administrator profile the moisture analyser can be protected against theft by using a freely selectable, up to six-digit numerical code: •... -
Page 68: Data Transfer
■ 15 Data Transfer Data Transfer For data-transfers to peripheral devices, the dryer is equipped with an RS232/V24-interface. Before the data-transfer, the RS232 interface must be matched with the one in the peripheral device in the dryer configuration menu (see chapter 13.5 "Configuration - Interface"). •... -
Page 69: Remote Control-Commands
15 Data Transfer ■ • Standard, duplex connection with additional hardware handshake in the peripheral device Dryer DB 9 female D25 / D9 Peripheral device RS 232 out RS 232 in RS 232 in RS 232 out 15.2 Remote control-commands Command Function ACKn... -
Page 70: Maintenance And Servicing
■ 16 Maintenance and Servicing Maintenance and Servicing 16.1 Utility program • Hold the Tara-Key to open the utility program Utility program # Balance Adjustment Balance Adj. History Temperature Calibration Temp. Adj. History Auto Repeatability Test Test measurement " Balance Adjustment Balance adjustment as definied in the configuration menu. -
Page 71: External Adjustment With Freely Selectable Weight
16 Maintenance and Servicing ■ Start the adjustment: Display Step - - - - The balance carries out a Zero measurement „- - - - g“ is shown flash- ing)..Measuring zero ... - - 1 0 0 After the zero measurement the display flashes with the recommended calibration weight. - Page 72 ■ 16 Maintenance and Servicing for 2 degrees Celsius), depending on the definition in the Configuration menu. NOTE For automatic adjustment by time and by time/temp. the date and time of the moisture analyser must first be correctly set (see chapter 13.7 "Configuration - Date/Time"). Adjustment can also be effected manually at any time when auto-adjustment is activated.
-
Page 73: Test Measurement
16 Maintenance and Servicing ■ 16.4 Test measurement The method set in test measurement enables a fast method development. • Hold «0/T» until the utility program is shown. • Select „Test measurement“ and press { • Press the soft key Method to define temperature, heating mode, unit and resolution as in intervalls of new method. -
Page 74: Cleaning
– 115 volt variant: T 6.3 A, 115 V, 5x20 mm • If the instrument still does not work after replacing the fuse, contact the Precisa Service Center. DANGER Under no circumstances should you use other fuses or attempt to bridge the fuse. -
Page 75: Error Messages
16 Maintenance and Servicing ■ 16.8 Error Messages The moisture analyser shows a description of the fault in the info-line. NOTE If an error occurs without a description of the error in the info-line, the Customer Service must be called. 16.8.1 Notes on Correcting Faults The following table shows faults and their possible causes. -
Page 76: Additional Information
Software download and update Adjustment: Balance automatic with internal calibration weight with a test weight Temperature at 100°C and 160°C, selectable Miscellaneous: Timer for date and time Interface for PCs and printers RS232 Precisa Slide In Modules Anti-theft protection Code and mechanically... - Page 77 17 Additional Information ■ Spezification EM 120-HR Connection: Mains voltage 230V or 115V Can be switched by changing the unit of heat (may only be done by Precisa Service) Mains frequency [Hz] 50 - 60 Power consumption [W] Dimensions: Instrument housing (WxDxH) [mm]...
Need help?
Do you have a question about the EM 120-HR and is the answer not in the manual?
Questions and answers