Advertisement
INSTALLATION MANUAL
EcoPower
Flush Valve
®
For the best results, be sure to read the following installation instructions and use the product only as described in this manual.
Variation & Specification
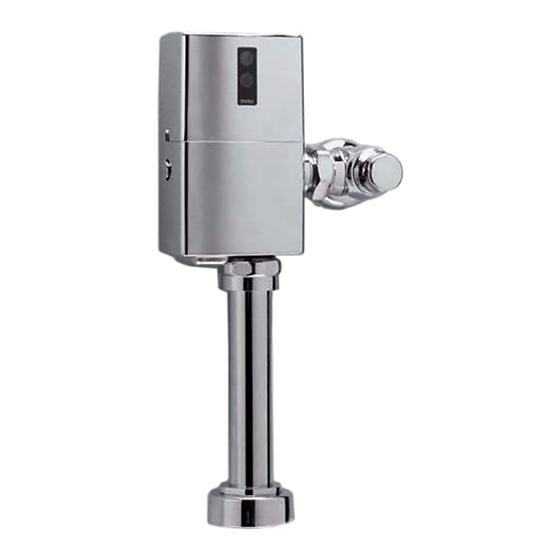
Toilet Flush Valve
Figure
TET1LN(32)#CP
TET1GN(32)#CP
TEW1GN(32)#CP
Model number
TET6LN(32)#CP
TET6GN(32)#CP
TEW6GN(32)#CP
7-3/4" (H) 4-1/2"(W) 3-1/8"(D)
Dimension of Cover
(198mm(H) 115mm(W) 80mm(D))
Detection time
6 seconds or more
32-104˚F (0-40˚C)
Ambient temperature
Water temperature 34-104˚F (1-40˚C)
Connection of the
1"NPT
water supply pipe
Minimum
15 PSI (103kPa)
35 PSI (241kPa)
Supply water
(Flowing)
pressure
125 PSI (862kPa)
Maximum
7 PSI (48kPa)
Shutoff pressure
Discharge quantity
per flush at 28 PSI
Approx. 1.6
Approx. 3.5
Approx. 1.28
(196kPa)
gallon (13L)
gallon (6L)
gallon (4.8L)
(Factory set)
Urinal Flush Valve
Figure
Model number
TEU1LN(12,22)#CP
TEU1GN(12,22)#CP
7-3/4" (H) 4-1/2"(W) 3-1/8"(D)
Dimension of Cover
(198mm(H) 115mm(W) 80mm(D))
Detection time
6 seconds or more
32-104˚F (0-40˚C)
Ambient temperature
Water temperature 34-104˚F (1-40˚C)
Connection of the
3/4"NPT
water supply pipe
Minimum required water pressure: 15 PSI (103kPa)
Supply water
(flowing)
pressure
Maximum water pressure: 125 PSI (862kPa)
Shutoff pressure
7 PSI (48kPa)
Discharge quantity
per flush at 28 PSI
Approx. 1.0 gallon
Approx. 0.5 gallon
(3.8L)
(196kPa)
(1.9L)
(Factory set)
03585T3R
Set-up Drawing
c
TET1LN32#CP
TET1GN32#CP
4-3/4" 1/2"
TEW1GN32#CP
(120 13mm)
11-1/2"
1-1/2"
(292mm)
NPSM
TET6LN32#CP
4-3/4" 1/2"
(120 13mm)
TET6GN32#CP
TEW6GN32#CP
27"
1-1/2"
(686mm)
NPSM
TEU1LN(12,22)#CP
TEU1GN(12,22)#CP
4-3/4" 1/2"
(120 13mm)
11-1/2"
(292mm)
1-1/2"
NPSM
Installation Precautions
1. Prior to Installation
Prior to Installing your TOTO
®`
s EcoPower
listed bellow:
· Closet fixture/Urinal fixture
· Drain line
· Water supply line
The supply piping to these devices shall be securely anchored to the
building structure to prevent the installed device from having unnecessary
movement when operated by the user. Care shall be exercised when
installing the device to prevent marring the exposed surface.
2. Important
All plumbing is to be installed in accordance with applicable codes
and regulations. Water supply lines must be sized to provide an
adequate volume of water for each fixture.
Flush all waterlines prior to operation.
The minimum pressure required to the valve is determined by the type
of fixture selected. Consult fixture manufacturer for pressure requirement.
Do not use toothed tools to install or service the valve.
Note
Be sure to install TOTO
®`
s EcoPower
is situated no more than 11-1/2"(292mm) above the top of the bowl or
Min.2-1/4"
(57mm)
the urinal. Refer to local codes for special requirements.Except for
1"NPT
TET6GN#CP, TEW6GN#CP and TET6LN#CP, make sure that the control
inlet supply
stop is installed 27" adove the top of the bowl for proper valve function.
3. Use care not to damage the surface of the infrared sensor.
4. For Toilet Flush Valve
The toilet sensor valve may not function if toilet seat and/or lid cover are
left upright as it may block the sensor.
Check local codes
5. For Urinal Flush Valve
The Urinal Flush Valve is designed to be used with a washout urinal
for optimum performance. However, a siphon jet urinal may also be
Min.2-1/4"
(57mm)
substituted. Blowout urinals are not recommended.
1"NPT
inlet supply
6. The detection range of the infrared sensor is shown in the figure above.
Do not install a handrail or any other object within the detection zone
of the sensor, as any object blocking the sensor may cause the valve to
malfunction. Additionally, to avoid the possibility of valve malfunction, do not
install the flush valve in a location where the sensor faces a mirror,
stainless steel wall, other highly reflective surface or another infrared sensor.
Check local codes
Detection zone
The detection zone is self-adjusting and is equipped with a
3-second flush delay. (No flush delay for Urinal flush valve)
The detection zone may differ according to the color of the
user's clothes.
When a user wears black clothes, the detection zone may
become smaller and the valve may not flush.
Max19-11/16"
(Max 500 mm)
L
Max31-1/2"
(Max 800 mm)
TET1GN(32)#CP
TEU1GN(12,22)#CP
TEW1GN(32)#CP
TET1LN(32)#CP
TEU1LN(12,22)#CP
TEW1LN(32)#CP
"AVOID"
DO NOT place the Infrared
sensor of one urinal so that sensor in front of a mirror,
it is in line with the sensor
of another automatic flush
valve sensor.
Min.2-1/4"(57mm)
Infrared sensor of the
automatic flush valve.
3/4"NPT
inlet supply
Infrared sensor of the
another automatic
flush valve.
Check local codes
Components
1. Required tools
Adjustable wrench, Phillips and slotted screwdrivers.
®
Flush Valve, install the items
2. Inspection
Unpack the flush valve and carefully make sure the cover, main unit and
all other parts are included and intact before starting installation of the
product.
Item
A
®
Flush Valve so that the control stop
B
C
D
E
Toilet Flush Valve
F
G
15
20
Max21-1/4"
(Max 550 mm)
L
Max33-1/2"
H
(Max 850 mm)
TET6GN(32)#CP
TEW6GN(32)#CP
"AVOID"
For TET1GN32#CP, TEW1GN32#CP, TET6GN32#CP,
DO NOT place the Infrared
TEW6GN32#CP, TEU1GN(12, 22)#CP, TET1LN32#CP,
stainless steel wall, or other
TET6LN32#CP AND TEU1LN(12, 22) #CP
highly reflective surface.
I
Mirror, Stainless steel wall or
other highly reflective surface.
J
Infrared sensor of the
K
automatic flush valve.
Figure
Description
Q'ty
Valve Body
1
assembly
Top cover
1
assembly
Screw
2
Back-up
1
battery Pack
Tool
1
(Allen wrench)
Notice Label
1
Owner's
1
Manual
Installation
1
Manual
(this manual)
Vacuum
breaker tube
1
(with spud
joint)
Control stop
1
Sweat
solder kit
(Escutcheon,
1
covering tube,
adapter)
To be continued on the back
Advertisement
Table of Contents

Subscribe to Our Youtube Channel
Related Manuals for Toto EcoPower TET1LN(32)#CP


Summary of Contents for Toto EcoPower TET1LN(32)#CP
- Page 1 INSTALLATION MANUAL 1. Required tools EcoPower Flush Valve 1. Prior to Installation ® Adjustable wrench, Phillips and slotted screwdrivers. Prior to Installing your TOTO ®` s EcoPower ® Flush Valve, install the items listed bellow: 2. Inspection · Closet fixture/Urinal fixture Unpack the flush valve and carefully make sure the cover, main unit and For the best results, be sure to read the following installation instructions and use the product only as described in this manual.
-
Page 2: Installation Procedure
Installation Procedure Test Run Step 3 Prior to inserting the flush valve tailpiece into the control stop, 1. Make sure the control stop is open. Step 6 be certain that the O-ring is in the groove at the end of the Note tailpiece, the locking nut and the snap ring are located as 2.
Need help?
Do you have a question about the EcoPower TET1LN(32)#CP and is the answer not in the manual?
Questions and answers