Table of Contents
Advertisement
Advertisement
Table of Contents

Subscribe to Our Youtube Channel
Related Manuals for Helmholz REX 100 WiFi


Summary of Contents for Helmholz REX 100 WiFi
- Page 1 Quick Start Guide REX 100 WAN|WiFi Version as of FW 1.9.0 www.helmholz.de...
-
Page 2: Table Of Contents
Content 1. Introduction 2. Preparing the REX 100 unit 3. Access to the myREX24-V2 portal 4. Initial REX configuration via the myREX24-V2 portal 5. Router configuration transfer options 6. Establishing a VPN connection to your REX 100 7. Tips and tricks 8. -
Page 3: Introduction
V1.5.0 or newer. 2. Preparing the REX 100 unit 2.1 REX 100 WiFi Connect a WiFi-compatible antenna (2.4 GHz) and ensure that a radio connection to a WiFi network is possible. Antennas are available separately as accessories. -
Page 4: Power Supply
Note: The housing of the REX100 is not grounded. Please correctly connect the functional grounding connection (FG) of the REX 100 WAN (700-875-WAN01) and REX 100 WiFi (700-875-WIF01) with the reference portal. 2.4 Digital inputs IN1 and IN2 The alarm inputs can be activated with potential-free switches, buttons or relay contacts. -
Page 5: Access To The Myrex24-V2 Portal
V2 portal and the VPN establishing of a connection with an REX router. You can find the software (shDIALUP) in the download area under www.helmholz.de. There you can also download further documents with additional example applications at any time. - Page 6 3.2 Logging in to the myREX24 V2 portal Once you install and start the shDIALUP software, you can use your login data to log in to the myREX24 V2 portal. Select “V2.myREX24.net” in the server list. Notes: - Alternatively, the login page can also be reached under: https://v2.myrex24.net. Any up-to-date browser can be used for this purpose.
- Page 7 Simple view Extended view Quick Start Guide REX 100 WAN | WiFi...
-
Page 8: Initial Rex Configuration Via The Myrex24-V2 Portal
4. Initial REX configuration via the myREX24-V2 portal The following information describes the basic configuration steps required in order to be able to set up a REX router for a VPN connection. A description of the extended functions can be found with the online help or in the manuals/white papers. - Page 9 4.2 Create new device A router can be added in the tree structure using the plus symbol or with a right- click of the mouse. If a project does not yet have a router, the same function is made available in the main view by way of the green button “Create new device”. Clicking on the respective button starts the configuration assistant, which guides the user through the settings.
- Page 10 4.3.2 Step 2 “Internet” – Network settings In step 2, the network configuration for the LAN and mobile WAN side of the device is defined. - LAN All REX 100 routers come with the IP address 192.168.0.100/24 as a default. Modify the IP address and the subnet mask in keeping with the machinery network.
-
Page 11: Router Configuration Transfer Options
5. Router configuration transfer options The created device configuration can be transferred to the actual REX 100 unit in a variety of ways. - 1. Download configuration to the PC (via USB stick) The configuration file is saved on the PC and can subsequently be transferred to the REX 100 using a USB stick (subsequent procedure in chapter 5.1). - Page 12 5.1 Transferring the confi guration using a USB fl ash drive Prerequisites for this are: - A PC with USB connection - An Internet connection with the myREX24 V2 portal - A FAT-formated USB stick In the myREX24-V2 portal, select the “Download confi guration to PC” option in the device settings.
- Page 13 5.2 Synchronization As soon as you have logged into your account of the REX 100, you can transfer retroactive changes at any time through “Synchronization”. Where there is an existing myREX24-V2 portal connection, the REX 100 checks cycli- cally whether there is a new configuration available and then loads it automatically. When, for example, you have edited the LAN IP address, the “Device configuration is not up to date”...
-
Page 14: Establishing A Vpn Connection To Your Rex 100
The synchronization function is confirmed through the following dialog. In this menu you can set a variety of user-defined settings, such as the sending of information/confirmation mails. The REX router now adopts the new settings and restarts. As soon as the boot pro- cess has concluded, the REX router logs into the portal again. -
Page 15: Tips And Tricks
To this purpose, enter the LAN IP address of the REX 100 into the address bar of a browser. Authenticate yourself with the standard - user: helmholz and the - password: router To view more information on each step of the connection, click on the Info icon in the status fields. - Page 16 In the event of irregularities or interruptions when establishing the connection, the diagnostics page supports you with troubleshooting. In the event of an error, the technical support of Helmholz requires the respective result from the individual and autonomous test functions.
- Page 17 7.1.5 Establishing a connection via a proxy It is possible to store a proxy on the configuration page of the REX 100. The required parameters can be adapted under the Internet settings of the router. 7.2 Device configuration: Services – NTP server For purposes of time synchronization of the REX 100, this carries out a comparison at regular intervals.
-
Page 18: Remote Maintenance Of Ethernet Cpus
The integrated 3 or 4-port switch is suitable for 100 Mbps and full duplex operation event of a device reset/switching on of the device in the case of REX 100 WiFi devices.. and supports auto-crossover and auto-negotiation. No special PROFINET functions are supported. -
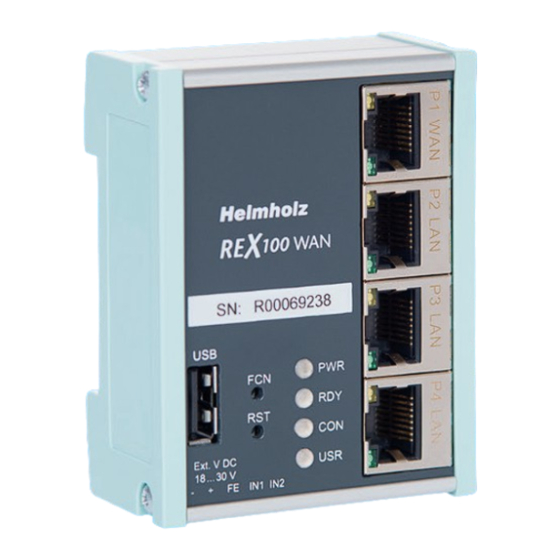
Page 19: Description Of Leds And Buttons
9. Description of LEDs and buttons 9.1 Description of LEDs and buttons Indicator light for the power supply Readiness indicator (this LED must show a solid light after a max. of 110 sec.) Off: There is no active Internet or VPN connection Solid light: Internet connection active or possible, but VPN connection inactive Flashing (1.5 Hz): VPN connection is active... - Page 20 9.2 myREX24 V2 portal LEDs The device is not connected with the portal The device has logged in at the portal and is thus online. Depending upon the device type, the device is connected with - a machine connected with the device (PLC) - the website of a connected machine - the integrated web server of the device (router) The device configuration is not up to date.
-
Page 21: Restoring The Rex 100 Router To Its Default Settings
10. Restoring the REX 100 router to its default settings In order to reset the REX 100 to the factory settings, the following steps are neces- Important: The IP address of the REX 100 LAN interface is reset to 192.168.0.100/24. sary: - Apply a supply voltage (or press “RST”) until the PWR LED lights up. -
Page 22: Technical Data
12. Technical data REX 100 WAN (700-875-WAN01) Dimensions (DxWxH) 32 x 59 x 76 mm - Pollution degree Weight Approx. 130 g - Altitude Up to 2,000 m Number of inputs | type 2 | DC 24 V, as per DIN EN 61131-2 Type 2 - Temperature cable rating 87 °C WAN interface... - Page 23 REX 100 WiFi (700-875-WIF01) Dimensions (DxWxH) 32 x 59 x 76 mm - Protection rating IP20 Weight Approx. 130 g Certifications CE, UL Number of inputs | type 2 | DC 24 V, as per DIN EN 61131-2 Type 2 UL 61010-1/ UL 61010-2-201 DC 24 V (18 ...
- Page 24 The information in this Quick Start Guide is, however, updated on a regular basis. When using your purchased products, please make sure to use the latest version of this Quick Start Guide, which can be viewed and downloaded on the Internet at www.helmholz.de.
Need help?
Do you have a question about the REX 100 WiFi and is the answer not in the manual?
Questions and answers