Advertisement
Quick Links
Advertisement

Related Manuals for SEW 3800 CL


Summary of Contents for SEW 3800 CL
- Page 1 AC/DC CLAMP METER INSTRUCTION MANUAL...
- Page 2 1.INTRODUCTION NOTE This meter has been designed and tested according to CE Safety Requirements for Electronic Measuring Apparatus, EN 61010-1, EN 61010-2-32 and other safety standards. Follow all warnings to ensure safe operation. WARNING READ "SAFETY NOTES" (NEXT PAGE) BEFORE USING THE METER.
-
Page 3: Safety Notes
2.SAFETY NOTES Read the following safety information carefully before attempting to operate or service the meter. l Use the meter only as specified in this manual, otherwise the protection provided by the meter may be impaired. l Always keep hands behind the meter barrier. l Use extreme caution when clamping around uninstalled conductors or bus bars. - Page 4 3.FEATURES l Full Autorange for all functions. l Data Hold function freezes the reading. l Max Hold function holds the absolutely maximum of readings. l Low battery indication. l Safety design throughout with no exposed metal Parts, shielded banana plugs and recessed input terminals.
-
Page 5: Specifications
4.SPECIFICATIONS Ranges AC Voltage 400/600 V AC Current 400/1000 A DC Voltage 400/600 V DC Current 400/1000 A Resistance 400/2000 Ù Diode 400/2000 mV at 1mA Range Resolution Accuracy 400 V 0.1 V ±(1.0%rdg+3dgt) 600 V 1 V 400 A 0.1 A ±(1.5%rdg+3dgt) 1000 A 1 A *Frequency Response 40Hz~500Hz... - Page 6 Diode Range Resolution Accuracy 400 mV 0.1 mV ±(1.0%rdg+3dgt) 2000 mV 1 mV * 1mA current Overload protection 750V rms. 1000V Diode & Ohm 600V rms. Conductor Size Approx. 40mm Max. Operating Pirnciple: Dual slope integration. Over Rage Indication: "O.L" indicated. Low Battery Indication: "...
- Page 7 Dimensions 255(L) x 80(W) x 35(D)mm Weight Approx. 420g (battery included) Power Source 9V (6F22) x 1 Accessories: Test leads. Carrying case. Instruction manual. 9V (6F22) x 1.
-
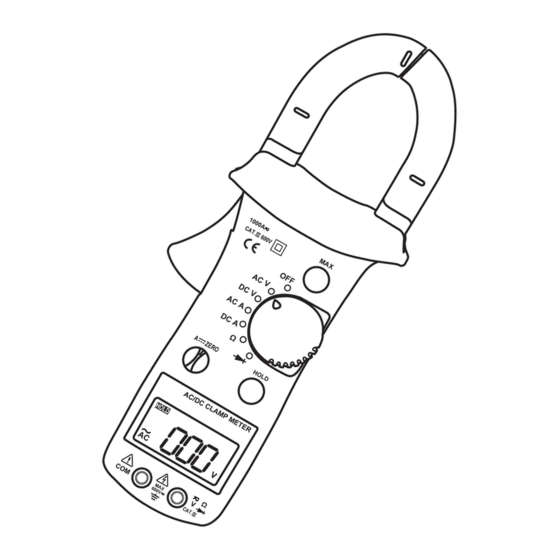
Page 8: Instrument Layout
5.Instrument Layout 1000A~ CAT. 600V AC V DC V AC A DC A A--- ZERO HOLD AC/DC CLAMP METER 600V CAT. - Page 9 (1) Transformer Jaws Pick up the conductor within the jaws center. (2) Barrier Provide a protective distance from hands to conductor. (3) Jaw Trigger Press to open the jaws (4) DCA zero adjust shaft (5) LCD Display 3¾ digit LCD with the maximum reading of 3999. (6) Input Terminal (7) Rotary Switch (8) Max Button...
- Page 10 6.MEASUREMENT Before proceeding with measurement ,read the safety notes. (1)Voltage measurement l Insert the BLACK test lead to COM and the RED one to the other terminal. l Switch to AC V range for AC voltage or DC V range for DC Voltage.
- Page 11 (3)Ohm & Diode Measurement For ohm test l Switch to OHM range and make sure there is no power in the circuit being measured. l Insert the BLACK lead to the COM and the RED one to another. l Connect the test leads to the circuit under test and read the display directly.
-
Page 12: Maintenance
7.MAINTENANCE Battery Replacement When low battery warning appears, change a new battery as follows (1)Disconnect the test leads from the instrument and turn off power. (2)Unscrew the battery cover and replace a new Battery. Cleaning and Storage WARNING To avoid electrical shock or damage to the meter, do not get water inside the case.
Need help?
Do you have a question about the 3800 CL and is the answer not in the manual?
Questions and answers