Table of Contents
Advertisement
Quick Links
Instructions for Use
s
Questions:
Clinical studies, multiple
Temporalscanner.com
language videos, & user
medical@exergen.com
manuals: exergen.com/s
1-800-422-3006
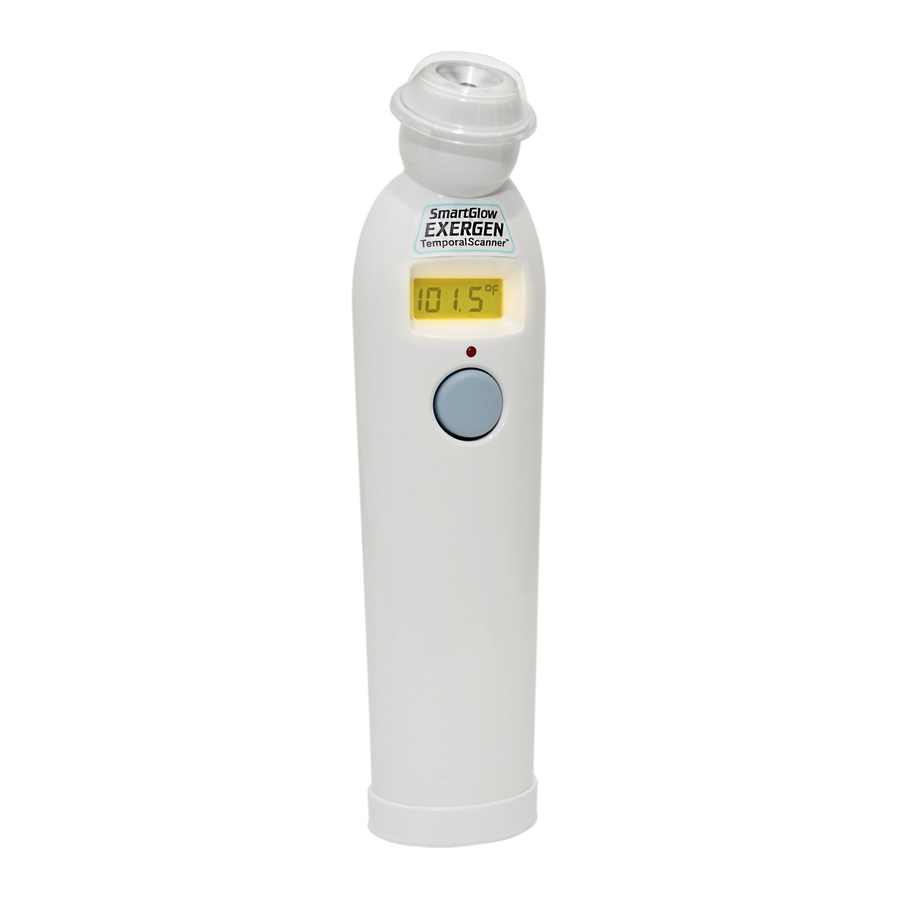
Familiarize Yourself with the Instrument
Protective Cap (remove during use)
To Scan: Depress the button. The instrument will continually
Probe Cone
scan for the highest temperature (peak) as long as the button is
Probe Sensor Lens
depressed. Beeping and LED flashing: Beep and LED flashing
Probe
LCD Display Screen
indicate a rise to a higher temperature, similar to a radar
LED Indicator Light
detector. Slow beeping indicates that the instrument is still
SCAN Button
scanning, but not finding any higher temperatures. Retain
Automatic turn-off in
30 seconds
Reading: The reading will remain on the display for 30 seconds
LED Indicator Light
after the button is released. To Restart: Depress the button to
Thumb-Push Ridges
restart. It is not necessary to wait until the display is clear, the
thermometer will immediately begin a new scan each time the
Battery Compartment
9-volt battery
button is depressed and held depressed.
Quick Start Instructions
Your thermometer is the home version of the professional Temporal S canner
used in thousands of hospitals and doctors' offices, and is used the same
way as doctors and nurses use the professional model. As a technologically
advanced instrument it must be used correctly. Please follow the
instructions below and read the user manual carefully.
Installing the Battery
Locate the battery compartment at the back of the thermometer.
1.
Face the top of the thermometer toward you and place your thumb on the ridges.
2.
Press down firmly and slide the cover away from you, toward the bottom of the
3.
thermometer.
Insert a 9-volt battery with the positive (small) terminal on the right.
4.
Slide the battery compartment cover back into place.
5.
Taking a Temperature
Remove protective cap.
1.
Hold thermometer so that thumb or index finger is positioned over the
2.
SCAN button (DO NOT depress until step four).
Place the probe flush (flat) on the center of forehead.
3.
Press and hold the SCAN button.
4.
Lightly slide thermometer either left or right from the center of forehead to
5.
the hairline, keeping the sensor flat and in contact with the skin for the
entire scan (2-3 seconds). You will hear beeping and a red light will flash
during the scan. This is normal, indicating that a measurement is taking place.
Release the SCAN button and remove the thermometer from head once you
6.
reach hairline.
Read the temperature on display.
7.
If perspiration is present on forehead:
Press and hold the SCAN button.
1.
Place the probe on the neck just behind the ear lobe.
2.
Release the SCAN button and remove the thermometer to get a reading.
3.
When not in use: Thermometer will shut off automatically after 30 seconds.
To turn off immediately, press and release the SCAN button quickly. Always
replace the cap to protect the sensor when not in use.
Important Safety Instructions
READ ALLINSTRUCTIONS BEFORE USING
When using the product, especially when children are present, basic safety
precautions should always be followed, including the following:
This product is intended for household use only. For information on thermometers for
•
professional use, please see www.exergen.com, or call 617-923-9900.
Use this product only for its intended use as described in this manual.
•
Use of this product is not intended as a substitute for consultation with your physician.
•
Do not take temperature over scar tissue, open sores or abrasions.
•
Basic safety precautions should always be observed, especially when this
•
product is used by, on or near children or invalids.
The operating environmental temperature range for this product is 60 to 104°F
•
(15.5 to 40°C).
Always store this thermometer in a clean, dry place where it will not become
•
excessively cold (-4°F/-20°C), or hot (122°F/50°C).
The thermometer is not shockproof. Do not drop it or expose it to shocks.
•
This thermometer is not intended to be sterile. Do not try to sterilize it.
•
Follow the cleaning instructions as described in this manual.
Do not use this thermometer if it is not working properly, if it has been exposed to
•
temperature extremes, damaged, been subject to electrical shocks or immersed in water.
There are no parts that you can service yourself except for the battery, which you
•
should replace when low following the instructions in this manual. For service,
examination, repair, or adjustments, return your thermometer to Exergen.
Do not operate where aerosol spray products are being used or where oxygen is
•
Clinically proven
being administered.
accuracy for
Do not take temperatures with this thermometer near places that are very hot,
•
all ages
such as fireplaces and stoves.
Do not use this thermometer outdoors.
•
Never drop or insert any object into any opening.
•
If your thermometer will not be used regularly, remove the battery to prevent
•
possible damage due to chemical leakage. If the battery leaks, remove carefully.
Do not allow bare skin to touch leaking fluid.
Dispose of used batteries properly. Do not wrap them in metal or aluminum foil.
•
Wrap them in newspaper before disposing of them. Do not burn them. Battery
may explode if overheated.
Save These Instructions
Scanning the Temporal Artery (TA)
Measure only the side of the head exposed to the environment. Anything
covering the area to be measured (hair, hat, wig, bandages) would insulate the
area, resulting in falsely high readings. Slide the thermometer straight across the
forehead, not down the side of the face. Midline on the forehead, the TA is
about a millimeter below the skin, whereas at the side of the face, the TA is
much deeper, and measuring there would result in falsely low readings. When
taking the temperature behind the ear (if there is perspiration on the forehead), first
push away any hair, exposing the area. Then, tuck the thermometer on the
neck below the ear lobe, in the soft conical depression, (the place where
perfume might be applied). Wait about 60 seconds before measuring the same
person again to avoid excessive cooling of the skin. An infant is frequently
swaddled in blankets and clothing covering the neck area. Unless visibly sweaty,
one measurement at the TA area is typically all that is required. Should you feel
the temperature is low, then push aside any clothing or blankets covering the
neck area for ~30 seconds or so, and repeat the measurement on the neck
behind the ear. Factors that may affect measurement accuracy: The patented
Arterial Heat Balance (AHB) technology in your TemporalScanner actually
makes two separate measurements (1) the temperature of the skin over the
temporal artery, and (2) the temperature of the room. To determine the most
accurate reading, it measures skin temperatures some 1000 times a second as
you sweep the TemporalScanner across the forehead. The AHB system then
calculates how much the blood has cooled down during its journey from the
heart to the skin over the temporal artery and makes allowance for this in the
temperature it displays. The result is a highly accurate reading - delivered
extremely fast and with no discomfort.
Are there environmental effects?
As part of its Arterial Heat Balance system, the Temporal Scanner measures the
temperature of the surrounding environment. For this measurement to be
accurate, it needs to have become acclimatized to the temperature of the room
in which it is to be used. If it is taken from a cold room into a hot room, or vice
versa, allow it to acclimate for at least 30 minutes before using it. Avoid holding
the Temporal Scanner by the head, as it will mistake the temperature of your
hand for that of the room.
SmartGlow Features - SmartGlow Model
• Soft Glow Display: Soft lighting for easy reading in any light.
Perfect for checking the temperature of a sleeping infant
(or adult) in a darkened room.
• Eight Temperature Memory: Automatically retains the
last 8 temperature readings for instant recall to check on fever progression.
• Programmable Beeper: Beeping sound indicating scanning can be turned off
or on to avoid waking a sleeping child (or adult). The flashing LED facing the
forehead while scanning turns off when the beeper is turned off.
• Programmable °F or °C: Select most convenient temperature scale.
• Elegant one-button programming and memory access.
SmartGlow : Eight Temperature Memory Mode
In memory mode, a small M will appear on the display with memory location ( 1, 2, 3,
4, 5, 6, 7, 8 ) and the memory location will alternate with the temperature stored in
that location. The most recent temperature is stored in location 1 and the earliest
temperature is stored in location 8. A display of 188. 8 means that no temperature
reading is stored in that memory location. Readings already in the memory when you
first use it are from the factory tests.
To enter memory recall mode, start from a blank display, and
1.
tap the button, 1 M will appear and alternate with the
temperature stored in that memory location.
To access previously stored readings, tap the power button
2.
again. 2 M will alternate with the temperature in that memory
location. Repeat through 8 M to access all recent memory
readings.
To exit memory recall mode and take a temperature, press
3.
and hold the button for 1-2 seconds until the display turns off.
SmartGlow : Turn the Audible Beeper OFF or ON
Your Temporal Scanner is equipped with a beeper and front/back
flashing LED's which gives you a soft audible and visual
feedback as you scan over the temporal artery on the forehead.
The original factory setting is with the beeper and LED's ON.
If the beeper is on and you are concerned that the sound or flashing LED may wake a
sleeping child (or adult), the beeper and front LED can be turned off as follows:
1. Starting with a blank display, tap the power button until the display flashes
loud,(tap 10 times, past the 8 memory locations and the F-C display)
2. Press and hold the button until Shh is displayed, indicating the quiet mode. A
beep will indicate that the setting has been changed, and the
TemporaI S canner will automatically shut off.
3. To turn the beeper and front LED back on, repeat step 1 to find Shh then step
2 to change into loud .
The TemporalScanner will automatically shut off 30 seconds after the last button
press, from any mode of operation. The TemporalScanner must be OFF (blank
screen) before taking a temperature. The TemporalScanner can be turned off
from any programming mode by pressing and holding the button for 3 seconds.
Selecting °F or °C Mode - SmartGlow Model
1. Starting from a blank display tap the button until the flashing
F - C appears after the 8 memory locations (9 taps). The current
temperature mode will appear in the upper right indicated by the
small °F or °C. The factory setting is °F.
2. To change from the °F to the °C mode, press and hold button
until the small °F in the upper right of the display changes to °C . A
beep will indicate that the setting has been changed, and the
TemporalScanner will automatically shut off.
3. To change from the °C to the °F mode, repeat step 2, and
press and hold the button until the small °C in the upper right of
the display changes to °F .
Advertisement
Table of Contents

Related Manuals for Exergen TAT-2000C/SmartGlow


Summary of Contents for Exergen TAT-2000C/SmartGlow
- Page 1 For service, tap the button, 1 M will appear and alternate with the examination, repair, or adjustments, return your thermometer to Exergen. temperature stored in that memory location. Do not operate where aerosol spray products are being used or where oxygen is Questions: •...
-
Page 2: Specifications
It is important to wait a full minute before Exergen Corporation will not pay for warranty service performed by a non- gentler to use than other types of measurement devices such as oral, rectal,...
Need help?
Do you have a question about the TAT-2000C/SmartGlow and is the answer not in the manual?
Questions and answers
When I want to check temperature, rather than giving the temperature it says “Lo”. Those that over and over no matter how many times I try to check
The Exergen TAT-2000C/SmartGlow thermometer may display "Lo" instead of the temperature if it is not detecting enough infrared heat to produce a reading. This can happen if the thermometer is not positioned correctly on the skin, if the scanning process is not performed properly, or if the environment is too cold. Ensuring proper use by following the instructions in the manual can help obtain an accurate reading.
This answer is automatically generated
How to change the battery