Table of Contents
Advertisement
Advertisement
Table of Contents
Troubleshooting

Related Manuals for Tableau TD2u

Summary of Contents for Tableau TD2u
- Page 1 Tableau TD2u USER GUIDE Version 1.3...
- Page 2 Copyright© 2018 Guidance Software, Inc. All rights reserved. EnCase®, EnScript®, FastBloc®, Guidance Software® and EnCE® are registered trademarks or trademarks owned by Guidance Software in the United States and other jurisdictions and may not be used without prior written permission. All other marks and brands may be claimed as the property of their respective owners.
-
Page 3: Table Of Contents
CHAPTER 1 Overview Tableau TD2u TD2u Kit Contents Navigating the TD2u Reading the LEDs USB Keyboard Support CHAPTER 2 Setting up the TD2u Startup Sequence Initialization Configuring the TD2u User-Selected Startup Mode System Settings (Menu 7.1) Set Examiner Name (Menu 7.1.2) Imaging Setup (Menu 7.2) - Page 4 Error Recovery Modes Factory Reset (Menu 7.3) Duplicator Info (Menu 8) Connecting Hard Drives Drive Detection CHAPTER 3 Using the TD2u Overview TD2u Menus and Options Duplicate (Menu 1) Initiating a Duplication Job (Menu 1) Image Destinations Preconditions Checking Wipe Disk (Menu 2)
- Page 5 Print All Logs (Menu 6.4) Resetting and Clearing Internally Stored Information CHAPTER 4 Troubleshooting and Support Troubleshooting Common Problems Power Supply Issues Problems with Disk Detection Problems with Encrypted Drives Replacing the Backup Battery for the Real-time Clock Compatible Batteries Replacing the Battery Testing the New Battery Index...
- Page 6 - vi -...
-
Page 7: Preface
Conventions Used in this Guide The TD2u has two soft keys placed immediately under the LCD display. The bottom line of the display shows text indicating the current function for each of the two soft keys. In this guide, soft key labels are indicated with square brackets. - Page 8 Tableau reports disk capacities and transfer rates according to the industry standard powers of ten convention. In TD2u screens, reports, and documentation, a 4 GB hard disk stores up to 4,000,000,000 bytes; a hard disk with a 150 MB/sec transfer rate transfers 150,000,000 bytes per second.
- Page 9 CHAPTER 1 OVERVIEW Tableau TD2u TD2u Kit Contents Navigating the TD2u Reading the LEDs USB Keyboard Support...
- Page 10 Tableau TD2u User Guide Version 1.3.0...
-
Page 11: Chapter 1 Overview
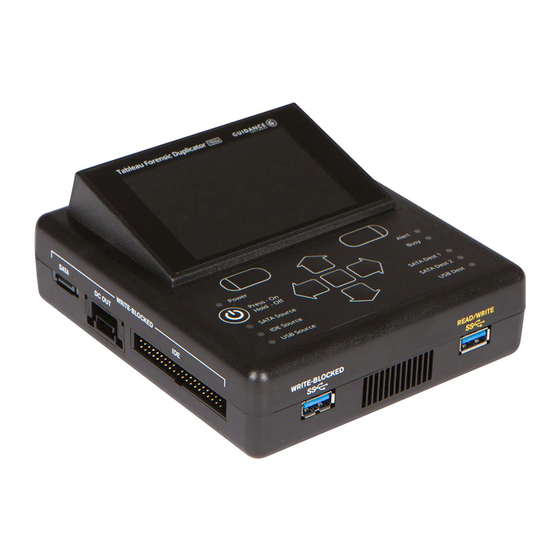
CHAPTER 1 Overview Tableau TD2u The Tableau TD2u is a forensic duplicator capable of performing 1:1, 1:2, and 1:3 duplications. It has many of the functions traditionally found in general-purpose, IT-oriented hard disk duplicators and provides features and functions that serve the specialized needs of forensic... - Page 12 Tableau TD2u User Guide Version 1.3.0 Item Model # Description High-output power supply. The TP5 provides enough power to supply the TD2u and most common com- binations of source and des- TP5-NC tination hard disks. The TP5 uses a universal 2-pin AC line...
- Page 13 Do not discard the foam packaging. It is designed to fit several industry-standard hard-sided carrying cases. If you received the TD2u kit in the cardboard box shipped by Tableau, you can buy a hard-sided case and reuse the foam insert directly in that case.
-
Page 14: Navigating The Td2U
In the upper right corner of the Main menu, the TD2u displays the date and time. As you navigate the TD2u menu structure, the menu item number displays in the upper left hand corner. -
Page 15: Reading The Leds
TD2u. Keep the Quick Start card with the TD2u as you familiarize yourself with its operation. Reading the LEDs The front of the TD2u has nine light emitting diode (LED) indicators. A tenth LED is located on the rear of the TD2u, near the power connector. SATA... - Page 16 Tableau TD2u User Guide Version 1.3.0...
-
Page 17: Chapter 2 Setting Up The Td2U
CHAPTER 2 SETTING UP THE TD2U Startup Sequence Initialization Configuring the TD2u User-Selected Startup Mode System Settings (Menu 7.1) Set Examiner Name (Menu 7.1.2) Imaging Setup (Menu 7.2) Factory Reset (Menu 7.3) Duplicator Info (Menu 8) Connecting Hard Drives Drive Detection... - Page 18 Tableau TD2u User Guide Version 1.3.0...
-
Page 19: Startup Sequence
The TD2u is optimized for the needs of forensic practitioners and computer forensic processes. Initialization After you turn on the TD2u, the device takes about five seconds to initialize and run a self-test procedure. The screen is blank and unlit until the self-test is complete. An LED check is then conducted so you can verify that all of the LEDs are functioning. -
Page 20: System Settings (Menu 7.1)
System Settings menu provides options for setting TD2u options, defaults, and the current date/time. The System Settings menu also provides options for viewing TD2u information and current status. The following table lists additional options and values you can set in System Options. -
Page 21: Set Examiner Name (Menu 7.1.2)
Once you have set the desired date and time, press the [Save] soft key to record your changes. When On, the TD2u flashes the yellow Alert LED at the end of a normal/successful acquis- Finished ition/task. Alert When Off, the TD2u flashes the yellow Alert LED only if there is an unusual condition or error. -
Page 22: Imaging Setup (Menu 7.2)
Tableau TD2u User Guide Version 1.3.0 If you are using an external keyboard, entering the Examiner Name is fairly straightforward. Using the TD2u keypad requires scrolling through individual characters. The characters are divided into four categories that appear at the bottom of the screen:... - Page 23 CHAPTER 2 Setting up the TD2u Note: As of version 1.3, you can change settings specific to each operation start screen by pressing the center button with the gear icon on that screen. Operations that do not have settings do not have a gear icon on their start screens.
- Page 24 Default Raw File Ext Default Sets the extension to the default value or .dmg .dmg When set to Prompt, the TD2u prompts the Prompt user to enter Case ID. Case ID Skip Skip When set to Skip, the Case ID is suppressed in subsequent logs.
-
Page 25: Error Recovery Modes
The TD2u supports two different error recovery modes, Exhaustive and Standard. Both modes refer to the way in which the TD2u recovers from read errors on the source hard disk. In the Exhaustive error recovery mode, when the TD2u detects a read fault, it begins a retry strategy that attempts to read each sector in the 64-sector block that contains the error. -
Page 26: Factory Reset (Menu 7.3)
In both error recovery modes, the TD2u handles unreadable sectors in the same way. When the TD2u has determined that a sector cannot be read from the source drive, it fills in the missing data with zeros on the destination drive. Zero data inserted in this way is also included by the TD2u when calculating the MD5 and SHA1 hashes for the duplication. -
Page 27: Connecting Hard Drives
Nov 28, 2017 The build data of the TD2u firmware release. Connecting Hard Drives Viewing the front of the TD2u, the source drive attaches to the left side of the duplicator and the destination drive(s) attach to the right side. - Page 28 3. Connect the source disk with its power cable to the left side TD2u power input. TC2-8-R2: IDE/SATA drive power cable TC5-8-R2: SATA drive power cable 4. Connect the destination disk or disks to the right side of the TD2u with the appropriate cable. For SATA devices, use the TC4-8-R2 unified cable...
-
Page 29: Drive Detection
CHAPTER 2 Setting up the TD2u 7. Turn on the TD2u by pressing the TD2u power switch located on the front of the unit to the lower left. The green Power LED indicates that the duplicator is turned on. Note: When connecting an IDE source disk to the TD2u, always connect the blue end of the IDE cable (TC6-2 or TC6-8) to the TD2u and the black end to the hard disk. - Page 30 Tableau TD2u User Guide Version 1.3.0...
-
Page 31: Chapter 3 Using The Td2U
CHAPTER 3 USING THE TD2U Overview TD2u Menus and Options Duplicate (Menu 1) Preconditions Checking Wipe Disk (Menu 2) Encryption (Menu 3) Disk Information (Menu 4) Disk Utilities (Menu 5) Status Information Logs Menu (Menu 6) Resetting and Clearing Internally Stored Information... - Page 32 Tableau TD2u User Guide Version 1.3.0...
-
Page 33: Overview
TD2u menu tree to facilitate navigation of the TD2u. TD2u Menus and Options The menus and screens in the TD2u are arranged in a tree structure. Under the Main menu, each branch of the tree is numbered to guide you as you navigate the menu tree. These numbers also make it easy to refer back to this guide for detailed information. - Page 34 Tableau TD2u User Guide Version 1.3.0 Main Menu Sub-menu 5.1 Format 5.1.1 Format Destination 5.1.2 Format Accessory 5. Disk Utilities 5.2 Hash 5.3 Blank Check 5.4 HPA/DCO Removal 6.1 View Logs 6.2 Save All Logs 6. Logs 6.3 Delete All Logs...
- Page 35 CHAPTER 3 Using the TD2u Main Menu Sub-menu 7.1 System Settings 7.1.1 Startup Screen 7.1.2 Examiner Name 7.1.3 Set Date and Time 7.1.4 Finished Alert 7.2 Imaging Setup 7.2.1 File Type 7.2.2 File Size 7.2.3 E01/EX01 Compression 7.2.4 Directory Name 7.
-
Page 36: Duplicate (Menu 1)
Tableau TD2u User Guide Version 1.3.0 Duplicate (Menu 1) The TD2u duplicates hard disks by either cloning or imaging them. Cloning, also known as disk- to-disk duplication, is the process of copying a source disk, sector by sector, to a destination disk. -
Page 37: Image Destinations
The TD2u provides a high degree of flexibility in selecting defaults for each field so that you can configure the TD2u to match your desired workflow. Details about the current operation are available during or at the end of duplication. To view... -
Page 38: Preconditions Checking
Tableau TD2u User Guide Version 1.3.0 is the name generated by the TD2u for each separate acquisition. If an [directory name] acquisition spans multiple destination disks, the same [directory name] is used on each destination disk. This makes it easy to group image files related to a particular acquisition. - Page 39 CHAPTER 3 Using the TD2u Clone or Name Image Destin- Type Explanations ations Reports that DCO is in use on the source disk. The TD2u does not auto- matically remove DCO on Source Hid- the source disk, as doing so...
- Page 40 Tableau TD2u User Guide Version 1.3.0 Clone or Name Image Destin- Type Explanations ations The TD2u checks select sec- tors on the source disk looking for non-blank data patterns. If all of the checked sectors appear to be blank, the TD2u warns...
-
Page 41: Wipe Disk (Menu 2)
You may want to wipe the destination disk before use, especially when doing disk-to-disk cloning. The TD2u provides three options to wipe a destination disk: a fast single pass wipe, a multi-pass wipe, or a Secure Erase. Follow the steps below to specify the type of wipe... -
Page 42: Single Pass Wipe
It may take longer to wipe larger or slower disks. Single Pass Wipe The TD2u writes a constant pattern of zeros (00h) to the destination drive in a single pass. The TD2u will display on-screen performance and timing metrics during the wiping process. -
Page 43: Encryption (Menu 3)
Encryption (Menu 3) The TD2u can encrypt destinations using whole disk encryption. All data stored on the destination is encrypted and hosts will only read seemingly random data until it is decrypted. Decrypting the data requires special decryption software/hardware and knowledge of the password used for encryption. -
Page 44: Unlock Destinations (Menu 3.2)
Tableau TD2u User Guide Version 1.3.0 You are prompted to enter a new drive password for the drive or drives to be encrypted. This password is required each time you want to access the data on the destination (read or write). -
Page 45: Change Dest Password (Menu 3.3)
This does not change the encryption across the drive. Generating a new secure header takes 15 to 20 seconds. Disk Information (Menu 4) The TD2u can display detailed information about the source or the destination hard disk(s). From the Disk Info (Menu 4.0) screen, select any drive attached to a source or destination... - Page 46 Tableau TD2u User Guide Version 1.3.0 The following table lists the disk information displayed by the TD2u. Example Value Legend Definition This field displays for encrypted drives that Unlock are still locked. This behavior is the same as (none) Drive that of the Unlock Destinations screen, and is provided for convenience.
-
Page 47: Disk Utilities (Menu 5)
Disk Utilities (Menu 5) The TD2u offers several utilities to assist with the processing of drives. These utilities can be found in Menu 5. Format (Menu 5.1) When using disk-to-file imaging, the destination drive must be formatted with a file system that is recognizable by the TD2u. - Page 48 ExFAT file system used by the TD2u. The TD2u performs what is generally referred to as a Quick Format, during which it writes the necessary Master Boot Record, Partition Boot Record, and data structures to the destination disk.
-
Page 49: Hash (Menu 5.2)
The TD2u performs a quick check to determine if the selected disk appears to be blank by reading sectors in the Primary and Secondary GPT. A sector is considered to be blank if it contains only a repeating pattern such as 00h, E5h, or FFh. -
Page 50: Hpa/Dco Removal (Menu 5.4)
Tableau TD2u User Guide Version 1.3.0 HPA/DCO Removal (Menu 5.4) The TD2u automatically detects the use of the ATA HPA (Host Protected Area) and DCO (Device Configuration Overlay) feature sets. Both HPA and DCO feature sets can be used to reduce the apparent capacity of a hard disk. - Page 51 CHAPTER 3 Using the TD2u Metric Displayed As Description Average Trans- fer Rate (bytes The average transfer Average Rate: yyy rate since the start of GB/unit second/minute) the current task. Instantaneous Transfer Rate The average transfer Current Rate: xxx MB/unit...
-
Page 52: Logs Menu (Menu 6)
TD2u. The most recent log entry is displayed at the top of this list with the oldest log entry at the bottom (end) of the list. - Page 53 Task did not completely normally. Task canceled. Sample TD2u Log The TD2u maintains detailed logs for each task initiated by the user. Here is a sample of an error-free log for a Disk-to-Disk acquisition. ------------------Start of TD2u Log Entry------------------ Task: Disk Duplication...
- Page 54 Tableau TD2u User Guide Version 1.3.0 Examiner: Temperance Case ID: <<not entered>> Case Notes: <<not entered>> Imager App: TD2u Imager Ver: 1.3.0 (build 13276-271fb7f) TD2u S/N: 000eccd2 00753057 -------------------------USB Source------------------------- Interface: USB Model: ADATA USB Flash Drive Firmware Revision: 1.00...
-
Page 55: Save All Logs (Menu 6.2)
-------------------End of TD2u Log Entry-------------------- If the TD2u had detected any bad sectors on the source drive, it would have added a section at the end of the TD2u log. This additional section would list the sector address and sector length of each unreadable region of the source disk. -
Page 56: Resetting And Clearing Internally Stored Information
The first non-volatile memory is a flash device which is used to store the firmware and serial number of the TD2u. The firmware can be updated using the Tableau Firmware Update utility (available from www.guidancesoftware.com/tableau). This flash device is never used to record any user-specific or acquisition-specific information. - Page 57 The third and final non-volatile memory is the on-board real-time clock (RTC) with battery backup. The real-time clock records the date and time as set by the user. The real-time clock does not record any user-specific or acquisition-specific information. The following table lists the reset/clear information stored internally by the TD2u. Non- Volatile...
- Page 58 Tableau TD2u User Guide Version 1.3.0 Non- Volatile Information User or Case-Spe- Ability to Reset/Clear Memory Stored cific Info All configuration settings can be erased and restored to factory defaults by selecting Setup > Factory TD2u con- Reset. Configuration settings (exclud-...
-
Page 59: Chapter 4 Troubleshooting And Support
CHAPTER 4 TROUBLESHOOTING AND SUPPORT Troubleshooting Common Problems Replacing the Backup Battery for the Real-time Clock... - Page 60 Tableau TD2u User Guide Version 1.3.0...
-
Page 61: Troubleshooting Common Problems
There is a green DC power LED on the rear edge of the TD2u, next to the female DC power barrel connector. If the TP5 power supply is connected properly to the TD2u and to AC power, ... - Page 62 TC3-8 cable is seated properly in the SATA connector of the hard disk. disk Tableau has tested the TD2u with an extensive in-house library of different hard disks spanning many years of hard disk development, but there might be compatibility issues with some hard disks.
-
Page 63: Problems With Encrypted Drives
This issue was fixed in TD2u v1.3 software. If you captured encrypted evidence on pre-v1.3 TD2u software, that evidence will no longer be usable on a TD2u that has been updated to v1.3 or later. Such a drive would be able to be unlocked, but the unlocked data container would present unintelligible information to the system. -
Page 64: Replacing The Backup Battery For The Real-Time Clock
Replacing the Backup Battery for the Real-time Clock The TD2u uses a real-time clock (RTC) with a backup battery. The battery has a shelf life of 12-18 months. If you use the TD2u regularly, expect the battery to last longer than 18 months. As the battery discharges, the TD2u displays a low battery warning message. ... - Page 65 5. The fan used in the TD2u is attached to the lower half of the plastic case. Carefully lift the lower half of the case away from you.
- Page 66 Tableau TD2u User Guide Version 1.3.0 The backup battery is near the heatsink, as shown in the photograph below. 7. Using the flat-blade screwdriver, gently pry the battery from the battery holder.
-
Page 67: Testing The New Battery
Testing the New Battery After you have securely fastened the TD2u case, return it to its normal upright position and attach just the TP5 power supply. Turn the TD2u on and observe the startup sequence. You should not see a battery warning dialog, but you will probably see a date/time warning to... - Page 68 (Menu 7.1.3). For detailed information about setting the date and time, see System Settings (Menu 7.1) on page 20. After resetting the date/time, turn the TD2u off, wait two minutes, and turn the TD2u on. The date/time, located in the upper left corner of the Main menu, should be correct.
-
Page 69: Index
Format Destination (Menu Blank Check (Menu 5.3) 49 5.1.1) 48 Format USB Accessory (Menu 5.1.2) 49 Compatible Batteries 64 Configuring the TD2u 19 Hash (Menu 5.2) 49 Connecting Hard Drives 27 HPA/DCO Removal (Menu Conventions Used in this 5.4) 50... - Page 70 Navigating the TD2u 14 Save All Logs (Menu 6.2) 55 Secure Erase 42 Set Examiner Name (Menu 7.1.2) 21 Overview 9, 33 Setting up the TD2U 17 Single Pass Wipe 42 Startup Sequence 19 Power Supply Issues 61 Status Information 50 Preconditions Checking 38 System Settings (Menu 7.1) 20...
- Page 71 USB Keyboard Support 15 User-Selected Startup Mode 19 Using the TD2u 31 View Logs (Menu 5.1) 52 Wipe Disk (Menu 2) 41 Writing Logs to a USB Storage Device 55...
Need help?
Do you have a question about the TD2u and is the answer not in the manual?
Questions and answers