Table of Contents
Advertisement
Quick Links
PROFESSIONAL MEDICAL PRODUCTS
LEO BLOOD PRESSURE MONITOR
WITH SOFTWARE
User manual
ATTENTION: The operators must carefully
read and completely understand the
present manual before using the product.
32902 / CONTEC08A
CONTEC MEDICAL SYSTEMS CO., LTD
No.112 Qinhuang West Street, Economic & Technical Development Zone,
Qinhuangdao, Hebei Province, PEOPLE'S REPUBLIC OF CHINA
Made in China
Shanghai International Holding Corp. GmbH (Europe)
Eiffestrasse 80, 20537 Hamburg, Germany
Gima S.p.A.
Via Marconi, 1 - 20060 Gessate (MI) Italy
gima@gimaitaly.com - export@gimaitaly.com
www.gimaitaly.com
0123
MAX
55°C
MIN
-20°C
Advertisement
Table of Contents

Related Manuals for Gima 32902


Summary of Contents for Gima 32902
- Page 1 User manual ATTENTION: The operators must carefully read and completely understand the present manual before using the product. 32902 / CONTEC08A CONTEC MEDICAL SYSTEMS CO., LTD 0123 No.112 Qinhuang West Street, Economic & Technical Development Zone, Qinhuangdao, Hebei Province, PEOPLE’S REPUBLIC OF CHINA Made in China 55°C...
-
Page 2: Table Of Contents
ENGLISH Contents Chapter 1 Safety Precautions ......................49 1.1 Operation for AC Adapter (Separate Sale) ..............50 1.2 Operation for Battery ...................... 51 Chapter 2 Main Unit ..........................53 Chapter 3 Button Functions ........................ 56 Chapter 4 External Interfaces ......................57 Chapter 5 Dry Battery/AC Adapter Installation ................. - Page 3 ENGLISH Chapter 13 SpO Measurement Function .................... 69 Chapter 14 SpO Measurement Method ....................72 Chapter 15 Installation of the Software ....................73 15.1 Demand of Editor ......................73 15.2 Installation of Software ....................74 Chapter 16 Keys and Symbols ......................74 Chapter 17 Error Message........................
-
Page 4: Chapter 1 Safety Precautions
ENGLISH Chapter 1 SAFETY PRECAUTIONS • Before use, carefully read “Safety Precautions” for a correct use. • To prevent users suffered hurt or damnification due to improper use, refer to “Safety Precautions”, and use this product properly. For safety reasons, be sure to comply with safety precautions. Note If not to use correctly, it exists that a potentially hazardous situation which may result in injury to the user or patient or damage to the equipment or other property. -
Page 5: Operation For Ac Adapter (Separate Sale)
ENGLISH For Infant and the person who can’t express oneself, please use the device under the guidance of a doctor. Otherwise it may cause accident or dissension. Please do not use for any other purpose. Otherwise it may cause accident or holdback. Please use special cuff. -
Page 6: Operation For Battery
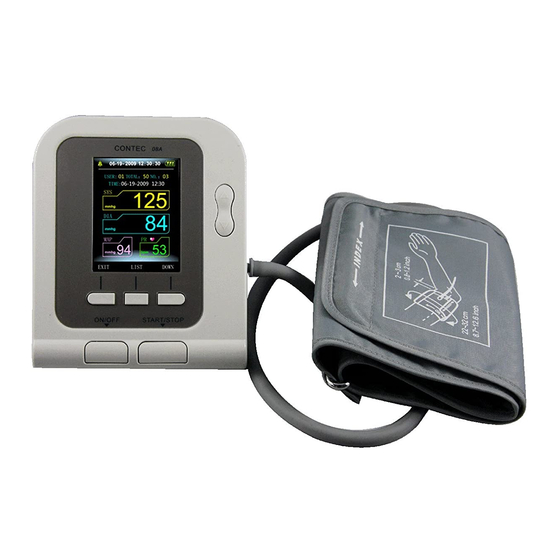
ENGLISH 1.2 Operation for Battery Note Please use 4 “AA” manganese or alkaline batteries, do not use batteries of other types. Otherwise it may cause fire. New and old batteries, different kinds batteries can not be used together. Otherwise it may cause battery leakage, heat, rupture, and damage to the device. Please don’t put wrong positive and negative of battery. When the batteries power exhausts, replace with four new batteries at the same time. - Page 7 ENGLISH pressure, pulse rate and record number, etc. With 2.8 inch color LCD screen, clear interface, the function of data review is complete. User can implement ON/OFF, manual measuring, system setup, parameters change and other operations with seven buttons which are located on the front panel of the device. The Sphygmomanometer uses audible and visual alarm, when the battery power is low, the buzzer will intermittent buzzing and LCD screen displays “Low Power” to prompt user replace batteries. When the measurement data exceeds the set alarm limit, the font color of measurement results will change to red...
-
Page 8: Chapter 2 Main Unit
ENGLISH Chapter 2 MAIN UNIT The production is in the package. Open the package and confirm whether the production is whole. Display Cuff plug Cuff air plug jack UP/DOWN button MEMORY button AC adapter jack MENU button USER SWITCH button USB plug jack ON/OFF button START/STOP button... - Page 9 ENGLISH Accessories (Specification: limb circumference 22-32cm (middle part of upper arm), please choose suited cuff when measuring pediatric or other). USB Data Line Software CD User Manual Optional Accessories AC adapter Input: voltage: AC 100V~240V frequency: 50Hz/60HZ rated current: AC 150mA Output: DC 6.0V ±...
- Page 10 ENGLISH B. PR (pulse rate) measurement Measurement range: 30bpm~250bpm Error: ±2bpm or ±2% (select the larger) C. Optical sensor: red light (wavelength: 660nm, 6.65mW) infrared light (wavelength: 880nm, 6.75mW) Note • The optional probe of the Sphygmomanometer is an integrated probe, the measuring part is integrated with the probe. • The service life of the integrated SpO probe is three years.
-
Page 11: Chapter 3 Button Functions
ENGLISH Note When the product and accessories described in this manual are about to exceed the period of use, they must be disposed according to relevant product handling specification. If you want to know more information, please contact our company or representative organization. Chapter 3 BUTTON FUNCTIONS All the operations to the Electronic Sphygmomanometer are through the buttons. -
Page 12: Chapter 4 External Interfaces
ENGLISH Chapter 4 EXTERNAL INTERFACES Note Please hold the airway tube plug to remove the NIBP cuff. Left side Cuff socket of Sphygmomanometer The right side of the device is USB socket Right side and AC adapter socket. USB socket AC adapter socket... -
Page 13: Chapter 5 Dry Battery/Ac Adapter Installation
ENGLISH Note The cuff socket and AC adapter socket of the sphygmomanometer only connect to the stated equipment which accord with the requirements of IEC 60601-1: 1988 “Medical electrical equipment-Part 1: General requirements for safety”. Chapter 5 DRY BATTERY/AC ADAPTER INSTALLATION The product can use dry battery or AC adapter as power source. 5.1 Dry Battery Installation 1. -
Page 14: Using The Ac Adapter
ENGLISH ENGLISH Note Dispose of the exhausted batteries according to applicable local regulations about environmental. 5.2 Using the AC Adapter 1. Connect the device and the AC adapter. Insert the AC adapter plug into the AC adapter socket on the right side of the device. -
Page 15: Chapter 6 Setting The Date And Time
ENGLISH Chapter 6 SETTING THE DATE AND TIME It is necessary to set date and time after turning on the device. The Electronic Sphygmomanometer can automatically stores measurement results, date and time. If dry battery power exhausts or removed, the time to stop. At the moment, please reset date and time. -
Page 16: Chapter 7 Unit
ENGLISH 2. After completing all time setting, select CONFIRM option and press ENTER button to confirm the setting value. If you do not want to change the time, select EXIT option and press ENTER button to return to the previous menu. Note Please choose the computer which should be ensured compliance with the requirements of IEC60950, or else it may damage the device. -
Page 17: Chapter 8 User Switch
ENGLISH Chapter 8 USER SWITCH The Electronic Sphygmomanometer stores the measure results of three users automatically, and up to 100 items for every user. Press USER button in main interface to switch users. Or press USER PURVIEW item in SYSTEM SETUP menu to switch users. -
Page 18: Chapter 9 Applying The Arm Cuff
ENGLISH When measuring, take the thick clothes off instead of rolling up the sleeves. In order to measure accurately, pay attention to applying the cuff properly (left arm). 1. Insert the arm cuff air plug in the cuff socket of sphygmomanometer. 2. -
Page 19: Chapter 10 Usage Method Of Sphygmomanometer
ENGLISH Chapter 10 USAGE METHOD OF SPHYGMOMANOMETER 10.1 Accurate Measurement Way Measurement in quiet and relaxing state. 1. Place your elbow on a table. 2. The cuff is level with your heart. 3. The palm of the hand is up, and the body relax. Advice Try to measure your blood pressure at the same time each day with the same arm and the same pose for consistency. -
Page 20: Bp Measurement
ENGLISH 10.2 BP Measurement 1. Press START/STOP button to take a measurement. Start measurement Measurement result During measurement, please keep correct pose and quiet state, do not move. Wish to stop measurement During measurement, press START/STOP button, device will stop inflating, and release the air from the cuff. 2. Confirm measurement value Measurement value can be automatically stored. -
Page 21: Chapter 11 Memory Function
ENGLISH Note • Wait at least 4-5 minutes between two measurements. When repeating measurements, because the arm appears congestion, it may not get correct blood pressure measurement. After the blood flow, take a measurement again. • When some factors affect the measurement results in measurement process, error messages will appear on the screen, you can obviate the malfunction and restart a measurement. 3. In no physiological alarm state, press any button to carry on the corresponding button function; in audio alarm state, press any button (except ON/OFF button) to clear up the audio alarm. -
Page 22: Delete Memory Values
ENGLISH 2. Press UP / DOWN button to circularly switch the former measurement values. *The right figure shows that there is no measurement result can be displayed. 3. Press LIST button to display 4. Press TREND button to display the data list interface. trend interface. -
Page 23: Chapter 12 Alarm Function
ENGLISH 1. Press MENU button to enter the system menu, select DELETE DATA option to enter its interface, select the user whose data will be deleted, after confirming again, all measurement results of the selected user will be deleted. 2. Finish Operation Select CONFIRM or EXIT to return to the previous menu, or hold ON/OFF button to turn the power off. -
Page 24: Technical Alarm
ENGLISH alarm is ON, the physiological alarm will occur; in ALARM SETUP interface, select SpO ALARM SETUP option to enter its interface, when the SpO measurement result is higher than the high limit or lower than the low limit and the alarm is ON, the physiological alarm will occur. In the state of physiological alarm, press any button to cancel the alarm and it does not affect the next alarm;... - Page 25 ENGLISH Precaution for SpO measurement Note • Make sure the nail covers the light. The probe wire should be on the backside of the hand. • SpO value always displays in the fixed place. • Testee can not use enamel or other makeup. • Testee’s fingernail can not be too long. • The fingers which are too cold or too thin may affect the measure accuracy, please insert the thicker finger such as thumb or middle finger deeply enough into the probe. • The SpO probe is suitable for children above four years old and adults(Weight should be between 15Kg to 110Kg).
- Page 26 ENGLISH • Do not perform SpO measuring and NIBP measuring on same arm at one time, because obstruction of blood flow during NIBP measuring may adversely affect the reading of SpO value. • Please don’t measure this device with function tester for the device’s related information. • The person who is allergic to rubber can not use this device. • For the special patients, there should be a more prudent inspecting in the placing process. The device can not be clipped on the edema and tender tissue. • The light (the infrared is invisible) emitted from the device is harmful to the eyes, so the user and the maintenance man should not stare at the light. • Check if the cable of SpO probe is in normal condition before measuring. After unplugging the SpO probe cable from the socket, “SpO %” and “bmp” on the screen will disappear.
-
Page 27: Chapter 14 Spo 2 Measurement Method
ENGLISH Chapter 14 MEASUREMENT METHOD (This chapter is only suitable for European Union market) 1. Attach the SpO probe to the appropriate site of the patient finger as the following figure. Place SpO probe 2. Plug the connector of the SpO probe cable into the USB socket in the lower right of the device. -
Page 28: Chapter 15 Installation Of The Software
ENGLISH • Excessive patient movement. • Outside ray radiation. • Improper SpO probe installation or incorrect contact position of the patient. • Temperature of SpO probe(optimum temperature between 28°C and 40°C). • Place the SpO probe on an limb that has a blood pressure cuff, arterial catheter, or intravascular line. • Concentrations of dysfunctional hemoglobin, such as carboxyhemoglobin (COHb) and methemoglobin (MetHb). • SpO is too low. • Bad circular injection of the part being measured. • It is required to use SpO probe which is provided by our company, contact with our sale department when changes SpO... -
Page 29: Installation Of Software
ENGLISH 15.2 Installation of Software 1. Place the CD-ROM in the CD-ROM compartment located on your computer. 2. If Auto Play for CDs is enabled, place CD in reader and follow instructions when they appear in the screen; otherwise follow install instructions below: Open Windows Explorer. - Page 30 ENGLISH Full-power Serial number 1. no NIBP data to review This item is compliant with 2. no finger inserted to Medical Device Directive 93/42/ probe (This item is only EEC of June 14, 1993, a directive 0123 suitable for European Union of the European Economic market) Community...
-
Page 31: Chapter 17 Error Message
ENGLISH Chapter 17 ERROR MESSAGE Error message will be displayed in the screen if there is something wrong when measuring. The causes and solutions are shown as follows: Error Message Causes Solutions Self-test failure Function abnormal Please contact us System failure Loose cuff Cuff is not connected correctly. -
Page 32: Chapter 18 Troubleshooting
ENGLISH Chapter 18 TROUBLESHOOTING Abnormal Phenomenons Causes Solutions BP measurement values Cuff is not connected correctly Correctly connect cuff too high or too low (refer to Chapter 9) Talk or move arms when Keep quiet and restart measuring a measurement The turnup clothing presses Take off the clothing which the arm... - Page 33 ENGLISH Hold the on/off button but can Power of batteries can be Replace all four batteries with not start the device exhausted new ones The battery polarities Check the battery installation is reversed for proper placement of the battery polarities Cuff inflation start before press the measurement button or never Pull out the cuff to deflate.
-
Page 34: Chapter 19 Maintenance, Cleaning And Keeping
ENGLISH Chapter 19 MAINTENANCE, CLEANING AND KEEPING *Please follow the instructions in the user manual. If you do not comply, our company will not assume responsibilities of the quality. Warning Must remove batteries and cut off the alternating power supply before cleaning the sphygmomanometer, accessories must be clean separately. - Page 35 ENGLISH procedure of hospital). The device can be inspected by inspection organizations which designated by the state, or inspected by professionals, also, users can contact with our company. Warning Do not submerge the device in water. Advice • Do not use any naphtha, • Do not attempt to clean thinner or gas to clean.
- Page 36 ENGLISH Warning It is recommended that you check if there is any damage on the Sphygmomanometer or the accessories regularly, if you find any damage, stop using it, and contact our Customer Service immediately. Warning The disposal of scrap instrument and its accessories and packing (including batteries, plastic bags, foams and paper boxes) should follow the local laws and regulations.
-
Page 37: Chapter 20 Nibp Specification
ENGLISH Chapter 20 NIBP SPECIFICATION Name Electronic Sphygmomanometer Display mode 2.8’’ color LCD Display NIBP specification Measurement method Oscillometric method Working mode Automatic Operation mode Continuous operation Measurement Range Pressure adult 0~290mmHg (0~38.6kPa) pediatric 0~235mmHg (0~31.3kPa) neonatal 0~140mmHg(0~18.6kPa) Pulse: 40~240/min Overpressure protection adult mode 295±5mmHg (39.33±0.67kPa) - Page 38 ENGLISH Resolution Pressure: 1mmHg(0.133kPa) Accuracy Static pressure: ±3mmHg(±0.4kPa) Error The BP Value of the device is equivalence with the measurement value of Stethoscopy. The error meets the requests in the ANSI/AAMI SP-10:2002+A1:2003 +A2:2006 Operating temperature/ humidity +5ºC~40 ºC 15%RH~80%RH Transport Transport by general vehicle or according to the order contract, avoid pounded, shake and splash by rain and snow in transportation Storage...
-
Page 39: Chapter 21 Spo 2 Specification
ENGLISH Chapter 21 SPECIFICATION (This chapter is only suitable for European Union market) Name Probe (Accessory Separate Sale) Model Y10UCH150 Measurement Range Measuring Range: 0%~100%; Pulse Rate Measuring Range: 30bpm~250bpm Resolution 1bpm Measurement Accuracy 70%~100% ±2% 0%~69% undefined ±2bpm or ±2% (select larger) Measurement Performance In Weak Filling Condition pulse-filling ratio: 0.4% error... -
Page 40: Appendix
ENGLISH Appendix Guidance and manufacturer’s declaration - electromagnetic emissions for all EQUIPMENT and SYSTEMS Guidance and manufacturer’s declaration - electromagnetic emission The device is intended for use in the electromagnetic environment specified below. The customer of the user of the device should assure that it is used in such and environment. Emission test Compliance Electromagnetic environment –... - Page 41 ENGLISH Guidance and manufacturer’s declaration - electromagnetic immunity for all EQUIPMENT and SYSTEMS Guidance and manufacturer’s declaration - electromagnetic immunity The device is intended for use in the electromagnetic environment specified below. The customer or the user of the device should assure that it is used in such an environment. Immunity test IEC 60601 test level Compliance level...
- Page 42 ENGLISH Voltage dips, short <5% U (>95% dip <5% U (>95% dip Mains power quality interruptions and in U ) for 0.5 cycle in U ) for 0.5 cycle should be that of a typical voltage variations on commercial or hospital 40% U (60% dip 40% U...
- Page 43 ENGLISH Guidance and manufacturer’s declaration - electromagnetic immunity for EQUIPMENT and SYSTEMS that are not LIFE-SUPPORTING Guidance and manufacturer’s declaration - electromagnetic immunity The device is intended for use in the electromagnetic environment specified below. The customer or the user of the device should assure that it is used in such an environment. Immunity test IEC 60601 Compliance...
- Page 44 ENGLISH NOTE 1 At 80 MHz and 800 MHz, the higher frequency range applies. NOTE 2 These guidelines may not apply in all situations. Electromagnetic propagation is affected by absorption and reflection from structures, objects and people. A Field strengths from fixed transmitters, such as base stations for radio (cellular/cordless) telephones and land mobile radios, amateur radio, AM and FM radio broadcast and TV broadcast cannot be predicted theoretically with accuracy. To assess the electromagnetic environment due to fixed RF transmitters, an electromagnetic site survey should be considered.
- Page 45 ENGLISH Recommended separation distances between portable and mobile RF communications equipment and the EQUIPMENT or SYSTEM - for EQUIPMENT or SYSTEM that are not LIFE-SUPPORTING Recommended separation distances between portable and mobile RF communications equipment and the device The device is intended for use in an electromagnetic environment in which radiated RF disturbances are controlled.
- Page 46 The warranty is valid for 12 months from the date of supply of GIMA. During the period of validity of the warranty, GIMA will repair and/or replace free of charge all the defected parts due to production reasons. Labor costs and personnel traveling expenses and packaging not included.
Need help?
Do you have a question about the 32902 and is the answer not in the manual?
Questions and answers