Table of Contents
Advertisement
Quick Links
Advertisement
Table of Contents

Subscribe to Our Youtube Channel
Related Manuals for Champion Brute Platinum XLT Tapper


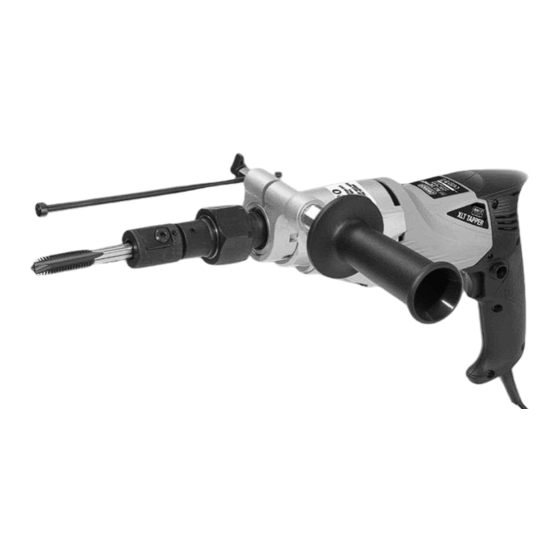
Summary of Contents for Champion Brute Platinum XLT Tapper
- Page 1 Please Remember to Register Your Tapper Online at www.championcuttingtool.com...
- Page 2 Power Input 4A / 450W Voltage 115V, 60Hz Forward No Load min Reverse Steel 14mm (9/16") Tapping Capacity Aluminum 16mm (5/8") Dimensions 400mm x 80mm x 200mm Net Weight 2.7 Kg (6 lbs) (Not including side handle 0.45 Kg (1 lb)) Lock Screw Locking screw Swivel joint...
-
Page 3: General Safety Instructions
GENERAL SAFETY INSTRUCTIONS I f o p e rat i n g a p owe r to o l i n a d a m p location is unavoidable, use an ear th WARNING! Read all safety warnings and leakage circuit breaker. Use of an earth all instructions. - Page 4 4) POWER TOOL USE AND CARE Symbols used in this manual Do not force the power tool. Use the correct V……..volts power tool for your application. The correct A……..amperes power tool will do the job better and safer at Hz……..hertz the rate for which it was designed.
-
Page 5: Specific Safety Instructions
2. Caution: This term means that there is a risk of damage to the machine, cutting tool or other LIST OF CONTENTS equipment • Brute Platinum XLT Tapper 3. Note: This terms offers useful information • Side Handle relating to the operation of the machine or its •... -
Page 6: Tapping Operation
SETTING UP FOR TAPPING ALWAYS ENSURE THAT THE HOLE ISN’T OVER TAPPED. THE HOLE’S DEPTH MUST BE MUST BE CAUTION: Never use a cutting tool which is LONGER THAN THE NEEDED THREADING DEPTH!! larger than the maximum rated capacity of the ALWAYS HOLD THE TOOL AS STRAIGHT AS machine. - Page 7 THE DEPTH STOP hole. ( The swivel joint will take up small amounts of misalignment) O n c e t h e h o l e i s t a p p e d , r e l e a s e t h e The depth stop is useful when tapping blind holes downward feed pressure and the spindle will to avoid bottoming out the tap.
-
Page 8: Maintenance
MAINTENANCE with the holder. Install the new brush into the brush holder with Every 50 hours of operation blow compressed air the male spade end pointing toward the rear of through the motor while running at no load to clean the motor then screw the brush holder in place. - Page 9 WIRING www.championcuttingtool.com...
-
Page 10: Exploded View
EXPLODED VIEW www.championcuttingtool.com... -
Page 11: Parts List
PARTS LIST Part No. Description Part No. Description XLT-1 POWER SUPPLY CABLE 16AX2CX3M SJTW XLT-38 OUTPUT GEAR M1.0 x 38T XLT-2 CORD ARMOR XLT-39 EXTERNAL CIRCLIP S-17 XLT-3 TRIGGER SWITCH XLT-40 TAP SPINDLE ENGAGEMENT GEAR XLT-4 CABLE CLIP XLT-41 SPINDLE XLT-5 PANHEAD TAPPING SCREW M4 x 14 XLT-42...
Need help?
Do you have a question about the Brute Platinum XLT Tapper and is the answer not in the manual?
Questions and answers