Table of Contents
Advertisement
Advertisement
Table of Contents

Related Manuals for Void Bias Q5


Summary of Contents for Void Bias Q5
- Page 1 Bias Q5 User Guide V1.0 Bias Q5...
- Page 2 This user guide is subject to change without notice. For the latest online version, visit: www.voidacoustics.com Void Acoustics and the Void logo are registered trademarks of Void Acoustics Research Ltd. in the United Kingdom, USA and other countries; all other Void trademarks are the property of Void Acoustics...
-
Page 3: Table Of Contents
Precautions regarding installation Appendix B: Specifications Switch on Switch off Mute Wi-fi switch 4.10 Armonía callback Wi-fi Connections Signal grounding Analog audio input connections Digital audio input connections Output connections Ethernet connections LED chart Bias Q5 User Guide V1.0 Page 3... - Page 4 Bias Q5 Bias Q5 User Guide V1.0 Page 4...
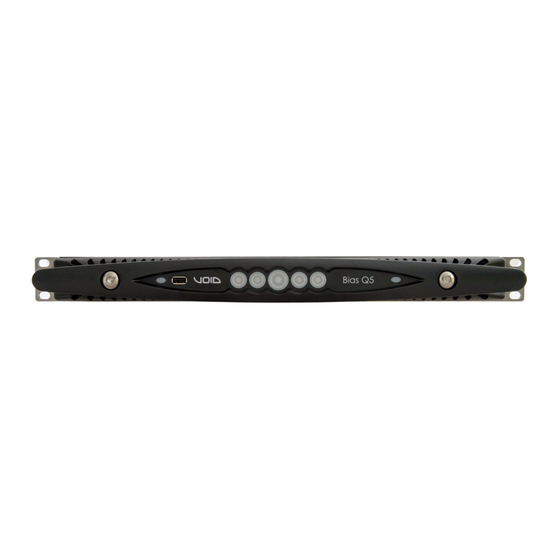
- Page 5 5. Main on/off switch, status LED and MUTE ALL 2. USB port 6. CH3 Status LED and MUTE 3. CH1 Status LED and MUTE 7. CH4 Status LED and MUTE 4. CH2 Status LED and MUTE 8. Armonía callback Bias Q5 User Guide V1.0 Page 5...
- Page 6 1 2 3 4 5 6 7 8 RJ45 Color code (TIA/EIA-568-B) ORANGE / WHITE ORANGE GREEN / WHITE COLD BLUE BLUE / WHITE Input XLR-M pinout GREEN Pin 1 Pin 2 BROWN / WHITE Pin 3 COLD BROWN Bias Q5 User Guide V1.0 Page 6...
- Page 7 1– 2– 1– CHB + CHB – 2– output stage B output Bridge-tied load stage A speakON CHA + connector CHA – 1– 2– 1– CHB + CHB – 2– output stage B Bias Q5 User Guide V1.0 Page 7...
- Page 8 L3 L2 L1 Bias Q5 User Guide V1.0 Page 8...
- Page 9 Once properly wired, insert and lock the flying connector into the shell provided by Powersoft. Bias Q5 User Guide V1.0 Page 9...
-
Page 10: Regulatory Information
Void Acoustics for reprocessing. For more information about where you can send your waste equipment for recycling, please contact Void Acoustics or one of your local distributors. -
Page 11: Important Safety Instructions
CONNECTION TO THE MAINS SHALL BE DONE ONLY BY A ELECTROTECHNICAL SKILLED PERSON CLASS3 ACCORDING THE NATIONAL REQUIREMENTS OF WIRING THE COUNTRIES WHERE THE UNIT IS SOLD. WARNING: FUSE ON NEUTRAL CLASS3 WIRING Bias Q5 User Guide V1.0 Page 11... -
Page 12: About
In buying 3.4 List of image panels this product, you are now part of the Void family and we hope using it brings you years of satisfaction. This guide will Q5 mechanical drawings: all dimensions in millimeters... -
Page 13: Installation
4 Installation 4.1 Location 4.3 Cleaning The intended use of Bias Q5 amplifiers is in a rack only. Always use a dry cloth for cleaning the chassis and the front The AC mains wirings of the units must be connected panel. -
Page 14: Three-Phase Electric Power
Bias Q5 to work in delta connection. • Contact the authorized service center for ordinary and extraordinary maintenance. -
Page 15: Switch Off
The system will push the user interface to the browser: Press the leftmost button: the button will light up and the now you can start managing your Bias Q5 amplifier system will establish a new local Wi-Fi network whose platform. -
Page 16: Connections
Panel H, p. 6.5 Ethernet connections There is no ground switch or terminal on the Bias Q5 amplifiers. All shield terminals of input connections are directly connected to the chassis. This means Bias Q5 amplifier platforms can be remotely controlled that the unit’s signal grounding system is automatic. -
Page 17: Led Chart
Usually this is a problem of IP addressing: both Armonia and Standby mode (all LEDs off) the Bias Q5 must belong to the same subnet. If a DHCP server is present on the network and a Bias Q5 amplifier fan fault detected... -
Page 18: Armonía Pro Audio Suite
Bias Q5 amplifier platforms can connect to the PC running • Matrix. The innovative routing engine of Bias Q5 Armonía through a Fast Ethernet connection. In order to allows any input to be routed to any output. -
Page 19: Warranty And Assistance
48 (forty eight) months, starting from having an in-house service department, Powersoft supports a the date of purchase printed on Void’s (or any of its network of authorized service centers. If your amplifier needs Authorized Dealer’s) invoice to the end customer. All repair, contact your Powersoft dealer (or distributor). -
Page 20: Appendix A: Mains Wiring Options
The parallel connection must be done at the breaker output and not N - n.c. at the connector level. Symbol “n.c.” means not connected. Single-Phase: 3-Wire; Grounded Neutral; Grounded at Midpoint pf Phase; Contiguous Ground Bias Q5 User Guide V1.0 Page 20... - Page 21 // N The parallel connection must be done at the breaker output and not N - n.c. at the connector level. Symbol “n.c.” means not connected. 3-Phase Delta: 3-Wire; Grounded Junction of Phases. Bias Q5 User Guide V1.0 Page 21...
- Page 22 The parallel connection must be done at the breaker output and not at the connector level. Symbol “n.c.” means not connected. Single-Phase: 2-Wire; Nongrounded Neutral. A - L B - L C - L 3-Phase Delta: 3-Wire. Bias Q5 User Guide V1.0 Page 22...
-
Page 23: Appendix B: Specifications
Weight 15 kg (33.0 lb) Thermal dissipation Single phase 115V 230V 1/8 Maximum Output Power @ 8 Ω 1127 BTU/h 1058 BTU/h 1/4 Maximum Output Power @ 8 Ω 2124 BTU/h 1639 BTU/h Bias Q5 User Guide V1.0 Page 23... - Page 24 North America Void Acoustics North America 503-854-7134 sales.usa@voidacoustics.com Head Office Void Acoustics Research Ltd Unit 15 Dawkins Road Industrial Estate Poole Dorset BH15 4JY England +44 (0) 1202 666 006 info@voidacoustics.com Registered in England & Wales No. 07533536 www.voidacoustics.com...
Need help?
Do you have a question about the Bias Q5 and is the answer not in the manual?
Questions and answers