Advertisement
Quick Links
Quick Hardware Setup Guide
IBM ATA 133 RAID Controller
Thank you for purchasing the IBM ATA 133 RAID controller. Please take a few
minutes to review this Quick Hardware Setup Guide before you install the controller.
If you require a further explanation of any item covered in this guide, please refer to
the installation instructions on your Driver and Documentation CD.
Contents for the IBM ATA 133 RAID Controller
The following items are included with the IBM ATA 133 RAID controller:
•
Two standard length 40-pin connector ATA-100/133 cables with two drive
connectors
•
Two extended length 40-pin connector ATA-100/133 cables with one drive
connector
•
A Driver and Documentation CD with utility programs, device drivers for various
operating systems, and the following documentation:
•
IBM ATA 133 RAID Controller User's Guide
•
Software license agreement
Technical Support
If you need help installing, configuring, or running the IBM ATA 133 RAID controller,
contact IBM Support. See the IBM ATA 133 RAID Controller User's Guide for contact
information.
Hardware Installation
Make a backup of your data before you change your system
configuration; otherwise you may lose data.
Perform the following steps to install the RAID controller. Each step is
explained more fully in the following text.
Step
Action
1
Unpack the IBM ATA 133 RAID controller.
2
Turn the computer off, remove the power cord, and remove the
cover.
3
Configure the motherboard.
4
Check the jumper settings on the RAID controller.
5
Install the RAID controller.
6
Set the jumpers on the IDE drives.
7
Connect the IDE drives to the RAID controller.
8
Replace the computer cover and turn the power on.
9
Run the BIOS Configuration Utility.
10
Install the operating system driver.
Copyright 2003 International Business Machines Corporation All Rights Reserved.
Caution
Step 1 Unpack
Unpack and install the hardware in a static-free environment. Remove the controller
and inspect it for damage. If the card appears damaged or if any items that you should
have received are missing, contact IBM Support.
Step 2 Power Down
Turn off the computer and physically remove the power cord from the back of the
power supply. Remove the cover from the chassis. Make sure the computer is
disconnected from any networks before you install the controller card.
Step 3 Configure Motherboard
Make sure the motherboard is configured correctly for the IBM ATA 133 RAID
controller. The IBM ATA 133 is essentially an IDE controller. Each IBM ATA 133
card you install requires an available PCI IRQ; make sure one is available.
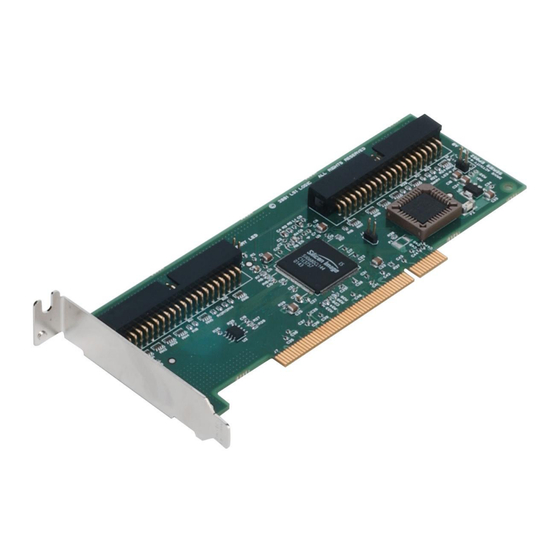
Step 4 Set Jumpers
Make sure the jumper settings on the RAID controller are correct. The jumpers are set
at the factory and you probably do not need to change them. The following table lists
all the jumpers and connectors on the RAID controller.
Item
Description
J1
Secondary IDE channel connector: connects the secondary
IDE drive to the RAID controller.
J2
Secondary channel activity LED: this can be connected to
an LED on the computer case to show activity on the
secondary IDE channel.
J3
Primary IDE channel connector: connects the primary IDE
drive to the RAID controller.
J4
BA5_ENABLE (Base address 5): must be open (not
jumpered) so that Base address 5 is enabled.
J5
Primary channel activity LED: this can be connected to an
LED on the computer case to show activity on the primary
IDE channel.
J6
Drive activity connector
The following diagram shows the location of the headers and connectors on the RAID
controller.
Secondary C hannel
J1
Secondary LED J2
Prim ary C hannel
J3
O p tion
R O m
J4
C o nt ro lle r
P rim ary LED J5
Part Number: DB11-000043-00
Type
40-pin
connector
2-pin header
40-pin
connector
2-pin header
2-pin header
2-pin header
Drive
Activity
LED J6
Advertisement

Related Manuals for IBM ATA 133


Summary of Contents for IBM ATA 133
-
Page 1: Technical Support
Make sure the motherboard is configured correctly for the IBM ATA 133 RAID controller. The IBM ATA 133 is essentially an IDE controller. Each IBM ATA 133 card you install requires an available PCI IRQ; make sure one is available. - Page 2 Step 5 Install the IBM ATA 133 RAID Controller Correct Order for Attaching the Drives Select a 3.3 V or 5 V PCI slot and align the IBM ATA 133 RAID controller bus Each of the standard length ATA-100/133 cables has a connector at each end for a connector to the slot, as shown below.
Need help?
Do you have a question about the ATA 133 and is the answer not in the manual?
Questions and answers