Table of Contents
Advertisement
Advertisement
Chapters
Table of Contents
Troubleshooting

Related Manuals for Welch Allyn Propaq LT 802LTAN


Summary of Contents for Welch Allyn Propaq LT 802LTAN
-
Page 1: Service Manual
Propaq ® Vital Signs Monitor Service Manual Software version 1.5X or later... - Page 2 This is not a sale of the software or any copy of the software; all right, title and ownership of the software remain with Welch Allyn or its vendors.
-
Page 3: Table Of Contents
Contents 1 - Safety summary ......... 1 Warnings. - Page 4 Contents Welch Allyn Propaq LT Vital Signs Monitor...
-
Page 5: Safety Summary
WARNING Use only accessories approved by Welch Allyn. Visit www.welchallyn.com. The use of any other accessories can result in inaccurate patient data, can damage the equipment, and can void your product warranty. -
Page 6: General Safety Considerations
If the monitor detects an unrecoverable problem, it displays a brief ‘Fault’ message. See “Alert Messages and Status Messages”, Propaq LT Vital Signs Monitor Directions for Use (810-2713-XX). Report all such errors to Welch Allyn. • Do not service a monitor under warranty. Servicing a monitor under warranty voids the warranty. -
Page 7: Symbols
Service Manual Safety summary Symbols WARNING Indicates conditions that could lead to illness, injury, or death. Caution In this manual, indicates conditions that could damage equipment or other property. - Page 8 Safety summary Welch Allyn Propaq LT Vital Signs Monitor...
-
Page 9: Overview
Repair and replacement of the radio and the antenna is not supported. Any service work on the radio and the antenna must be performed by certified and qualified service personnel at an authorized Welch Allyn service center. (For contact information, see page ii.) -
Page 10: Returning Products
For information on any of these services, call one of the numbers listed on page Returning products To return a product for service, contact Welch Allyn Technical Support and request a Return Material Authorization (RMA) number. Welch Allyn does not accept returned products without an RMA. -
Page 11: Product Configurations
Troubleshoot and repair, and then “Troubleshooting and repair” on page 11 functional verification verify functionality “Disassembly and reassembly” on page 25 “Functional verification” on page 55 Return the monitor to an authorized “Returning products” on page 6 Welch Allyn service center... -
Page 12: Service Options
Service options Warranty service All repairs on products under warranty must be performed or approved by Welch Allyn. Refer all warranty service to Welch Allyn Factory Service or another authorized Welch Allyn Service Center. Obtain an RMA number for all returns to Welch Allyn Factory Service. -
Page 13: Related Documents
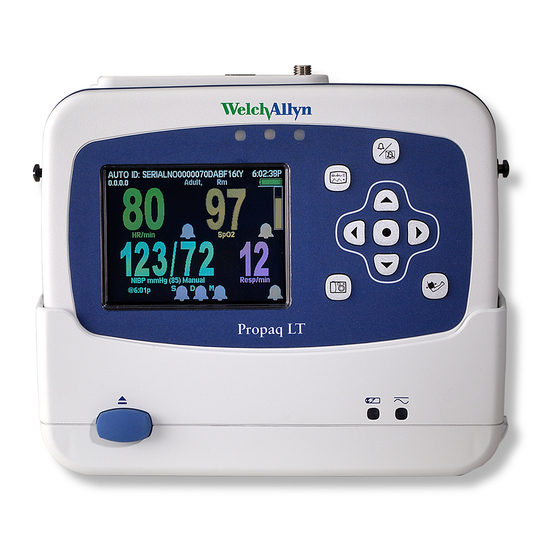
Service Manual Overview Related documents Title Reorder Number Propaq LT Vital Signs Monitor Directions for Use 810-1828-XX Controls Monitor Power - Turn the monitor power on or off. Down - Move the cursor down to the next display item. Action - Act based on what is highlighted. Silence/Reset - Silence the current alarm tone for 90 seconds or reset a silenced alarm tone. - Page 14 Overview Welch Allyn Propaq LT Vital Signs Monitor STEWART, ANN STEWART, ANN 7762940 7762940 3:00:06P 3:00:06P Adult Adult Rm ICU 263 Rm ICU 263 1mV/cm 1mV/cm Service HR/min HR/min NIBP mmHg NIBP mmHg Resp/min Resp/min SpO2 SpO2 Setup Setup Alarms...
-
Page 15: Troubleshooting And Repair
....21 Troubleshooting chart Caution Replace parts, components, or accessories only with parts supplied or approved by Welch Allyn. The use of any other parts can lead to inferior monitor performance and will void the product warranty. General Refer to “Service chart”... - Page 16 Problem with the cradle power Replace the cradle power board. board. “Disassembling the cradle” on page 47. Problem with the monitor. Send the monitor to an authorized Welch Allyn Service Center for service. (See “Returning products” on page 6.) Monitor battery fails to charge.
- Page 17 Replace the top chassis assembly. “Disassembling the top chassis” on page 34. Voltages displayed on the service Main board fault. Send the monitor to an authorized Welch Allyn menu are out of range. Service Center for service. (See page ii.) Repeated occurrence of “SpO...
- Page 18 In facilities with 802.11a networks, administrators can reconfigure the radio, the Acuity network, or both, to meet local security or policy requirements. When you send a model 802LTAN or 802LTAS monitor to Welch Allyn for service, the radio is reset to the factory configuration.
- Page 19 The Acuity system is at capacity for Turn off another wireless monitor. licenses. Frequent communication faults Faulty antenna or poor antenna Send the monitor to an authorized Welch Allyn with no apparent cause. On the connection. Service Center for service. (See “Returning Radio Monitoring service screen, products”...
- Page 20 Troubleshooting and repair Welch Allyn Propaq LT Vital Signs Monitor Battery states and service State Description Type of State Possible Corrective Action Battery state unknown. Normal transitory. Should not If the state persists, replace the battery persist. pack. “Removing the lithium ion battery assembly”...
- Page 21 Service Manual Troubleshooting and repair Charger states and service State Description Charger Charger Type of State Possible Corrective Action Status Power Charger state Normal initial transitory state of unknown. very short duration. Monitor docked, Normal operating state when the If the power adapter is not No-power fault.
-
Page 22: Battery Use And Care
Troubleshooting and repair Welch Allyn Propaq LT Vital Signs Monitor Battery use and care The battery meets specification when used in an environment between 0° C and 40° C. • Operating the monitor in a cold environment (below 20° C) reduces battery run time. -
Page 23: Service Chart
This chart shows which procedure to use for specific service operations on monitors not covered by warranty. Caution Do not service a monitor under warranty. Any service not performed at a Welch Allyn service center voids the product warranty. Note Do not attempt to replace any component, including the NIBP pressure transducers, soldered onto the main board. - Page 24 Troubleshooting and repair Welch Allyn Propaq LT Vital Signs Monitor Cradle Service Action Replace the fuse “Replacing the fuse” on page 47. Replace the interconnect board “Disassembling the cradle” on page 47. “Functional verification” on page 55. Replace the power board “Disassembling the cradle”...
-
Page 25: Service Menus For Repair And Network Troubleshooting
• Main board replacement or repair Caution Main board repair must be performed at the Welch Allyn Factory Service Center. Any change to the main board requires system testing, calibration, and verification, which can be done only at the Factory Service Center. - Page 26 Troubleshooting and repair Welch Allyn Propaq LT Vital Signs Monitor 3. Simultaneously press and to access the NIBP characterization service screens. A warning message appears: “NIBP characterization affects neonatal cuff detection.” 4. Press to continue. The first steps of the procedure appear: HALL, ROBERT E.
- Page 27 Service Manual Troubleshooting and repair Set LCD bias When the display module has been replaced, you must then set the LCD bias. Perform this test only under fluorescent lighting. Note 1. On the monitor, navigate to the Bias screen. HR/min Setup Service Display...
- Page 28 Troubleshooting and repair Welch Allyn Propaq LT Vital Signs Monitor...
-
Page 29: Disassembly And Reassembly
Disassembly and reassembly Procedures overview This describes all disassembly steps required for module-level and board-level service procedures. Disassembly is presented here as a sequence of procedures. Do not perform any unnecessary procedures. Example: Remove the air filter assembly and replace the air filter only if it appears that the filter is clogged and is restricting air flow to the pump. - Page 30 Disassembly and reassembly Welch Allyn Propaq LT Vital Signs Monitor Screws Caution Observe recommended screw torque specifications, especially with screws that secure directly into plastic standoffs. Note To avoid mismatching screws and holes, keep the screws for each piece with that piece as you remove modules, circuit assemblies, and other components.
- Page 31 Service Manual Disassembly and reassembly Connectors Note All connectors are keyed or labeled to facilitate proper connection. Take care to correctly align all connector halves before attempting to connect them. Zero insertion force (ZIF) flex cable connectors ZIF connectors use a sliding outer piece that latches and unlatches to secure and release the flex cable.
- Page 32 Disassembly and reassembly Welch Allyn Propaq LT Vital Signs Monitor 2. Insert the flex cable into the connector. 3. Slide the latching piece toward the connector body until it clicks into place. Caution Do not attempt to remove a flex cable until the ZIF latch has been opened.
-
Page 33: Procedures
When the monitor, the cradle, or the battery reaches end of life, recycle it locally Note according to national, state, and local regulations, or return it to Welch Allyn. The battery pack assembly consists of the rechargeable lithium ion cells, a protection board, and the battery door. -
Page 34: Replacing The Air Filter
Disassembly and reassembly Welch Allyn Propaq LT Vital Signs Monitor Battery compartment Battery assembly Battery door Replacing the air filter Note It is not necessary to replace the air filter each time you service or repair the monitor. See “Recommended service intervals”... -
Page 35: Separating The Top And Bottom Chassis Halves
Service Manual Disassembly and reassembly Air filter 3. If the O-ring shows signs of wear, replace it with a new one. REASSEMBLY: Lubricate the outside of the O-ring with a drop of alcohol to prevent it from riding up the side of the cylinder when inserted. - Page 36 Disassembly and reassembly Welch Allyn Propaq LT Vital Signs Monitor 3. Remove the screws from the bottom chassis. • Remove three screws from the top and one from the bottom left corner. • Remove two screws from inside the battery compartment.
- Page 37 Service Manual Disassembly and reassembly Display cable Display cable connector (J4) 9. Remove the slotted blue gasket that runs around the chassis halves. REASSEMBLY: The slotted blue gasket between the top and bottom chassis halves is directional; it can be correctly aligned in only one way. Take care to reinstall the gasket correctly.
-
Page 38: Disassembling The Top Chassis
Disassembly and reassembly Welch Allyn Propaq LT Vital Signs Monitor Disassembling the top chassis The top chassis assembly contains the top plastic panel assembly (including the integrated overlay for buttons, window, LEDs, and trim), the display module, and the speaker. - Page 39 Service Manual Disassembly and reassembly c. Remove the rubber gaskets from the display module. d. Set aside the display module, protecting the display surface from damage. Display surface 4. Remove the speaker. REASSEMBLY: Before removing the speaker, note the alignment of the speaker cable terminals for rerouting the cable.
-
Page 40: Removing The Main Board From The Bottom Chassis Assembly
Caution Do not touch, move, or adjust the radio antenna. The radio antenna is extremely fragile and is exposed during this procedure. If the antenna is damaged, the monitor must be returned to a Welch Allyn authorized Service Center for repair. - Page 41 Service Manual Disassembly and reassembly Main board screws Reassembly: 4 inch lbs 5. Lift the top of the main board slightly away from the chassis to access the NIBP tubing connection to the air inlet/filter. Lift this side of the main board slightly to access the NIBP tubing connection underneath 6.
- Page 42 Note If the radio card or the antenna has been moved out of position, return the monitor to a qualified Welch Allyn service center. The radio and the antenna are not field-serviceable components. REASSEMBLY: When reconnecting the tubing, lubricate the inlet port, using a cotton swab dampened with water.
- Page 43 Service Manual Disassembly and reassembly REASSEMBLY: When reconnecting the ECG cable, be certain that the cable leads are perpendicular to the board and to the ZIF connector before you lock the connector clips. 8. Disconnect the SpO (flex) cable from connector J3 on the back of the main board. J1 (ECG) J3 (SpO flex cable...
- Page 44 Disassembly and reassembly Welch Allyn Propaq LT Vital Signs Monitor Power switch cable connector J2 11. Remove the main board. Main board with NIBP module...
-
Page 45: Removing The Nibp Assembly From The Main Board
Service Manual Disassembly and reassembly Removing the NIBP assembly from the main board WARNING After replacing any part of the NIBP assembly, you must characterize NIBP. Failure to characterize NIBP could lead to excessive cuff pressure for neonatal patients. This procedure consists of 3 parts: •... - Page 46 Disassembly and reassembly Welch Allyn Propaq LT Vital Signs Monitor REASSEMBLY: The pump input (suction) port is slotted and is oriented away from the main board. The output port (pressure) is not slotted and is oriented toward the main board.
- Page 47 Service Manual Disassembly and reassembly Cable ties Pump wires 7. Note how the two pump wires are connected to the pump. Red wire to the + terminal Black Black wire to the unmarked terminal 8. Desolder the two pump wires connected to the pump. 9.
- Page 48 Disassembly and reassembly Welch Allyn Propaq LT Vital Signs Monitor Cable routing notch 11. Remove the single screw securing the valve assembly to the main board. Screw Reassembly: 4 inch lbs Pressure transducers Caution Do not attempt to remove the pressure transducers. The pressure transducers are not user-serviceable.
-
Page 49: Removing The Patient Connector Panel From The Bottom Chassis
Service Manual Disassembly and reassembly Removing the patient connector panel from the bottom chassis “Removing the lithium ion battery assembly” on page 29. “Separating the top and bottom chassis halves” on page 31. “Removing the main board from the bottom chassis assembly” on page 36. -
Page 50: Removing The Power/Usb Flex Connector From The Bottom Chassis
Disassembly and reassembly Welch Allyn Propaq LT Vital Signs Monitor Remove all adhesive tape from the ferrite beads and remove all pieces of the adhesive gasket. Use all new adhesive tape on the ferrite beads and a new adhesive gasket on the connector assembly. -
Page 51: Disassembling The Cradle
Service Manual Disassembly and reassembly Disassembling the cradle Note To facilitate reassembly, observe carefully while disassembling. Replacing the fuse 3A, slow blow, 2AG 1. Remove the fuse cover by rotating it (using a screwdriver) 90 counterclockwise. fuse cover 2. Remove and replace the fuse. 3. - Page 52 Disassembly and reassembly Welch Allyn Propaq LT Vital Signs Monitor Removing the lower housing, I/O panel, and power board 1. Remove the seven machine screws from the bottom of the lower housing. Bottom chassis screws (7) Reassembly: 6 inch lbs REASSEMBLY:Note the three screw holes that have nylon washers.
- Page 53 Service Manual Disassembly and reassembly 3. With the AC power adapter unplugged from the wall, plug the AC power adapter into the cradle AC power input connector. 4. Using the AC power adapter connector for leverage, carefully rock the I/O panel from side to side to break the bond of the adhesive gasket, and then separate the I/O panel from the upper housing.
- Page 54 Disassembly and reassembly Welch Allyn Propaq LT Vital Signs Monitor Power board Interconnect board 8. Carefully detach the thin, black rubber seal from the upper case. REASSEMBLY: Carefully install the thin, black rubber seal in the trough in the lower case before joining the upper and lower case halves.
- Page 55 Service Manual Disassembly and reassembly REASSEMBLY: Align the power board with the slots in the lower cradle housing. lower cradle housing power board alignment slots REASSEMBLY: When closing the cradle, bend the white insulator on the power board to slide along the wall of the lower cradle housing. insulator lower cradle housing 9.
- Page 56 Disassembly and reassembly Welch Allyn Propaq LT Vital Signs Monitor 10. Disconnect J1 and J2 from the Interconnect board. 11. Remove the Power board and I/O panel by sliding the Power board out from the slots in the upper housing.
- Page 57 Service Manual Disassembly and reassembly REASSEMBLY: (1) Clean all remnants of adhesive from the upper and lower cradle cases, and from the I/ O panel if you are reusing it. (2) Apply a new adhesive gasket to the I/O panel. Note: On USB-equipped cradles, keep the USB port cover out of the way during reassembly.
- Page 58 Disassembly and reassembly Welch Allyn Propaq LT Vital Signs Monitor 2. Remove the two latch springs by compressing them and lifting them off of the posts. REASSEMBLY: Note the small alignment slot on one side of the bracket and the small alignment hole on the other.
-
Page 59: Functional Verification
Functional verification Functional verification overview This section describes the procedure for a complete functional test to support recommended preventive-maintenance schedules. Equipment required The following equipment is required for functional verification of a fully configured monitor. Commercially available general-purpose/medical test equipment Item Manufacturer part number/specification Power supply... -
Page 60: Procedures
Functional verification Welch Allyn Propaq LT Vital Signs Monitor Welch Allyn accessories and test equipment ECG cable, 4’, 5-lead 008-0522-00 (AAMI) or 008-0522-01 (IEC) NIBP Hose, Neonatal, 8’ 008-0265-XX Neonatal #1 cuff, disposable, box of 10 008-0620-XX Adult Cuff 008-0628-XX... - Page 61 Service Manual Functional verification ID: SET_CAOJ1T9L ID: SET_CAOJ1T9L 3:00:06P 3:00:06P Adult Adult Service Service NIBP NIBP SpO2 SpO2 Radio Radio Software Software Display Display Battery Battery Voltages Voltages Buttons Buttons Battery Battery Show Info Show Info ID: SET_CAOJ1T9L ID: SET_CAOJ1T9L 3:00:06P 3:00:06P Adult...
- Page 62 Functional verification Welch Allyn Propaq LT Vital Signs Monitor Charge time (optional procedure) A normally discharged battery pack typically requires 3 hours (4 hours maximum) to fully charge, whether the monitor is on or off during charging. A normally discharged battery pack is one on which a monitor has recently run for Note more than 5 minutes just before a low-battery shutdown.
- Page 63 Service Manual Functional verification STEWART, ANN STEWART, ANN 7762940 7762940 15:14:28 Adult Adult Rm ED 2 Rm ED 263 1mV/cm 1mV/cm Waveform Source Waveform Source Lead I Lead I Lead II Lead II 6 sec 6 sec Lead III Lead III 80 80 12 12 Resp...
- Page 64 Functional verification Welch Allyn Propaq LT Vital Signs Monitor 8. Verify that the monitor displays a Resp waveform with a rate of 20 bpm ± 2 bpm. Test either the monitor or the monitor with the sensor, as required for your application.
- Page 65 (“Characterize NIBP” on page 21) and then repeat this Characterization Test. If the monitor cannot pass the Characterization Test, return it immediately to an authorized Welch Allyn Service Center. WARNING Use of an uncharacterized monitor can result in overinflation of neonatal cuffs.
- Page 66 Functional verification Welch Allyn Propaq LT Vital Signs Monitor Note Wait one minute for the NIBP to initialize before you select a test pressure. Note Before you switch from one test pressure to another, wait for the pump to fully inflate the cuff and stop pumping.
- Page 67 Service Manual Functional verification 6. Verify that the pressure reading on the monitor is within 3 mmHg of the reading on the digital pressure meter. 7. Press to start the test at 300 mmHg. The cuff inflates to approximately 300 mmHg and then settles to a lower pressure.
- Page 68 Functional verification Welch Allyn Propaq LT Vital Signs Monitor 1. Tie the ECG inputs of a leakage tester to either (a) the negative pin of the dc output connector of the power adapter or (b) pin 7 or pin 11 of the 17-pin connector on the cradle.
- Page 69 Service Manual Functional verification 6. Holding both probes in contact with the specified pins, trigger the hi-pot test. 7. Hold the test probes in place until the test is completed. Verify that PASS appears in the tester display. 8. For cradles equipped with a USB port: a.
- Page 70 Functional verification Welch Allyn Propaq LT Vital Signs Monitor Light load (24 hours) • ECG with normal sinus rhythm and 60 beats/minute • Resp at 20 breaths/minute Heavy load (8 hours) • ECG with normal sinus rhythm and 60 beats/minute •...
-
Page 71: Checklist And Test Results Report Form
Service Manual Functional verification Checklist and test results report form Use a copy of this 3-page form to track your progress through the validation tests. Test Specification Result Pass NA Fail Charging/LED operation 4 Input current, cradle < 50 mA Status, cradle powered, Power indicator: ON monitor not inserted... - Page 72 Functional verification Welch Allyn Propaq LT Vital Signs Monitor Test Specification Result Pass NA Fail System 1 Indicators, start-up Red, yellow, and green LEDs Low, medium, and loud tones 5 Voltage, power supply Within range 7 Pixels Visual 10 Buttons...
- Page 73 Service Manual Functional verification Test Specification Result Pass NA Fail NIBP characterization 5 Wrong cuff alert “Kinked or neonate cuff” mesage appears NIBP leak rate 291 mmHg 8 Leak rate 8 mmHg in 10 seconds 12 Leak rate NIBP accuracy 4 Accuracy @ 80 mmHg monitor reading = meter reading ±...
- Page 74 Functional verification Welch Allyn Propaq LT Vital Signs Monitor...
-
Page 75: Replacement Parts
Replacement parts This list includes field-replaceable service parts only. Product accessories are listed separately at www.welchallyn.com. Order Number Description Top chassis 020-0647-XX Top Panel Assembly (includes buttons, window, panel overlay) 020-0631-XX Service Kit, Display, Color LCD, QVGA with extender flex 630-0223-XX Gasket, Display (2 each) 600-0506-XX... - Page 76 Replacement parts Welch Allyn Propaq LT Vital Signs Monitor Charging cradle 020-0635-XX Interconnect PCB 020-0638-XX Power Board Assembly, with Power and Interconnect Cables 020-0650-XX Panel Assembly, I/O, Cradle 600-0544-XX Gasket, Adhesive, I/O Panel 503-0058-XX Fuse, 3A, Slo-Blo, 2AG 020-0637-XX Housing, Upper Cradle...
-
Page 77: A - 35-Ml Test Volume
35-ml test volume Refer to the illustration below: 1. Move the syringe plunger to the 35-ml line. 2. Drill a small hole (for example, 9/64”) through the syringe and the plunger shaft, at a location between the plunger and the top of the syringe. 3. - Page 78 35-ml test volume Welch Allyn Propaq LT Vital Signs Monitor...
-
Page 79: Index
Index accessories disassembly procedures adhesive gasket display air filter protecting replacing removing antenna correct position of not user-serviceable assembly procedures ECG cable autoclave ECG flex cable electrostatic discharge, see ESD equipment required functional verification battery end of life operating states operation procedure, partial discharge field-replaceable unit... - Page 80 Index Welch Allyn Propaq LT Vital Signs Monitor service menus shipping LCD bias speaker disassembly removal cable main board not user-serviceable removing menu, service technical support menus, service troubleshooting monitor tubing service chart removal monitor controls verification NIBP see functional verification...
Need help?
Do you have a question about the Propaq LT 802LTAN and is the answer not in the manual?
Questions and answers