Roche CoaguChek XS System User Manual
Hide thumbs
Also See for CoaguChek XS System:
- Quick start manual ,
- User manual (222 pages) ,
- Procedures manual (59 pages)
Table of Contents
Advertisement
Advertisement
Table of Contents

Related Manuals for Roche CoaguChek XS System


Summary of Contents for Roche CoaguChek XS System
- Page 1 User Manual This is a CLIA waived system.
- Page 3 The contents of this manual, including all graphics and photographs, are the property of Roche Diagnostics. No part of this document may be reproduced or transmitted in any form or by any means, electronic or mechanical, for any purpose, without the express written permission of Roche Diagnostics.
- Page 4 Manual version Revision date Changes Version 3.0 November 2009 New document Version 4.0 March 2011 Revised to update meter pictures, remove patent information, add disposal information, and update product specifications section. September 2013 Version 5.0 Revised ERROR 6 verbiage. Version 6.0 February 2016 Revised for additional test strip material number...
-
Page 5: Table Of Contents
User Resources ..................2 Video ........................2 Getting Started ....................2 User Manual ......................2 Test Strip Package Inserts ................2 The CoaguChek XS System .............3 Anticoagulation Medication ................3 Blood-clotting Time ..................3 How the System Works ...................4 The CoaguChek XS Meter ................5 Operating Conditions ..................6 Getting Started ...................7... - Page 6 Memory ..................... 30 Storing Test Results in Memory ............... 30 Reviewing Stored Test Results ..............30 Erasing Stored Test Results ............... 32 Cleaning the Meter ................. 34 Cleaning the Exterior ..................34 Cleaning the Test Strip Guide ..............35 Advanced Features ................. 37 Setting Advanced Features ................
-
Page 7: About This Manual
About this Manual Symbols and Abbreviations The test strip insert, the label on the back of the meter, the User Manual, and other packaging material may contain the following symbols or abbreviations: Use by Batch code/Lot number In vitro diagnostic medical device Catalog number Consult instructions for use Caution, consult accompanying documents. -
Page 8: User Resources
Several resources are available to help you use and maintain the CoaguChek XS System. Video (DVD Format) The CoaguChek XS System Video is for new users of the CoaguChek XS System. The video will help you get comfortable with the CoaguChek XS Meter and the testing procedure. -
Page 9: The Coaguchek Xs System
The CoaguChek XS System The CoaguChek XS System is intended for use by professional healthcare providers for quantitative prothrombin time testing for the monitoring of warfarin therapy. The CoaguChek XS System uses fresh capillary or nonanticoagulated venous whole blood. Anticoagulation Medication Anticoagulation medications, also known as blood thinners, are prescribed to avoid unwanted clots. -
Page 10: How The System Works
How the System Works The CoaguChek XS System includes a meter and CoaguChek XS PT test strips. Each box of test strips has its own code chip that you insert into the meter. The code chip contains important information about the test strips such as their expiration date and lot number. -
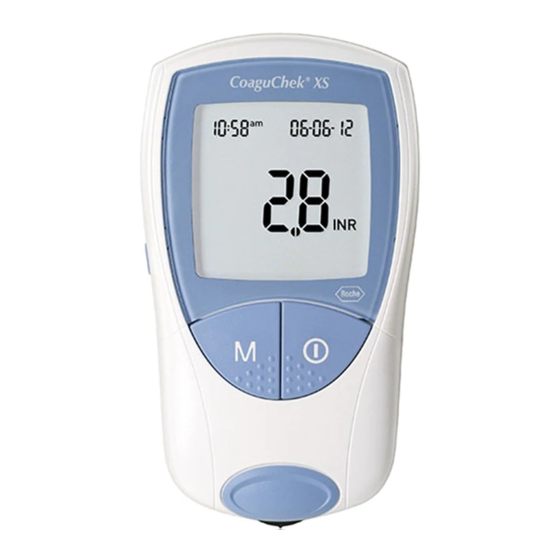
Page 11: The Coaguchek Xs Meter
The CoaguChek XS Meter A Display Battery Compartment Cover B M (Memory) Button G Code Chip Slot C ON-OFF Button H SET Button D Test Strip Guide Cover Data Port E Test Strip Guide... -
Page 12: Operating Conditions
Operating Conditions To ensure that the CoaguChek XS Meter functions correctly, follow these guidelines: • Use the meter at room temperature, between 59°F and 90°F (15°C and 32°C). • Use the meter at a relative humidity of less than 85%, without condensation. -
Page 13: Getting Started
Getting Started Refer to the Getting Started guide to learn how to set up the meter and prepare for and run your first blood-clotting-time test. Batteries The CoaguChek XS Meter uses 4 AAA batteries. The recommended batteries, alkaline-manganese batteries, should last for approximately 300 tests. -
Page 14: Installing (Or Replacing) Batteries
Installing (or Replacing) Batteries Have ready 4 AAA batteries. 1. Open Battery Compartment With the meter powered off, turn it over. Press the latch gently inward and lift the cover. Remove the old batteries, if necessary. 2. Insert New Batteries Position the batteries according to the diagram inside the battery... -
Page 15: Meter Setup
Meter Setup The CoaguChek XS Meter is preset with the U.S. date format (month-day-year) and U.S. time format (12-hour as opposed to 24-hour). Before you use the meter for the first time—or if there is no battery power for more than 1 minute—you’ll have to set the current date and time. - Page 16 1. Go to Setup Mode If the meter is not already in Setup mode, press the SET button The date format flashes in the upper-right corner. 2. Set Today’s Date Press the SET button Press the M button change the year. Press the SET button Press the M button change the month.
- Page 17 The time format flashes in the upper-left corner. Press the SET button 3. Set Current Time Press the M button change the hour. Press the SET button Press the M button change the minutes. Press the SET button 4. Power Off Power the meter off...
-
Page 18: Code Chip
Code Chip Each box of test strips comes with its own code chip. The code chip provides the meter with information such as the lot number and expiration date of the test strips. Before each test, make sure the correct code chip is in the meter. Each time you open a new box of test strips, replace the old code chip with the new one. - Page 19 2. Match Codes Make sure that the three- number code on the new test strip container matches the three-number code on the new code chip. 3. Insert New Code Chip Slide the new code chip into the code chip slot until it snaps into place.
-
Page 20: Integrated Quality Controls
Integrated Quality Controls The CoaguChek XS System has quality control functions integrated into the meter and test strips, so you never have to run quality control tests with liquid quality controls. The meter automatically runs its own quality control test as part of every blood test. -
Page 21: Testing A Blood Sample
Testing a Blood Sample Tips for a Good Fingerstick For fingerstick blood testing, increasing the blood flow in the finger will help you get a good drop of blood. Before you prick the finger, try the following techniques until you see that the fingertip has good color: •... -
Page 22: Important Notes About Blood Testing
Important Notes About Blood Testing Always • Operate the meter at temperatures between 59°F and 90°F (15°C and 32°C). • Refer to the test strip package insert for proper use and handling of test strips. • Keep the test strip guide and meter clean. You may occasionally need to clean them. -
Page 23: Infection Control
Infection Control Follow appropriate infection control guidelines. • Use gloves. • Use a separate lancet for each person. • Dispose of used lancets and test strips in a stable container with a lid according to infection control guidelines. • Follow all other hygiene and safety procedures applicable. Caution: There is a potential risk of infection. -
Page 24: Preparing For A Test
Preparing for a Test 1. Gather Items Gather the following items: • CoaguChek XS Meter • Container of test strips • Test strip code chip • CoaguChek lancet 2. Match Codes Make sure the code number on the test strip container and the code chip match. - Page 25 3. Insert Code Chip Make sure the meter is powered off. With the code number facing up, insert the code chip into the code chip slot until it snaps into place. 4. Wash Hands Have the patient wash his or her hands in warm, soapy water.
-
Page 26: Performing A Test
Performing a Test 1. Get Ready Take a test strip out of the container. Close the container tightly. Do not open a container of test strips or touch a test strip with wet hands or wet gloves. This may damage the test strips. - Page 27 3. Match the Code Confirm that the number displayed matches the number on the test strip container, then press If the numbers are different, make sure you are using the code chip that came with the test strips you are using. An hourglass appears as the meter warms up, which takes about thirty seconds.
- Page 28 5. Identify the Target Area Find the target area on the test strip. You can dose the target area by bringing the patient’s finger to the top of the test strip or by bringing the meter to the patient’s finger so that the side of the test strip touches the blood drop.
- Page 29 7. Record Result Record the result according to your facility’s guidelines. 8. Clean Up Place the used test strip and lancet in an approved container. Power the meter If the meter is dirty, wipe it clean with a recommended cleaner.
-
Page 30: Out Of Range Values
Out of Range Values The CoaguChek XS PT test strips provide test results if the INR value is 0.8 and 8.0. If the result falls outside of this range, the meter displays < (less than) 0.8 or > (greater than) 8.0. If the meter indicates an out-of-range value, refer to the test strip package insert and repeat the test. -
Page 31: Optional Testing Methods
Optional Testing Methods Using Capillary Tubes You may use capillary tubes to collect the blood from a fingerstick and to dose the test strip. Use only CoaguChek Capillary Tubes/ Bulbs, REF 11621173001. Do not use glass capillary tubes or capillary tubes that contain anticoagulants. The following steps are optional to the fingerstick blood sample instructions in the Preparing for a Test and Performing a Test sections of this manual. - Page 32 2. Fill the Capillary Tube When the flashing test strip appears on the meter’s display, stick the fingertip. Then touch the capillary tube to the blood drop. Keep the tube level, and allow it to fill by capillary action. Fill the tube only halfway.
- Page 33 4. Record Result Record the result according to your facility’s guidelines. 5. Dispose of Blood After testing, discard the capillary tube along with the Collection Items used test strip and lancet according to infection control guidelines.
-
Page 34: Using Venous Blood
Using Venous Blood You may use the CoaguChek XS Meter to test venous blood. Blood may be collected directly using a butterfly or a needle and syringe. Do not clean the syringe tip with alcohol or water prior to dosing the test strip. - Page 35 2. Dose the Test Strip Discard the first 4 drops of blood. Then immediately place 1 hanging drop of blood directly onto the target area of the test strip. Completely cover the target area. Do not touch the test strip. Do not introduce air bubbles, move the meter, or add more blood during testing.
-
Page 36: Memory
Memory Storing Test Results in Memory The CoaguChek XS Meter automatically stores up to 300 test results and their dates and times in its memory. If the memory is full when you perform a test, the oldest result is automatically deleted. - Page 37 2. View Most Recent Result The most recent test result appears. The letters mem indicate that you are viewing a result in memory. The time and date of the test also appear. If there are no results in memory, a 0 appears in the display’s top-right corner.
-
Page 38: Erasing Stored Test Results
Erasing Stored Test Results You can erase all of the test results that are stored in the meter’s memory. You cannot, however, erase individual test results. To erase all stored results: 1. Go to Erase mode. With the meter powered off, press and hold down the M button . - Page 39 2. Confirm Press the M button confirm that you want to erase the entire memory. Note: To exit Erase mode without erasing the results, press the ON-OFF button instead. The hourglass symbol flashes while the test results are being erased. Then, the counter is set to 0 and 3 dashes appear.
-
Page 40: Cleaning The Meter
Cleaning/Disinfecting the Meter It is important to follow the procedures below to clean and disinfect the meter. Failure to follow these procedures may cause malfunction of the meter. • Do not use sprays of any sort • Ensure that swab or cloth is only damp, not wet Cleaning/Disinfecting the Exterior •... -
Page 41: Cleaning The Test Strip Guide
Cleaning/Disinfecting the Test Strip Guide • Use only 70% isopropyl alcohol or 10% bleach solution to clean the CoaguChek XS test strip guide. • Do not use any other cleaning/disinfecting solutions on the test strip guide. Use of other cleaning/disinfecting solutions could result in damage to the meter. - Page 42 Caution: Do not insert any objects into the test strip guide. Doing so could damage the electrical contacts behind the test strip guide. 3. Allow to Dry With the cover off, allow the test strip guide to dry for at least 10 minutes before re-attaching the test strip guide cover and testing again.
-
Page 43: Advanced Features
Advanced Features The CoaguChek XS Meter includes advanced features that you can set up as necessary. They are: • Changing the unit of measurement • Disabling the beep (With the beep enabled, the meter beeps when it detects a test strip, when it is ready for you to apply a sample, when it detects a sample, when the result is displayed, and when an error occurs—3 short beeps.) •... -
Page 44: Setting Advanced Features
Setting Advanced Features You can access these settings by going to Setup mode. To go to Setup mode, press the SET button . The date format, flashing, will appear. Once you are in Setup mode, you’ll use these buttons: • to change a setting •... -
Page 45: The Meter's Display
The Meter’s Display When you power the meter on, it briefly shows all the display’s letters, numbers, and symbols. Regularly check that all segments of each letter, number, and symbol appear. Please compare your meter’s display to the meter display shown here on this page. You can display all the letters, numbers, and symbols for a longer time to allow comparison. -
Page 46: Error Messages
CoaguChek XS Meter. If you see an error message, first try to correct the problem using the solution described below. If the problem persists, call Roche Diagnostics Technical Service Center at 1-800-428-4674, 24 hours a day, 7 days a week. - Page 47 Error: Meter Temperature Solution: The meter is too cold or too Power the meter off and warm to measure correctly. allow it to stand for about 30 minutes at room temperature (between 59°F and 90°F). Error: Battery Solution: The battery level is too low. Replace the batteries.
- Page 48 Check to see if you have not properly inserted, or the correct code chip damaged. properly inserted in the meter. For more information, see the Code Chip section of this manual. If the code chip is damaged, call Roche Diagnostics Technical Service Center at 1-800-428-4674.
- Page 49 Error: Test Strip Expired Solution: The test strip has expired. Check the meter’s date setting. If it is not correct, set the correct date. For more information, see the Meter Setup section of this manual. If the date is correct, power the meter off and remove the code chip and the test strip.
-
Page 50: Error Messages You May See After You Apply Blood
Error Messages You May See After You Apply Blood Error: Time Exceeded Solution: You did not apply blood to Power the meter off and the test strip within 180 remove the test strip. Repeat seconds after the blood drop the test using the same test symbol appeared. - Page 51 Error: Test Strip Interference Solution: The test strip was touched or Power the meter off and removed during the test. remove the test strip. Repeat the test using a new test strip and blood taken from a new fingerstick from a different finger.
- Page 52 Error: Quality Control Failure Solution: The test strip failed the Power the meter off and internal quality control check. remove the test strip. Repeat The test strip is unusable. the test using a new test strip and blood taken from a new fingerstick from a different finger.
- Page 53 Error: Measurement Error Solution: Measurement error caused Do not touch or remove the test by the blood sample. strip when a test is in progress. Be sure to apply the blood drop to the test strip within 15 seconds of sticking the fingertip. In rare cases, “error 7”...
- Page 54 If you still receive this message when you repeat the test, you must use an alternative test method to confirm the result. Error: Internal Error Solution: An error occurred during the Power the meter off and internal diagnostic test. remove the batteries. Wait at least 1 minute before re-inserting the batteries in the battery compartment.
- Page 55 Error: Internal Error Solution: Because this error indicates possible damage to the heater plate contacts, call the Roche Diagnostics Technical Service Center at 1-800-428-4674 to have the meter replaced.
-
Page 56: Other Information
Other Information Ordering Information for Health Care Professionals Please contact Roche Diagnostics Customer Service at 1-800-428-5076. REF/Cat. Number CoaguChek XS System 04837975001 (includes carrying case) CoaguChek XS PT Test 04625315160 2 x 24 tests CoaguChek XS PT Test 07797826160 1 x 24 tests... -
Page 57: Product Specifications
Product Specifications Operating Conditions Temperature 59°F to 90°F (15°C to 32°C) Relative humidity less than 85% (without condensation) Maximum altitude 14,000 feet (4300 m) Placement Operate the meter on a level, vibration-free surface or hold it so it is roughly horizontal. Measuring range Refer to test strip package insert. -
Page 58: Support/Services
1-800-428-4674 if you have questions regarding the handling of your meter, the reliability of your results, or if you suspect the meter is defective. Repairs Please note that repairs, new settings or other modifications to the meter may only be performed by persons authorized by Roche Diagnostics. -
Page 59: Symbols
Symbols The following table lists all of the display screen icons and their meaning. Symbol Meaning Test strip (without sample application area) Test strip (with sample application area) Apply sample User must wait until the meter has completed an action. 24-hour time format 12-hour time format Time between midnight and noon... - Page 60 Symbol Meaning Beep tone is enabled Beep tone is disabled Result is above the chosen therapeutic range (only with INR as unit) Result is below the chosen therapeutic range (only with INR as unit) • Results in the chosen unit •...
- Page 61 Symbol Meaning Battery status: • When the batteries still have their full charge, all segments are lit. • Individual segments disappear one by one as the batteries become weaker. • When there is no segment remaining, you can no longer perform a test. You can, however, still access the meter’s memory.
-
Page 62: Disposal Of The Meter, Test Strips, Lancets, And Batteries
European Directive 2002/96/EC.** This is not a requirement for the United States; however, Roche is committed to recycling and sustainability. Please consider the following points when disposing of your used testing materials: •... -
Page 63: Warranty
Purchaser’s sole and exclusive remedy, with respect to the CoaguChek XS meter and parts thereof, shall be the repair and/or replacement of the meter or parts at Roche Diagnostics’ option. THE ABOVE WARRANTY IS EXCLUSIVE OF ALL OTHER WARRANTIES, AND ROCHE DIAGNOSTICS MAKES NO OTHER... - Page 64 Notes...
- Page 66 COAGUCHEK is a trademark of Roche. Roche Diagnostics GmbH Sandhofer Strasse 116 68305 Mannheim, Germany Made in Germany Manufactured for and distributed in the U.S.A. by: Roche Diagnostics 9115 Hague Road Indianapolis, IN 46250-0457 Rx Only www.roche.com www.coaguchek-usa.com www.usdiagnostics.roche.com...
Need help?
Do you have a question about the CoaguChek XS System and is the answer not in the manual?
Questions and answers
At the end of my test the results are coming in seconds not as INR how do I fix this problem.
How to change from seconds to INR reading