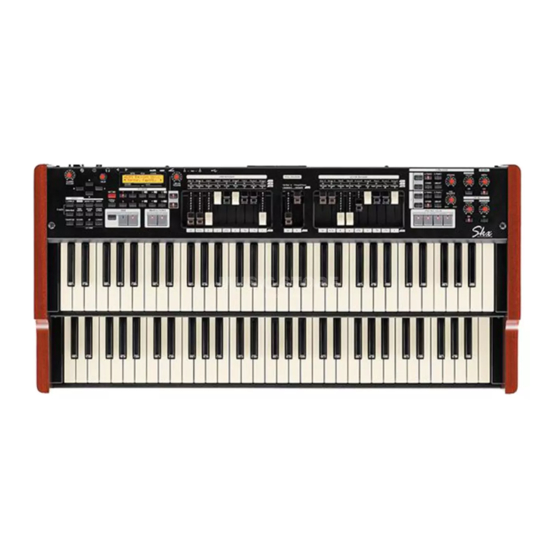
Hammond SKX Owner's Manual
Stage keyboard
Hide thumbs
Also See for SKX:
- Reference manual (398 pages) ,
- Manual (34 pages) ,
- Quick start manual (17 pages)
Table of Contents
Advertisement
Quick Links
Model: Skx
ST AGE KEYBOARD
Th ank you, and congratulations on your choice of the Hammond SKX
Stage Keyboard.
Th e Hammond SKX features authentic Hammond Organ Sound along
with high-quality keyboard and orchestral voices to make it the perfect
instrument for all musical occasions.
Please take the time to read this Manual completely in order to full ad-
vantage of the many features of your SKX, and please retain it for future
reference.
MIX
BALANCE
EXV1
EXV2
PLAYER
Owner's Manual
Advertisement
Table of Contents
Troubleshooting

Related Manuals for Hammond SKX


Summary of Contents for Hammond SKX
- Page 1 Please take the time to read this Manual completely in order to full ad- vantage of the many features of your SKX, and please retain it for future reference. BALANCE...
-
Page 2: Important Safety Instructions
Immediately turn the power off , remove the AC adap- adaptor. tor from the outlet, and request servicing by your re- tailer, the nearest Hammond Dealer, or an authorized Do not attempt to repair the unit, or replace parts in Hammond distributor, as listed on the “Service” page it. - Page 3 Reorient or relocate the receiving antenna. A replacement fuse cover can be obtained from your local Hammond Dealer. Increase the separation between the equipment and re- ceiver. If the fi tted moulded plug is unsuitable for the socket outlet in your home, then the fuse should be removed and the plug cut ...
-
Page 4: Important - Please Read
Such objects can dis- color or otherwise harmfully aff ect the fi nish. Do not paste stickers, decals, or the like on the SKX. Peel- ing such matter off the SKX may damage the exterior fi n- ish. -
Page 5: Introduction
INTRODUCTION Introduction... -
Page 6: Table Of Contents
ADD THE TOUCH-RESPONSE PERCUSSION .........28 BUILT IN SOUNDS AND LIBRARY .............56 ADD EFFECTS TO THE ORGAN SECTION ..........29 MULTI-EFFECTS, REVERB ..............57 VIBRATO & CHORUS ....................29 LESLIE ........................29 PATCH ......................58 OVERDRIVE ......................29 “USER” AND “PRESET” .................58 NAME THE PATCH ..................59 Skx Owner’s Manual... - Page 7 HOW TO READ THE DISPLAY ..............66 MIDI JACKS ON THE SKX ................. 104 OPERATION IN THIS MODE ...............66 WHAT THE MIDI CAN DO ON THE SKX ..........104 PARAMETER OPERATION EXAMPLE: ............67 WHAT IS A “MIDI TEMPLATE?” ............... 104 SHORT CUT TO FUNCTION MODE ...........69 MIDI CHANNEL ...................
- Page 8 Leslie Parameters ..................148 System Parameters ................... 148 Tone Wheel Parameters ................148 Pipe Parameters..................148 CUSTOM TONE-WHEELS LIST ............149 MIDI IMPLEMENTATION CHART ............. 150 MIDI CHANNELS AND MESSAGES ..........151 SPECIFICATIONS .................. 152 SERVICE ....................155 Skx Owner’s Manual...
-
Page 9: Main Features
Master Equalizer allows you to tailor the total tonal response of the SKX. MUSIC PLAYER Th e SKX is equipped to play MP3/WAV type audio fi les. Th is makes it very convenient for accompanying solo performances or practicing. -
Page 10: Names And Functions
Allows you to recall Patches you frequently use quickly. (P. 24) OCTAVE LOWER button Allows you to move the pitch of the LOWER part “UP” or “DOWN” by octaves when used in conjunction with the OC- TAVE DOWN/UP buttons. (P. 54) Skx Owner’s Manual... - Page 11 BALANCE EXV1 EXV2 ORGAN SECTION PERCUSSION UPPER ON, LOWER ON buttons ON button Allows you to “sound” or “mute” each part of the Organ sec- Allows you to add the Percussion eff ect to the UPPER part. tion. (P.
- Page 12 Allows you to adjust the amount of the Organ Multi-Eff ects. (P. 52) EFFECTS FOR THE EXTRA VOICE SECTION EXTRA VOICE EFFECT ON button Allows you to turn the selected Extra Voice Multi-Eff ect “ON” or “OFF”. (P. 57) Skx Owner’s Manual...
-
Page 13: Rear Panel
Th e following Foot Switches / Damper Pedals can be used with power during performance. (P. 16) SKX: ❷ POWER switch HAMMOND VFP1, FS-9H Turns the power to the SKX “ON” or “OFF.” (P. 22) BOSS FS-5U YAMAHA FC4A, FC5 AUDIO OUTPUT TERMINALS ❾... -
Page 14: Keyboard
ACCESSORIES ❶ ❶ ❶ AC adaptor Supplies power to the SKX. NOTE: Use only a Hammond-approved AC adaptor AD3-1250-2P, ❷ ❷ DO NOT substitute another similar-looking AC adaptor. ❷ AC cord set Plug one end into AC adaptor and the other end into an AC wall outlet. -
Page 15: Hook-Up
HOOK-UP... -
Page 16: Basic Hook-Up
BASIC HOOK-UP Connect audio cables and accessories as shown below. Th e SKX is not self-contained - an external amplifi er/speaker system is required in order to hear the sound. However, if you connect a set of stereo headphones to the PHONES jack, you can hear the sound through the headphones even if an external amplifi er is not connected. -
Page 17: Connecting The Leslie Speaker
To control the parameters of the Leslie Speaker 2101/mk2 (fi ne adjustment of the Rotor speed or the rise time, etc.): 1. Connect the MIDI OUT of the SKX with the MIDI IN of the Leslie Speaker with a MIDI cable. -
Page 18: Expand The Keyboard
MIDI Pedalboard MOUNTING THE CU-1(optional) 1. Connect the MIDI OUT of the MIDI pedalboard to the MIDI IN of the SKX with a MIDI cable. 2. When using a Leslie Switch CU-1, connect the CU-1 to the FOOT SWITCH jack. -
Page 19: Pedalboard (25 Keys)
AC Adaptor: the power source, audio, etc. AD1-1210 (100-120V region) 3. Switch ON the power of SKX and call the MIDI template “Pedal KBD”. (P. 112) AD3-1210 (220-240V region) Separately purchased 4. If you are using the CU-1, set the CONTROL - FOOT DEVICE” at “CU-1”. - Page 20 Skx Owner’s Manual...
-
Page 21: Getting Ready To Play
GETTING READY TO PLAY... -
Page 22: Switch On
1. Before turning the power ON, confi rm the [MASTER VOLUME] knob is set to minimum. 2. Turn the [POWER] (on the rear of SKX) to the “ON”. Th e Title mode and then the Play mode are displayed (as illustrated). -
Page 23: Play With The Patches
Th ere are 100 Patches loaded in memory from the factory, allowing you to immediately start playing. You can also create 100 Patches of your own. “USER” AND “ PRESET” There are two domains: “USER” and “PRESET” in SKX’s Patches Patch memory. You can freely overwrite in the “USER” do- “VALUE”... -
Page 24: Register Favorite Patches (Favorites)
Favorites effi cient. Th ey are used to be registered like the above chart according to song or show advance. approximately ½ second, and the selected Favorite button will blinks momentarily. Your Favorite is stored. Skx Owner’s Manual... -
Page 25: Column: Record Favorites Like Preset Buttons
Column: RECORD FAVORITES LIKE PRESET BUTTONS You can record a Favorite Patch with a procedure similar to the Hammond XB/XK series organs, by holding the [RECORD] button, and pressing the selected favorite button - after doing the following procedure. ①... -
Page 26: Use The Foot Controllers
EXPRESSION PEDAL Th e Expression Pedal controls the overall volume or loudness of the SKX. Press forward with the front of your foot to increase the volume and back with your heel to decrease the volume. NOTE: The performance of the Expression pedal can be tailored in vari- ous ways. -
Page 27: Try Creating Your Own Sound
TRY CREATING YOUR OWN SOUND In this section you’ll learn how to create your own sound. In this example, the Organ and Extra Voices are combined (Jazz Organ and Electric Piano). SELECT [ MANUAL] First, select the [MANUAL] button (LED lit). Th e [MANUAL] button makes all the current top panel set- tings active, allowing for real-time registration, and the creation of new Patches. -
Page 28: Switch The Organ Section On
Pull out Upper Drawbars to your taste. You can monitor your selections easily while playing the keyboard. Th e Drawbars make the fundamental organ sound of SKX. Th e tone changes depending on how far the Drawbars are pulled out. -
Page 29: Add Effects To The Organ Section
ADD EFFECTS TO THE ORGAN SECTION VIBRATO & CHORUS Adding a richness to the sound by changing pitch slightly with periodically. [UPPER], [LOWER] buttons Switches the Vibrato & Chorus eff ect ON/OFF. When “ON” the light illuminates. NOTE: You can adjust the Vibrato & Chorus eff ect to your liking. (P. 81) For this example, switch ON the [UPPER] button. -
Page 30: Allocating The Extra Voices
Piano), adjust the Extra Voice volume knob accordingly. Th e [VOLUME] knob adjusts entire volume of the Extra Voice sections. Th e [BALANCE] knob adjusts the volume balance between Extra Voice sections 1 and 2. BALANCE EXV1 EXV2 Skx Owner’s Manual... -
Page 31: Add Effects To The Extra Voice Section
Adjusts the amount of eff ect added. Turning the knob clock- wise increases the amount. EXV1 EXV2 ADD REVERB TO BOTH SECTIONS REVERB Th e SKX’s Digital Reverberation is common to both Organ and Extra Voice sections. [ON] button Turns the Reverb eff ect ON. [DEPTH] knob BALANCE Adjusts the amount of Reverb added. -
Page 32: What Is A "Part
Organ terms: UPPER. LOWER, and PEDAL. Th ese parts can be individu- or, Swell ally played with diff erent sounds. Th e SKX has 2 keyboards. All parts are available simultaneously, by expanding the MIDI Pedalboard. Lower or, Great... -
Page 33: Lower To Pedal
LOWER TO PEDAL When a MIDI Pedalboard is connected to the SKX, you can play the LOWER part sound (or “registration”) with the Pedalboard us- ing the “LOWER TO PEDAL”. [LOWER to PEDAL] BUTTON Turns the Lower To Pedal function “ON” (LED lit) and “OFF”... -
Page 34: Record The Patch To Memory
Patch” for approximately ½ second, after which the previous mode will return. Th e recorded Patch is automatically selected. NOTE: The user created Patch data is not lost when the power is turned off and/or disconnected. Skx Owner’s Manual... -
Page 35: Setting Up
SETTING UP... -
Page 36: Sound Engine Structure
Lower Upper Drawbars Drawbars Drawbars Expression Pedal Vibrato & Chorus Overdrive V&C Equalizer Multi Effect Organ Volume Leslie TC & Equalizer Multi Effect Master Expression Reverb Simulator Equalizer Line Out, Leslie 11Pin, Phones without Leslie simulator Skx Owner’s Manual... -
Page 37: Organ Section
To fully utilizing SKX, read the following detailed explanations about the various functions for creating music. ORGAN SECTION TONE-WHEELS Th e sound source or “engine” of the classic Hammond Organ are the electro-magnetic TONE-WHEEL SETS Tone Wheel Generators. On the SKX, the Tone Wheel engine is replicated digitally. -
Page 38: Organ Section
ORGAN SECTION ORGAN TYPE Th ere are various “Organ” types: the Hammond Tone Wheel organs used in every- where rock, jazz, and Gospel, the transistor organ frequently heard in pop music of 1960’s. Classical pipe organ used in classical music or church services. All organs have characteristic sounds. -
Page 39: Column: Selecting The Organ Types
Column: SELECTING THE ORGAN TYPES Use the control panel for switching the Organ Types. Example: Switching the Organ Type to “Pipe” ① PRESS THE [DRAWBAR] Press the [DRAWBAR] button. The DRAWBAR Function mode is displayed and the presently selected Organ Type (“BType1”... -
Page 40: Harmonic Drawbars
HARMONIC DRAWBARS™ Th e 9 Drawbars on the SKX are used to create the basic “Hammond” sounds. Each Drawbar is marked with the register numbers 1 - 8 along the fl at part of the Drawbar. If you push back a Drawbar until you cannot see any number at all, the sound of the Drawbar is not heard. -
Page 41: Drawbars For The Upper And Lower Parts
DRAWBARS FOR THE UPPER AND LOWER PARTS Th e Colors of the Drawbars are traditional to Hammond, and were established to provide a quick visual guide to the harmonics generated by the Drawbars. WHITE DRAWBARS Th e left white Drawbar represents the “fundamental” or “8´... -
Page 42: Drawbar Registration Patterns
Notice that Drawbar registrations are expressed in number groups of 2, 4 and 3. Th is “2-4-3” number formula for Drawbar Registration has been a Hammond conven- tion since the beginning. It has been found to be the easiest way to convey a specifi c setting. -
Page 43: Modern Drawbar Registrations
Th e Drawbar registrations introduced on the previous page are typically for classical music. Th ey were created at the dawn of the Hammond Organ, when it was intended to sound like a pipe or church organ. Later on, as the Hammond Organ spread throughout Jazz, Pop, Rock and (especially) Gospel music, Some timeless registra- tions become common. -
Page 44: Drawbars (Vx)
VoixClst Octave Flute Dolce Flute Mixture Hautbois If the Organ Type is set to Vx, refer to the “Vx” row on the other side of the Drawbars for the correspondence between each bar and the footage. Skx Owner’s Manual... -
Page 45: Drawbars (Farf )
Strings 8´ Th e original Italian Farf ” type organ was Strings 4´ tablet-equipped with different sounds at Trumpet 8´ various footages. On the SKX, the opera- Strings 16´ Oboe 8´ Piccolo 4´ tion is made with Drawbars instead of tab- Bass 16´... -
Page 46: Drawbars (Pipe)
OpenDiap Gedeckt VoixClst Octave Flute Dolce Flute Mixture Hautbois If the Organ Type is Pipe, refer to the “Pipe” row on the other side of the Drawbars for the correspondence between each bar and the footage. Skx Owner’s Manual... -
Page 47: Operating Organ Section
OPERATING ORGAN SECTION ON / OFF AND VOLUME CONTROL Th e UPPER and LOWER part of the Organ section can be sounding “ON” or PEDAL PART IS ALWAYS ON “OFF” by using [UPPER ON] and [LOWER ON] buttons. The PEDAL part has no switch and always “ON”. NOTE: You can set that the Extra Voice Section turns “OFF”... -
Page 48: Percussion
Organ tones are normally heard as long as the playing key is held down. Th e word “Percussion” refers to a tone that is not steady and fades away, such as a piano or chimes. Th e SKX has Percussion tones which enhance the sounds produced by the Drawbars. -
Page 49: Vibrato & Chorus
VIBRATO & CHORUS Th e Hammond Vibrato & Chorus is another hallmark of the Classic Hammond sound. Vibrato alters the pitch slightly, as a violinist, singer, or guitarist may do. And Chorus combines a detuned signal with the original for a lush tone. -
Page 50: Overdrive
NOTE: You can fi ne-tune the Overdrive sound. (P. 90) NOTE: The button and knob are for the Organ section. The Overdrive eff ect for the Extra Voice section is operated by the parameter in the control panel. (P. 97) Skx Owner’s Manual... -
Page 51: Leslie
LESLIE Th e rotating sound of the LESLIE Speaker is the natural partner of the Ham- mond Organ. A Digital version is built-in to the SKX; and the controls will also function with a connected physical Leslie. [FAST] button STATUS CHART OF EACH BUTTON Toggles the mode of the Rotor by two steps. -
Page 52: Multi-Effects, Reverb
MULTI-EFFECTS, REVERB Th e SKX has on-board Digital Multi-Eff ects and Reverb to enhance the Organ sec- tion. MULTI-EFFECTS REVERB Th e Digital Reverb is common to both Organ and Extra Voice [EFFECT ON] button sections. To engage the Muti-Eff ects. Press this button and the light will go ON. -
Page 53: Pedal Sustain, Coupler
PEDAL SUSTAIN, COUPLER A popular option for playing the Pedals or Manual Bass is Pedal Sustain, which allows the Pedal voice to smoothly decay upon release, much in the manner of a string bass. Using the Lower keyboard, you can play the Pedal part together (Manual Bass). Th e Pedal part can be played by Lower keyboard, or the Lower part can be played by the extended Pedalboard (Lower To Pedal). -
Page 54: Octave Shift
NOTE: OCTAVE buttons can be assigned various functions instead of the octave shift (P. 78). NOTE: You can select whether the Octave setting changes while notes are being held or when the next note is pressed after releasing the notes being held (P. 79). Skx Owner’s Manual... -
Page 55: Transpose
For example, if you set Transpose at [+5], the note “F” sounds when you play the “C” key. (By playing in the key of C the SKX sounds in the key of F.) [TRANSPOSE] button ... -
Page 56: Extra Voice Section
EXTRA VOICE SECTION Th e EXTRA VOICE section contains the sounds other than Or- Th ere are two sections of the Extra Voice on the SKX. Th e Organ gan which comprise the SKX. As a system, you select which voice and Extra Voice sections can be played simultaneously. -
Page 57: Multi-Effects, Reverb
MULTI-EFFECTS, REVERB Th e SKX is equipped with Multi-Eff ects capable of adding various eff ects to the Extra Voices, and Reverb capable of adding the eff ects of playing in a concert hall. MULTI-EFFECTS TWO EXTRA VOICES AND MULTI-EFFECTS... -
Page 58: Patch
Registraion were recorded to the preset of the B-3/C-3. But many more parameters than the Drawbar registra- Percussion tions are recorded to the Patches on the SKX. Organ If you wish to keep the “traditional” style of regis- Effects tration (Drawbars only), Select the proper param- eters in “Patch Load”. -
Page 59: Name The Patch
NAME THE PATCH ① ④ GO TO THE MENU MODE GO TO PATCH FUNCTION MODE Press [ENTER] and go to PATCH Function mode. Press the [MENU/EXIT] button. Menu mode will be displayed. ② GO TO PAGE A ⑤ INPUT NAME If Page A is not displayed, go to Page A by pressing [] button. -
Page 60: Record To The Patch
½ second: Recording Patch... When the recording is completed, the display returns to the previous one. NOTE: The recorded Patch data is retained if the power is switched off or disconnected. Skx Owner’s Manual... -
Page 61: Using The Control Panel
USING THE CONTROL PANEL... -
Page 62: What You Can Do On The Control Panel
WHAT YOU CAN DO ON THE CONTROL PANEL Your access to deep-editing the SKX. All of the parameters and all of the controls not covered by the top panel knobs and switches are here. Th e modes displayed are, basically “PLAY”, “MENU” and “FUNCTION”. See how to read them and how to use the buttons on the next pages. -
Page 63: Play Mode
PLAY MODE Th e Play mode is basic for all operations. All information necessary for ordinary performance is displayed here. To locate this mode 1. Play mode is normally displayed when the instrument is fi rst powered “ON.” 2. However, if you need to locate this mode from another display mode, touch the [PLAY] button. -
Page 64: Menu Mode
HOW TO READ THE DISPLAY Page Items OPERATION IN THIS MODE Move the page. Select the item in the page. Enter the selected Function mode. Return to the Play mode. Skx Owner’s Manual... -
Page 65: Menu And The Contents
Favorites. (P. 74) 4. FORMAT 4. CONTROL Allows you to format a USB Flash Drive for use with the SKX. Allows you to change how the various controls, such as Foot (P. 117) Switch, Expression Pedal, etc., will function. (P. 76) -
Page 66: Function Mode
Shows there is another page on the right (or the left) of this page. CURSOR PAGE name CURSOR On the SKX, the cursor style is to Flash the entry. VALUE (fl ashing VALUE) OPERATION IN THIS MODE Move the page up or down. -
Page 67: Parameter Operation Example
PARAMETER OPERATION EXAMPLE: ADJUST THE [FAST] PERCUSSION DECAY TIME “FASTER” ① LOCATE THE MENU MODE Press the [MENU/EXIT] button. Th e Menu mode is displayed. ② SELECT THE MENU PAGE Find the “PERCUSS” using the [],[] buttons. “PERCUSS” is on Page B. ③... - Page 68 Patch Parameters. A parameter which is common to all Patches is called a Global Parameter. For a complete listing of all Patch and Global Parameters, please consult the APPENDIX at the back of this manual. Skx Owner’s Manual...
-
Page 69: Short Cut To Function Mode
SHORT CUT TO FUNCTION MODE To make programming quicker and easier, each button on the top panel can be used to access the Function mode page associated with that button instantaneously. Pressing and holding any of the buttons on the top panel automatically “shortcuts” the display to the related Function mode item. -
Page 70: Display Lock Mode
USING REGISTERED PAGE You can still use the [CONTROL] button to access a frequently-used Function mode page in Display 11 PIN Lock mode. However, you cannot move the cursor if the page has two or more parameters. Skx Owner’s Manual... -
Page 71: Setting The Parameters
SETTING THE PARAMETERS... -
Page 72: Drawbar
Set the octave shift for the UPPER part. Th e setting range is -2 to +2. ance between organ and extra voice section. ❾ UPPER ZONE LOW / HIGH Set the sounding range of the UPPER part with these two parameters. Skx Owner’s Manual... -
Page 73: Setting The Pedal Part
8G. It comes from range of MIDI note numbers. PEDAL ZONE - LOW / HIGH The internal sound engine of the SKX receives all Set the sounding range for the PEDAL part with these two parameters. the MIDI note number against internal keyboards which has 5 octave, 1C to 6C. -
Page 74: Patch
PATCH LOAD - EXTRA VOICE EFFECTS (G) NOTE: “G” means “Global”. These parameters will be recorded when The parameters specific to the Extra Voice Section Effects set, and are common in each Patch. (Overdrive, Multi-Eff ects and Equalizer). Skx Owner’s Manual... -
Page 75: Exvoice (Extra Voices)
EXVOICE ( Extra Voices) In this mode the basic Extra Voice settings are made such as the Extra Voice instrument and volume. To locate this mode: MENU/ ENTER EXIT or, touch either button in the voice group. See “Function mode” (P. 66) for operation details. ❼... -
Page 76: Control
Optional Leslie Mode Switch (CU-1) connected. “Sleeve”. ❷ FOOT SWITCH - TIP MODE (G) The SKX requires a foot switch that uses a Stereo Th is sets the Foot Switch function. Jack. Two Mono-Jack foot switches may be used, OFF: ........Does not function. -
Page 77: Expression
❹ EXPRESSION - SOURCE (G) Sets the source of Expression control. PED (NORM): CLOSE OPEN For the (Optional) Hammond-Suzuki EXP-50J pedal etc. PED (REV): For using a Korg XVP-20 type of Expression Pedal etc. EXPRESSION LIMIT MIDI: For using Expression information received at the UPPER Keyboard channel. -
Page 78: Glide
GLIDE - EXTRA VOICE 2 (P) When Glide range is set at “-1”. Assigns the Glide to the various sections of SKX. (15) is for Organ section, and (16) and (17) are for the Extra Voice section. D AMPER... -
Page 79: Display
tons. DRAWBAR PRIORITY ORIGIN:....... Works according to the buttons’ original function. PRIO UPPER and PRIO LOWER allows to make play- LES STOP, LES FAST:..Similar to the [LESLIE STOP], [LESLIE FAST] buttons. ing style which using Adjust Preset keys [A ] or [B] VIB UPPER, VIB LOWER: of the B-3/C-3 (below fi gure). -
Page 80: Percuss (Percussion)
The higher the note is, the lesser the volume. DRAWBAR LEVEL OFF: no change in volume. When the Percussion was activated on the B-3/C-3, the volume of the Drawbars became slightly softer in volume. This is simulated on the SKX. Skx Owner’s Manual... -
Page 81: Vib&Cho (Vibrato & Chorus)
VIB&CHO ( Vibrato & Chorus) In this mode, the settings specifi c to Vibrato and Chorus are adjusted. To locate this mode: MENU/ ENTER EXIT or, keep pressing either of the VIBRATO & CHORUS [UPPER], [LOWER] buttons for a few seconds. See “Function mode”... -
Page 82: Leslie
Th is is for setting the virtual Speaker. RotSmall: A small Leslie speaker, such as the Leslie 145 RotLarge: A large Leslie speaker, such as the Leslie 122 Station: A fi xed speaker, such as the Hammond PR-40 Skx Owner’s Manual... - Page 83 ❺ SLOW SPEED - HORN (L) Mode: SLOW FAST SLOW FAST STOP SLOW SPEED - BASS (L) Sets the speed of the Rotors in Slow mode. Th e setting range is 0, 24 to 318 rpm. At 0, no rotation. ❻...
-
Page 84: External Leslie Speaker
A prompt will appear in the display allowing you to select the Th e display will show the above message during the treatment. Cabinet you want to record. NOTE: If you don’t wish to record, touch the [MENU/EXIT] button. Skx Owner’s Manual... -
Page 85: Cust. Tw (Custom Tone-Wheels)
CUST. TW ( Custom Tone-Wheels) In this mode, you select or edit the characteristics of each Tone Wheel set to be used on the manual keyboards. To locate this mode: MENU/ ENTER EXIT See “Function mode” (P. 66) for operation details. ❹... - Page 86 Tone Wheel in play. This NOTE: If you increase the value too high above the original Tone Wheel pitch, the sound will “hash” noise, another Hammond anomaly original- get “Thin”. ly considered to be a defect grew to be an integral part of the Hammond sound.
-
Page 87: Record The Custom Virtual Tone Wheels
Record the CUSTOM virtual Tone Wheels Th e Tone Wheel Parameters (= 3 - 8 of the previous paragraph) are for determining the Custom Number for recording. Th e Custom Number is selected and used, when you play. ① ENTER THE NAME Enter the Custom Name if desired. -
Page 88: Pipe
❻ PAN - DIRECTION (Pi) Adjusts the directionality of the Pipes in order to simulate chamber placement. Th e setting range is L64 - C - R63 (Left - Center - Right). Skx Owner’s Manual... - Page 89 ❼ PAN - IMAGING (Pi) Sets the arrangement of the Pipes. FIX: No panning or imaging - All notes sound uniformly. L-R: Sounds Left to Right which according to the keys. PAN AND OUTPUT The Pipe Stops are extended left to right. Because of this, you may notice that some notes will sound louder than other if only one LINE OUT is used.
-
Page 90: Od / Eff (Overdrive / Effects)
Replicates the pre-amplifi er of an electric piano. ❹ OVERDRIVE - OUTPUT LEVEL Allows you to balance the Overdrive level with the input level if the two are diff erent. Th e setting range is 0 to 127. Skx Owner’s Manual... -
Page 91: Multi-Effects
MULTI-EFFECTS ❺ EFFECT TYPE Selects the Multi-Eff ect type. Th e following eff ects are built in the SKX. Tremolo, Auto Pan, Wah-Wah, Ring Mod., Phaser, Flanger, Chorus, Delay Th e parameters for the Multi-Eff ects are diff erent type by type. Th e explanation... - Page 92 Adjusts the central frequency. It is linked with the [EFFECT AMOUNT] knob on the top panel when the SOURCE (6) is set at MAN. Th e setting range is 0 to 127. Th e frequency becomes higher as the value is increased. Skx Owner’s Manual...
- Page 93 Ring Mod. Th e Ring Modulator creates complex, metallic-like sounds by taking the sum and diff er- ence of the fundamental tone and a second “ring” frequency. ❺ ❺ ❻ ❻ ❼ ❼ ❽ ❽ ❾ ❾ ❻ RING MODULATOR - SOURCE Waveform, Selects which to use to modulate the ring frequency.
- Page 94 Controls the frequency range of the eff ect. Th e setting range is 0 to 127. At 0 the eff ect is added to all frequencies. Th e eff ect is added to the higher frequencies as the value increases. Skx Owner’s Manual...
- Page 95 Flanger Th is is the sweeping “Jet Airplane” sound adjustable from a mild shimmer to a deep “swoosh”. ❺ ❺ ❻ ❻ ❼ ❼ ❽ ❽ ❾ ❾ ❻ FLANGER - RATE Adjusts the modulation speed. It is linked with the [EFFECT AMOUNT] knob on Rate the top panel.
- Page 96 Chorus Th is “Chorus” is NOT the same as Hammond’s proprietary “Chorus-Vibrato”. Th is eff ect is the familiar Chorus as heard widely on electric pianos, guitars, etc. ❾ ❾ ❺ ❺ ❻ ❻ ❼ ❼ ❽ ❽ ❻ CHORUS - RATE Adjusts the speed of the cycle of the rising and falling eff ect pitch.
-
Page 97: Effects For The Extra Voice Section
Delay Th is is for adding echo eff ects. ❺ ❺ ❻ ❻ ❼ ❼ ❽ ❽ ❾ ❾ ❻ DELAY - TYPE Level TYPE = MONO Select the type of delay here. Original Signal MONO: Effect Signal A simply delayed sound. RtoL, LtoR: The delay is alternated in the stereo fi eld. -
Page 98: Equaliz (Equalizer)
In this mode, you adjust the settings for the Equalizer. An Equalizer is used to adjust the tonal quality. Th e SKX’s built-in Equalizer consists of 3 bands and a recreation of the unique “tone” control that was part of the vintage B-3/C-3. -
Page 99: Reverb
REVERB In this mode, you set the Reverb eff ect. Reverb is common with the Organ and Extra Voice sections, the single reverb control section aff ects both. To locate this mode: MENU/ ENTER EXIT or, keep pressing the [REVERB ON] button for a few seconds. See “Function mode”... -
Page 100: Tune
Th is is for tuning the entire keyboard. Th e setting range is A = 430 to 450 Hz. NOTE: The parameter of this mode is a Global parameter. It is recorded when it is set, and is common for each Patch. Skx Owner’s Manual... -
Page 101: Default
❽ ALL Th is is for defaulting all parameters of the SKX. If any unstable condition occurs on the SKX system, defaulting “all” will usually clear the problem. NOTE: You can also totally initialize your keyboard by switching the power ON while pressing and holding the [RECORD] button. -
Page 102: System
SYSTEM In this mode, set the auto power off , audio output mode, and the System information of the SKX is displayed. To locate this mode: MENU/ EXIT ENTER See “Function mode” (P. 66) for operation details. ❼ ❼ ❽ ❽... -
Page 103: Midi
MIDI... -
Page 104: About Midi
11 PIN MIDI OUT JACK Th is is for sending performance information. To an external MIDI sound module from SKX or to record performances and con- trols to an external sequencer. MIDI IN JACK Th is jack is used for playing SKX from external MIDI equipment. -
Page 105: Midi Channel
Th is message is for transmitting the particular data between compatible equipment of the same model or same make. Th e SKX can do a memory dump (= sending the total information compliment on- board) and recording them to an external sequencer. -
Page 106: Midi Structure
MIDI STRUCTURE Th e SKX has “Keyboard Channels” to transmit playing information of the keyboards and “External Zone Channels” to control external MIDI equipment on the key- boards. Map of Extra Voice Extra Voice Section 1 Section 2 the MIDI... -
Page 107: Keyboard Channels
E XTERNAL ZONE CHANNELS Th e External Zone channels are for using SKX as a simple master keyboard to control the external MIDI equipment. Th ese are Patch parameters, and it is possible to make diff erent settings to each Patch. -
Page 108: Using An External Sequencer
*1 To record the control of External Zones, addition of above illustration, connect MIDI IN of controlled Set the MIDI channel of the SKX (TX KBD) to that of the external sequencer. MIDI equipment to MIDI OUT of external se- quencer, and set Echo ON the external sequencer. -
Page 109: Using A Midi Sound Module
Keyboard channels (easier) sure, but it makes some problem. Probably the program number By this, the External Zone performance is sent from the MIDI OUT instead of Key- is diff erent between SKX and MIDI equipment board channels. that you wish to use. About octave, velocity Use diff erent MIDI templates, depending whether the keyboard is expanded or not. -
Page 110: Zones
SKX are assigned. Th ey are called “External Zones”. MENU/ EXIT Th e range of the built-in sound engine on the SKX (called “Inter- nal Zone”) is set at the same time. You can use each separately on a same keyboard. -
Page 111: Panic Function And Parameter Re-Load
Sets the Pan of the selected Zone (Control Change #10). If a problem occurs to the MIDI system, it may be caused by a cypher. When the SKX and an external MIDI equipment is Th e setting range is L64(Left) - C(Center) - R63(Right). -
Page 112: Midi
Registered Parameter Number) “ON” or “OFF”. Th is allows you to recall the MIDI Template you want to use. On the SKX it is used for transmitting the messages such as the Use [][] buttons to select the desired Template and press Drawbar Fold Back or the Leslie ON. -
Page 113: Keyboard Channels
The Patch parameters, Global parameters and Sets the MIDI channel for sending the UPPER part playing system parameters of the Temporary (= the data, the control data of the SKX and that of the Leslie speaker. present setting values) are transmitted. TX LOWER The contents of each Patch or that of the Leslie Cabinet are not transmitted. - Page 114 Skx Owner’s Manual...
-
Page 115: Save The Setup
SAVE THE SETUP... -
Page 116: Save Your Setup
SAVE YOUR SETUP A USB FLASH DRIVE port is built in on the SKX. You can save the setting of each Parameter as a fi le to it. Th e USB Flash drive can be used for the Music Player or as a Voice Library. -
Page 117: Initialize The Usb Flash Drive
INITIALIZE THE USB FLASH DRIVE A “fresh” Th e USB Flash drive must be formatted (or “initialized”). Th e initializing procedure is as follows: NOTE: When initializing is completed, all the contents of the USB Flash drive are erased. FLASH DRIVE Insert the USB Flash drive to the USB FLASH DRIVE port. -
Page 118: Working With Setups
INSERT THE USB FLASH DRIVE Locate the SETUP mode. A Setup fi le name will displayed. If you have Voice Libraries loaded into the SKX and want to save those as part of your Setup, press the [] button to display WHAT DOES THIS MEAN? the “TYPE”... -
Page 119: Changing The Setup Name
Press the [ENTER] button. Th is is the screen where the name is entered. Setup: Global parameter, Patch parameter, Leslie Cabinet, Custom Tone Wheel, Temporary (except the Expression Source and Device ID) Whole: In addition to the Setups, the whole Voice Library in the SKX. Save the Setup... -
Page 120: Loading The Setup
LOADING THE SETUP DELETING THE SETUP NOTE: If you do this operation, the settings in the SKX are replaced ① INSERT THE USB FLASH DRIVE with the newly loaded setups. You should save important Make sure that the USB Flash drive is correctly inserted. -
Page 121: Working With Patches
Same name exists. The USB Flash drive already contains a file by that name. Modify the Patch name on the SKX, or delete the fi le with To locate the PATCH mode, please refer to the illustration same name on the USB Flash drive (next page). -
Page 122: Loading A Patch
LOADING A PATCH DELETING THE PATCH NOTE: If you do this operation, a Patch in the SKX are replaced with ① INSERT THE USB FLASH DRIVE the newly loaded Patch. Therefore, it is recommended that Make sure that the USB Flash drive is correctly inserted. -
Page 123: Working With Custom Tone Wheel
Th ere is a fi le with same name already. Change the Custom name on the SKX, or delete the fi le with same name in the USB Locate the fi le mode by pressing [] button. A Tone Wheel Flash drive (next page). -
Page 124: Loading A Custom Tone Wheel
WHEEL WHEEL ① NOTE: If you do this operation, a Patch in the SKX are replaced with INSERT THE USB FLASH DRIVE the newly loaded Patch. You should save important data be- Make sure that the USB Flash drive is correctly inserted. -
Page 125: Music Player
MUSIC PLAYER... -
Page 126: Before Playing Back
BEFORE PLAYING BACK Th e Music Player feature of your SKX allows you to play audio fi les from a USB Flash Drive. In this way, you can use a previously recorded rhythm track as an accompani- ment for a “one-man band” performance. You can also play along with, or simply listen to, favorite songs. -
Page 127: Working With The Music Player
WORKING WITH THE MUSIC PLAYER FLASH DRIVE Insert a USB Flash drive to the USB FLASH DRIVE port. Wait until the display “Confirming USB. Please wait.” disappears. Locate Song List mode. A. Press the [MENU/EXIT] - Page D by [] - PLAYER by [] - [ENTER] button or, B. -
Page 128: Music Player Modes
Song automatically starts playing. ONE: When the current Song ends, the playback will stop. SHUF: When the current Song ends, a Song is selected at random from the fi les on the USB Flash drive, and starts playing. Skx Owner’s Manual... -
Page 129: Voice Library
VOICE LIBRARY... -
Page 130: What Is Voice Library
If the fi le is compressed in some way, you must expand it before it is ready hammond for use. LibVL-SKccc.sys audio PLACING FOLDER When you insert the USB Flash drive to the SKX, the folder of the Voice patch Library is automatically created. setup \HAMMOND\SKX\LIB system Copy the library fi le you want to add here using the personal computer. -
Page 131: Working With Voice Library
[VALUE] knob or the [],[] buttons. NOTE: The capacity of the Voice Library fi le on the upper right of the display, and the remaining capacity of the SKX on the bottom right. You can not additionally register larger fi les than the remaining capacity. -
Page 132: Delete A Voice Library
DELETE A VOICE LIBRARY CLEAR ALL VOICE LIBRARIES When the remaining capacity of the SKX is not enough for the If you want to “start fresh” and load all new Voice Libraries, you Voice Library you want to load, you can increase the capacity by can clear the entire Voice Library memory. -
Page 133: Troubleshooting
Troubleshooting... -
Page 134: Troubleshooting
“ON” Connect the Foot Switch and/or Damper Pedal, then turn the power to the SKX “ON”. Th e polarity of the switch(es) will be set automatically. Do not depress the switch(es) until the SKX is fully powered up: i.e., the PLAY mode screen is displayed. -
Page 135: Appendix
APPENDIX... -
Page 136: Extra Voice Instrument List
Alto Saxophone. “Straight”, “Vibrato” indicate variations. 4 Wind 7 Al. Sax Vibrato 4 Wind 8 Tn. Sax Straight Tenor Saxophone. “Straight”, “Vibrato” indicate variations. 4 Wind 9 Tn. Sax Vibrato 4 Wind 10 Ba. Sax Straight Baritone Saxophone. Skx Owner’s Manual... - Page 137 Simulates the strings keyboard via multi-eff ects. “o” indicates octave unison. 5 Other 7 Syn. Strings 1 o 5 Other 8 Syn. Strings 2 Synthesized strings sounds. Simulates the strings of the Hammond SX/CX series. 5 Other 9 Syn. Strings 2 o 5 Other 10 Syn. Strings 3 Synthesized strings sounds.
-
Page 138: Preset Patch List
Fortissimo B-3 OEM F#Pkeys P046 P096 Reed Solo B-3 OEM G Pkeys P047 P097 Sforzando B-3 OEM G#Pkeys P048 P098 P049 A.Pf / Positiv P099 B-3 OEM A Pkeys Hrpsi / Positiv FullTh eatrOrgn P050 P100 Skx Owner’s Manual... -
Page 139: Midi Templates
Use this template to play on the Use this template to play only playback the performance of Pedal keyboard connecting to on the SKX and control the only SKX to the external se- the MIDI IN jack. MIDI equipment connected to quencer. -
Page 140: Midi Information
However if Hold 1 or Sostenuto is ON, the sound will be continued until these are turned off. k=Drawbar Group: 5 = Upper, 6=Lower n=MIDI Channel Number: 0H - FH (Ch. 1 - 16) vv=Control Value: 00H - 7FH (0 - 127) 0 - 63=Off, 64 - 127=On Skx Owner’s Manual... -
Page 141: Drawbar Data List 1
Drawbar Data List 1 Control Number Upper: 50H(80) Lower: 51H(81) Pedal: 52H(82) Upper / Lower Pedal Level 16´ 5 1⁄3´ 8´ 4´ 2 2⁄3´ 2´ 1 3⁄5´ 1 1⁄3´ 1´ 16´ 8´ 00H(0) 09H(9) 12H(18) 1BH(27) 24H(36) 2DH(45) 36H(54) 3FH(63) 48H(72) 00H(0) 09H(9) 01H(1) -
Page 142: System Exclusive Message
Sub ID #1 End Of Exclusive Sub ID #2 SUZUKI ID 00 10 Device Family code Device Family number 00 23 00 00 00 00 End Of Exclusive When Identity Request is received, Identity Reply will be transmitted. Skx Owner’s Manual... -
Page 143: Global Parameters
Global Parameters Category Parameter NRPN SysEx Address SysEx Data Default Description MSB to LSB Length (62) (63) Transpose 3A - 40 - 46 (-6 - 0 - +6) Tune Master Tune 032E - 0338 - 0342 (430 - 440 - 450) 0338 Expression Source... -
Page 144: Patch Parameters
Turn Extra Voice On via NRPN ......Bx 62 50 63 00 06 01 (x = Upper channel) Turn Extra Voice On via System Exclusive ....F0 55 dd 10 23 13 00 50 00 01 F7 (dd = Device ID) Skx Owner’s Manual... - Page 145 Category Parameter NRPN SysEx Address SysEx Data Patch Load MSB to LSB Length (62) (63) Percussion On 00, 01 (Off /On) DRAWB Percussion Th ird On 00, 01 (Off /On) Decay Fast 00, 01 (Off /On) Volume Soft 00, 01 (Off /On) Level On Soft 00 - 0F (1 - 16) Level On Normal...
- Page 146 Vibrato Tremolo 00 - 0F (0 - 15) Vibrato Cho. Emphasis 00 - 09 (0 - 9) Vibrato On Pedal 00, 01 (Off /On) Vibrato Cho. Mix 00 - 40 - 7F (D64 - EVEN - 63V) Skx Owner’s Manual...
- Page 147 Category Parameter NRPN SysEx Address SysEx Data Preset Load MSB to LSB Length (62) (63) Overdrive On 00, 01 (Off /On) EFFECT Eff ects p=0: DRAWB Overdrive Type 00 - 03 p=1: EXV 00: Tube 01: Stomp Box 02: Clip 03: E.
-
Page 148: Leslie Parameters
Off , Soft, Mid, Loud LPF Cut Off Freq. 0 - 127 Cut Off Freq. -64 - +0 LPF Resonance -100 - +100 Pan - Direction L64 - C - R63 Pan - Imaging Fixed, L-R, R-L, Pyramid, Inverted Pyramid Skx Owner’s Manual... -
Page 149: Custom Tone-Wheels List
CUSTOM TONE-WHEELS LIST BType1, BType2 Real B-3 B-3/C-3 in good condition. Contains moderate motor hum and leakage noise. 80's Clean 80’s “clean-sounding” B-3/C-3. Motor hum or leakage noise is removed, “vibration” caused by the wow/fl utter of the motor remained. Noisy Replicates the entire sound output from the B-3/C-3, including the motor hum and leakage noise. -
Page 150: Midi Implementation Chart
: Local On/Off : All Notes Off Messages : Active Sense : Reset Mode 1: OMNI ON, POLY Mode 2: OMNI ON, MONO O: Yes Mode 3: OMNI OFF, POLY Mode 4: OMNI OFF, MONO X: No Skx Owner’s Manual... -
Page 151: Midi Channels And Messages
MIDI CHANNELS AND MESSAGES External Zone Upper Lower Pedal (Tx. only) Part Part Part Note Pitch Bend Modulation Volume, Pan (7, 10) Expression (11) O *1 Hold 1 (64) Drawbar Reg. CC#80, CC#81 CC#82 12 - 20 (Upper) 21 - 29 (Lower) 33, 35 (Pedal) Spring Shock (48) -
Page 152: Specifications
Digital, 11 programs Control: On, Depth Master Equalizer Bass, Mid, Treble Keymap Buttons Manual Bass, Lower to Pedal, Octave Up, Octave Down, Lower, Transpose Patches Capacity 100 User Patches, 100 Preset Patches, Manual Favorites 10 Banks, 10 Numbers Skx Owner’s Manual... - Page 153 Patch fi le 123 Index Patch Load 58, 74 Glide 78 Pedalboard 18 Global Parameters 143 Percussion 28, 48, 80 Allocate 56 Pipe 38, 46, 88 Assign 78 Play Mode 63 Harmonic Drawbars 40 Auto Power Off 22 POLY 73, 110 Pop Up 79 Instrument 30, 75 Power 22...
- Page 154 Skx Owner’s Manual...
-
Page 155: Service
Although every attempt has been made to insure the accuracy of the descriptive contents of this Manual, total accuracy cannot be guaranteed. Should the owner require further assistance, inquiries should fi rst be made to your Authorized Hammond Dealer. If you still need further assistance, contact Hammond at the following addresses:... - Page 156 Printed in China 00457-40202 V1.01-180322 SUZUKI MUSICAL INST. MFG. CO., LTD. Hamamatsu, Japan...
Need help?
Do you have a question about the SKX and is the answer not in the manual?
Questions and answers
Is there an easy how to guide to setup stops, sounds, etc. for the Hammond skx pro? And simple steps how to save any setups done as "favorites"?
To set up stops and sounds on the Hammond SKX Pro and save setups as favorites:
1. Select a Preset Sound:
- Turn the value knob to browse through the 100 preloaded presets.
- Each preset configures the upper manual, lower manual, and pedals.
2. Customize the Sound:
- You can edit components like the type of organ (e.g., B3, A100) and sample sets for pianos or ensembles via the Edit page.
3. Save a Favorite Setup:
- Press the [MENU/EXIT] button to locate the Menu Mode.
- Press the [►] button twice to go to the Favorite page.
- Choose the desired Bank and Number.
- Hold the [RECORD] button and press the desired Favorite button (1–10).
- The display will show “Recording Favorite...” and the button will blink, confirming the save.
Note: Favorites save combinations (complete setups), not individual patches or voices.
This answer is automatically generated