Honda F220 Owner's Manual
Hide thumbs
Also See for F220:
- Owner's manual (202 pages) ,
- Owner's manual (46 pages) ,
- Owner's manual (242 pages)
Table of Contents
Advertisement
Quick Links
Download this manual
See also:
Owner's Manual
Advertisement
Table of Contents

Related Manuals for Honda F220


Summary of Contents for Honda F220
- Page 2 Honda F220 OWNER’S MANUAL Original instructions MANUEL DE L’UTILISATEUR Notice originale BEDIENUNGSANLEITUNG Originalbetriebsanleitung MANUAL DE EXPLICACIONES Manual original...
- Page 3 All information in this publication is based on the latest product information available at the time of printing. Honda Motor Co., Ltd. reserves the right to make changes at any time without notice and without incurring any obligation. No part of this publication may be reproduced without written permission.
- Page 4 Disposal To protect the environment, do not dispose of this product, battery, engine oil, etc. carelessly by leaving them in the waste. Observe the local laws and regulations or consult your authorized Honda dealer for disposal.
-
Page 5: Table Of Contents
..............30 9. TRANSPORTING/STORAGE ............37 10. TROUBLESHOOTING ............... 39 11. SPECIFICATIONS ................40 MAJOR Honda DISTRIBUTOR ADDRESSES ....Inside back cover ‘‘ EC Declaration of Conformity ’’ CONTENT OUTLINE ..Inside back cover... -
Page 6: Safety Instructions
− For your safety and the safety of others, pay special attention to these precautions: Honda tiller is designed to give safe and dependable service if operated according to instructions. Read and understand the Owner’s Manual before operat- ing the tiller. Failure to do so could result in personal injury or equipment damage. - Page 7 Gasoline is extremely flammable and is explosive under certain conditions. Do not smoke or allow flames or sparks in the area where the tiller is refueled or where gasoline is stored. Do not overfill the fuel tank, and make sure the fuel tank cap is closed securely after refueling.
- Page 8 To ensure safe operation − Operator responsibility Read the owner’s manual carefully. Be familiar with the controls and their proper use of the tiller. Use the tiller for the purpose it is intended that is, cultivating the soil. Any other use could be dangerous or damage the equipment, especially never use it to cultivate soil containing rocks, stones, wires and any other hard materials.
- Page 9 To ensure safe operation − Operator responsibility Stop the engine in the following cases: Whenever you leave the tiller unattended. − Before refueling − When stopping the engine, move the throttle lever to the LOW position, then turn the engine switch OFF. If the fuel valve is equipped on the tiller, be sure to turn the fuel valve OFF.
- Page 10 To ensure safe operation − Fire and burn hazard Gasoline is extremely flammable, and gasoline vapor can explode. Use extreme care when handling gasoline. Keep gasoline out of reach of children. Add fuel before starting the engine. Never remove the cap of the fuel tank or add gasoline while the engine is running or when the engine is hot.
- Page 11 To ensure safe operation − Carbon monoxide poisoning hazard Exhaust contains poisonous carbon monoxide, a colorless and odorless gas. Breathing exhaust can cause loss of consciousness and may lead to death. If you run the engine in an area that is confined or even partially enclosed, the air you breathe could contain a dangerous amount of exhaust gas.
-
Page 12: Safety Label Locations
These labels warn you of potential hazards that can cause serious injury. Read the labels and safety notes and precautions described in this manual carefully. If a label comes off or becomes hard to read, contact your Honda dealer for a replacement. (DE and GE types) CUTTING DANGER READ OWNER’S MANUAL, EXHAUST CAUTION, FUEL CAUTION... - Page 13 (C, D and U types) HOT CAUTION TINE DANGER * * (U type) READ OWNER’S MANUAL (C, D types) READ OWNER’S MANUAL * * French labels come with the tiller...
-
Page 14: Ce Mark And Noise Label Locations
CE mark and noise label locations (DE and GE types) NOISE LABEL CE MARK Name and address of manufacturer Sales agency and address Description code Year of manufacture Frame serial number Machine mass (standard specification) Engine net power... -
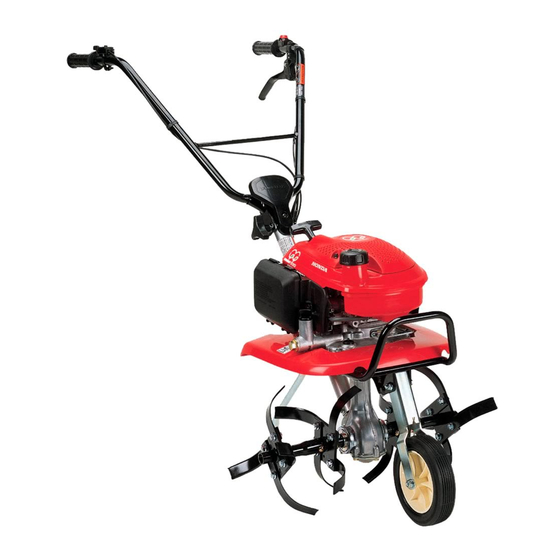
Page 15: Component Identification
COMPONENT IDENTIFICATION ENGINE SWITCH THROTTLE CONTROL LEVER FUEL TANK CAP FRONT COVER (Equipped type) HANDLEBAR HEIGHT ADJUSTER FRAME SERIAL NUMBER AIR CLEANER ENGINE OIL FILLER CAP ENGINE OIL DRAIN BOLT TRANSMISSION OIL FILLER CAP FRONT WHEEL (Equipped type) Record the frame serial number in the space below. You will need this number when ordering parts. - Page 16 STARTER GRIP SPARK PLUG MUFFLER CLUTCH LEVER CHOKE LEVER FUEL VALVE DRAG BAR ROTOR TRANSMISSION OIL LEVEL CHECK BOLT...
-
Page 17: Pre-Operation Check
PRE-OPERATION CHECK Engine oil level Running the engine with insufficient oil can cause serious engine damage. Be sure to check the tiller on a level surface with the engine stopped. Remove the oil filler cap. Check the oil level with the level gauge looking into the filler neck. - Page 18 Transmission oil Place the tiller on a level surface and remove the two screw bolts from front cover, and remove the front cover (equipped type). SCREW BOLTS FRONT COVER Remove the transmission oil level check bolt. The oil should be level with the lower edge of the oil filler hole.
- Page 19 Air cleaner Never run the engine without the air cleaner. Rapid engine wear will result. Remove the air cleaner cover and check cleaner for dirt or obstruction of the element (see page LATCH TABS HOOKS ELEMENT AIR CLEANER COVER...
- Page 20 Fuel Check the fuel level, and refill the tank if the fuel level is low. Use unleaded gasoline with a Research Octane Number of 91 or higher (a Pump Octane Number of 86 or higher). Never use stale or contaminated gasoline or an oil/gasoline mixture. Avoid getting dirt or water in the fuel tank.
- Page 21 Gasolines containing alcohol If you decide to use a gasoline containing alcohol (gasohol), be sure it’s octane rating is at least as high as that recommended by Honda. There are two types of ‘‘gasohol’’: one containing ethanol, and the other containing methanol.
- Page 22 Tools and Attachments To install a tool or attachment on the tiller, follow the instructions furnished with the tool or attachment. Ask your Honda dealer for advice if you encouter any problem or difficulty in installing a tool or attachment.
-
Page 23: Starting The Engine
STARTING THE ENGINE Be sure the clutch is disengaged to prevent sudden uncontrolled movement when the engine starts. The clutch is engaged by pulling in the clutch lever and disengaged by releasing the lever. Turn the fuel valve to the ON FUEL VALVE position. - Page 24 Move the throttle control lever slightly to the left. HIGH THROTTLE CONTROL LEVER Pull the starter grip lightly until you feel resistance, then pull briskly in the direction of the arrow as shown. Hold the handle with your left hand and start the engine by pulling out the recoil starter Direction vigorously.
- Page 25 Carburetor Modification for High Altitude Operation At high altitude, the standard carburetor air-fuel mixture will be too rich. Performance will decrease, and fuel consumption will increase. A very rich mixture will also foul the spark plug and cause hard starting. Operation at an altitude that differs from that at which this engine was certified, for extended periods of time, may increase emissions.
-
Page 26: Tiller Operation
TILLER OPERATION Adjusting the handle position The handle position should be adjusted to suit the stature of the operator and work condition. To adjust the handlebar height, loosen the handlebar height adjuster, select the appropriate holes and tighten it. HANDLEBAR HEIGHT ADJUSTER Clutch operation The clutch engages and disengages the power from the engine to the transmission. - Page 27 Handle angle adjustment (GE and U types) The handle can be adjusted at three different angles in either direction. To adjust, loosen the handle angle adjuster and turn the handle column to the required position. After adjustment, tighten the adjuster securely.
- Page 28 Front wheel (Equipped type) After getting to the tilling site, move the front wheel to the raised position before tilling. Always stop the engine before lowering or raising the wheel. To raise or lower the wheel, pull out the wheel assembly, move the wheel, then relase the wheel assembly.
- Page 29 Tilling depth adjustment Tilling depth can be adjusted by removing the retainer and sliding the drag bar up or down as necessary. DRAG BAR RETAINER Do not use the tiller with a rotor whose diameter is in excess of Operating the tiller on grades could cause the tiller to tip over. Allowing any one to operate this tiller without proper instruction may result in injury.
-
Page 30: Stopping The Engine
STOPPING THE ENGINE In an emergency: Turn the engine switch OFF. ENGINE SWITCH In normal use: Release the clutch lever to the DISENGAGED position. DISENGAGED CLUTCH LEVER... - Page 31 Move the throttle control lever fully to the right. THROTTLE CONTROL LEVER Turn the engine switch OFF. ENGINE SWITCH...
- Page 32 Turn the fuel valve to the OFF position. FUEL VALVE...
-
Page 33: Maintenance
If the engine must be run, make sure the area is well ventilated. Use only genuine Honda parts or their equivalent for maintenance or repair. Replacement parts which are not of equivalent quality may damage the tiller. - Page 34 Changing the engine oil Remove the oil filler cap and the drain bolt to drain. After reinstalling the drain bolt, refill the crankcase with the recommended oil (see page Check if the oil level is up to the level gauge. Oil capacity: 0.30 L (0.32 US qt, 0.26 lmp qt) Draining the oil while the engine is still warm will make draining easily.
- Page 35 Servicing the air cleaner A dirty air cleaner will restrict air flow to the carburetor. To prevent carburetor malfunction, service the air cleaner regularly. Service more frequently when operating the engine in extremely dusty areas. Never run the engine without the air cleaner. Rapid engine wear will result.
- Page 36 Spark plug service Recommended spark plug: U14FSR-UB (DENSO) To ensure proper engine operation, the spark plug must be properly gapped and free of deposits. Remove the spark plug cap. Use the spark plug wrench to remove the spark plug. If the engine has been running, the muffler will be very hot. Be careful not to touch the muffler.
- Page 37 Spark arrester maintenance (equipped type) In Europe and other countries where the machinery directive 2006/42/EC is enforced, this cleaning should be done by your servicing dealer. If the engine has been running, the muffler will be very hot. Allow it to cool before proceeding.
- Page 38 Throttle cable adjustment Measure the free play at the lever tip. Free play: 10 15 mm (0.4 0.6 in) − − If the free play is incorrect, loosen the lock nut and turn the adjusting nut in or out as required. After adjusting the free play, tighten the lock nut firmly.
- Page 39 Clutch cable adjustment Set the handlebar height in the center position (see page Place the tiller on a level surface and remove the two screw bolts from front cover, and remove the front cover (equipped type). SCREW BOLTS FRONT COVER The clutch spring should extend 0.08 ±...
-
Page 40: Transporting/Storage
TRANSPORTING/STORAGE Transporting If the tiller has been used, allow it cool for at least 15 minutes before loading it on the transport vehicle. A hot engine and exhaust system can burn you and can ignite some material. To prevent fuel spillage, drain the fuel when transporting the tiller, turn the engine switch to the OFF position, and keep the tiller level. - Page 41 Storage Do not place the tiller with the handlebars on the ground. It will cause the oil entering the cylinder or the fuel spillage. Preparation for storage To prepare the tiller for extended storage (over 30 days), the following should be accomplished to ensure that the tiller will be ready for use when required.
-
Page 42: Troubleshooting
Is the spark plug in good condition? Remove and inspect the spark plug. Clean, readjust gap and dry the spark plug. Replace it if necessary. If the engine still does not start, take the tiller to an authorized Honda dealer. -
Page 43: Specifications
SPECIFICATIONS Model Overall length 1,280 mm (50.4 in) 1,200 mm (47.2 in) Overall height 1,035 mm (40.7 in) 975 mm (38.4 in) Overall width 615 mm (24.2 in) 585 mm (23.0 in) Dry mass [weight] 29.0 kg 30.0 kg 23.5 kg (51.8 lbs) 24.5 kg (63.9 (66.1... - Page 44 0.6 0.7 mm − Refer to page: 33 (0.02 0.03 in) − Valve clearance IN: 0.06 0.10 mm − See your authorized EX: 0.09 0.13 mm − Honda dealer Other specification No other adjustments needed. Specifications are subject to change without notice.
- Page 45 MEMO...
-
Page 46: Major Honda Distributor Addresses
For further information, please contact Honda Customer Information Centre at the following address or telephone number: ADRESSES DES PRINCIPAUX DISTRIBUTEURS Honda Pour plus d’informations, s’adresser au Centre d’informations clients Honda à l’adresse ou numéro de téléphone suivants: ADRESSEN DER HAUPT-Honda-VERTEILER... - Page 47 AUSTRIA CROATIA FINLAND Honda Motor Europe (North) Hongoldonia d.o.o. OY Brandt AB. Jelkovecka Cesta 5 Tuupakantie 7B Hondastraße 1 2351 Wiener Neudorf 10360 Sesvete − Zagreb 01740 Vantaa Tel. : + 43 (0)2236 690 0 Tel. : + 385 1 2002053 Tel.
- Page 48 @ @ ICELAND NETHERLANDS REPUBLIC OF BELARUS Bernhard ehf. Honda Motor Europe (North) Vatnagardar 24-26 Afd. Power Equipment- Scanlink Ltd. 104 Reykdjavik Capronilaan 1 Kozlova Drive, 9 220037 Minsk Tel. : + 354 520 1100...
- Page 49 @ ventas aucasa.com @ taller aucasa.com @ SLOVAKIA REPUBLIC SWEDEN UNITED KINGDOM Honda Slovakia, spol. s r.o. Honda Nordic AB Honda (UK) Power Equipment Prievozská 6 821 09 Bratislava Box 50583 - Västkustvägen 17 470 London Road Tel. : +...
-
Page 50: "Ec Declaration Of Conformity" Content Outline
"EC Declaration of Conformity" CONTENT OUTLINE "CE-Déclaration de conformité" DESCRIPTION DE TABLE DES MATIERES "EU-Konformitätserklärung" INHALTSÜBERSICHT DESCRIPCIÓN GENERAL DEL CONTENIDO DE LA "Declaración de Conformidad CE" DESCRIZIONE DEL CONTENUTO DELLA "Dichiarazione CE di Conformità" *1: see specification page. á *1: consulte la p gina de las é...
Need help?
Do you have a question about the F220 and is the answer not in the manual?
Questions and answers
What horsepower is the honda f210