Table of Contents
Advertisement
Advertisement
Table of Contents

Related Manuals for Honda F210


Summary of Contents for Honda F210
- Page 2 Honda motor Co., Ltd. reserves the right to make changes at any time without notice and without incurring any obligation. No part of this publication...
-
Page 3: Table Of Contents
CONTENTS 1. WARNING LABEL LOCATIONS ....:.... 2. TILLER SAFETY ........3. COMPdNENT IDENTIFICATI'ON ......4. PRE-OPERATION CHECK ....... : .. 5. STARTING THE ENGINE ........6. TILLER OPERATION ........7. STOPPING THE ENGINE ........8. MAINTENANCE ........ -
Page 4: Warning
1. WARNING LABEL LoCATIONS (MAIN CLUTCH ) IIEAD OWNER’S MANUAL FIRST mR SAA OPERATION. WEXNAUST GASES ARE POISONOUS AVOID INHALATION. GASOLINE IS FLAMMABLE AND EXPLOSIVE. STOP FOR SPUlEll FUEL OlblEAKAGE BEFORE STARTING. WOU NOT TILT TILLER EXCESSIVELY OR FULL MAY SPILL E OIL FILLER STARTING. - Page 5 2. TILLER SAFETY To ensure safe operation READ THIS OWNERS MANUAL CAREFULLY. Never permit anyone to operate the tiller without proper instruction. Know how to stop the tiller quickly and understand the operation of all the controls. Keep children and pets at a safe distance when tilling. Wear close-fitting clothing and sturdy,...
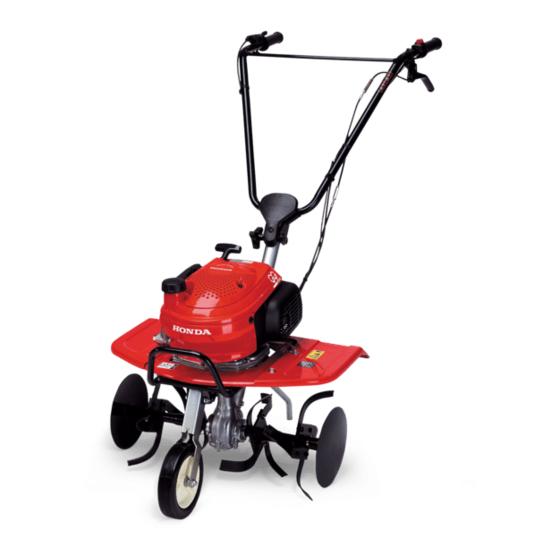
- Page 6 3. COMPONENT IDENTIFICATION THROTTLE LEVER CLEANER FUEL TANK ENGINE SWITCH FUEL VALVE FRONT WHEEL RECOIL STARTER SPARK PLUG TRANSMISSION FILLER CLUTCHLEVER ENGINE FILLER ENGINE DRAIN BOLT DRAG TRAhiSMlSSlON LEVEL ROiOR CHECK BOLT...
- Page 7 Engine oil is a major factor affecting engine performance and service life. Non-detergent or vegetable oils are not recommended. Be sure to check the tiller on a level surface with the engine stopped. Use Honda 4-stroke oil, or an equiva- lent high detergent, premium quality motor...
- Page 8 2. Transmission gear oil Place the tiller on a level surface and remove the transmission oil filler cap. The oil should be level with the lower edge of the oil filler hole. Add high quality engine oil if the level is low. TRANSMISSION FILLER TRANSMlSSlbN...
- Page 9 4. Fuel Use any regular grade. automotive gasoline (unleaded gasoline is preferred) with a pump octane rating of 86 or higher. Never use an oil/gasoline mixture or dirty gasoline. Avoid getting dirt, dust or water in the fuel tank. CAUTION: Gasoline substitutes are not recommended;...
- Page 10 5. STARTING THE ENGINE CAUTION: Be sure the clutch is disengaged. 1. Turn the fuel valve ON. FUEL VALVE 2. Pull the choke rod out. NOTE: Do not use the choke if the CHOKE engine is warm or the air temperature is high.
- Page 11 4. Move the throttle lever slightly the left. 5. Pull the starter grip lightly until resistance is felt, then pull briskly. STARTER GRIP CAUTION: allow starter grip to snap back against the engine. Return it gently to prevent damage to the starter. 6.
- Page 12 1. Handlebar height adjustment CAUTION: Before adjusting the handlebar, place the tiller on firm level ground to prevent the handle from collapsing accidentally. To adjust the handlebar height, loosen adjuster, select the appropriate holes and tighten the adjuster. 2. Tilling depth adjustment Tilling depth...
- Page 13 4. Front wheel 0 To move the tiller from place to place when not tilling: Working from the right side of the tiller, pull the wheel arm toward you, pivot the wheel down and then release the wheel arm. Be sure that the arm locks in place.
-
Page 14: Stopping
7. STOPPING THE ENGINE 1. Move the throttle lever fully to the right. THROTTLE LEVER 2. Turn the engine switch to either OFF position. 3. Turn the fuel valve OFF. NOTE: In case of an emergency, turn the engine switch to the OFF position immediately. -
Page 15: Maintenance
Maintenance Schedule NOTE (1)‘: Service more frequently when used in dusty areas. (2): These items should be serviced by an authorized Honda dealer, unless owner has the proper tools and is mechanically proficient. See the Honda Shop Manual. - Page 16 1. Changing oil Drain the oil while the engine is still warm to assure rapid and complete drain- ing. 1. Remove the oil drain bolt and the filler cap to drain. 2. Reinstall the drain bolt and fill the crankcase to the upper level with the recommended oil (P.
- Page 17 2. Air cleaner service A dirty air cleaner will restrict air flow to the carburetor. To prevent carburetor malfunction, service air cleaner regularly. Service more frequently when operating the engine in extremely dusty areas. ever use gasoline or low flash point solvents for cleaning the air cleaner element.
- Page 18 3. Spark plug service Recommended spark plug: BMR-4A (NGK) W14MR-U (ND) To ensure proper engine operation, the spark plug must be properly gapped and free of deposits. 1. Remove the spark plug cap. If the engine has been running, the muffler will be very hot.
- Page 19 4. Clutch lever free play adjustment 1. Check the clutch lever free play at the lever tip as illustrated. Clutch lever free play: mm (0.08-0.24 (0.08-0.24 2. If the clearance is incorrect, loosen the lock nut and turn the adjusting bolt in or out as required.
- Page 20 5. Throttle cable adjustment Measure the free play at the lever tip. Free play: 5-10 mm (0.2-0.4 If the free play is incorrect, loosen the lock nut and turn the adjusting bolt in or out as required. THROTTLE LEVER 6. Fuel strainer cleaning Water or sediment accumulated in the fuel strainer can cause loss of power or...
- Page 21 3. Remove water and sediment from the filter screen and sediment cup. a’( 4. Reinstall the fuel strainer, reconnect the fuel lines and secure them with the clips. NOTE: Turn the fuel valve ON and check for leaks. 7. Rotor assembly Install the tine assemblies and side disks as illustrated below.
-
Page 22: Transporting/Storage
9. TRANSPORTING/STORAGE Transporting Turn off the fuel valve. Keep the tiller level. Do not lay it on its side or lean it back on its handle- bars. Tie the tiller down securely with a suitable strap or rope to prevent it from tipping over. -
Page 23: Troubleshooting
If there is no spark, replace the plug and check again. If OK, try to start the engine according to-the instructions. 6. If the engine still does not start, take the tiller to an authorized Honda dealer. - Page 24 11. SPECIFICATIONS Model......F210 .1,250 x 585 x 960 mm (49.2 x 23.0 x Dimensions(LxWxH)..37.8 in) .27.5 kg (60.6 lb) Dry weight .....I,030 mm (40.6 in) Maximum handle height ..Engine Model ...... .GVlOO Type ....... Single cylinder, 4-stroke, forced cooled, side valve, gasoline...
-
Page 25: Warranty
Your purchase of a Honda product is greatly appreciated by both the dealer and American Honda Motor Co., Inc. We want to assist you in every way... - Page 26 When you write or call, please provide the following information: • Model and serial numbers • Name of the dealer who sold the Honda power equipment to you • Name and address of the dealer who services your equipment •...
- Page 27 Regional Office Locations NORTHEAST REGIONAL OFFICE MIDWEST REGIONALOFFICE American Honda Motor Co., Inc. American Honda Motor Co., Inc. NORTHWEST REGIONAL OFFICE Customer Relations Department Customer Relations Oepartment (includes Alaska) P.O. P.O. American Honda Motor Co., Inc. Moorestown, Jersey 08057 Greendale,...
Need help?
Do you have a question about the F210 and is the answer not in the manual?
Questions and answers
Dove posso comprare il filtro aria per il mio motozzappa F210 ?
You can buy an air filter for the Honda F210 tiller from the following sources:
1. JAPG Mowers and Machinery website ([japgmowers.co.uk](https://japgmowers.co.uk/honda-f210-tiller-parts-2457-c.asp)), where the air filter (part numbers 17210-895-505 and 17211-896-751) is listed for £8.79 (£7.33 ex. VAT).
2. eBay ([ebay.co.uk](https://www.ebay.co.uk/itm/183946427625)), where the air filter for Honda G100, GV100 engines and F200, F210 tillers (part number 17210-895-505) is available.
This answer is automatically generated