Haaga 677 Operating Instructions Manual
Isweep series
Hide thumbs
Also See for 677:
- Operating instructions manual (196 pages) ,
- Original operating instructions (31 pages) ,
- User manual (7 pages)
Advertisement
Table of Contents
- 1 Table of Contents
- 2 About These Instructions
- 3 Safety Instructions
- 4 Maintenance and Repair
- 5 Design and Function
- 6 Putting into Operation
- 7 Using the Sweeper
- 8 Transport
- 9 Putting out of Operation and Storage
- 10 Maintenance and Care
- 11 Reach
- 12 EC Declaration of Conformity
- 13 Technical Data
- 14 Troubleshooting
- Download this manual
See also:
User Manual
Advertisement
Table of Contents

Related Manuals for Haaga 677


Summary of Contents for Haaga 677
- Page 1 677 / 697 • Operating instructions...
-
Page 2: Table Of Contents
Contents 1 About these instructions ......................30 2 Safety instructions ......................... 31 3 Design and function ........................40 4 Putting into operation ........................41 5 Using the sweeper .......................... 42 6 Transport ............................46 7 Putting out of operation and storage..................47 8 Maintenance and care ........................ - Page 3 Publisher's notice Dear customer, thank you for purchasing These instructions will allow you to use a quality product from Haaga. This prod- the sweeper safely and efficiently. uct has been manufactured using modern Before using the sweeper for the first production processes with comprehensive time, please carefully read the "Safety...
-
Page 4: About These Instructions
1.1 Symbols used • Please enclose a copy of the invoice in the event of a warranty claim. Warning! • Only genuine Haaga spare parts must A warning informs you about possible be used. health risks or risks of fatal injury to •... -
Page 5: Safety Instructions
• Minors must not operate the sweeper – • Persons who are prohibited from except for juveniles over the age of 16 strenuous physical activity for health who are trained under supervision. reasons should ask a doctor for advice on whether working with the sweeper •... - Page 6 • the chapter "Technical data" in these • Always wear a dust protection mask in instructions. dusty conditions. • compliance with the operating, main- • Wear sturdy gloves. tenance and storage conditions pre- Use the machine only in technically per- scribed by the manufacturer.
- Page 7 2.3 Information on battery and • If the fluid comes into contact with the eyes, do not rub and rinse out the charging socket eyes with plenty of water for at least 15 minutes. Also consult a doctor. Warning CAUTION! •...
- Page 8 • Always keep the battery clean and dry. • Electrical connection is permitted only to a properly installed socket. • Observe the technical data. • After use of the charger, disconnect the • Fully charge the battery before use. mains plug from the socket. •...
- Page 9 • Never eat or drink in the area of the • Never connect (short-circuit) the con- charger – gases may be produced when tacts of the charger with metal objects charging the battery. (e.g. nails, coins, jewellery). The charger may be damaged by a short circuit. •...
- Page 10 2.7 Instructions for work • Take care in slippery, wet or snowy conditions. There is a risk of slipping on preparation slopes or uneven ground. Danger of injury • Make sure that the sweeper does not collide with objects, e.g. shelves, scaf- •...
- Page 11 • When sweeping up leaves, improve the Danger of injury! capacity of the waste bin by briefly placing the sweeper on the rear side of • The sweeper is designed for operation the waste bin. by one person only – do not allow any other persons into the working area.
- Page 12 2.11 Instructions for storage • Accumulated dirt deposits and wound-up threads etc. behind the Risk of accident! roller mounting can lead to sluggish operation of the sweeper and impair • Do not reach into the swivel area of functioning. the push handle – parts of the body may be trapped between the push Danger of injury! handle and housing if the push handle...
-
Page 13: Maintenance And Repair
2.12 Instructions for CAUTION! maintenance and repair Damage to the sweeper due to improper NOTE maintenance. • Carry out maintenance of the sweeper • Repairs must be performed only by regularly. Perform only the mainte- authorised service centres or by spe- nance work described in the instruc- cialists in this field who are familiar tions. -
Page 14: Design And Function
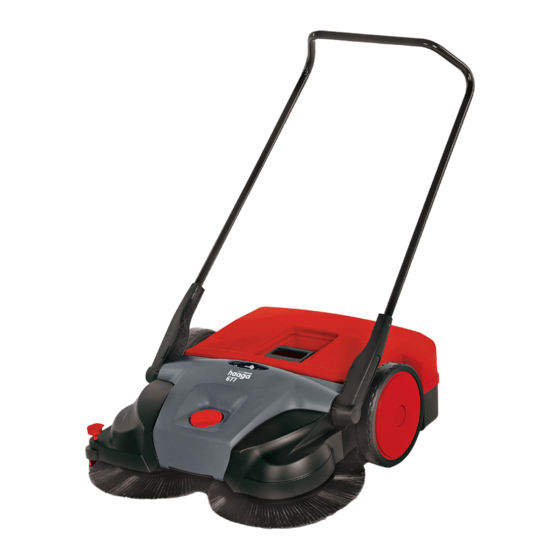
3 Design and function 3.1 Important components 1. Push handle 2. Waste bin 3. Waste bin handle 4. Disc brush height adjustment 5. Carrying handle 6. Disc brush 7. Side guide roller 8. Running wheel 9. Fine dirt sweeping roller 10. -
Page 15: Putting Into Operation
4 Putting into operation 4.1 Fitting the push handle 4.2 Connecting battery cable Danger of injury! CAUTION! • Avoid injury due to push handle acci- Damage to the sweeper due to improper dentally falling over. connection. NOTE • The sweeper may be damaged and the warranty rendered void if the cables The push handle can be fitted in two dif- are mixed up on the battery. -
Page 16: Using The Sweeper
4.3 Charge battery 1. Plug the charger plug into the charging socket on the sweeper. NOTE 2. Plug the charger into a 230 V power The charger has a fully electronic volt- outlet. age and current limitation function. • The LED indicator on the charger lights This ensures that a connected battery up red during charging. - Page 17 2. Adjust the sweeper • An excessive contact pressure will (see Adjusting the sweeper). increase the pushing resistance. NOTE 3. Guide the push handle with both hands. The knob for height adjustment of the 4. Push the sweeper forward at normal disc brushes is located in the middle walking pace.
- Page 18 • Sweeping edges and corners: • Wear a dust protection mask in dusty Press the handle of the brush hold- conditions. ing-down device down. NOTE • Operation on surfaces: Pull the handle Empty the waste bin each time after use. of the brush holding-down device up.
- Page 19 • Disconnect the sweeper from the power source while cleaning. Disconnect the Recommendation: apply a thin coating cable from the battery. of Haaga genuine lubricant spray to the brush drives. Danger of injury! • Wear sturdy gloves in order to avoid cut injuries, e.g.
-
Page 20: Transport
6 Transport 6.1 Carrying the sweeper 6.2 Transporting the sweeper in a vehicle Danger of injury! CAUTION! • Hold the sweeper so that falling over or tipping down of the push handle Damage to the sweeper due to improper cannot cause injuries to the user or transport. -
Page 21: Putting Out Of Operation And Storage
7 Putting out of operation and storage 7.1 Removing the push handle • For storage periods of longer than 2 months: disconnect battery cable to Danger of injury! protect the battery against deep dis- charge. • Avoid injury due to push handle acci- dentally falling over. -
Page 22: Maintenance And Care
• Have all other work performed by a qualified specialist dealer. • The sweeper must be switched off and disconnected from the power supply • Use only genuine Haaga spare parts. when performing all work. Otherwise there is a risk of accidents or damage to the sweeper. - Page 23 (see Cleaning the sweeper). tact Service if necessary. Recommendation: Apply a thin coating Check the height adjustment of Haaga genuine lubricant spray to the (see Height adjustment). brush drives (see Spraying the brush drives with lubricant). It must be possible to easily move the sweeper switch to "0"...
- Page 24 4. Knock out the foam insert. • Use only Haaga genuine lubricant spray. Use of other oils or greases can 5. Clean the foam insert with water and impair functioning of the brush drives. allow to dry. 1. Position the sweeper so that it is verti- 6.
-
Page 25: Reach
677 / haaga 697 Haaga Kehrsysteme GmbH, Wielandstr. 24, 73230 Kirchheim / Germany hereby confirms that the sweeper haaga 677 / 697 incl. charger conforms with the Directives 2006/42/EC, 2006/95/EC, 2011/65/EU and has been developed and manufactured in accordance with the ap- plicable standards. -
Page 26: Technical Data
11 Technical data Technical data haaga 677 haaga 697 haaga 697 plus Sweeping width approx. cm Sweeping performance approx. m²/hour 3,600 4,100 4,100 Waste bin capacity (litres) Weight in kg Operating time with full battery power*, min. approx. Noise and vibration information (meas-... -
Page 27: Troubleshooting
12 Troubleshooting Problem Cause Remedy Sweeper dirty Clean the sweeper (see Cleaning the sweeper) Brushes blocked Eliminate blockage (see Eliminating blockages) Brush drives dirty Clean the brush drives (see Cleaning the sweeper) Sweeper moves Lubricate brush drives with lubri- sluggishly cant spray or does not run smoothly...