Table of Contents
Advertisement
Quick Links
Primo
401
™
Quick Start Guide
English
1
2
13
12
3
4
11
5
6
10
9
8
7
EN
Specifications
GSM 900/1800 MHz
Network:
Dimensions:
91 mm x 46 mm x 19 mm
74 g
Weight:
Battery:
3.7V/800 mAh Li-ion battery
Min: 0°C (32°F) Max: 40°C (104°F)
Operating ambient temperature:
Charging ambient temperature:
Min: 0°C (32°F) Max: 40°C (104°F)
Min: -20°C (-4°F) Max: 60°C (140°F)
Storage temperature:
Changes and errors excepted.
© IVS GmbH 2015 • All rights reserved
QSG_Primo_401_en_A4(A7)_v1.1
English
0197
Version 1.1
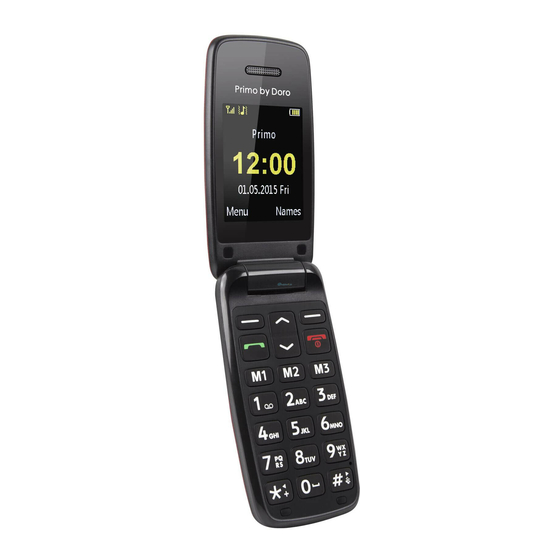
1. Receiver/
Make phone calls holding
loudspeaker
the cell phone to the ear
2. Display
3. Left soft key
Selection of the main menu
Right soft key
Open the phone directory
4. Call button
Dial and answer calls;
open the call log
5. Arrow keys
In idle state
quick access list
to open messages.
Scroll up and down in
menus and lists
6. Speed dial
Speed dial the numbers
saved under M1, M2 and
M3 with one keystroke
7. * key
In idle state: to enter: "*"/ "+"
14
/ "P"/"W";
Input: special characters
8. # key
In idle state: long keystroke
to toggle between ring tone
on/off;
Input: toggle input modes
9. Microphone
2. Insert the SIM card
by carefully pushing
it under the metal
bracket on the lower
side. Make sure the
contacts of the SIM
card point downwards
and the cut-off corner
fits exactly in the
recessed shaping
of the holder. The
contacts of the SIM
card must not be
scratched or bent.
Try not to touch the
contacts with your
fingers.
3. Insert the rechargea-
ble battery by pushing
it into the battery
compartment ensuring
that the three contacts
on the front touch the
three spring contacts
on the bottom in the
battery compartment.
10. Numerical
In idle state: input of phone
keys
number;
long keystroke on 1: calling
the voice mail box (the
phone number must be
stored)
11. Exit key
Exiting a call, returning to
idle state; switching the
phone on/off
to open the
12. LEDs
Notification of missed
calls and received text mes-
sages,
13. Micro USB
For battery charger
port
14. Headset
For standard headset with
connector
3.5 mm
phone jack
4. Replace the cover
and push it upward
using gentle pressure
with the thumb until
it snaps securely into
place again.
When the battery performance is low, the
empty battery symbol flashes to indicate the
battery state and an alarm signal will sound. To
recharge the battery, connect the mains adapter
to the micro USB connector on the bottom side
of the phone.
When the battery charger is connected to the
phone, the red charging LED is on. The battery
charge status moves when the battery is
charging (visible in the upper right corner of the
display).
A complete charging process of the recharge-
able battery takes approximately 3 hours. When
the battery is fully charged the animation of the
battery charging status stops.
Installing the SIM card and the battery
The SIM card holder is located inside the battery
compartment.
CAUTION
Only use batteries, charger and accessories
that have been approved for use with this
particular model. Connecting other accessories
may be dangerous and may invalidate the
phone's type approval and guarantee.
1. Remove the cover
of the battery
compartment by
Battery charging
placing a thumb on
the cover's riffle on
the rear of the phone
casing and pushing
the cover downwards.
If the rechargeable
battery is inserted,
remove it by lifting it
on the notch at the top
using a finger nail.
Power on the phone
Press and hold the red button
phone to turn it on and off.
If the SIM card is valid but protected with a
PIN code (Personal Identification Number),
Enter PIN is displayed.
Enter the SIM PIN code and press OK
(
upper left corner of keypad). Delete with
Delete (
upper right corner of keypad).
Setting the language
The default language of the phone menu,
messages and so on is determined by the SIM
card used (Automatic). You can always switch
between the languages supported by the phone.
1. Press Menu
2. Select Phone settings
3. Select Language
4. Select language
Setting time and date
1. Press Menu
2. Select Phone settings
3. Select Time and date
4. Select Set time/date
5. Enter the time (HH:MM)
6. Enter the date (DD/MM/YYYY)
on the
â
â
Settings
OK.
â
OK.
â
OK.
â
OK.
â
Settings
â
OK.
â
OK.
â
OK.
â
OK.
â
.
â
OK.
Advertisement
Table of Contents

Related Manuals for Doro Primo 401


Summary of Contents for Doro Primo 401
-
Page 1: Quick Start Guide
Primo ™ Installing the SIM card and the battery 1. Receiver/ Make phone calls holding 10. Numerical In idle state: input of phone loudspeaker the cell phone to the ear keys number; The SIM card holder is located inside the battery Quick Start Guide compartment. - Page 2 Making phone calls Creating an entry in the phonebook Safety instructions Medical units The use of equipment that transmits radio signals, for example, mobile phones, 1. Enter the phone number with the area code. WARNING 1. Press Menu â Phonebook â...
Need help?
Do you have a question about the Primo 401 and is the answer not in the manual?
Questions and answers