Advertisement
Table of Contents
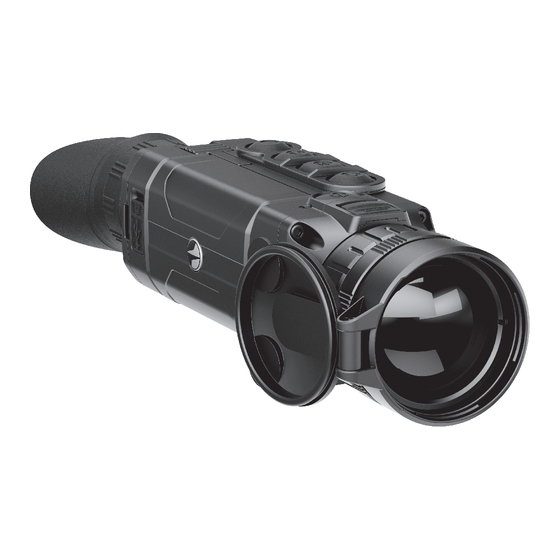
- 1 Description of Controls
- 2 Using the Battery Pack
- 3 Installation
- 4 Safety Measures
- 5 External Power Supply
- 6 Operation
- 7 Sensor Calibration
- 8 Main Menu Functions
- 9 Menu Contents
- 10 Status Bar
- 11 Usb Connection
- 12 Wireless Remote Control
- 13 Troubleshooting
- 14 Maintenance and Storage
- Download this manual
Advertisement
Table of Contents

Related Manuals for Pulsar Helion XQ19F


Summary of Contents for Pulsar Helion XQ19F
- Page 3 Thermal Imaging Scope HELION 1-24 25-48 Lunette d'imagerie thermique HELION Wärmebildgerät HELION 49-74 75-100 Monocular térmico HELION Termovisore HELION 101-126 РУССКИЙ Тепловизор HELION 127-152...
- Page 4 MODEL HELION MODEL HELION XQ19F XQ30F XQ38F XQ50F XP28 XP38 XP50 SKU# 77391 77393 77394 77395 SKU# 77403 77404 77405 Microbolometer: Microbolometer: Type uncooled uncooled Type uncooled Resolution, pixels 384x288 384x288 Resolution, pixels 640x480 640x480 640x480 Frame rate, Hz Frame rate, Hz Pixel size, µm Pixel size, µm Optical characteristics:...
- Page 5 BATTERY PACK: The design and software of this product are subject to change for development purposes. The latest edition of this user manual is available at www.pulsar-nv.com Quick-release Li-Ion battery packs IPS5/IPS10 Operating time in Wi-Fi mode up to 16 hours* Operation on АА...
-
Page 6: Description Of Controls
Turn display on Calibrate the sensor mode Install the Battery Pack into the charger by inserting the pins (A) of the battery into the grooves (B) of the charger – the Pulsar logo on Device is on Calibrate the sensor the battery Pack should be located closer to the lever;... -
Page 7: Installation
INSTALLATION: Connect the external power supply to the USB port (4) of the device (Pic. 1 on the flyleaf). Remove the protective cover from the Battery Pack. The device switches to operation from external power supply, and the Lift the lever (13). IPS5 Battery Pack will begin slowly charging. -
Page 8: Main Menu Functions
Mode М (manual). Close the lens cover, turn the device on with a Notes. short press of the ON button (11). Having finished calibration, open - actual magnification is the product of the basic magnification value and the lens cover. continuous digital zoom value. - Page 9 Menu contents and description Switch between the palette selected in the menu and the basic palette with a short press of the UP (10) button. Wi-Fi Wi-Fi ON/OFF Turn Wi-Fi on with a short press of the M (9) button. Selection of calibration mode.
- Page 10 Units of Access level Owner. The Stream Vision user has Selection of units of measurement measure the complete access to all device's functions. Enter the submenu "M/Y" with a short press of Access level Guest. The Stream Vision user has the M button.
- Page 11 Wi-Fi – off (default password) Enter the submenu with a short press of the M button. Digital zoom – off Select icon with a short press of the M button. PiP – off A marker appears on the left side of the Colour palette –...
-
Page 12: Status Bar
The built-in recorder operates in two modes: hardware version service information - Photo (photography; in the top left corner of the display you can see: photography icon Select menu option Device information with a short If estimated number of photos that can be saved to the Flash card is more press of the M button to review information. - Page 13 - the maximum duration of a recorded file is seven minutes. After this STADIAMETRIC RANGEFINDER time expires a video is recorded into a new file. The number of Thermal imagers are equipped with a stadiametric rangefinder which recorded files is limited by the capacity of unit's internal memory. allows the user to estimate approximate distance to an object of known - regularly check the free capacity of the internal memory, move size.
-
Page 14: Usb Connection
PC tablet via Wi-Fi in real time mode. You can find further guidelines on Stream Vision in a separate booklet or at our web USB disconnection. site www.pulsar-nv.com When USB is disconnected from the device where connection is in Note: The Stream Vision application allows you to update the software the USB Mass storage device mode, the device remains on the OFF features of your thermal imager. -
Page 15: Wireless Remote Control
(preferably by a noncontact method). Clean the external imaging device. surfaces of the lenses with products expressly designed for this Follow the link to read FAQs on thermal vision purpose. http://www.pulsar-nv.com/support/faq/ Store the device in a carrying case. Remove the Battery Pack for long-term storage.
Need help?
Do you have a question about the Helion XQ19F and is the answer not in the manual?
Questions and answers