
Related Manuals for Dillon EDXtreme


Summary of Contents for Dillon EDXtreme
-
Page 1: User Instructions
EDXtreme Dynamometer and Crane Scale Optional Communicator User Instructions AWT35-501242 Issue AC... - Page 2 Dillon is a trademark of the Illinois Tool Works group of companies whose ultimate parent company is Illinois Tool Works Inc (“Illinois Tool Works”). Copyright © 2014 Illinois Tool Works. All rights reserved. No part of this publication may be reproduced by making a facsimile copy, by the making of a copy in three dimensions of a two-dimensional...
-
Page 3: Table Of Contents
Declaration of Conformity (EDX PSU) ................9 Chapter 2 Introduction ..........................11 EDX Front Panel ......................11 EDX Keys ........................12 EDXtreme Connector ....................... 12 External Power Supply Connection (EDX 4-Pin) ............13 Communicator Front Panel ....................14 Communicator Keys ....................15 Communicator Connectors .................... - Page 4 Communicator Setup Menu ..................... 43 Communicator Config Menu .................... 46 Communicator Print Formats ................... 48 Chapter 7 General Information ....................... 51 Changing Batteries ......................51 EDXtreme ........................51 Communicator ......................51 Battery Life ........................53 Care ..........................53 Radio Information ......................54 Installing Spacers ......................
-
Page 5: Chapter 1 General Information And Warnings
Cautions give information about procedures that, if not observed, could result in damage to equipment or corruption to and loss of data. NOTE: This is a Note symbol. Notes give additional and important information, hints and tips that help you to use your product. EDXtreme User Instructions... -
Page 6: Safe Operation
Protect the instrument from impact in use and storage. Any significant damage or deformation to the loading element is cause for evaluation by Dillon, particularly in the element side members to the right and left of the display. Relieve all torsional and off axis loads. -
Page 7: Safe Handling Of Equipment With Batteries
Dillon recommends only using qualified rigging hardware and cannot be responsible for unapproved hardware. This instrument is not designed for the following: Applications that see rapid, dramatic temperature swings or thermal shock. Wide variation in readings can occur. Environments with high electromagnetic fields such as cranes employing electromagnets to lift metal. -
Page 8: Cleaning The Machine
1.7.1 Modifications The FCC states that any changes or modifications to this device that are not expressly approved by Dillon may void the user’s authority to operate the equipment. 1.7.2 Radio Safety The radiated output power of this device is far below the FCC radio frequency exposure limits. -
Page 9: Radio Communications Reliability
In these applications where timely updates are critical, a communication cable should be used to physically connect the EDXtreme and Communicator remote (see setup of wired communications). Alternately, the EDXtreme display can be observed directly. -
Page 10: Declaration Of Conformity (Edx And Communicator Ii)
1.8 Declaration of Conformity (EDX and Communicator II) EDXtreme User Instructions... -
Page 11: Declaration Of Conformity (Edx Psu)
1.9 Declaration of Conformity (EDX PSU) EDXtreme User Instructions... - Page 12 EDXtreme User Instructions...
-
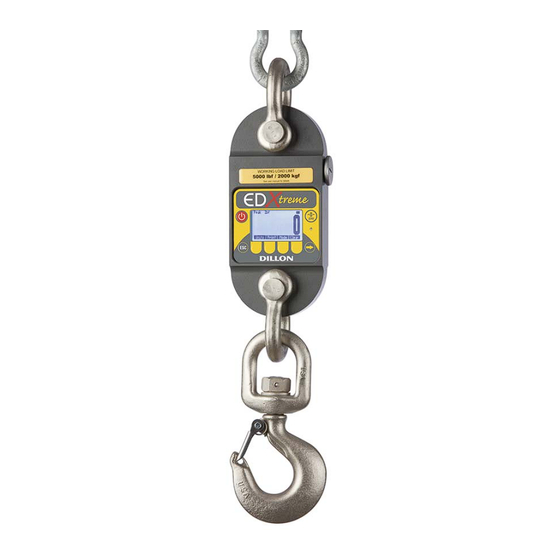
Page 13: Chapter 2 Introduction
(EDX) electronic dynamometer from Dillon is a force measurement load sensor and digital readout in one instrument. The EDX can be used to measure tension or weight. It can operate stand-alone or be coupled with a remote Dillon Communicator, via radio communication or direct wire connection, for improved convenience, functionality and safety. -
Page 14: Edx Keys
Arrow key viewed. 2.2 EDXtreme Connector The connector on the EDXtreme is recessed for protection. It is used to connect the instrument to a Communicator remote display/controller, printer, PC or external power supply. See your Dillon distributor for details. Figure 2.2 EDXtreme Connector... -
Page 15: External Power Supply Connection (Edx 4-Pin)
2.2.1 External Power Supply Connection (EDX 4-Pin) Plug the 4-pin end of the power supply cable into the EDXtreme 4-pin connector located on the back of the unit. Plug the power supply adapter into an AC power outlet. Refer to Figure 2.4... -
Page 16: Communicator Front Panel
2.3 Communicator Front Panel Figure shows the Dillon Communicator. This is a battery powered (or AC adapter powered), radio-linked (or wired) remote display and control unit. Figure 2.5 Dillon Communicator EDXtreme User Instructions... -
Page 17: Communicator Keys
Display Mode key EDX specific peak value, multiple display of force Display Mode values and multiple display of peak values. Use these keys to enter numeric characters. Use Keypad keys for address assignments and other miscellaneous data entry. EDXtreme User Instructions... -
Page 18: Communicator Connectors
2.4 Communicator Connectors The Communicator has 2 connectors. CELL is for wireline communications with an EDXtreme. COM1 is for serial communications or an external power supply. Figure 2.6 CELL and COM1 Connectors 2.4.1 External Power Supply Connection (Communicator 4-Pin) Plug the 4-pin end of the power supply cable into the COM1 4-pin connector located on the top of the unit. -
Page 19: Power On And Annunciators
Capture of a new peak value. This annunciator will remain lit for a few seconds. Press the Arrow key, , to move between the two displays shown in Figure 2.8. lbf and kgf are units of force, not weight. See Config--Units on page 39 for more information. EDXtreme User Instructions... -
Page 20: Soft Keys
Enter Setup Menu. See page Setup Enter Configuration menu. See page Config Press Arrow Setup C onfig U nits Print M ode Clear See Setup See C onfig section section Setup Send C lear Figure 2.9 Soft Key Menu EDXtreme User Instructions... -
Page 21: Chapter 3 Edx Operation
EDX Operation The EDXtreme uses a menu system to perform specific functions or make changes to the configuration. Refer to Figure 3.1 for the user menu diagram. Press Arrow Setup Config Units Print Mode Clear See Setup See Config section... -
Page 22: Force Measurement
Apply the tare force to the EDX and press the ZERO key. Apply the force to the EDX and read the net force on the display. Steps are not required if the weight of the fixturing is not needed. This should be maintained, however, to know cumulative loads. EDXtreme User Instructions... -
Page 23: Displaying Peak Force
ESC key Force press Dual display Live & Peak Peak Peak Arrow key press Setup Config Clear Units Print Mode Figure 3.2 Display Mode Menu Press the Mode soft key repeatedly until the desired display mode is reached. EDXtreme User Instructions... -
Page 24: Log Mode
Setup Setup allows the user to configure how the EDXtreme stores data internally. This stored data can be downloaded via the 4 pin Lemo (CELL port on the EDX) to a PC via a keyboard wedge or other device. - Page 25 This the percentage above where the unit will record the peak load. Re-arm %: (based on capacity) This is the load percentage the force must drop below before the "OVERLOAD" will reset (re-arm) and store another load. EDXtreme User Instructions...
- Page 26 This will export/send the Log information out the configured port. Clear This will clear any data in the Log mode. Clearing "On Lift", "Timed" and "Overload" stored data. Note: All Log Modes will record Date and Time along with it's force and peak reading. EDXtreme User Instructions...
-
Page 27: Chapter 4 Edx Setup
Set Motion then: Enter time Range (div): 1 in Seconds Choose Motion Set Filter Reset Timer: YES (*40) or NO Figure 4.1 Operator Setup Menu for the EDXtreme Figure 4.1 for communicator setup and corresponding flow diagram. EDXtreme User Instructions... - Page 28 Enter weight value Enter weight value Enter Hour Setpoint Setpoint Deactivate? Enter Deactivate? Enter weight value weight value Enter Minute Enter Seconds * The Setpoints parameter is a future feature Figure 4.2 EDXtreme Operator Setup Menu Continued EDXtreme User Instructions...
-
Page 29: Setup Menu
Force 104.5 lbf Peak 302.5 lbf Format #4 Fixed position output. Works well with RS-232 utilities, such as WedgeLink, for parsing into a spreadsheet such as Microsoft Excel. (comma separated) Excel 104.5 Date Time 302.5 Date Time EDXtreme User Instructions... -
Page 30: Setup--Misc
Set AZT (Div): .5- Automatic Zero Tracking: Set this value for the number of divisions off of zero for the display to return to zero. Set Motion Range (Div): 1- Number of divisions that load has to change for the display to update/refresh. EDXtreme User Instructions... - Page 31 Seconds, after motion stops that the backlight will shut off. The next selection will allow the user to configure if motion resets timer. Choose Yes or No to have motion reset the Timer which turns off the backlight. Use of the backlight will affect battery life. EDXtreme User Instructions...
-
Page 32: Setup--About
4.1.3 Setup--About The next soft key is the About. The About menu shows an assortment of information about your Dillon instrument. This can be handy for maintaining calibration, troubleshooting or determining if the firmware can be upgraded. Press this and access... -
Page 33: Setup--Test
4.1.4 Setup--Test The Test functions can help service technicians diagnose your Dillon instrument by showing information on key internal functions. Typically these menus will have significance only to trained technicians. You may look at these menus without technical guidance, but the information may have little meaning, or an error may be reported that may not exist. -
Page 34: Setpts
4.1.6 Setpts Future Feature! EDXtreme User Instructions... -
Page 35: Chapter 5 Edx Configuration
When you are done press the Enter key and the soft keys shown in Figure become available. The default password is “0”. If the password has been changed and forgotten, contact your Dillon distributor for assistance. EDXtreme User Instructions... -
Page 36: Edx Configuration Menu
Com 1 Radio Radio Enable or Disable only Network ID Network Name Disable Choose transmit level, Disable or RS232 Choose Mode; Print Key, Choose Baud Choose Parity Choose databits Remote, Poll or Continuous Figure 5.3 Configuration Menu EDXtreme User Instructions... -
Page 37: Config--Setup
Press Cell or COM 1. The following display appears. Trans Level: (*Disabled) Enter Select a transmission level using the Sel keys to enable as RS-232 or disable. Choices are; Disabled (default), RS232. Press Enter to accept the setting. See note below. EDXtreme User Instructions... - Page 38 The * indicates which option is currently selected. Select a baud rate using the Sel keys to scroll through the choices. Choices are 1200, 2400, 4800, 9600 (default), 19200, 38400, 57600, and 115200. Press Enter to accept the setting. The following display appears: EDXtreme User Instructions...
- Page 39 ASCII value of the poll character. Choose Remote for wireline communications to the Communicator. Choose Print Key Only to print only when the Print key is pressed. Press ESC to return to the first soft key set of the Configuration menu. EDXtreme User Instructions...
-
Page 40: Config--Mode
Use the available soft keys to enter a number (1-255), then press Enter to accept. Key in the network name. This will be to identify each EDXtreme when displayed on the handheld communicator. Press Enter to return to the first soft key set of the Configuration menu. -
Page 41: Config--Units
Enter Select a Peak Capture Rate using the Sel key to scroll through the choices. Choices are 100Hz - Normal (default), 1kHz - High Speed, and 10Hz - Battery Saver. Press Enter to accept the displayed setting. EDXtreme User Instructions... - Page 42 Use the Num keys to enter the first number and the Adv key to move to the next number of the timer value. Press Enter when the desired timer value is entered. Key presses reset the timer. Characters received through the serial port also reset the timer. EDXtreme User Instructions...
-
Page 43: Config--Chpwd
IMPORTANT: Changing the password denies access to this menu without entry of the new password. Contact your Dillon distributor if you lose your password. 5.1.7 Config--Reset The last soft key in this set is the Reset soft key. Use this to reset the system to its factory default settings. -
Page 44: Chapter 6 Communicator Operation
Communicator Operation The Dillon Communicator is a remote display and control module designed to work with the EDXtreme. It can be connected by wire or can communicate by radio if both the Communicator and EDXtreme are equipped with optional radio boards. -
Page 45: Communicator Setup Menu
YES or NO Up or DOWN Selected Backlight Choose backlight ON, OFF or Timer intensity: 1- 10 operation If Timer enabled then: Enter time in Seconds Choose Motion Reset Timer: YES or NO Figure 6.1 Communicator Setup Menu EDXtreme User Instructions... - Page 46 Follow onscreen prompts for directions. Contrast shortcut There is a keypad shortcut for increasing and decreasing contrast. While in normal display mode press Arrow key and F2 simultaneously to increase contrast. Press Arrow key and F1 simultaneously to decrease contrast. EDXtreme User Instructions...
- Page 47 Press this key to perform LOOP/NOLOOP tests on CELL. Press ESC to return to Test soft key display. CELL must be enabled and configured to RS232 in Config menu to test. This completes the Setup menu description. EDXtreme User Instructions...
-
Page 48: Communicator Config Menu
P o ll o r C o n tin u o u s R S 2 3 2 C h o o se B a u d C h o o se P arity C ho o se d ata bits Figure 6.3 Communicator Config(uration) menu EDXtreme User Instructions... - Page 49 Key in the number or EDXtremes that will be communicating on this network. NUMBER OF EDXTREMES IN NETWORK 0 = AUTO (0-15) Key in the address for EDXtreme 1. Must be the same number as the EDXtreme you are trying to communicate to. (Each EDXtreme must have a different address.)
-
Page 50: Communicator Print Formats
Fixed position output for active EDX only. Works well with RS-232 utilities, such as WedgeLink, for parsing into a spreadsheet such as Microsoft Excel. Excel 104.5 Date Time 302.5 Date Time Fixed characters. Position Description Live force number EDXtreme User Instructions... - Page 51 Displayed unit of measure (up to 7 characters) 9,17,26 Commas Carriage Return Example 1: <sp><sp><sp>104.5,<sp><sp><sp><sp>lbf,<sp><sp><sp>302.5,<sp><sp><sp><sp>lbf<CR> Example 2 (custom unit) <sp>140000.,<sp><sp><sp><sp><sp>kg,<sp>165450., ,<sp><sp><sp><sp><sp>kg<CR> This would yield (shown in courier): 111111111122222222223333333333444444444455555555 123456789012345678901234567890123456789012345678901234567 104.5, lbf, 302.5, lbf<CR> 140000., kg, 165450., kg<CR> EDXtreme User Instructions...
- Page 52 Format #5 Live force, unit of measure, peak force, unit of measure for active EDXtreme only. All tab separated. 11/19/13 (if enabled) 12:46:00 (if enabled) 104.5<tab>lbf<CR> (if presently displaying live readings) 302.5<tab>lbf<CR> (if presently displaying peak readings) Format #6 Cell #, description, live force, unit of measure for all active EDXs plus a total.
-
Page 53: Chapter 7 General Information
The Communicator uses 4 AA batteries. Refer to the instructions below for battery replacement. Remove the black battery cover from the bottom of the communicator. Press the tab of the gray battery box.The battery box will pop out slightly. Pull on the box to remove it from the Communicator. EDXtreme User Instructions... - Page 54 Remove the batteries (with a screwdriver if necessary) and replace with new AA batteries. Be sure to observe polarity when installing new batteries. Place the cover back on the battery holder and tighten the securing screw. Do NOT over tighten! EDXtreme User Instructions...
-
Page 55: Battery Life
7.3 Care The EDXtreme is built to be rugged and endure typical industrial and commercial use. It is still, however, a precision instrument that should be treated with care. Store the instrument in its carry case with power off. Remove batteries if not being used. -
Page 56: Radio Information
7.4 Radio Information The radio technology used in the radio equipped EDXtreme and Communicator is a 2.4 GHz digital spread spectrum system designed for communications reliability. Radio operation and the performance attained can be difficult to predict and will vary with environment and conditions. - Page 57 A punch sized slightly smaller than the holes in the spacer may be helpful. The spacers should “sandwich” the dynamometer body, but should not be drawn completely tight. Remove the four large circular foam plugs from the carry case and it can continue to be used with the spacers attached. EDXtreme User Instructions...
-
Page 58: Chapter 8 Common Configurations
CELL Trans Level – RS-232 (all other parameters should agree with peripheral such as baud, data bits & parity) COM1 Trans Level – Disabled Communicator connected to one EDXtreme by wire on CELL port Key Settings (EDXtreme and Communicator): COM1 Trans Level – Disabled CELL Trans Level –... - Page 59 Key Settings (EDXtreme 2): COM1 Trans Level – Disabled RADIO Trans Level – Enable Network ID (1-255) Network Name: (example EDX 2) Key Settings (EDXtreme 3): COM1 Trans Level – Disabled RADIO Trans Level – Enable Network ID: (1-255) Network Name: (example EDX 3) Key Settings (EDXtreme 4): COM1 Trans Level –...
-
Page 60: Chapter 9 Troubleshooting
Display is completely dark Display contrast too dark Hold the Arrow key down while pressing the F1 key several times to decrease the display contrast. EDXtreme does not appear Check installation & Insure that shackles are in good working condition and aligned straight. - Page 61 Operating channels mis- Remote and link must be on the same operating channel. See EDXtreme matched and Communicator configurations of COM1 for radio (under Comm menu) and Common Configurations. Excessive radio noise or Remove dynamometer and Communicator from the environment.
-
Page 62: Chapter 10 Weighing And Force Measurement Practices
To achieve published accuracy you must use the shackle pins and centering spacers provided by Dillon. 10.4 Torque and Bending Torque and bending should be avoided. Use swivels on the lifting wire for anti-torque and avoid side forces. -
Page 63: Good Force Measurement Practice
10.6 Good Force Measurement Practice EDXtreme User Instructions... -
Page 64: Chapter 11 Specifications
Calibration: of readings. Passes only with three consecutive confirming runs, with all points in specification. Stand alone EDXtreme with no radio and no backlight lasts up to 400+ hours. 40 hours Battery Life: continuous with Radio Link System. Use with two C-Cell alkaline batteries. (When using backlight, battery life will be reduced, depending on intensity.) -
Page 65: Communicator Ii Specifications
Open-air range up to 600 feet, line-of-sight. Indoor range dependent Range: upon environment with 300 feet common. Low power radio systems are dependent upon interference levels from other radio systems and environmental conditions. Radio devices are not suitable for all applications. EDXtreme User Instructions... -
Page 66: Capacity And Resolution
Designed for indoor use Input Voltage 100-240 VAC 50-60Hz, 0.55A Output Voltage 5 VDC Operating Temperature -4 F to 158 F (20 to 70 C) Connector Sealed connector to be used with EDXtreme or Communicator II Approval EDXtreme User Instructions... - Page 68 AUTHORIZED DISTRIBUTORS Avery Weigh-Tronix Ask the experts. Dillon distributors offer complete 1000 Armstrong Drive service capabilities from application assistance to Fairmont, Minnesota U.S.A. sales and product support. Their experienced representatives are the most knowledgeable Toll-Free: (800) 368-2031...
Need help?
Do you have a question about the EDXtreme and is the answer not in the manual?
Questions and answers