
Related Manuals for Allied Telesis AT-MR420TR


Summary of Contents for Allied Telesis AT-MR420TR
- Page 1 ® CentreCOM AT-MR420TR AT-MR820TR Multiport Micro Repeaters Installation Guide PN 613-10625-00 Rev A...
- Page 2 Copyright ©1997 Allied Telesyn International Corp. All rights reserved. No part of this publication may be reproduced without prior written permission from Allied Telesyn International Corp. Allied Telesyn International Corp. reserves the right to make changes in specifications and other information contained in this document without prior written notice. The information provided herein is subject to change without notice.
-
Page 3: Electrical Safety And Installation Requirements
Electrical Safety and Installation Requirements U.S. Federal Communications Commission RADIATED ENERGY Note: This equipment has been tested and found to comply with the limits for a Class A digital device pursuant to Part 15 of the FCC Rules. These limits are designed to provide reasonable protection against harmful interference when the equipment is operated in a commercial environment. - Page 4 INSTALLATION ELECTRICAL—AUTO VOLTAGE ADJUSTMENT This product will automatically adjust to any voltage between the ranges shown on the label. ELECTRICAL—TYPE CLASS 1 EQUIPMENT THIS EQUIPMENT MUST BE EARTHED. Power plug must be connected to a properly wired earth ground socket outlet. An improperly wired socket outlet could place hazardous voltages on accessible metal parts.
- Page 5 KLASSE 1 GERÄTE DIESE GERÄTE MÜSSEN GEERDET SEIN. Der Netzstecker darf nur mit einer vorschriftsmäßig geerdeten Steckdose verbunden werden. Ein unvorschriftsmäßiger Anschluß kann das Metallgehäuseteile unter gefährliche elektrische Spannungen setzen. NETZKABEL Das Netzkabel sollte eine maximale Länge von 4,5 Metern, einen Nennwert von mindestens 6 A und 250 V haben, aus HAR-Material hergestellt und mit einer gepreßten, IEC 320 entsprechenden, Anschlußverbindung an einem Ende, und am anderen Ende mit einem im Land des Endverbrauchers geprüften Stecker...
- Page 6 ELEKTRISK—KLASSE 1-UDSTYR DETTE UDSTYR KRÆVER JORDFORBINDELSE. Stikket skal være forbundet med en korrekt installeret jordforbunden stikkontakt. En ukorrekt installeret stikkontakt kan sætte livsfarlig spænding til tilgængelige metaldele. ELEKTRISK—LEDNING Anvend ledning af maksimum 4,5 meters længde, med en kapacitet på minimum 6 amp., 250 v, bestående af en IEC 320 connector med indstøbt HAR ledning i den ene ende og et stik i den anden ende godkendt der er af myndighederne i brugerlandet.
- Page 7 ELEKTRISCHE—SNOEREN Gebruik een elektrisch snoer, maximum 4,5 meter lang, berekend voor ten minste 6 ampère, 250 V, uit HAR vervaardigd, met aan het ene uiteinde een gevormde IEC 320 stekker en aan het andere uiteinde een stekker die goedgekeurd is door het land waar het toestel zal worden gebruikt.
- Page 8 ELECTRICITE—INFORMATION SUR LE CORDON Utiliser un cordon secteur de 4,5 mètres de long maximum, calibré à 6 ampères minimum, 250V, et fabriqué en câblage HAR avec connecteur IEC 32C moulé à une extrémité et à l’autre extrémité, une prise de courant mâle répondant aux normes du pays d’utilisation.
- Page 9 ASENNUSSOHJEET HUOMAUTUS: Nämä mallit on suunniteltu käytettäviksi VAAKA-asennossa. PYSTYASENNUSTA EI SAA TEHDÄ ilman Allied Telesyn -pystykiinnitysalustaa, joka on suunniteltu tähän tarkoitukseen. HUOMAUTUS: Ilmavaihtoreikiä ei pidä tukkia ja niillä täytyy olla vapaa yhteys ympäröivään huoneilmaan, jotta ilmanvaihto tapahtuisi. HUOMAUTUS: ÄLÄ irroita kumijalkoja tuotteesta, ellei Allied Telesyn- pystykiinnitysalusta ole käytössä.
- Page 10 ISTRUZIONI PER IL MONTAGGIO ATTENZIONE: questi modelli sono concepiti per il funzionamento in posizione ORIZZONTALE. NON È POSSIBILE EFFETTUARE IL MONTAGGIO VERTICALE senza utilizzare l’apposito telaio per il montaggio verticale Allied Telesyn. ATTENZIONE: le prese d’aria non vanno ostruite e devono consentire il libero ricircolo dell’aria ambiente per il raffreddamento.
- Page 11 FORSIKTIG: MEKANISK LASTNING Installering av utstyret på hyllen må utføres på slik måte at ingen farlige situasjoner oppstår som en følge av ujevn lastning. FORSIKTIG: Luftventilene må ikke blokkeres og må ha fri tilgang til luft med romtemperatur for avkjøling. FORSIKTIG: Gummiføttene må...
- Page 12 INSTRUÇÕES DE INSTALAÇÃO CUIDADO: Este modelos foram projetados para funcionar na posição HORIZONTAL. NÃO DEVE SER EFETUADA INSTALAÇÃO VERTICAL sem o uso de um chassis de montagem vertical Allied Telesyn projetado para este fim específico. CUIDADO: CARREGAMENTO - O equipamento deverá ser montado no suporte de montagem de forma a não causar perigo devido a carregamento não-uniforme.
- Page 13 INSTRUCCIONES DE MONTAJE ATENCION: Estos modelos están diseñados para operar en posición HORIZONTAL. NO SE DEBEN MONTAR VERTICALMENTE sin el uso de un chasis de montaje vertical de Allied Telesyn que se ha diseñado para este fin. ATENCION: CARGA MECANICA - El montaje del equipo en el bastidor debe realizarse de manera tal que no cause una condición peligrosa debido a la distribución desigual del peso.
- Page 14 MONTERINGSINSTRUKTIONER VARNING: Dessa modeller är konstruerade för användning i HORISONTALLÄGE. VERTIKALMONTERING får EJ UTFÖRAS utan att ett Allied Telesyn specialkonstruerat vertikalt monteringschassi används. VARNING: MEKANISK BELASTNING: Utrustningen ska installeras i chassit på så sätt att fara inte uppstår p g a ojämn belastning. VARNING: Luftventilerna får ej blockeras och måste ha fri tillgång till omgivande rumsluft för avsvalning.
-
Page 15: Table Of Contents
AT-MR420TR Faceplates ........ - Page 16 Technical Specifications ........31 The AT-MR420TR/AT-MR820TR Specifications ..... . . 31 Physical .
- Page 17 Appendix D CentreCOM AT-MR420TR/AT-MR820TR Guide Feedback ..45 Appendix E Where To Find Us ..........47 Appendix F Index .
-
Page 19: About This Guide
This guide is written for system administrators who are responsible for configuring, monitoring, and maintaining a Local Area Network (LAN) of which Allied Telesyn’s AT-MR420TR and AT-MR820TR Micro Repeaters are components. This guide serves as an installation guide and reference guide for both products. -
Page 20: Document Conventions
A note provides additional information or describes the possible consequence of a specific action you can perform. Contacting ATI Technical Support If you are having problems with your AT-MR420TR/AT-MR820TR, you can contact ATI’s Technical Support staff by: Telephone Bulletin board services... -
Page 21: Internet Mail
AT-MR420TR and AT-MR820TR Installation Guide The process is straightforward: Once the BBS is accessed, it requests that you register either as a new user or as a current user. It then provides instructions on the various features and functions available. -
Page 23: Product Description
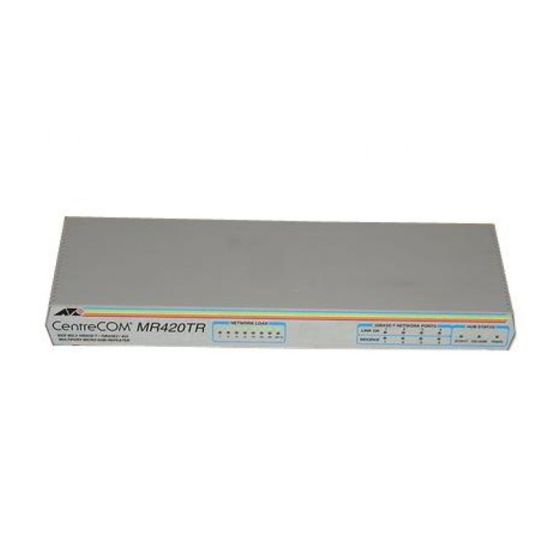
IEEE standards. While identical in structure, the AT-MR420TR Micro Repeater differs from the AT-MR820TR Micro Repeater in that the former has 4 Shielded/Unshielded Twisted Pair (STP/UTP) ports whereas the latter has 8 STP/UTP ports. - Page 24 Product Description Figure 1: AT-MR420TR and AT-MR820TR Front Panels Figure 2: AT-MR420TR and AT-MR820TR Rear Panels On the back panel are four/eight STP/UTP RJ45 network ports, including Port 4/8, an uplink port, as well as the 10Base5 and 10Base2 backbone network ports, Figure 1 and Figure 2 also show the three-pin...
-
Page 25: Features
Application Specific Integrated Circuit (ASIC) and Surface Mount Technology (SMT). These result in enhanced functionality, increased reliability, improved performance, and lower cost. The AT-MR420TR/AT-MR820TR Micro Repeaters have the following features: IEEE 802.3 compliant 10Base-T and Ethernet Version 1.0 and 2.0 compatible... -
Page 26: Backbone Network Port
Product Description jabber lock-up automatically prevents transmitted data from reaching the repeater if the transmitted data time exceeds a specified duration (usually 5 ms). Backbone Network Port There are two user-selectable network media options which can be used to connect to a backbone network: 10Base2 and 10Base5. These network ports are located on the back panel. -
Page 27: 10Base2/Aui Backbone Port Switches
AT-MR420TR and AT-MR820TR Installation Guide 10Base5 (Attachment Unit Interface [AUI]) — Located to the right of the BNC port, the 10Base5 network port connects the repeater to the network using standard ( thick) Ethernet cable and AUI-series connectors. Alternatively, you can fit an Allied Telesyn 802.3 transceiver into this port for alternative media connections, for example fiber optics. -
Page 28: Backbone Enable Switch
Product Description Backbone Enable Switch This dual-position switch allows you to activate the backbone network AUI and BNC ports. When this switch is ON (default position), it is depressed below the surface of the chassis. The ON position (enabled) indicates that both 10Base2 and AUI ports have a backbone network capability. -
Page 29: Installation
Installation Site Requirements Ventilation AT-MR420TR/AT-MR820TR Micro Repeaters have grilled openings on both sides for ventilation. Although they do not require an internal fan to aid in cooling, adequate ventilation is required. Ensure that the ventilation openings located on the sides of the chassis are never blocked. -
Page 30: Quick Installation
10Base-T ports. If the UPLINK port is not used for cascading, you may connect a standard 10Base-T cable to port 4/8. 6. If the AT-MR420TR/AT-MR820TR Micro Repeaters are to be connected to an external transceiver, attach a transceiver to the 15-pin AUI connector on the back panel. -
Page 31: Connections
10Base-T device on the opposite end of the STP/UTP cable is operational. AUI Network Port Each AT-MR420TR/AT-MR820TR Micro Repeater has one AUI port to accommodate a 10Base5 (standard or thick Ethernet cable) connection to the network backbone using an AUI or convert the media type, for example fiber optics. -
Page 32: Led Status Indicators
Installation LED Status Indicators The front panel indicators are grouped into the following categories: Network Load Port Status Hub Status Network Load Indicators Eight Network Load LEDs indicating the percentage of network utilization, are located on the front panel. Figure 5 shows these LEDs. Figure 5: Network Load Indicators Port Status Indicators Two Port Status indicators are associated with each 10Base-T (RJ45) - Page 33 AT-MR420TR and AT-MR820TR Installation Guide Note A data packet is too fast for the human eye to distinguish on an LED, therefore the LEDs will not reflect real-time activity. The repeater artificially stretches the LED on time for easier observation.
-
Page 34: Hub Status Indicators
Installation If there is no link light, there is no signal continuity. Check that the attached Data Terminal Equipment (DTE) is ON and that the proper cable is being used. If this check does not identify the problem, it may indicate that a repeater or the device connected to the port is faulty. -
Page 35: System Check
AT-MR420TR and AT-MR820TR Installation Guide Table 1: Hub Status LEDs Color Description Power green lights when AC power is applied Collision amber flashes indicating an SQE or frame collisions on a segment. This may be caused by an overloaded segment, faulty cable, or loose connection. - Page 36 Installation Note The LINK LED validates the receive pair only. The opposite end of the STP segment is responsible for validating the transmit pair.
-
Page 37: Connectivity
Chapter 3 Connectivity Four Media Connectors This repeater has four types of ports and media connectors: AC input power connector 10Base5 (AUI) network backbone port 10Base2 (BNC) network backbone port Four/Eight STP/UTP 10Base-T (RJ45) ports These four types of connecting media are described in the following sections. - Page 38 Connectivity Figure 8: Power Connector...
-
Page 39: 10Base-T Network Specifications
AT-MR420TR and AT-MR820TR Installation Guide 10Base-T Network Specifications Table 2 provides an overview of the IEEE 802.3 specifications for 10Base-T network configurations using thick, thin, and twisted-pair wiring. Table 2: IEEE 802.3 Network Specifications 10Base-T 10Base2 10Base5 Media Twisted Pair... - Page 40 Connectivity Figure 9: AUI Network Port 10Base5 (Thick) Ethernet Cable. When configuring 10Base5 coax segments, IEEE 802.3 specifications allow a maximum of 100 MAU attachments, spaced at multiples of 2.5 meters (8.2 ft.) measured accurately from the cable end (50 Ω terminator included). The 10Base5 cable segment should not exceed 500 meters (1,640 ft.).
-
Page 41: Bnc Port
Both ends of the segment must be terminated with a 50Ω termination with a power rating of 0.5 watts or greater. The AT-MR420TR and AT-MR820TR repeaters provide internal 50Ω terminator with a slide switch. Earth grounding of the segment shield is required at only one point on the cable. -
Page 42: Twisted Pair (Rj45) Connector
10Base-T STP cables can be up to 100 meters (328 ft.) in length. The cable should be 22 to 26 AWG TP wire with 100Ω impedance and rated at Category 3, 4, or 5. The AT-MR420TR/AT-MR820TR Micro Repeaters use RJ45 modular connectors for 10Base-T connections. - Page 43 Generally, cable that is more or less round in section, gives better results. Hub to MAU Wiring. The most typical TP cable for the AT-MR420TR/ AT-MR820TR Micro Repeaters is TP Hub to TP transceiver Data Terminal Equipment (DTE).
-
Page 45: Topology
(AT-MR420TR)/twenty-six (AT-MR820TR) ports. Its design complies with the four-repeater rule. Additional UTP ports are available if the AUI port is used for cascading. -
Page 46: Bnc Terminator Switch
Topology Figure 13: AT-MR820TR Four Cascaded Repeaters The Four-Repeater Rule. The IEEE 802.3 standard provides general rules for 10Base-T cable length and network connections on single segments of cable or on point-to-point links with media attenuation and signal propagation delays. The basic rule applies for all networks. The maximum number of repeaters in the data path between any two nodes cannot exceed four. - Page 47 AT-MR420TR and AT-MR820TR Installation Guide the termination switch. Figure 14 shows the location of the two- position 50 Ω Terminator switch. The switch is either ON (the default) or OFF. Figure 14: Terminator Switch OFF (disabled) — When installing a hub at an intermediate point of a thinnet cable, a BNC-T connector must be used to connect the cable to the backbone port and the terminator switch must be disabled.
-
Page 48: Backbone Networks
Media Dependent Interface (MDI/MDI-X) switch. Cascading through port 4/8 means if a single, standalone AT-MR420TR/AT-MR820TR Micro Repeater can support 4/8 ports, when a second AT-MR420TR/AT-MR820TR Micro Repeater is uplinked (cascaded) using the port 4/8 of the first unit to any port of a... - Page 49 A maximum of four repeaters (the four repeater rule) can be interconnected. The network effectively consists of 6 nodes for the AT-MR420TR and 14 nodes for the AT-MR820TR. The Uplink port is located on the back panel, as shown in Figure 16.
-
Page 50: 10Base5 Backbone
Topology In the MDI configuration — the slide switch is to the left — you can connect the 10Base-T port to another 10Base-T internal crossover port, that is, a repeater using straight-through twisted pair cable to form an interrepeater link. See Figure 16. If you use this port to connect repeaters to each other, the RJ45 pinout switch must be set to MDI. -
Page 51: 10Base2 Backbone
AT-MR420TR and AT-MR820TR Installation Guide 10Base2 Backbone A maximum of 30 AT-MR420TR/AT-MR820TR Micro Repeaters can be connected in a network using 10Base2 (thin Ethernet). When you use the BNC port, you avoid using transceivers to complete the linkage. See Figure 18. -
Page 52: Fiber Optic Backbone
Topology Fiber Optic Backbone By attaching a fiber optic transceiver, the AUI port can connect your network to a fiber optic (10Base-FL/FOIRL) cable backbone. 100 Meters maximum Fiber Optic Category 3-5 Transceiver UTP cable wired Fiber Optic cable Pin to Pin Figure 19: AT-MR820TR on a Fiber Optic Backbone The advantages of fiber optic cable are as follows: immune to electromagnetic interference... -
Page 53: Technical Specifications
Appendix A Technical Specifications The AT-MR420TR/AT-MR820TR Specifications Physical Height 37.6 mm (1.55 in.) Width 332 mm (13 in.) Depth 112 mm (4.4 in.) Installation options Tabletop or rack-mount Electrical Rating Input voltage 100-120 or 200-240 VAC Frequency 50 or 60 Hz Amperage 0.5/0.25 Amp... -
Page 54: Diagnostic Leds
Technical Specifications Diagnostic LEDs Individual port link status (4/8) Individual port receive activity (4/8) Hub status (3), specifying: Both Transmit and Receive activity Collision Power Certification Safety UL 1950, CSA 22.2 No. 950 (Canadian Standards Association), TUV EN60950 Emission FCC Part 15 Class A, VCCI Class 1, CDOC Class A, EN55022 (CISPR 22) Class A 10Base-T Pin Assignments... -
Page 55: Connectors
AT-MR420TR and AT-MR820TR Installation Guide Connectors Notice how the pins are numbered in Figure 20. Be sure to hold the connectors in the same orientation when connecting the wires to the pins. Figure 20: Connector Pin Numbers Each twisted-pair link segment must have a male connector attached to both ends. -
Page 56: Straight-Through Wiring
6 (RX-) 6 (RX-) Crossover Wiring Two AT-MR420TR/AT-MR820TR Micro Repeaters can communicate only if the transmitter on one unit is connected to the receiver on the other unit. This reversal, or crossover function, can be implemented either in the wiring or in the device itself using the MDI/MDI-X switch. -
Page 57: Rule
AT-MR420TR and AT-MR820TR Installation Guide 5 - 4 - 3 Rule In addition to the requirements outlined in Chapter 3, Table 2, follow the “5-4-3 rule” to ensure that your configuration does not exceed the maximum 10Base-T data transmission path (the longest path through any given network). -
Page 59: Glossary
Appendix B Glossary 10Base2—Also called thin Ethernet, thinnet or CheaperNet, a 10 MHz baseband specification. Cable impedance is 50 Ω and maximum coaxial segment length is 185 meters (607 ft.). 10Base5—Also called thick Ethernet, a 10 MHz baseband specification. Cable impedance is 50 Ω... - Page 60 Glossary medium (coax cable) for data packet transmission. It provides for a level of error detection should that transmission be corrupted or impeded by contention for the transmission medium. COAX SEGMENT—A segment of Ethernet cable that contains MAUs. COAXIAL CABLE—A two-conductor (center conductor, shield system), concentric, constant impedance transmission line used as the trunk medium in the baseband system.
- Page 61 AT-MR420TR and AT-MR820TR Installation Guide HUB/REPEATER—A hub is a central signal distributor. It is used in a wiring topology consisting of several point-to-point segments originating from a central point. The term hub is often used interchangeably with the term repeater. Multiport 10Base-T, 10Base2 and fiber optic (10Base-FL, FOIRL) repeaters are considered hubs.
- Page 62 Glossary MEDIUM ATTACHMENT UNIT (MAU)—In a LAN, a device used in a data station to couple the DTE to the transmission medium. MEDIUM DEPENDENT INTERFACE (MDI)—The mechanical and electrical interface between a hub and a transceiver (MAU). MDI-X is another version of the interface that enables hubs to connect using different pin-outs, thereby avoiding conflicts that occur when receiving and transmitting packets use the same pin-out.
- Page 63 AT-MR420TR and AT-MR820TR Installation Guide SQE TEST—Commonly referred to as Heartbeat, is a special 802.3 signal sent by the MAU to the DTE to test the collision detection function. Some DTE want SQE and others do not. Repeaters do not want the SQE Test.
-
Page 65: Technical Support Fax Order
Appendix C Technical Support Fax Order Name__________________________________________________________________ Company _______________________________________________________________ Address ________________________________________________________________ City ________________________ State/Province _______________________________ Zip/Postal Code ___________________ Country _______________________________ Phone _______________________________ Fax _______________________________ Incident Summary Model number of Allied Telesyn product I am using _____________________________ Network software products I am using ________________________________________ ______________________________________________________________________ Brief summary of problem _________________________________________________ ______________________________________________________________________... -
Page 67: Centrecom At-Mr420Tr/At-Mr820Tr Guide Feedback
Appendix D CentreCOM AT-MR420TR/AT-MR820TR Guide Feedback Please tell us what additional information you would like to see discussed in the guide. If there are topics you would like information on that were not covered in the guide, please photocopy this page, answer the questions and fax or mail this form back to Allied Telesyn International Corp. -
Page 69: Where To Find Us
Appendix E Where To Find Us For Technical Support or Service Location Phone Asia (+65) 3815-613 (+65) 3833-830 Singapore, Taiwan, Thailand, Malaysia, Indonesia, Korea, Philippines, China, India Australia (612) 416-0619 (612) 416-9764 Australia, New Zealand France (+33) 1-60-92-15-32 (+33) 1-69-28-37-49 France, Belgium, Luxembourg, The Netherlands, Middle East, Africa Germany... - Page 70 Where To Find Us For Sales Information Australia San Diego, CA Tel: (619) 279-3899, Fax: (619) 279-3897 Lindfield, NSW Tel: (612) 416-0619, Fax: (612) 416-9764 Santa Ana, CA Tel: (714) 838-0434, Fax: (714) 838-9721 Canada Clearwater, FL Rexdale, Ontario Tel: (813) 726-0022, Fax: (813) 726-0234 Tel: (416) 675-6738, Fax: (416) 675-0057 Norcross, GA Richmond, British Columbia...
-
Page 71: Index
Appendix F Index Numerics 50 Ω terminator switch 4, 6 features 3 802.3 transceiver 5 auto partitioning 3 jabber lock-up protection 3 link integrity 3 ambient temperature 7 regeneration 3 application specific integrated circuit (ASIC) 3 ground 4 backbone 10Base5 29 indicators fiber optic 30 activity 1... - Page 72 Index 10Base2/AUI backbone switches 5 surface mount technology (SMT) 3 AUI 17 switches AUI network 9 backbone enable 5, 6 backbone 17 BNC terminator 24 backbone network 4 MDI/MDI-X 27 BNC 19 media select 5, 6 BNC network 9 network backbone 15 technical support services RJ45 9 bulletin board xx...
Need help?
Do you have a question about the AT-MR420TR and is the answer not in the manual?
Questions and answers