Table of Contents
Advertisement
Quick Links
Replacement Parts List
NOTE:
If requested color is not available, similar color will be
substituted. Prices are subject to change.
Part .....................Cost ................ Qty...................Total Cost
Pad Set ................. $13.99 ............. ___ ................... $_______
Instructions ........... $0.00 ............... ___ ................... $_______
Merchandise Total...................... ......................$_______
Shipping and handling:.............. ......................$_______
Up to $25.00 .............$5.95
$25.01 to $50.00 ......$6.95
$50.01 to $75.00 ......$8.95
$75.01 to $100.00 ....$9.95
$100.01 to $150.00 ..$10.95
Sales Tax ..........................................................$_______
(Arizona, California, Georgia, Indiana, Missouri, South Carolina, and Texas
residents add applicable sales tax.)
Grand Total .................................... ..................$_______
No shipping and handling on instructions for quantities under 6. Add $.50 for each
instruction over 6, then add applicable shipping and handling.
Fill Out For Credit Card
q Visa
Card Exp. Date:______________________________
Cardholder's Name:___________________________
Card Number:________________________________
Signature__________________________________
$150.01 to $200.00 ..$11.95
$200.01 and up .......$13.95
Outside Continental USA $10.00
q Mastercard
31
Belt-Positioning
Belt-Positioning
Instruction Manual
Instruction Manual
40-100 lbs. (18.1-45.4 kg) 43-57" (110.1-144.8 cm)
and at least 4 years old
Pronto
Pronto
Booster
Booster
4358-4376E
Advertisement
Table of Contents

Related Manuals for Cosco Pronto


Summary of Contents for Cosco Pronto
- Page 1 Pronto Pronto Replacement Parts List NOTE: If requested color is not available, similar color will be Belt-Positioning Belt-Positioning substituted. Prices are subject to change. Part .....Cost ....Qty....Total Cost Booster Booster Pad Set ....$13.99 ..... ___ ....$_______ Instructions ... $0.00 ....___ ....$_______...
- Page 2 C-4 Removing Backrest C-5 Cup Holder C-6 Removing Seat Pad for Cleaning D. General Vehicle Installation ..Pages 19-21 D-1 Understanding Your Vehicle D-2 Vehicle Seating Position D-3 Knowing Your Vehicle Belts D-4 Aircraft Information ©2013 Cosco Management Inc. All Rights Reserved.
-
Page 3: Registration And Safety Notices
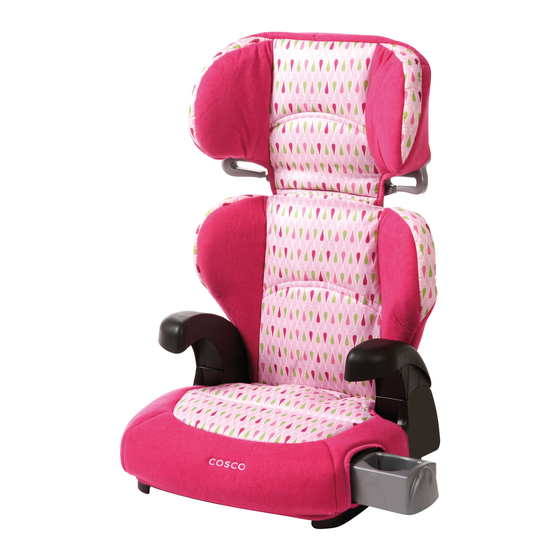
A-1 Thank You... A-2 Registration and Safety Notices Thank you for choosing this car seat, referred to throughout Please complete the postage-paid registration card that this manual as a child restraint. The DJG family is committed came with your child restraint, and send it to us. Child to creating a child restraint with the most comfort and restraints could be recalled for safety reasons. - Page 4 A-3 Understanding Your Child Restraint Front Back Headrest Cup Holder Shoulder Belt Headrest Adjustment Positioning Guide Backrest Backrest Release Tab (behind seat pad) Armrest Seat Base Instruction Manual Storage (under seat base)
-
Page 5: Vehicle Seating Position
B-3 Child Restraint Use Failure to follow these warnings can result in the Do not use this child restraint unless serious injury or death of your child. To help you the child is 40-100 lbs (18.1- 45.4 kg), recognize instructions which are most critical to 43-57 in. -
Page 6: Preparing Child Restraint
C-1 Preparing Child Restraint Attach Arm Covers (on select models) NOTE: Depending on your model, you may need to assemble you Slide armrest covers over booster seat. Skip this section if already assembled. armrests. Do not use this child restraint without the seat pad. - Page 7 Attach Headrest to Attach Headrest to Backrest Backrest With the headrest and Attach headrest pad by backrest facing down, attaching pad to tabs near slide the headrest into the the bottom of the headrest. track on the back of the headrest.
-
Page 8: Adjusting Headrest
Rotate Backrest Up Until Attach Backrest Pad It Clicks Slide backrest pad onto one Tuck backrest hole flap side of the backrest. Pull under the backrest pad. pad tight and slide the pad over the other side of the backrest. Bottom of the headrest pad should be behind the backrest pad as shown. -
Page 9: Adjusting Backrest
C-3 Adjusting Backrest Remove Backrest from Base Backrest has 2 positions, Lift backrest hook out of upright and semi-reclined. the opening in seat base. The semi-recline position Store backrest for future is to be used only to use. install the child restraint Lay flap over hole where flush against the back of backrest connects to the... -
Page 10: Removing Seat Pad For Cleaning
Remove Pad from C-6 Removing Seat Pad for Cleaning Headrest From the back, remove the elastic from the back of the headrest. Do not use this child restraint without the seat pad. Failure to do this can result in serious injury. Depending on your model, you may need to unhook bottom of pad from tabs... -
Page 11: Understanding Your Vehicle
Safety Tip: D-1 Understanding Your Vehicle Children are safer when Your vehicle’s features may be considerably different than properly restrained in those pictured here. Consult your vehicle owner’s manual to rear seating positions help identify your vehicle’s specific features and locations. than in the front seating positions. -
Page 12: Vehicle Belts
Vehicle Belts E-1 Preparing Belt-Positioning Booster • Automatic/Passive Vehicle Seat Belts You MUST have a vehicle lap belt to install any child restraint. An automatic (passive) shoulder vehicle belt may or may not Booster with Backrest: have a separate vehicle lap belt. Consult your vehicle owner’s 40-100 lbs (18.1-45.4 manual. - Page 13 E-2 Installing Booster Seat with Secure Shoulder Belt Secure the shoulder belt Backrest through the shoulder belt positioning guide in the headrest. Place Belt-Positioning Booster Seat Forward- The shoulder belt should Facing in Vehicle lay snugly across the center of the child’s Center the child restraint shoulder and across the in the chosen seating...
- Page 14 E-3 Installing Booster Seat without The shoulder belt should lay snugly across the Backrest center of the child’s shoulder and across the Remove backrest from base. See section C-4. chest (not on the face or neck). Place Belt-Positioning Pull up on the shoulder Booster Seat Forward- belt to tighten.
-
Page 15: Troubleshooting
Troubleshooting Warranty Dorel Juvenile Group, Inc. (DJG) warrants this product to the If your child restraint is not held securely by the original retail purchaser as follows: vehicle belt: This product is warranted against defective materials or Remove all the slack in the vehicle belt. Make sure the belt workmanship for one year from the date of original purchase. -
Page 16: Replacement Parts Order Form
Replacement Parts Order Form Complete the form below. Your model number with color code and manufacturer date code MUST be included on the form to ensure proper replacement parts. Your model number with color code and the date code can be found on a sticker on the side of child restraint.
Need help?
Do you have a question about the Pronto and is the answer not in the manual?
Questions and answers