Table of Contents
Advertisement
Replacement Parts List
NOTE: If requested color is not available, similar color will
be substituted.
Part
Cost
Crotch Strap/Buckle $5.99 X______= $ ______________
Harness Strap . . . . .$2.99 X______= $ ______________
Seat Pad . . . . . . . .$29.99 X______= $ ______________
Harness Retainer . . .$1.50 X______= $ ______________
Locking Clip . . . . . . .$2.50 X______= $ ______________
Top Anchorage (Tether)
Kit . . . . . . . . . . . . . . .$9.99 X______= $ ______________
Latch Kit . . . . . . . .$24.99 X______= $ ______________
Cup Holder . . . . . . .$3.50 X______= $ ______________
Instructions . . . . . . .$0.00 X______= $ ______________
Merchandise Total:
Shipping and handling:
Up to $25.00 . . . . . . . . . .$5.95
$25.01 to $50.00 . . . . . . .$6.95
$50.01 to $75.00 . . . . . . .$8.95
$75.01 to $100.00 . . . . . .$9.95
Sales Tax:
(Indiana, California, Arkansas, and Massachusetts residents add applicable
sales tax.
Grand Total:
No shipping and handling on instruction manuals on quantities of 6 or less.
Add $.50 for each instruction manual over 6, then add applicable shipping
h e n a d d a p p l i c a b l e s h i p p i n g a n d h a n d l i n g .
o n o v e r 6 , t
A d d $ . 5 0 f o r e a c h i n s t r u c t i
e s u n d e r 6 .
o n s f o r q u a n t i t i
N o s h i p p i n g a n d h a n d l i n g o n i n s t r u c t i
and handling.
Fill Out For Credit Card
Visa
Card Exp. Date: ______________________________
Cardholder's Name: __________________________
Card Number: ______________________________
Signature: __________________________________
Quantity Total Cost
$ ______________
$ ______________
$100.01 to $150.00 . . . . .$10.95
$150.01 to $200.00 . . . . .$11.95
$200.01 and up . . . . . . . .$13.95
Outside Continental USA $10.00
$______________
$ ______________
Mastercard
46
C C o o m m m m u u t t e e r r / / V V e e n n t t u u r r a a / /
H H i i g g h h B B a a c c k k B B o o o o s s t t e e r r
I I n n s s t t r r u u c c t t i i o o n n M M a a n n u u a a l l
www.djgusa.com
This child
restraint is
designed for
use by children
whose:
Weight:
22-80 pounds
(10.1-36.3 kg)
Height:
34-52 inches
(85.1-132.1 cm)
Read all instructions
BEFORE USING
this child restraint.
KEEP INSTRUCTIONS FOR FUTURE USE.
IMPORTANT!
Failure to follow the warnings on the labels
and in the instruction manual can result in
the death or serious injury of your child.
Para recibir las instrucciones en español, llame al
1-800-544-1108 o solicitarse por escrito al dirección por arriba.
Eng. 4358-3502A
Advertisement
Table of Contents

Subscribe to Our Youtube Channel
Related Manuals for Cosco 22859


Summary of Contents for Cosco 22859
- Page 1 Replacement Parts List NOTE: If requested color is not available, similar color will be substituted. Part Cost Quantity Total Cost Crotch Strap/Buckle $5.99 X______= $ ______________ Harness Strap ..$2.99 X______= $ ______________ Seat Pad ..$29.99 X______= $ ______________ Harness Retainer .
-
Page 2: Table Of Contents
Before You Begin... Thank you for choosing this car seat, referred to throughout this manual as a child restraint.The DJG family is committed to creating a child restraint with the most comfort and convenience available today. Remember, parents are a child’s first teachers and examples. -
Page 3: Warnings
WARNING Failure to follow these warnings can result in the serious injury or death of your child. To help you recognize those instructions which are most critical for your child’s safety, we use this symbol According to accident statistics, children are safer when properly restrained in the rear seating positions than in the front seating positions. -
Page 4: Warm Weather Use
WARNING Secure the top anchorage strap (tether) provided with this child restraint as specified in both the vehicle and child restraint manufacturer's instructions. Do not remove any of the warning labels or other labels on the child restraint. Placing your child in a hot child restraint may result in burns. -
Page 5: Understanding Your Vehicle
Understanding Your Vehicle Your vehicle’s features may be considerably different than those pictured here. Consult your vehicle owner’s manual to help identify your vehicle’s specific features. A.Anchor Bracket For Top Anchorage Strap (Forward-Facing Only) LATCH Anchors (In seat bight) Seat Buckles D.Air Bag (Consult your vehicle owner’s manual for all air... -
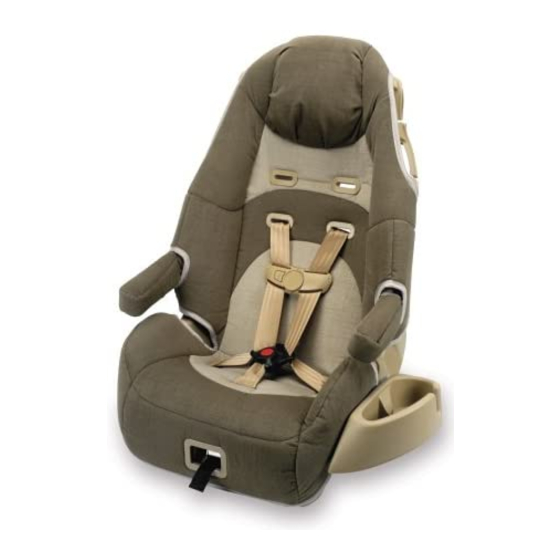
Page 6: Child Restraint Parts
Child Restraint Parts Pillow (Optional) Shoulder Belt Guide Harness Retainer Armrests (Optional) Buckle Plates Front Buckle Harness Release Lever Cup Holder Harness Adjustment Strap Back Top Anchorage Splitter Plate (Tether) Strap & LATCH Belt Hook (may be between Instructions pad and shell) Locking Clip Shell (behind harness) -
Page 7: Preparing Child Restraint To Fit Your Child
Choosing Restraint and Position Your child’s height, weight and age determine how your child restraint should be placed in the vehicle and which restraint should be used. 22-40 lbs. (10.1-18 kg) 34-43 in. (85.1-110 cm) and Over 1 Year Old Forward-Facing using 5-point harness Child and child restraint face... -
Page 8: Harness Height
Place the child’s bottom and back flat against the child restraint.This will increase comfort and allow the harness to properly tighten. Check Harness Height Forward-Facing Position: Harness guide Harness must be Guide just above If the top harness guides are below the child’s shoulders, the child weighs at least 40 lbs. -
Page 9: Securing Your Child In Child Restraint: Puzzle Buckle Plates
Securing Your Child in the Child Restraint; Puzzle Buckle Plates NOTE: Depending on your model, follow the unbuckling and buckling steps that matches your buckle plates. Position harness straps over the child’s shoulders. Fit top buckle plate over bottom buckle plate. The connection should be flat. -
Page 10: Dual Buckle Plates
Securing Your Child in the Child Restraint; Dual Buckle Plates NOTE: Depending on your model, follow the unbuckling and buckling steps that matches your buckle plates. Position harness straps over the child’s shoulders. Push each buckle plate into buckle until you hear a “click”. -
Page 11: Choosing Latch Or Vehicle Belts
Removing Your Child From the Child Restraint Press on release button and pull apart. For either style “A” or “B”, press red button on buckle to release the buckle plates. Place harness over sides of child restraint. Loosen harness by pushing down on the harness release lever while pulling out on the harness. -
Page 12: Locking Clip
Knowing Your Vehicle Belts Not all vehicle belts will work with this child restraint. You must determine if your vehicles belts are compatible with this child restraint. If you will use the LATCH system, refer to the LATCH section. ELR - Emergency Locking Retractor Belts Definition:These belts only lock in a sudden stop or crash.To see if you have this type of belt, pull on the lap belt, let it return part way, then pull on it again. -
Page 13: Locking Clip
Locking Clip NOTE: The locking clip is located on the back of the seat. You do not need a locking clip when using this seat as a belt-positioning booster. Remove the locking clip when the vehicle seat belt is not being used with the child restraint. -
Page 14: Forward-Facing Use
Forward-Facing Use Lap/Shoulder Belt Refer to the “Choosing Restraint and Position” section to make sure your child is at the proper weight and height. LATCH Belt WARNING: Using this child restraint in any vehicle seat where the lap or LATCH belts cannot be tightened securely and properly or where it can be loosened by pulling on it can result in serious injury or death. -
Page 15: Forward-Facing Installation With Vehicle Belts
Forward-Facing Installation with Vehicle Belts: Place child restraint flush against the back of the vehicle seat forward- facing in the back seat. Thread the vehicle lap belt or lap/shoulder belt combination through the belt path and out other side. Buckle. Place one knee in the child restraint and push down firmly while pulling... -
Page 16: Latch
Forward-Facing Installation with LATCH Belt: Install LATCH Belts NOTE: LATCH system along with the adult lap or lap/shoulder belt. Route LATCH belt through upper slot in side of shell. Pull one LATCH hook across the back and out the other side. The LATCH adjuster can be on either side, but the belt should not be twisted. -
Page 17: Adjusting The Top Anchorage Strap (Tether)
With weakest hand at belt path, tilt and push the child restraint forward and back, and from side to side. If the LATCH belts do not loosen, your child restraint should be secure. NOTE: front to back or about an inch from side to side is acceptable. -
Page 18: Belt-Positioning Booster Use
To Attach Top Anchorage Left side Right side Strap: At the adjuster, unlace free end of strap from right side of adjuster slide and Hook loosen into “loops” (1). Put knee in child restriant and push down; attach hook to To child restraint anchor to estimate how much you need, then unhook... -
Page 19: Removal Of Harness
Removal of Harness Harness must be removed for use as a Belt-Positioning Booster. From the back of the seat, unfasten harness from splitter plate. Pull harness adjustment strap as far out as possible. Pull harness through the slots from the front. Unthread harness from the harness retainer. -
Page 20: Belt-Positioning Booster Installation
Belt-Positioning Booster Installation Place child restraint against the back of the vehicle seat. top anchorage strap and hook under the child restraint. Place the child’s bottom and back flat against the child restraint. Place lap belt across child’s thighs. Lock buckle. NOTE: restraint has armrests, make sure the lap and... -
Page 21: Reinstall Harness
Reinstall Harness From the front of child restraint push buckle’s metal plate through pad and shell. Make sure buckle faces out. From underneath, pull buckle’s metal clip through pad and shell. Pull up on buckle to make sure buckle’s metal plate stops against the shell. -
Page 22: Removing Seat Pad For Cleaning
Removing Seat Pad for Cleaning Remove harness as described in the “Belt- Positioning Booster” section. If your child restraint has armrests, pull armrest covers off armrests and pull through hole in back of shell. From underneath bottom of shell, release the elastic straps shown in red. -
Page 23: Trouble Shooting
Trouble Shooting If your child restraint is not held securely by the belt: Press down firmly on the child restraint and remove all the slack in the belt. Make sure the belt buckle is not up against the child restraint where the belt cannot be tightened. Review Locking Clip section and Top Anchorage Strap Section. -
Page 24: Warranty
Warranty Dorel Juvenile Group, Inc. (DJG) warrants this product to the original retail purchaser as follows: This product is warranted against defective materials or workmanship for one year from the date of original purchase. An original receipt is required to validate your warranty.
Need help?
Do you have a question about the 22859 and is the answer not in the manual?
Questions and answers