Advertisement
Table of Contents
O W N E R ' S
1. Read this manual carefully before starting assembly. Read each step completely before beginning
each step.
2. Some smaller parts may be shipped inside larger parts. Check inside all parts and cartons before
assembling or ordering parts.
3. If hardware is tightened too soon, mounting holes may not align and parts may not easily fit together.
Leave bolts slightly loose until you are instructed to tighten them.
4. To make assembly as easy as possible, place all parts of the table tennis in a cleared area and
remove the packaging material. Organize all parts as per parts identifier in the assembly manual.
Do not dispose of the packing material until assembly is completed.
5. Avoid scratching table tennis top and metal tube parts during the assembly process.
6. Assemble product on clean, level and flat surface.
7. Take time to correctly orientate parts exactly as per each assembly diagram.
8. Save this instruction in the event that the manufacturer has to be contacted for replacement parts.
CAUTION:
Thank you for buying our product. We try hard to ensure that our products are of high quality and free of problems, such as
Manufacturing defects or missing parts. However, if you have any problems with your new product, please DO NOT RETURN IT
TO THE STORE!
Please Do Not Return This Product To The Store!
Contact Escalade Sports customer service department at:
R
Phone:
1-866-873-3528
Fax:
1-866-873-3533
E-mail:
tabletennis@escaladesports.com
Please provide model number and/or part number of the product and/or part when you call or write. These numbers can be found on the
product, packaging, and/or in this Owner's Manual.
Please visit our website at: www.escaladesports.com
ON-LINE TROUBLE SHOOTING
ON-LINE PARTS REQUESTS
ADDITIONAL ESCALADE SPORTS PRODUCT INFORMANTION
Escalade Sport products may be manufactured and/or licensed under the following patents.
R
6120397 , 5816957 , 5769744 , 5119741 , 4911085 , 4717157 , D460140 , D420563
Additional patents may be pending. One or more of the listed patents and/or pending patents may cover specific product.
READ ASSEMBLY, OPERATING AND SAFETY INSTRUCTIONS
CAREFULLY! AT LEAST TWO ADULTS ARE NEEDED TO PUT
THIS TABLE TOGETHER!
Toll-Free!
Toll-Free!
TECHNICAL ASSISTANCE
FREQUENTLY ASKED QUESTIONS
R
Be sure to write your model number and serial number here
for future reference. You can find these numbers printed on
the bottom of the table.
MODEL NO.: T8485W/F
DATE CODE : CPSIA#2-T8485W/F-_______-SY
PURCHASE DATE : _______________________
M A N U A L
Mailing Address (correspondence only):
Escalade Sports
PO Box 889
Evansville, IN 47706
2017 Escalade Sports
R
C
Advertisement
Table of Contents

Related Manuals for Stiga Play The Best T8485W


Summary of Contents for Stiga Play The Best T8485W
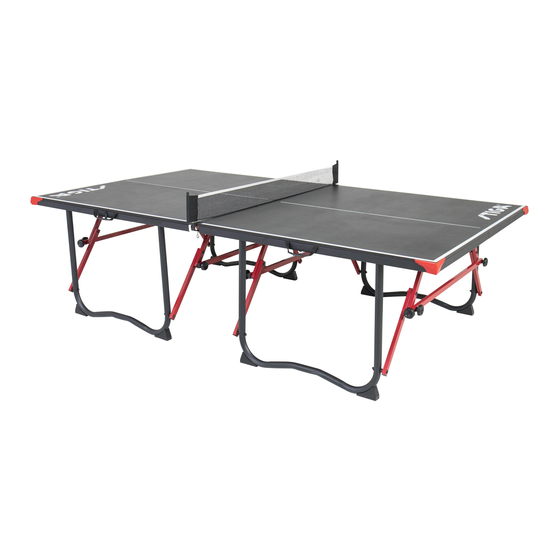
- Page 1 Be sure to write your model number and serial number here for future reference. You can find these numbers printed on the bottom of the table. MODEL NO.: T8485W/F DATE CODE : CPSIA#2-T8485W/F-_______-SY PURCHASE DATE : _______________________ O W N E R ’ S M A N U A L 1.
-
Page 2: Care And Maintenance
CARE AND MAINTENANCE You have purchased a quality product that will give you years of enjoyment. By following these simple maintenance steps, you will add to the life of your new table. THE TABLE TOP The top (playing surface) of your table is made of Particle Board. Like all products made of wood, it can be affected by atmospheric changes in both temperature and humidity. - Page 3 HARDWARE IDENTIFIER (To Scale) H2 - 8 mm x H1 - 8 mm x 40 mm Tensioning Knob Bolt - Short Knob Bolt - Long (4 pcs) (8 pcs) PARTS IDENTIFIER (Not to Scale) P1 - Table Tennis Table Top P2 - Leg With Leg Caps - Lower “A”Leg P4 - Lower “B”Leg...
-
Page 4: Step
IMPORTANT NOTE: Place table half top with playing surface face down on a CLEAN flat surface for ease of correct assembly and to prevent any scratches or blemishes to the playing surface. PARTS REQUIRED 1 pc P1 Table Tennis Table Top and Frame Assembly STEP 1: Lay one piece P1 Table Tennis Table Top and Frame Assembly flat with playing surface facing down as shown in FIGURE 1. -
Page 5: Figure
PARTS REQUIRED 4 pcs P5 Upper Leg Connector 8 pcs - H2 Knob Bolt - Long STEP 3: Install P5 Upper Leg Connector with P3 Lower “A”Leg Connector and P4 Lower “B”Leg Connector using H2 Knob Bolt - Long as shown in FIGURE 3 & DETAIL B,C,D,E. Tighten this hardware. DO NOT OVERTIGHTEN AND CRUSH TUBES. Repeat procedures for other table top. -
Page 6: Figure
WARNING THIS STEP REQUIRES TWO CAPABLE ADULTS. VERY CAREFULLY TURN THE TABLE OVER AND SET IT ON ITS LEGS. BE CAREFUL THE TABLE IS HEAVY . DROPPING THE TABLE CAN CAUSE SERIOUS INJURIES OR PROPERTY DAMAGES. PARTS REQUIRED 2 pcs - P6 Net Post 2 pcs - P6 Net Post 1 pc - P7 Net 1 pc - P7 Net... - Page 7 READ OPERATING INSTRUCTIONS CAREFULLY BEFORE OPERATING TABLE! DO NOT ALLOW CHILDREN TO OPEN TABLE! DO NOT CLIMB, STAND OR JUMP ON CAUTION: TABLE! SERIOUS OR FATAL INJURY MAY RESULT! THIS IS NOT A TOY! TABLE IS TO BE OPENED OR CLOSED BY ADULTS ONLY! FAILURE TO COMPLY WITH OPENING AND CLOSING INSTRUCTIONS COULD RESULT IN PERSONAL INJURY OR PROPERTY DAMAGE.
- Page 8 DETAIL A DETAIL B DETAIL C DETAIL H DETAIL D DETAIL G DETAIL E DETAIL F - 8 -...
- Page 9 T8485 TABLE TENNIS TABLE SPARE PARTS Key# Part No. Description T8485SY-H1 8 mm x mm Tensioning Knob Bolt - Short T8485SY-H2 8 mm x 55 mm Knob Bolt - Long T8485SY-P1 Table Tennis Table Top and Frame Assembly T8485SY-P2 Leg With Leg Caps (Pre-installed) T8485SY-P3 Lower “A”Leg Connector (Pre-installed) T8485SY-P4...
- Page 10 T8485 TABLE TENNIS TABLE SPARE PARTS Key# Part No. Description DETAIL G T8485SY-C1 3.5 mm x mm Flat Head Screw T8485SY-C10 3.5 mm x 14 mm Round Head Screw T8485SY-C12 Hinge T8485SY-C13 Wheel DETAIL H T8485SY-C17 mm x mm Allen Head Bolt T8485SY-C18 mm x mm Plastic Flat Washer...
Need help?
Do you have a question about the Play The Best T8485W and is the answer not in the manual?
Questions and answers