Table of Contents
Advertisement
Quick Links
2008-08-13
5011609903-LES 4
VFD-L Series Instruction Sheet
1
Preface
Thank you for choosing DELTA's VFD-L series AC Drive. The VFD-L series is
manufactured using high-quality components, material and incorporating the
latest microprocessor technology available.
This manual will help in the installation, parameter setting, troubleshooting,
and daily maintenance of the AC motor drive. To guarantee safe operation of
the equipment, read the following safety guidelines before connecting power
to the AC motor drive. Keep this operating manual handy and distribute to all
users for reference.
Important Notes:
AC input power must be disconnected before any maintenance. Do
not connect or disconnect wires while power is applied to the
circuit. Only qualified technicians should perform maintenance on
the VFD-L.
A charge may still remain in the DC-link capacitor with hazardous
voltages even after the power has been turned off. To avoid personal
injury, do not remove the cover of the AC drive until all "DISPLAY
LED" lights on the digital keypad are off. Please note that there
are live components exposed when the AC drive is open,. Be careful
to not touch these live parts.
The AC drive may be destroyed beyond repair if power is
misapplied to the input/output terminals. Never connect the AC
drive output terminals U/T1, V/T2, W/T3 directly to the AC main
circuit power supply.
There are highly sensitive MOS components on the printed circuit
boards. These components are especially sensitive to static
electricity. To avoid damaging these components, do not touch the
circuit boards with metal objects or your bare hands.
Ground the VFD-L using the ground terminal.
The grounding
method must comply with the laws of the country where the AC
drive is to be installed.
2
Receiving and Inspection
This VFD-L AC drive has gone through rigorous quality control tests at the
factory before shipment. Since many things may happen during shipping,
please check for the following after receiving the AC motor drive.
◎ Inspect the unit to insure it was not damaged during shipment.
◎ Make sure that the part number indicated on the nameplate corresponds
with the part number of your order.
Nameplate Information: Example of 1HP230V
AC Drive Model
MODEL :VFD007L21A
Input Spec.
INPUT
:1PH/9.7A 3PH/5.1A 200-240V 50-60Hz
Output Spec.
OUTPUT :3PH 0-240V 4.2A 1.6kVA 1HP
Output Freq. Range
Freq. Range:1.0~400Hz
Bar Code
007L21A0T610001
Serial NO.
DELTA ELECTRONICS, INC.
MADE IN XXXXX
Model Explanation
VFD 007 L 21 A
version
A: standard
D: PNP Mode
B: with EMI
Filter
E: PNP Mode with EMI Filter
Input voltage
VFD-L series
002:0.2kW
007:0.75kW
Applicable motor capacity
004:0.4kW
015:1.5kW
Variable Frequency Drive
Serial Number Explanation
007L21A0 T 6 10 001
Production number
Production week
Production year 2006
T: Taoyuan W: Wujiang
Production factory
230V 1-PHASE 1HP (0.75kW)
Model
If there is any nameplate information not corresponding to your purchase
order or any problem, please contact your distributor.
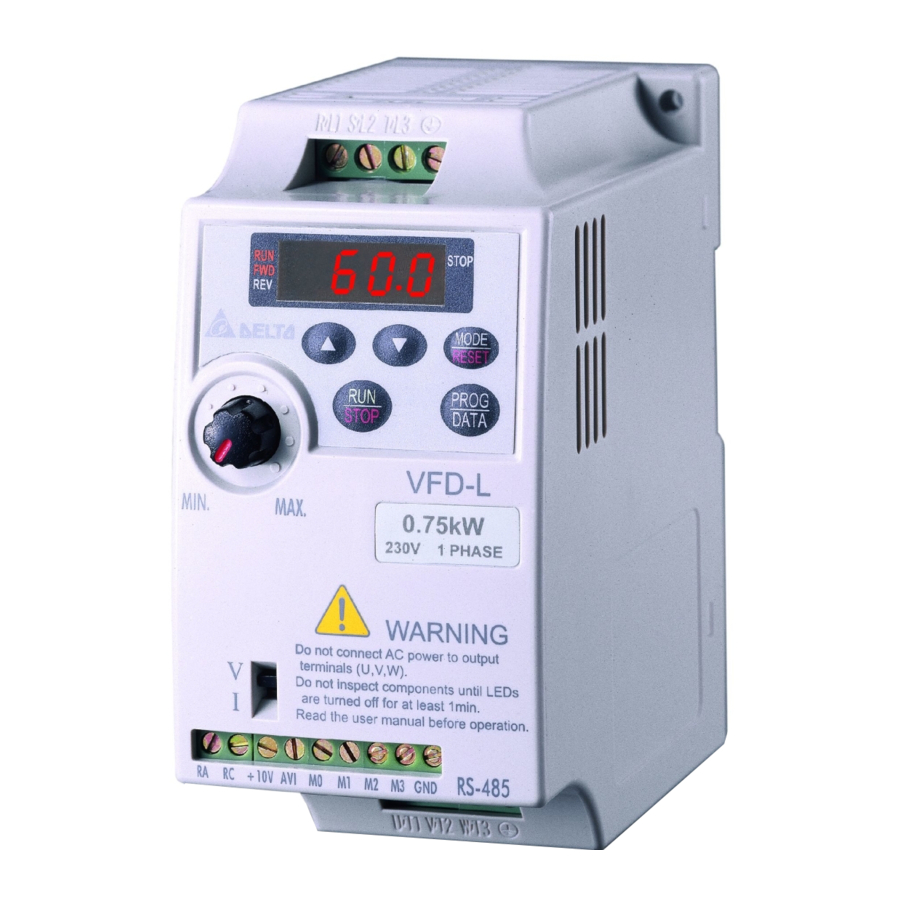
Dimension
R U N
S T O P
F W D
R E V
M O D E
R E S E T
R U N
P R O G
S T O P
D A T A
VFD-L
M IN .
M A X .
0.75KW
230V IPHASE
WARNING
Do not connect AC power to output
terminals (U,V,W).
Do not inspect components until LEDs
are turned off for at least 1min.
Read the user manual before operation.
R A R C
10V A V I M 0 M 1 M 2 M 3 G N D
R S -485
+
3
Wiring
Basic Wiring Diagram
Users must connect wiring according to the circuit diagram shown below.
Please follow all National and State wiring codes, when wiring the VFD-L.
Figure 1 for models of VFD-L series
VFD002L11A, VFD002L11B, VFD002L21A, VFD002L21B, VFD004L11A,
VFD004L11B, VFD004L21A, VFD004L21B, VFD007L21A, VFD007L21B, VFD015L23A
Main Circuit Power
R/L1
U/T1
R/L1
MCCB
IM
S/L2
S/L2
V/T2
3~
T/L3
T/L3
Motor
W/T3
Factory default settings
RA
Forward/Stop
Multi-function indication
M0
output contacts
Reverse/Stop
RC
M1
120VAC/28VDC 3A
Factory default:
Reset
M2
Fault Indication
Multi-step 1
RJ-11 1:+EV
M3
Common Signal
2:GND
GND
3:SG-
6 1
←
4:SG+
RS-485
Power supply for Potentiometer
Communication
Main circuit (power)
+10V 10mA(MAX)
+10V
port
3
terminals
Master Freq. setting
2
Control circuit terminals
Analog voltage
VR
AVI
0 10VDC
~
1
VR 3K 5K
Shielded leads
:
~
Ω
GND
Analog current
NOTE: Do not plug in a Modem or telephone line to the RS-485 communication port,
permanent damage may result. Terminals 1 & 2 are the power source for the
optional copy keypad and should not be used while using RS-485
communication.
*If the AC Drive model is VFD002L11A/B, VFD004L11A/B, VFD002L21B, VFD004L21B
or VFD007L21B, please use power terminals R/L1 and S/L2.
*If the AC Drive model is VFD002L21A, VFD004L21A or VFD007L21A, 1-phase/3 phase
power may be used on R/L1, S/L2, T/L3. When VFD002L21A/VFD004L21A or
VFD007L21A use 1-phase power, please select any two of the three input terminals
R/L1, S/L2, T/L3.
*If the AC Drive model is VFD015L23A, single phase power is not allowed.
Figure 2 for models of VFD-L series
VFD004L21D, VFD004L21E, VFD007L21D, VFD007L21E
Main Circuit Power
R/L1
R/L1
U/T1
MCCB
IM
S/L2
S/L2
V/T2
3~
T/L3
T/L3
Motor
W/T3
Power supply
Factory default settings
+15V 30mA(MAX)
RA
Multi-function indication
+15V
Forward/Stop
output contacts
M0
RC
Reverse/Stop
120VAC/28VDC 3A
M1
Factory default:
Fault Indication
Reset
M2
RJ-11 1:+EV
Multi-step 1
2:GND
M3
3:SG-
GND
6 1
4:SG+
←
VR: 3K 5K
~
Ω
RS-485
1
3
Communication
VR
+15V
Main circuit (power)
Master Freq. setting
Power supply
port
2
terminals
Analog voltage
3
+15V 30mA(MAX)
Control circuit terminals
2
0 10VDC
~
VR
AVI
VR 3K 5K
:
~
Ω
1
Shielded leads
Analog current
GND
NOTE: Do not plug in a Modem or telephone line to the RS-485 communication port,
permanent damage may result. Terminals 1 & 2 are the power source for the
optional copy keypad and should not be used while using RS-485
communication.
*If the AC Drive model is VFD004L21E, VFD007L21E, please use power terminals
R/L1 and S/L2.
*If the AC Drive model is VFD004L21D, VFD007L21D, 1-phase/3 phase power may be
used on R/L1, S/L2, T/L3. When VFD004L21D/VFD007L21D use 1-phase power, please
select any two of the three input terminals R/L1, S/L2, T/L3.
Wiring for NPN mode and PNP mode
NPN Mode for models:
VFD002L11A, VFD002L11B, VFD002L21A,
PNP Mode for models:
VFD002L21B, VFD004L11A, VFD004L11B,
VFD004L21D, VFD004L21E, VFD007L21D, VFD007L21E
VFD004L21A, VFD004L21B, VFD007L21A,
VFD007L21B, VFD015L23A
+10V
FWD/STOP
FWD/STOP
M0
REV/STOP
REV/STOP
Factory
M1
RESET
setting
RESET
M2
Factory
Multi-step 1
Multi-step 1
setting
M3
Digital Signal Common
GND
*Don't apply the mains voltage directly
to above terminals.
E
*Don't apply the mains voltage directly
to above terminals.
Main circuit wiring
AC line input terminals
grounding
Single phase models input from R/L1, S/L2
R/L1 S/L2 T/L3
UP/DOWN
LED display
Function
Display key
Data
Frequency
Confirmation key
setting
RUN/STOP
Motor capacity
and input power
The signal selection
for AVI to input
RS485
DC0~+10V
communication
or 4~20 mA
port
U/T1 V/T2 W/T3
Motor connections U/T1, V/T2, W/T3
Control circuit wiring
Figure 3 for models: VFD002L11A, VFD002L11B, VFD002L21A, VFD002L21B, VFD004L11A,
VFD004L11B, VFD004L21A, VFD004L21B, VFD007L21A, VFD007L21B, VFD015L23A
Wire Gauge:22-24AWG, Torque: 4Kgf-cm
RA RC +10V AVI M0 M1 M2 M3 GND
Relay
Figure 4 for models: VFD004L21D, VFD004L21E, VFD007L21D, VFD007L21E
Wire Gauge:22-24AWG, Torque: 4Kgf-cm
RA RC +15V AVI M0 M1 M2 M3 GND
Relay
Wiring Notes: PLEASE READ PRIOR TO INSTALLATION.
Do not connect the AC input to any of the U/T1, V/T2, W/T3
terminals, as it will damage the AC drive..
Ensure all screws are tightened to the proper torque rating.
1.
During installation, follow all national and local electrical, construction,
and safety codes for the country the drive is to be installed in.
2.
Ensure the appropriate protective devices (circuit breaker or fuses) are
connected between the power supply and AC drive.
3.
Make sure that the leads are connected correctly and the AC drive is
properly grounded. (Ground resistance should not exceed 0.1Ω.)
4.
Use ground leads that comply with AWG/MCM standards and keep
them as short as possible.
5.
Multiple VFD-L units can be installed in one location. All the units should
be grounded directly to a common ground terminal. The VFD-L ground
terminals may also be connected in parallel, as shown in the figure
below. Ensure there are no ground loops.
6.
When the AC drive output terminals U/T1, V/T2, and W/T3 are
connected to the motor terminals U, V, and W, respectively, the motor
will rotate counterclockwise (as viewed from the shaft ends of the motor)
when a forward operation command is received. To reverse the
direction of motor rotation, switch over any of the two motor leads.
7.
Make sure that the power is capable of supplying the correct voltage
and required current to the AC drive.
+15V
8.
Do not attach or remove wiring when power is applied to the AC drive.
M0
9.
Do not monitor the signals on the circuit board while the AC drive is in
M1
operation.
M2
10.
Route the power and control wires separately, or orthogonal to each
M3
other.
GND
11.
If a filter is required for reducing EMI (Electro-Magnetic Interference),
E
install it as close as possible to AC drive. EMI can also be reduced by
lowering the Carrier Frequency.
12.
If the AC drive is installed in the place where a load reactor is needed,
install the filter close to U/T1, V/T2, W/T3 side of AC drive. Do not use a
Capacitor or L-C Filter (Inductance-Capacitance) or R-C Filter
(Resistance-Capacitance).
13.
When using a general GFCI (Ground Fault Circuit Interrupter), select a
current sensor with sensitivity of 200mA or above, and not less than
0.1-second operation time to avoid nuisance tripping. For the specific
GFCI of the AC motor drive, please select a current sensor with
sensitivity of 30mA or above.
4
Summary of Parameters
Group 0: User Parameters
The parameter may be set during operation.
Pr.
Functions
0-00
Identity code of drive
d1: 40W
(Read only)
d2: 100W
d3: 200W
Grounding
0-01
Rated current display
40W: d0.4A
(Read only)
100W: d0.8A
200W: d1.6A
0-02
Parameter reset
d10: Reset Parameters to Factory Setting
0-03 Start-up display of AC
d0: F (Frequency command)
drive
d1: H (output frequency)
d2: U (user-defined unit)
d3: A (output current)
0-04 User-defined Unit
d0: Display User-Defined Unit (u)
d1: Display Counter Value (C)
d2: Display Process Operation (1=tt)
(Display the current speed's step and the
rest time for this step speed)
d3: Display DC-BUS voltage (U)
d4: Display output voltage (E)
0-05 User-defined
d0.1 ~ d160
coefficient K
0-06
Software version
Read only
0-07
Password input
d0 ~ d999
Password
0-08
d0 ~ d999
configuration
Group 1: Basic Parameters
Pr.
Functions
1-00
Maximum operation Freq.
1-01
Maximum setting Freq.
1-02
Maximum output voltage
1-03
Mid-point freq.
1-04
Mid-point voltage
1-05
Minimum output freq.
1-06
Minimum output voltage
1-07
Upper bound of freq.
1-08
Lower bound of freq.
1-09 Accel time 1 (Tacc1)
1-10 Decel time 1 (Tdec1)
1-11 Accel time 2
1-12 Decel time 2
1-13 JOG Accel time
1-14 JOG Decel time
1-15 JOG frequency
1-16
Auto-accel/decel
S-curve setting in
1-17
acceleration
S-curve setting in
1-18
deceleration
Group 2: Operation Method Parameters
Forward
running
Pr.
Functions
2-00
Source of frequency
d0: Digital keypad
command
d1: 0 ~ 10V from AVI
d2: 4 ~ 20mA from AVI
d3: Controlled by V.R on drive
d4: RS-485 communication interface
2-01
Source of operation
d0: By digital keypad
command
d1: By external terminals, keypad STOP
d2: By external terminals, keypad
d3: By RS-485 communication interface, keypad
d4: By RS-485 communication interface, keypad
2-02
Stop method
d0: Ramp stop d1: Coast stop
2-03
Carrier freq.
d3 ~d10K Hz
Factory
Settings
Setting
d4: 400W
d5: 750W
d6: 1.5KW
400W: d2.5A
750W: d4.2A
1.5K: d7.0A
d0
d0
d0
d1.0
#.#
d0
d0
Factory
Settings
Setting
d50.0 ~ d400Hz
d60.0
d10.0 ~ d400Hz
d60.0
d2.0 ~ d255V
d220
d1.0 ~ d400Hz
d1.0
d2.0 ~ d255V
d12.0
d1.0 ~ d60.0Hz
d1.0
d2.0 ~ d255V
d12.0
d1 ~ d110%
d100
d0 ~ d100%
d0.0
d0.1 ~ d600 Sec
d10.0
d0.1 ~ d600 Sec
d10.0
d0.1 ~ d600 Sec
d10.0
d0.1 ~ d600 Sec
d10.0
d0.1 ~ d600 Sec
d10.0
d0.0 ~ d600 Sec
d10.0
d1.0Hz~d400Hz
d6.0
d0: Linear Accel/Decel
d0
d1: Auto accel, linear decel
d2: Linear accel, auto decel,
d3: Auto Accel/Decel
d4: Linear accel. Auto decel, stall
prevention during
deceleration
d5: Auto accel. Auto decel, stall
prevention during
deceleration
d0 ~ d7
d0
d0 ~ d7
d0
Factory
Settings
Setting
d0
d0
enable
STOP enable
STOP disable
d0
d10
Advertisement
Table of Contents

Related Manuals for Delta VFD-L Series


Summary of Contents for Delta VFD-L Series
- Page 1 R S -485 Group 0: User Parameters The parameter may be set during operation. The signal selection Thank you for choosing DELTA’s VFD-L series AC Drive. The VFD-L series is for AVI to input Factory RS485 manufactured using high-quality components, material and incorporating the...
- Page 2 Factory Factory Factory Fault Functions Settings Functions Settings Functions Settings Fault Descriptions Corrective Actions Setting Setting Setting Name 2-04 Reverse operation d0: Enable reverse 6-01 Over-current d0: disable d170 Communication protocol d4: 8,E,1 1. Switch off power supply. ASCII mode 9-04 inhibit d1: Disable reverse...
Need help?
Do you have a question about the VFD-L Series and is the answer not in the manual?
Questions and answers