Table of Contents
Advertisement
Quick Links
Advertisement
Table of Contents

Related Manuals for PulseAudio PA66AMP


Summary of Contents for PulseAudio PA66AMP
- Page 1 6X6 AUDIO DISTRIBUTION AMPLIFIER VANCO PART NUMBER PA66AMP, PA66KIT 6x6 audio matrix with 6 bridgeable zones to accomodate 1 or 2 speakers per zone Integrated wifi adapter + Android and IOS app allows for effortless control via smartphone or tablet...
-
Page 2: Dear Customer
DEAR CUSTOMER Thank you for purchasing this product. For optimum performance and safety, please read these instructions carefully before connecting, operating or adjusting this product. Please keep this manual for future reference. THIS PRODUCT IS 100% INSPECTED AND TESTED IN THE UNITED STATES TO VERIFY PERFORMANCE PARAMETERS. - Page 3 FEATURES The PA66AMP/PA66KIT is a functional, easy-to-install, highly compatible, expandable, and user-friendly audio distribution system. It provides up to 25W @ 8 Ohm Power by Class D amplifier to up to 18 zones which at can be controlled by packaged keypads (included with PA66KIT), RS232, IR, or via Wifi with the iOS and Android apps.
-
Page 4: Specifications
Protection, Over Temperature Protection System on Voltage ...........DC +12V External Mute Voltage........DC +12V Power Supply .............AC115V/60Hz, 230V/50Hz Output Connection ..........Terminal Block Dimension ............16.9”W x 3.5”H x 16.4”D Weight ..............25 lbs PACKAGE CONTENTS PA66AMP: PA66KIT: • 6x6 Amplifier • 6x6 Amplifier • Remote Control •... -
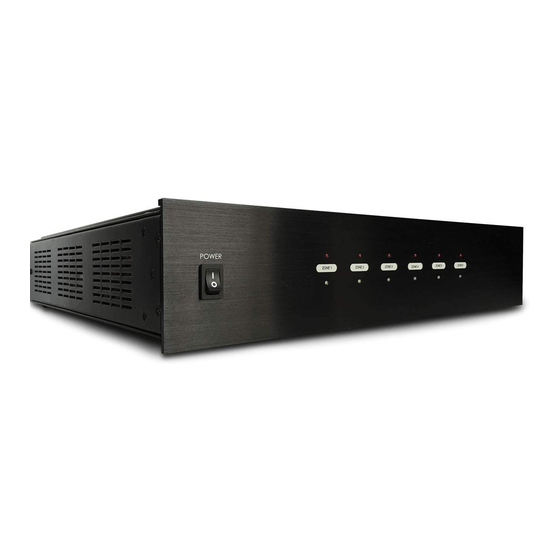
Page 5: Panel Descriptions
PANEL DESCRIPTIONS 1. Power ON/OFF Switch 2. PEAK LED indicates if a connected source level is too high. If the PEAK LED is RED, reduce the zone input or output level. 3. Standby/Zone ON LED- When this LED is BLUE this indicates a zone is not on or in Standby mode. - Page 6 KEYPAD 1. Numeric LED Display 2. IR Receiver Target 3. Selection and Status LED’s 4. Power/Status. Press and Hold to Turn Zone ON/OFF. When ON, Press to toggle through settings 5. Increase Volume, Treble or Bass 6. Decrease Volume, Treble or Bass 7.
-
Page 7: Remote Control
REMOTE CONTROL 1. Power: switches power (On/Off) for the certain zone. 2. Mute: allows you to mute a certain zone. 3. BAL: These L & R buttons can adjust the balance of L/R channel in stereo mode. 4. VOL: Volume adjustment 5. -
Page 8: Connect And Operate
CONNECT AND OPERATE Before you begin to install the PA66AMP/KIT, it is important to implement good installa- tion practices: 1. Make sure that AC power is disconnected before making ANY connections to the main unit and attached devices. 2. Install in a well-ventilated environment 3. -
Page 9: Connecting The Speakers
CONNECTING THE SPEAKERS The PA66AMP/KIT can work with speakers that are 4-8 Ohm. There are two modes that can be set for different setups: Stereo or Bridge. An 8 Ohm speaker can only be used when in Bridge mode. To choose between modes,... - Page 10 Without power being connected, connect a Cat5e/6 cable to the RJ45 port labeled KEYPADS on the back of the PA66AMP/KIT. We recommend terminating the Cat5e/6 using the 568B standard. At this point it is also important to address your keypads. Refer to the chart below which is also found on the PCB board of the back of the keypad to set the dip switches according to the zone you would like it to control.
- Page 11 STATUS PORTS There are six 12Vdc trigger outputs which correspond to the six output zones. When a zone is powered ON by the PA66AMP/KIT keypad, the corresponding zone sends 12Vdc to the trigger output jack. The triggers can be used to automatically switch peripheral equipment ON or OFF.
- Page 12 Plug: Tip is Positive (+) Trigger Outputs for Zones 1 ~ 6: Zone ON; 12Vdc applied to the TRIGGER OUTPUT, Zone OFF; 12Vdc removed from the TRIGGER OUTPUT. CONTROL: When any zone is on, 12Vdc applied to the CONTROL OUT. When All zones are OFF, 12Vdc removed from the CONTROL OUT Trigger Inputs: PA- IN: Apply 12Vdc for input #1 override on all six zones.
- Page 13 CASCADING SOURCES INTO ADDITONAL ZONES The PA66AMP/KIT can allow 6 sources to be distributed to up to 18 zones on 3 different units using the provided ribbon cable to connect between units. To do this first each unit needs to be addressed according using the MASTER/ SLAVE switch.
- Page 14 Wi-fi control: After downloading both apps from the appropriate mobile app marketplaces, open the Install app to begin linking your wireless device to the PA66AMP/KIT. NOTE: YOUR WIRELESS DEVICE MUST BE ON THE SAME WIRELESS NETWORK YOU INTEND ON USING AFTER SETUP.
- Page 15 Once the PA66-WIFI app is opened, press on the + icon. Next, ensure that the SSID of the network your wireless device is the same as it is found on the app. Enter the Wi-fi password Once all of the information has been entered correctly, press on the Configuration button.
- Page 16 USING THE CONTROL APP Now that the integrated Wi-Fi adapter has been configured to the network, you can now access and use the PA66 App. 1. Zone numbered 1-6: touch to select a different zone to control 2. Name of zone being controlled. This can be customized by touching the label.
- Page 17 4. Adjusts treble. Status shown on right 5. Adjusts bass. Status is shown on right 6. Adjusts left and right balance in Stereo mode 7. Press to change the source being played on the current zone. The name of the zone is shown on the right but is customizable once the Source button has been selected.
-
Page 18: Technical Support
TECHNICAL SUPPORT In case of problems, please contact Vanco Technical Support by dialing 1-800- 626-6445. You can also email technical support issues to info@vanco1.com When calling, please have the Model Number, Serial Number (affixed to the bottom of the unit) and Invoice available for reference during the call. Please read this Instruction Manual prior to calling or installing this unit, since it will familiarize you with the capabilities of this product and its proper installation. -
Page 19: Limited Warranty
LIMITED WARRANTY With the exceptions noted in the next paragraph, Vanco warrants to the original purchaser that the equipment it manufactures or sells will be free from defects in materials and workmanship for a period of two years from the date of purchase. - Page 20 ® Vanco International 506 Kingsland Drive Batavia, Illinois 60510 call: 800.626.6445 | fax: 630.879.9189 visit: www.vanco1.com Introducing a new brand from Learn more at pulse1audio.com...
Need help?
Do you have a question about the PA66AMP and is the answer not in the manual?
Questions and answers