Table of Contents
Advertisement
Advertisement
Table of Contents

Related Manuals for Masimo Root RDS-7


Summary of Contents for Masimo Root RDS-7
- Page 1 Root™ Operator's Manual...
- Page 3 Medical electrical equipment with respect to electric shock, fire and mechanical hazards only in accordance with UL 60601-1/CAN/CSA C22.2 No. 601.1 Patents: www.masimo.com/patents.htm © 2013 Masimo Corporation Masimo and , are federally registered trademarks of Masimo Corporation. Root is a trademark of Masimo Corporation. www.masimo.com Masimo...
- Page 4 The use of the trademarks PATIENT SAFETYNET and PSN is under license from University HealthSystem Consortium. All other trademarks and registered trademarks are property of their respective owners. www.masimo.com Masimo...
-
Page 5: Table Of Contents
About the Main Screen ---------------------------------------------------------------- 28 About the Status Bar ------------------------------------------------------------------- 29 Using the Touchscreen Interface --------------------------------------------------- 31 Menu Navigation ------------------------------------------------------------------------ 34 Understanding Windows -------------------------------------------------------------- 35 Accessing Main Menu Options ------------------------------------------------------ 43 Device Settings ------------------------------------------------------------------------- 44 About -------------------------------------------------------------------------------------- 53 www.masimo.com Masimo... - Page 6 Environmental --------------------------------------------------------------------------- 79 Display ------------------------------------------------------------------------------------ 80 Alarms ------------------------------------------------------------------------------------- 80 Nurse Call Specifications ------------------------------------------------------------- 81 Connectors ------------------------------------------------------------------------------- 81 Communication Specifications ------------------------------------------------------ 81 Applicable Standards and Regulations ------------------------------------------- 82 Symbols ----------------------------------------------------------------------------------- 84 Chapter 9: Service and Maintenance ------------------------------------------------- 87 Cleaning ---------------------------------------------------------------------------------- 87 www.masimo.com Masimo...
- Page 7 Power-On Self Test -------------------------------------------------------------------- 88 Nurse Call Setting Connections----------------------------------------------------- 88 Battery Test ------------------------------------------------------------------------------ 90 Repair Policy ----------------------------------------------------------------------------- 90 Return Procedure ----------------------------------------------------------------------- 91 Contacting Masimo --------------------------------------------------------------------- 91 Sales & End-User License Agreement -------------------------------------------- 92 Warranty ---------------------------------------------------------------------------------- 92 Exclusions -------------------------------------------------------------------------------- 93 Restrictions ------------------------------------------------------------------------------- 93 Index ------------------------------------------------------------------------------------------ 95 www.masimo.com...
-
Page 9: About This Manual
The following is an example of a caution: CAUTION: This is an example of caution statement. A note is given when additional general information is applicable. The following is an example of a note: Note: This is an example of a note. www.masimo.com Masimo... -
Page 11: Product Description And Intended Use
Instantly interpretable, high-visibility display of Masimo’s breakthrough rainbow® and SET® measurements from Masimo's Radical-7® handheld monitor Intuitive, touchscreen navigation for easy and adaptable use in any hospital environment ... -
Page 13: Safety Information, Warnings, And Cautions
Refer servicing to qualified service personnel trained in the repair of this device. CAUTION: Do not place Root where the controls can be changed by the patient. Note: Do not monitor more than a single patient at a time on Root. www.masimo.com Masimo... -
Page 14: General Information, Warnings And Cautions
General Information, Warnings and Cautions WARNING: When placed on a flat surface, the device should be secured with a mounting system recommended by Masimo. WARNING: Do not touch, press or rub the touchscreen with abrasive cleaning compounds, instruments, brushes or rough-surface materials, or bring them into contact with anything that could scratch the touchscreen. -
Page 15: Compliance Information, Warnings And Cautions
Note: This device complies with Part 15 of the FCC Rules. Operation is subject to the following two conditions: (1) This device may not cause harmful interference, and (2) this device must accept any interference received, including interference that may cause undesired operation. www.masimo.com Masimo... - Page 16 Root Safety Information, Warnings, and Cautions Note: This Class A digital apparatus complies with Canadian ICES-003. Note: Use Root in accordance with Environmental Specifications section in this manual. www.masimo.com Masimo...
-
Page 17: Electrical Information, Warnings And Cautions
Root by qualified personnel only. WARNING: Risk of explosion if battery is replaced with an incorrect type. Replace with Masimo supplied parts only. WARNING: Do not incinerate the battery. CAUTION: To ensure patient electrical isolation, connect only to medical technologies with electrically isolated circuits. - Page 18 CAUTION: Do not use extension cords or adapters of any type. CAUTION: Only use the AC power cable provided by Masimo. Using a different AC power cable could cause damage to Root. Check the power cord and plug to ensure that it is intact and undamaged.
-
Page 19: Chapter 1: Description
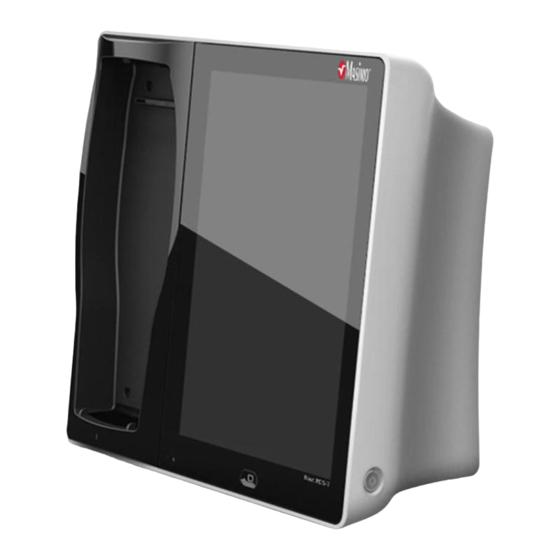
Radical-7 can communicate monitored parameters and measurements.* Root Display and Provides an interface for user interactions. Touchscreen Home Button Provides access to the Main Screen. Root Charging Shows an indication of the battery charge for Root. Indicator www.masimo.com Masimo... - Page 20 Root. Back View Feature Description 1 Handle Allows the user to transport Root. 2 Speaker Provides audible notification. 3 Nurse Call Connector Provides a connection to a Nurse Call system. www.masimo.com Masimo...
- Page 21 Contains the input connector for a hospital grade 6 Power Entry Module AC power cord and the fuse holder. Equipotential Ground Provides electrical grounding for Root. Connector Iris Connectivity Ports Provide connection for standalone devices. Side Views Right side Left side Feature Description www.masimo.com Masimo...
- Page 22 System Status Provides an indication of alarms and system messages. Lights See System Status Lights on page 63. Places Root in Power On, Standby and Power Off 2 Power Button modes. MOC-9 Ports Provide connectivity for MOC-9 modules. www.masimo.com Masimo...
-
Page 23: Chapter 2: Setting Up
Check all materials against the packing list. Save all packing materials, invoice and bill of lading. These may be required to process a claim with the carrier. If anything is missing or damaged, contact Masimo's Technical Service Department. See Return Procedure on page 91. Guidelines for Setting Up Root has a built-in bracket interface that allows it to be mounted on a pole or roll stand. -
Page 24: Power On
Power On, press the Power Button for two (2) seconds until a single audible tone sounds. Once Root turns on, if no Radical-7 or MOC-9 module is connected, the Root display shows the following message: Please Connect a Device. The user is now able to connect Radical-7 and MOC-9 modules. www.masimo.com Masimo... -
Page 25: Initial Battery Charging
4. The Root Charging Indicator remains orange while the battery is charging and will illuminate green when Root is fully charged. See Battery Root on page 47 and About the Status Bar on page 29. See Safety Information, Warnings, and Cautions on page 11. www.masimo.com Masimo... -
Page 26: Radical-7 Connection
Status Bar. Root display will show active measurements and parameters. For Radical-7 charging conditions, see Radical-7 Charging Indicator on page 64. Nurse Call Connection Port Use a Nurse Call connection cable to connect to a Nurse Call System. www.masimo.com Masimo... - Page 27 Depending on the connection type of the Nurse Call System, it may be necessary to orient the other end of the Nurse Call connection cable to fit correctly into the system connection. For more information, see Device Output on page 51. www.masimo.com Masimo...
-
Page 29: Chapter 3: Operation
Chapter 3: Operation The information in this chapter assumes that Root is set up and ready for use. This chapter provides necessary information for proper operation of the device. Do not operate Root without completely reading and understanding these instructions. www.masimo.com Masimo... -
Page 30: About The Main Screen
Provides a dynamic, user-configurable display area for all Windows the data from Radical-7 or a MOC-9 module. Provides access to the configuration options for Root, Main Menu Radical-7 and MOC-9 modules. See Accessing Main icon Menu Options on page 43. www.masimo.com Masimo... -
Page 31: About The Status Bar
Wi-Fi connectivity has been enabled. The icon itself Wi-Fi also indicates the strength of the wireless signal. See Wi-Fi on page 46. Provides access to the Ethernet screen. If this icon is visible, then Ethernet connectivity has been enabled. Ethernet See Ethernet on page 46. www.masimo.com Masimo... - Page 32 See Sounds on page 57. Displays the current time and provides access to the Localization screen which contains settings related to local Current time, language and geography. Time See Localization on page 45. www.masimo.com Masimo...
-
Page 33: Using The Touchscreen Interface
Below is a list of all the different types of controls available on Root and the various ways to interact with each type of control. Control Applicable Description Actions Toggle Slide knob Switches between toggle states Press left or right of Quickly moves knob left or right www.masimo.com Masimo... - Page 34 Quickly moves knob to Tap position along slider path Press center When closed, expands the spinner (focused) tile When open, collapses the spinner Swipe up/down When open, scrolls through spinner tiles Press unfocused When open, scrolls tile into center tile (focused) position www.masimo.com Masimo...
- Page 35 When parameter or measurement alarm is present, silences parameter or measurement alarm Press and hold Enables parameter and measurement drag and drop Live Swipe down Separates pleth and acoustic Waveform waveforms Swipe up Combines pleth and acoustic waveforms www.masimo.com Masimo...
-
Page 36: Menu Navigation
When navigating through menus and configuring settings, all changes must be confirmed by selecting OK. To cancel the changes, select Cancel. Any screen requiring selection of option(s) will time out after one (1) minute of inactivity and return to the Main Screen. www.masimo.com Masimo... -
Page 37: Understanding Windows
Analog View displays values in relation to alarm ranges. Details about the displayed information of parameters and measurements can be found in the instructions for use or operator's manual of Radical-7 and the appropriate MOC-9 module(s). Trend View Analog View Feature Description www.masimo.com Masimo... - Page 38 Trend (Available only in Trend View). Adjust the Time Frame by Zoom preset increments using the "+" and "-" buttons. Displays parameters and measurements which are not Well shown as Trend Displays or Analog Gauges. www.masimo.com Masimo...
- Page 39 Indicates current reading of the parameter or 3 Numeric Value measurement. Indicate high and low alarm limits for the parameter 4 Alarm Limits or measurement, if supported. Parameter or Indicates the name of the parameter or Measurement measurement. Label www.masimo.com Masimo...
- Page 40 General features of the Analog View are: Ref. Feature Description Indicates current status of a parameter or Needle measurement. Indicate high and low alarm limits for the Alarm Limits parameter or measurement. Indicates current reading of the parameter or Numeric Value measurement www.masimo.com Masimo...
- Page 41 Root Chapter 3: Operation Ref. Feature Description Parameter or Indicates the name of the parameter or Measurement Label measurement. www.masimo.com Masimo...
- Page 42 In the example below, the SpO2 gauge is shown as a quarter circle, where values lower than 88% will trigger an alarm, and the PR gauge is shown as a half circle, where values below 50 bpm and above 140 bpm will trigger an alarm. Quarter Circle Half Circle www.masimo.com Masimo...
- Page 43 Display or Gauge. To expand a parameter or measurement Order Instruction Step 1 Press and hold the Numeric Value until it dims. Step 2 Drag the Numeric Value over any Trend Display. Step 3 Release the Numeric Value. www.masimo.com Masimo...
- Page 44 Root Chapter 3: Operation Minimizing a parameter or measurement Order Instruction Step 1 Press and hold the Numeric Value until it shrinks. Step 2 Drag the Numeric Value to the Well. Step 3 Release the Numeric Value. www.masimo.com Masimo...
-
Page 45: Accessing Main Menu Options
About See About on page 53. Trend Settings See Trend Settings on page 53. Profiles See Profiles on page 54. Iris See Iris on page 54. Layout See Layout on page 55. Sounds See Sounds on page 57. www.masimo.com Masimo... -
Page 46: Device Settings
Battery Root See Battery Root on page 47. Battery Radical See Battery Radical on page 48 Brightness See Brightness on page 49. Access Control See Access Control on page 50. Device Output See Device Output on page 51. www.masimo.com Masimo... - Page 47 Sets the display format Time 12 hour for current time. 24 hour Line Sets to match regional 60 Hz 50 Hz or 60 Hz Frequency power line frequency. Date Sets the current date. Time Sets the current time. www.masimo.com Masimo...
- Page 48 Additional fields in the Wi-Fi screen display read-only settings about the Wi-Fi connection that cannot be configured by the user. Your Masimo sales representative can provide necessary information regarding an initial Wi-Fi connection. Ethernet Use the Ethernet screen to enable or disable Ethernet connectivity. When Ethernet connectivity is enabled, the Ethernet icon will appear in the Status Bar.
- Page 49 The user can also access Root's Battery screen by pressing the Battery icon on the Status Bar. See About the Status Bar on page 29. Option Description State of Charge Provides a read-only display of battery level remaining. Battery Allows trained personnel to access battery diagnostic Diagnostics information www.masimo.com Masimo...
- Page 50 Radical-7's Battery icon on the Status Bar. See About the Status Bar on page 29. Option Description State of Charge Provides a read-only display of battery level remaining. Battery Allows trained personnel to access battery diagnostic Diagnostics information www.masimo.com Masimo...
- Page 51 Settings Setting Allows automatic adjustment of Auto Root's display brightness On or Off Brightness based on ambient light. Adjust the brightness level of Brightness the Root display by sliding the 1, 2, 3, 4 button (4 is brightest). www.masimo.com Masimo...
-
Page 52: Access Control
Silence menu option. See On or Off Enabled Sounds on page 57. Lock Alarm Sets the lowest alarm volume 3, 4, or Off Volume level. Press Save to Save as Saves current profile Adult parameter as the Adult Profile. load. www.masimo.com Masimo... - Page 53 Should be Normal or Call Normal changed to accommodate Inverted Polarity institutional Nurse Call settings. Nurse Alarms, Signal IQ Controls the source of monitoring Call Alarms Alarms and Signal which sets off the trigger. Trigger www.masimo.com Masimo...
- Page 54 Root Chapter 3: Operation Note: The Nurse Call feature is disabled when Audio Pause is enabled and Nurse Call Trigger is set to Alarms. For more information about Audio Pause, see Audio Pause on page 62. www.masimo.com Masimo...
-
Page 55: About
Configurable Settings Default Setting 15, 30, 45 minutes Default Duration captured by 2 hours Duration Trend Lines. 1, 2, 4, 8, 12, 24 hours Clear Delete all stored Press Clear to delete all Trends trend data. stored trend data. www.masimo.com Masimo... -
Page 56: Profiles
Custom profiles can also be created to accommodate usage in any hospital care area. See the Masimo Instrument Configuration Tool Directions for Use for information on adding Profiles. For more information regarding Profiles, see the instructions for use or operator’s manuals for Radical-7 and appropriate MOC-9 module(s). -
Page 57: Layout
37. Option Description Factory Default Configurable Setting Settings Layout Controls the sizing of Fixed Fixed or Dynamic Style Trend Displays. The following diagram and tables explain the differences between Fixed and Dynamic modes for a Trend View. www.masimo.com Masimo... - Page 58 For more information about expanding and minimizing parameters, see Customizing Windows on page 41. *Size of each Trend Display is automatically adjusted. *When the number of Trend Displays reaches maximum viewing capacity, additional parameters expanded will result in the replacement of existing Trend Displays. www.masimo.com Masimo...
-
Page 59: Sounds
When only Radical-7 or a single MOC-9 module is connected to Root, the Available Layout will be 100%. When Radical-7 and/or multiple MOC-9 modules are connected, the user will have the option to select from several pre-configured layouts. Sounds www.masimo.com Masimo... -
Page 60: Alarm Interface
Access Control menu. See Access Control on page 50. Alarm Interface Alarms can have different priority levels and come from different sources. The following tables describe alarm behaviors in more detail. Priority Alarm Sound Five (5) beeps: beep-beep-beep, brief pause, beep-beep Three (3) beeps: beep-beep-beep www.masimo.com Masimo... - Page 61 The example shown here is a "High Level Impedance" alarm in the lower Window. Note that the border of the Window illuminates red, and the explanation of the alarm is shown at the top of the Window (High Impedance Detected). www.masimo.com Masimo...
- Page 62 For more information about Silence Duration, refer to the instructions for use or operator’s manuals for Radical-7 and appropriate MOC-9 module(s). Icon Description Visual Appearance Alarms There are currently no active alarms, and no alarms have been silenced. www.masimo.com Masimo...
- Page 63 There are currently no active alarms, but at least one alarm has been and is still silenced. There is currently at least one active alarm that has not been silenced. There is currently at least one active alarm, but all active alarms are silenced. www.masimo.com Masimo...
-
Page 64: Trend Download
USB for evaluation. Trend data is stored in non-volatile memory, so it is not erased when Root is shut off. Trend data download is initiated using the Masimo Instrument Configuration Tool, which converts the data to a .TXT or .CSV file. -
Page 65: Lights
The alarm priority is determined by the Radical-7 and MOC-9 module(s) that are connected to Root. The following are system level alarm messages that accompany System Status Lights when Radical-7 and MOC-9 modules are not connected: Status Light Message Alarm Priority Low battery Service required High AC Power Indicator www.masimo.com Masimo... - Page 66 Whenever Root is connected to an AC power source, if not fully charged, its battery will charge. Light Battery Indication Status Green Battery is fully charged. Orange Battery is charging. Battery charging error. Battery is not being charged. Root is not connected to AC power source. Radical-7 Charging Indicator www.masimo.com Masimo...
- Page 67 Press and hold the Power Button for eight (8) seconds, until two (2) audible tones sound. The Home Button will flash, and the Power Button will flash orange. Power Off Power Off completely shuts down Root and results in a longer startup sequence. www.masimo.com Masimo...
-
Page 69: Chapter 4: Moc-9
Use a MOC-9 cable to connect other MOC-9 modules to Root. To use an MOC-9 Port Identify the MOC-9 end of the cable. Orient the cable to fit correctly into an MOC-9 Port. Insert the MOC-9 cable securely into any of the three (3) compatible ports on Root. www.masimo.com Masimo... -
Page 71: Chapter 5: Iris
Patient SafetyNet. Root receives and may display information from Radical-7, MOC-9 modules, as well as standalone devices. Ref. Description 1 - 4 Standalone devices connected via Iris (e.g., monitor, pump, ventilator) Root Radical-7 MOC-9 modules Patient SafetyNet or Masimo Connectivity Gateway Electronic Health Records system www.masimo.com Masimo... -
Page 72: Iris Connection Ports
To connect a standalone device via an Iris Connectivity Port: Connect the RS-232 end of the Iris Adapter to the standalone device. Connect the RJ-45 end of the Iris Adapter to any of the four (4) compatible Iris Connectivity Ports on Root using a RJ-45 cable. www.masimo.com Masimo... -
Page 73: Iris Status Screen
When a standalone device is connected to Root via one of the Ports, the corresponding part of the icon will be lit green or yellow. In the example below, a standalone device is connected to Iris Connectivity Port 1. Port 1 (connected) Port 2 www.masimo.com Masimo... - Page 74 Port 3 Port 4 Status and connection type are read-only and not configurable by the user. For more information on Iris connectivity, refer to the instructions for use or operator’s manual for the appropriate version of Masimo Patient SafetyNet. www.masimo.com Masimo...
-
Page 75: Chapter 6: Messages
(e.g. SedLine icon. Disconnected) Reconnect Radical-7 or Radical-7 Radical-7 is disconnected acknowledge message by Disconnected from Root. pressing the Alarm Silence icon. For additional messages, refer to the instructions for use or operator's manuals for Radical-7 and MOC-9 modules. www.masimo.com Masimo... -
Page 77: Chapter 7: Troubleshooting
Brightness on page 49. Root turns on, but The brightness If the condition persists, Root Main Screen is dim setting is not requires service. Contact Masimo or blank. correct. Technical Support. See Return Procedure on page 91. Root requires service. Contact... - Page 78 Procedure on page 91. Home Button does Root requires service. See Return not work when Internal failure. Procedure on page 91. pressed. AC power cable Battery does not may be Unplug and replug AC power cable. charge. disconnected. www.masimo.com Masimo...
- Page 79 Correction Root Charging Root requires service. See Return Indicator illuminates Internal failure. Procedure on page 91. red. Unplug and replug Nurse Call connector. Nurse Call does not Connection error communicate. See Nurse Call Setting Connections on page 88. www.masimo.com Masimo...
-
Page 81: Chapter 8: Specifications
*This represents approximate run time at the lowest brightness, using a fully charged battery. Environmental Root Operating Temperature 32°F to 122°F (0°C to 50°C) Transport/Storage Temperature -40°F to 158°F (-40°C to 70°C) Operating Humidity 10% to 95%, non-condensing Storage Humidity 10% to 95%, non-condensing www.masimo.com Masimo... -
Page 82: Display
Characteristic Description Type Backlit Active Matrix TFT LCD Resolution 1280 x 800 pixels Size 10.1 in (25.65 cm) Diagonal Color 24 bit RGB Touchscreen Characteristic Description Type Multi-Touch P-Cap Alarms Visual Alarm Priority System Status Light Color High Yellow www.masimo.com Masimo... -
Page 83: Nurse Call Specifications
Specification Max Voltage 36 VDC or 24 VAC peak Connectors Connector Type Number of Ports Ethernet 10/100 MBps Nurse Call 1/4 inch round female MOC-9 Masimo Connector USB 2.0 Iris RS-232/RJ-45 Communication Specifications Communication Type Description WLAN Radio Tri Mode IEEE 802.11 a/b/g... -
Page 84: Applicable Standards And Regulations
CAN/CSA 22.2 No. 601.1: 2005 IEC 60601-1 / UL 60601-1: 1988 + A1: 1991 + A2: 1995 EN 60601-1: 1990 + AI: 1993 + A2: 1995 ISO 9919:2005 Type of Protection Class I (on AC power) Internally powered (on battery power) www.masimo.com Masimo... - Page 85 Chapter 8: Specifications Compatibility Standards FCC ID: VKF-RDS7 Model - RDS-7: FCC parts 15.207, 15.209, 15.247, and 15.407 IC:7362A-RDS7 Canada IC Model: RDS-7 RSS-210 EN 3000 328, Europe EN 301 893, R & TTE Directive EN 301 489-17 www.masimo.com Masimo...
-
Page 86: Symbols
Keep dry radiation IPX1 Protection Fragile, handle with against liquid drops care falling vertically Federal (USA) law restricts this device to Fuse replacement sale by or on the order of a physician Equipotential ground UL, LLC, certification terminal www.masimo.com Masimo... - Page 87 IC Model Mark of conformity to European Medical AC Current Instrument Directive 93/42/EEC Authorized representative in the Nurse Call interface European community Wireless features can be used in member states with the restriction of indoor use in France www.masimo.com Masimo...
-
Page 89: Chapter 9: Service And Maintenance
Cidex Plus (3.4% glutaraldehyde) 10% bleach solution 70% isopropyl alcohol solution Do not allow liquids to enter the interior of Root. Using the recommended cleaning solutions on the touchscreen will not affect the performance of Root. www.masimo.com Masimo... -
Page 90: Replacing The Fuses
Connect Root to AC power, and verify that the AC Power Indicator is illuminated. Power On Root. Within five (5) seconds, all available indicators will illuminate, the device will emit a tone, and the Masimo logo will display. Nurse Call Setting Connections For maximum flexibility, either normally open or normally closed signals are available. - Page 91 2 and 3 contacts normally closed Normal 1 and 2 contacts normally closed Nurse Call 2 and 3 contacts normally Polarity opened Inverse 1 and 2 contacts normally closed Nurse Call 2 and 3 contacts normally Polarity opened Inverse www.masimo.com Masimo...
-
Page 92: Battery Test
Power On Root and verify that the Root Battery Indicator icon on the Status Bar shows a full charge. Repair Policy Masimo or an Authorized Service Provider must perform warranty repair and service. Have the malfunctioning device repaired. Clean a contaminated and/or dirty device before returning, following the cleaning procedure described in Cleaning on page 87. -
Page 93: Return Procedure
A certificate stating the product has been decontaminated for bloodborne pathogens. Return the product to the shipping address given by Masimo Technical Services. Contacting Masimo To contact Masimo, refer to the following: USA, Canada, and Asia... -
Page 94: Sales & End-User License Agreement
Masimo for a full refund. Warranty Masimo warrants to the initial Purchaser for a period of one (1) year from the date of purchase that: (i) each new Product and the Software media as... -
Page 95: Exclusions
Products are provided AS-IS without warranty. This warranty, together with any other express written warranty that may be issued by Masimo is the sole and exclusive warranty as to the Product and Software. This warranty is expressly in lieu of any oral or implied warranties, including without limitation any implied warranty of merchantability or fitness for a particular purpose. - Page 96 Purchaser shall not assign or transfer this License, in whole or in part, by operation of law or otherwise without Masimo's prior written consent; except that the Software and all of Purchaser’s rights hereunder shall transfer automatically to any party that legally acquires title to the Product with which this Software is included.
-
Page 97: Index
Alarms • 72 Warnings and Cautions • 13 Applicable Standards and Connectors • 73 Regulations • 73 Contacting Masimo • 80 Audio Pause • 27, 48, 53, 57 Customizing Windows • 29, 38, Back View • 18 Battery Radical • 41, 45 Device Output •... - Page 98 Nurse Call Connection Port • 24 Nurse Call Setting Connections • Touchscreen • 72 70, 78 Trend Download • 57 Nurse Call Specifications • 72 Trend Settings • 40, 49 Troubleshooting Radical-7 and MOC-9 Modules • 69 Power On • 22 www.masimo.com Masimo...
- Page 99 Root Index Understanding Windows • 33 Unpacking and Inspection • 21 Using Analog View • 34, 36 Using the Touchscreen Interface • Using Trend View • 34, 51 Warranty • 80 Wi-Fi • 27, 41, 43 www.masimo.com Masimo...
- Page 102 36185/7694A 0513...
Need help?
Do you have a question about the Root RDS-7 and is the answer not in the manual?
Questions and answers