Table of Contents
Advertisement
Quick Links
1
User's Guide
Creative PC-CAM 300
Information in this document is subject to change without notice and does not represent a commitment on the part of Creative Technology Ltd. No part of this
manual may be reproduced or transmitted in any form or by any means, electronic or mechanical, including photocopying and recording, for any purpose
without the written permission of Creative Technology Ltd. The software described in this document is furnished under a license agreement and may be used
or copied only in accordance with the terms of the license agreement. It is against the law to copy the software on any other medium except as specifically
allowed in the license agreement. The licensee may make one copy of the software for backup purposes.
Copyright © 2001 by Creative Technology Ltd. All rights reserved.
Version 1.0
August 2001
Video Blaster and Sound Blaster are registered trademarks of Creative Technology, Ltd. Blaster and Oozic! are trademarks of Creative Technology Ltd.
MediaRing Talk is a trademark of MediaRing.com Ltd/MediaRing.com, Inc. PixAround, PixMaker and PixScreen are trademarks of PixAround.com.
IBM is a registered trademark of International Business Machines Corporation.
Intel and Pentium are registered trademarks of Intel Corporation.
Microsoft, MS-DOS, Windows, and the Windows Logo are registered trademarks of Microsoft Corporation.
All other products are trademarks or registered trademarks of their respective owners.
Advertisement
Table of Contents

Related Manuals for Creative PC-CAM 300


Summary of Contents for Creative PC-CAM 300
- Page 1 Creative PC-CAM 300 Information in this document is subject to change without notice and does not represent a commitment on the part of Creative Technology Ltd. No part of this manual may be reproduced or transmitted in any form or by any means, electronic or mechanical, including photocopying and recording, for any purpose without the written permission of Creative Technology Ltd.
- Page 2 OR USE THE SOFTWARE. PROMPTLY RETURN, WITHIN 15 DAYS, THE SOFTWARE, ALL RELATED DOCUMENTATION AND ACCOMPANYING ITEMS TO THE PLACE OF ACQUISITION FOR A REFUND. This is a legal agreement between you and Creative 2. For Use on a Single Computer reproduce on the copy all copyright and other Technology Ltd.
- Page 3 CDDB Data, the Creative if you fail to comply with any term or Software with other programs, you shall not CDDB Client and CDDB Servers. CDDB condition of this Agreement.
- Page 4 PRODUCT RETURNS to contaminate other computer programs or assume the entire cost of all necessary servicing, If you must ship the software to Creative or an computer data, consume computer resources, repair or correction. authorized Creative distributor or dealer, you must...
- Page 5 This Agreement is the entire agreement between us Microsoft Software. Any other use of the Microsoft OR IMPLIED, INCLUDING, BUT NOT LIMITED and you agree that Creative will not have any Software is prohibited. TO, ANY IMPLIED WARRANTIES OR liability for untrue statement or representation made...
- Page 6 Creative disclaims any Modifications périphériques à votre sytème. liability with regard to any illegal use of the Creative Any changes or modifications not expressly product and Creative shall in no event be liable with Notice for the USA...
-
Page 7: Table Of Contents
Minimum System Requirements ................xvi Document Conventions ................... xvii Installing PC-CAM 300 In Your Package ........................1-1 About PC-CAM 300......................1-2 Buttons and LCD on PC-CAM 300..................1-4 Buttons ........................1-4 LCD........................... 1-4 Inserting or Changing Batteries.................... 1-7 Installing PC-CAM 300......................1-8 In Windows 98, Windows 98 SE and Windows Me.......... - Page 8 Using PC-CAM 300 as a Web Camera Starting PC-CAM Center ......................2-2 Capturing Images and Videos ....................2-3 Taking a Photo in Preview Mode................2-3 Recording a Video in Preview Mode ...............2-3 Viewing a Photo........................2-4 Viewing a Video........................2-4 Reactivating the Camera......................2-5 Starting PC-CAM Center Help.....................2-5 Using PC-CAM 300 as a Digital Camera Turning on The Camera ......................3-2...
- Page 9 Webchat ..........................D-2 eMail ..........................D-2 Telephone ..........................D-2 Download Drivers ....................... D-2 Download Manuals ......................D-2 If You Have a Problem......................D-3 Returning a product for repair................. D-4 Operating Hours........................D-4 Limited Warranty ......................... D-5 Creative European Contact Centre...
-
Page 10: Introduction
Introduction Creative PC-CAM 300 is an Internet video camera that allows you to capture images in 24-bit (16.7 million) colours. It also records videos in full-colour. The following are just some of the things you can do with your PC-Cam 300: Video-Conferencing. -
Page 11: About The Applications
This powerful application lets you take pictures or record video clips and store them in albums. Center Use this application to download pictures to your computer, when using PC-CAM 300 as a portable digital camera. You can also export these pictures or video clips to other programs, or send them as attachments to your e-mail message. -
Page 12: Pixaround Pixscreen (Creative Edition)
ActiveMovie technology allows you to view multimedia content on the Web, including MPEG audio and video. ULead Photo Express 4.0 ULead Photo Express MCE™ is an image editing and enhancement application that My Custom Edition™ compliments your PC-CAM 300. -
Page 13: Before You Begin
Before You Begin README .ile The README file on the PC-CAM 300 installation CD contains information not available at the time of printing. Read the file before connecting your PC-CAM to the computer. Minimum System ® ® ® 266 MHz Intel... -
Page 14: Document Conventions
Document Conventions The following typographical conventions are used throughout this document: Table i: Document conventions This Represents This notepad icon indicates information that is of particular importance and should be considered before continuing. This alarm clock icon indicates that failure to adhere to directions may result in loss of data or damage to your computer. -
Page 15: Installing Pc-Cam 300
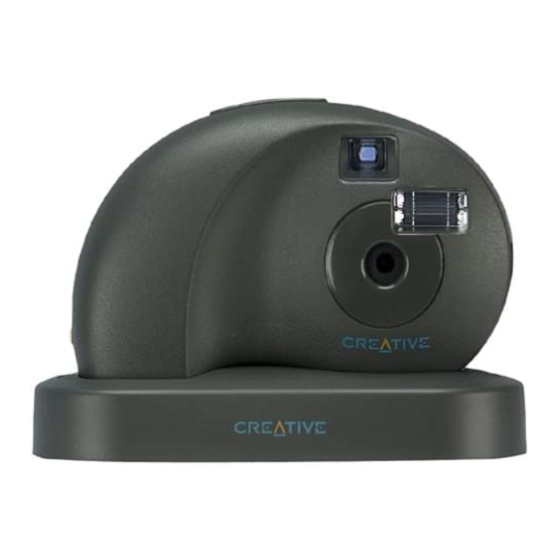
Buttons and LCD on PC-CAM 300 Inserting or Changing Batteries Installing PC-CAM 300 In Your Package Your package contains the following items: One PC-CAM 300 camera with wrist strap One USB cable One PC-CAM 300 installation CD Adjustable Base 4 x AAA Batteries... - Page 16 Snapshot button PC-CAM 300 Viewfinder Focus-free lens Strobe Flash Front LED Lights up when the camera is connected to the computer. Front view Camera-ready LED Viewfinder Back view Figure 1-1: Front and back views of PC-CAM 300. 1-2 Installing PC-CAM 300...
- Page 17 Audio Recording icon Red eye flash mode icon picture taken. Battery level indicator Image counter Operation Mode button Flash mode button. Flash mode Icons Figure 1-2: Buttons and LCD on PC-CAM 300. Installing PC-CAM 300 1-3...
-
Page 18: Buttons And Lcd On Pc-Cam 300
Buttons and LCD The following section explains the functions of the buttons and LCD on your PC-CAM 300. Refer to Figure 1-1 and Figure 1-2 for the location of these buttons and LCDs on your camera. on PC-CAM 300 Buttons... - Page 19 This icon indicates that your camera is in Red eye flash mode. In this mode, the camera emits multiple flashes for each photo taken. No Flash This icon indicates that your camera’s flash is disabled. Battery level indicator This icon displays the battery level. Installing PC-CAM 300 1-5...
- Page 20 Operation Mode button for two seconds. Image Counter Depending on which mode you are in, this counter displays the remaining number of photos, video clips or audio samples that can be recorded. 1-6 Installing PC-CAM 300...
-
Page 21: Inserting Or Changing Batteries
Inserting or For PC-CAM 300 to function as a portable digital camera when it is disconnected from the computer, you need to insert four 1.5 V AAA alkaline batteries into its battery compartment. Changing Batteries To insert or replace batteries 1. -
Page 22: Installing Pc-Cam 300
PC-CAM 300 In Windows 98, 1. Do not connect PC-CAM 300 to your computer before installing the drivers. Windows 98 SE and If you accidentally begin installation with PC-CAM 300 connected, the Add New Hardware Wizard dialog box appears. - Page 23 USB cable Figure 1-4: Connecting PC-CAM 300 to the computer. i. If you are prompted to insert the Windows 98 CD, replace the PC-CAM 300 Installation CD with the appropriate CD. Note: Windows 98 is available in various editions. Be sure to use the correct edition for your computer.
- Page 24 6. Place PC-CAM 300 on top of your computer monitor or another flat surface. 7. When the Light Frequency Selection dialog box appears (see Figure 1-5), select the option that represents your power supply frequency, and then click the OK button.
-
Page 25: In Windows 2000
Do not restart your computer until all the drivers and applications are installed. 5. Connect PC-CAM 300’s USB cable to an available USB port on your computer. 6. Place PC-CAM 300 on top of your computer monitor or another flat surface. - Page 26 4. Click the Device Manager button. A window appears. 5. Click the plus (+) sign next to the Imaging Device icon. The entries Creative PC-CAM 300 (Still Image) and Creative PC-CAM 300 (Video) should appear. Click the plus (+) sign next to the Universal Serial Bus controllers icon.
-
Page 27: Using Pc-Cam 300 As A Web Camera
Using PC-CAM 300 as a Web Camera When PC-CAM 300 is connected to the computer, it can be used as a web camera. Read the following sections for more information on how you can do that: Starting PC-CAM Center Capturing Images and Videos... -
Page 28: Starting Pc-Cam Center
Starting PC-CAM PC-CAM Center is an easy-to-use application that enables you to take pictures and record short videos with the PC-CAM 300 camera. You can also view the pictures and videos, create and Center manage albums, and download image files from your camera. -
Page 29: Capturing Images And Videos
4. If the Save automatically check box is selected, click to clear it. 5. To start recording a video, click the Capture video button. The button starts blinking to indicate that recording is now in progress. Using PC-CAM 300 as a Web Camera 2-3... -
Page 30: Viewing A Photo
3. Double-click the thumbnail of the image that is displayed in the Thumbnails window. The image is displayed in the PC-CAM 300 Viewing window, in its actual size. If you are not satisfied with the result, you can select a higher resolution, and then capture the image again. -
Page 31: Reactivating The Camera
3. Double-click the thumbnail of the video that is displayed in the Thumbnails window. The video is displayed in the PC-CAM 300 Viewing window, in its actual size. If you are not satisfied with the result, you can select a higher resolution, and then capture the video again. -
Page 32: Using Pc-Cam 300 As A Digital Camera
Using PC-CAM 300 as a Digital Camera To use PC-CAM 300 functions as a portable digital camera, when it is not connected to your computer. Note: Remember to insert four 1.5 V AAA alkaline batteries into the camera’s battery compartment. -
Page 33: Turning On The Camera
One beep indicates that your camera has been turned on. Battery Low When the battery is running low, the following occurs: Battery-low indicator (as shown on the right) is displayed. When the Snapshot button is pressed, two warning beeps are heard. 3-2 Using PC-CAM 300 as a Digital Camera... -
Page 34: Taking Pictures
This is the default mode once the camera is turned on. Select this mode if you want to take single snapshots at high resolution. Images are captured at a resolution of 640 x 480. Using PC-CAM 300 as a Digital Camera 3-3... - Page 35 Press the Snapshot button once to take the snapshots. The front red LED will light up and the camera-ready green LED blinks, indicating that the images are being stored in memory. The flash is automatically disabled in this mode. 3-4 Using PC-CAM 300 as a Digital Camera...
-
Page 36: Tips On Taking Good Pictures
Fill the viewfinder with the object (unless taking a panoramic picture). Moving objects Fast-moving objects may appear blurry in your picture. Unless a blurred or out-of-focus effect snapshot is intended, avoid taking fast-moving objects. Using PC-CAM 300 as a Digital Camera 3-5... -
Page 37: Recording A Video Clip
5. Press the Snapshot button once more to end the recording. A beep sound is heard at the end of the recording. 6. The recorded video clip taken is stored in the camera’s memory, and the counter value decreases accordingly. 3-6 Using PC-CAM 300 as a Digital Camera... -
Page 38: Recording Voices Or Sounds
4. In the Destination box, click the album to transfer the files to. Depending on the type of media files in your camera, only the relevant media album will be shown. Alternatively, drag-and-drop the thumbnails to the relevant album directly. Using PC-CAM 300 as a Digital Camera 3-7... -
Page 39: Deleting Images And Audio From The Camera
2. A beep sound is heard when the last file is cleared. The value on the camera’s Image counter increases accordingly. 3-8 Using PC-CAM 300 as a Digital Camera... -
Page 40: Technical Specifications
Technical Specifications .eatures and Colour VGA (640 x 480 pixels) CCD image sensor Specifications 8 MB of on-board non-volatile memory for image storage Multi Function LCD display captured Snapshot button for taking pictures or videos when used as a stand-alone camera LEDs to indicate powered-on state and camera-readiness state High-quality, focus-free, scratch-resistant glass lens Built-in optical viewfinder... -
Page 41: Driver And Operating System Compatibility
When attached: • Captures video at up to 30 frames per second at image resolutions of 320 x 240 and 160 x 120 and up to 15 frames per second at 640 x 480 • Captures still images in 24-bit colour at all image resolutions up to 1024 x 768 Attaches to the computer via the Universal Serial Bus (USB) port Driver and Operating USB model supports Windows 98, Windows Me and Windows 2000... - Page 42 Video Mode • 640 x 480 • 352 x 288 • 320 x 240 • 176 x 144 • 160 x 120 Image Resolution 640 x 480 (Undocked mode) 320 x 240 Light Sensitivity 10 lux Video .ormats 24-bit RGB 4:2:0 YUV Planar JPEG Exposure Control...
-
Page 43: Troubleshooting
If you have a technical problem with this product, you may wish to consult our self-help tool “Knowledgebase” for on-line troubleshooting and solutions (www.europe.creative.com/ support) Problem Installing The setup program for PC-CAM 300 does not run automatically after you insert the Installation CD into the drive. Software Cause The AutoPlay feature in your Windows system may not be enabled. - Page 44 An application reports that the video driver is already in use, or that the camera cannot be found. Solution Do the following: The camera is not properly connected. To resolve this problem, ensure that the camera’s USB connector is inserted, and that the USB host controller is enabled in your computer’s BIOS.
- Page 45 2. In the Control Panel window, double-click the Scanners & Cameras icon. The Scanners & Cameras Properties dialog box appears. 3. On the Devices tabbed page, select the entry Creative PC-CAM 300 (Video) and then click the Properties button. 4. In the Creative PC-CAM 300 (Video) Properties dialog box, click the Events tab.
-
Page 46: Note On Usb Compatibility
Note on USB Compatibility While testing PC-CAM 300 on PC motherboards with integrated Universal Serial Bus (USB) ports, we encountered a small number of motherboards that do not meet the USB specification exactly. These and other non-USB-compliant motherboards may not operate correctly with PC-CAM 300. -
Page 47: Technical Support
We are committed to giving you the best products aswell as the best service by providing you with a comprehensive suite of eService options complemented by telephone support. With Creative's eService strategy, we deliver the best possible customer experience using our multilingual Customer support portal, interactive chat, email support and our self-service knowledgebase. -
Page 48: Webchat
You have the option to contact our service support team via telephone. Telephone numbers can be found in the “Creative European Contact Centre” section below. Download Drivers The Creative website offers a range of updates and drivers for our products in a variety of operating systems. Download Manuals Browse Creative's extensive library of product installation and user guides to find documentation for your Creative product. -
Page 49: If You Have A Problem
Problem If you have a problem installing or using your Creative product, please use the Creative eServices and/or telephone support for assistance. Should you contact Technical Support, you may be asked for information regarding the following:... -
Page 50: Returning A Product For Repair
90 days from the date of shipment from Creative, or what is left on the original item’s warranty, whichever is longer. To avoid tariffs when shipping a product to Creative Labs from outside the E.U. or from zones with special tax status, you must complete the relevant customs documentation before shipping the product. -
Page 51: Limited Warranty
This warranty gives you specific arising from or relating to the use of this product, even if Creative or its licensors have legal rights. You may have other been advised of the possibility of such loss. -
Page 52: Creative European Contact Centre
Creative European Contact Centre CREATIVE LABS (IRELAND) LTD., Italy Holland Technical Support Department, +353 1 4333210 +353 1 4333272 Ballycoolin Business Park, Blanchardstown, Dublin 15, Ireland. Austria Switzerland Fax: +353 1 8205052 +353 1 4380060 +353 1 4380070 United Kingdom...
Need help?
Do you have a question about the PC-CAM 300 and is the answer not in the manual?
Questions and answers