Advertisement
Quick Links
Download this manual
See also:
User Manual
Your webcam is Plug & Chat capable, so no software installation is needed.
However, installing software will enable you to completely experience all
your webcam's features.
Install software and drivers (optional, Windows compatible only)
1) Visit www.creative.com/support/downloads/.
2) Select your webcam.
3) Click Live! Cam Starter Pack to download the software.
Follow the rest of the instructions on the screen to complete the installation.
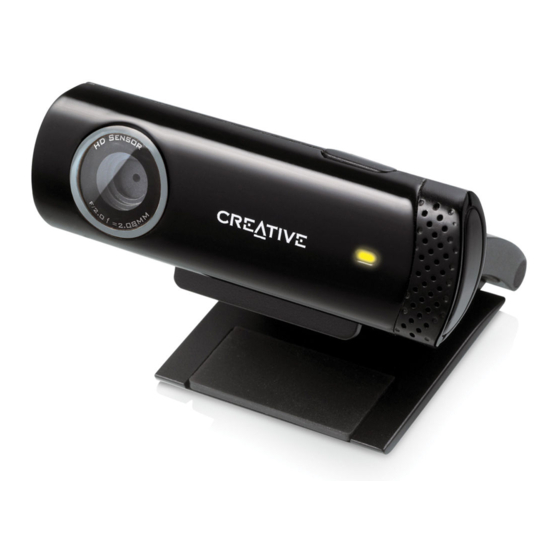
Using Your Live! Cam
Component
1
Snapshot/Live!
Contacts button
2
Yellow Power LED
3
Noise-Cancelling
Microphone
4
Hinged lever
USB cable
5
To launch Live! Central 3
Double-click the Live! Central 3 icon on your taskbar. Alternatively, from the desktop,
click Start All Programs Creative
Creative Knowledge Base
Resolve and troubleshoot technical queries at Creative's 24-hour self-help Knowledge
o
1
30
Base. Go to www.creative.com, select your region and then select Support.
Product Registration
Registering your product ensures you receive the most appropriate service and product
support available. You can register your product during installation or at
2
www.creative.com/register.
Please note that your warranty rights are not dependent on registration.
More Information
Learn how to make full use of your Live! Cam by visiting www.mylivecam.com.
3
You can get the latest tips and tricks, as well as tutorials on how to use the many
software features.
5
4
Keep this document for future reference.
Copyright © 2010 Creative Technology Ltd. All rights reserved. The Creative logo and Live! are registered trademarks of Creative Technology Ltd. in the United States
and/or other countries. Microsoft, Windows and the Windows logo are registered trademarks of Microsoft Corporation.
Votre webcam est un périphérique Plug & Chat, vous n'avez donc pas
besoin d'installer de logiciel. Cependant, si vous ne le faites pas, vous ne
pourrez pas profiter entièrement de toutes les fonctionnalités de votre
webcam.
Installez le logiciel et les pilotes (facultatif, uniquement
compatibles avec Windows)
1) Consultez www.creative.com/support/downloads/.
2) Sélectionnez votre webcam.
3) Cliquez sur Pack de démarrage Live! Cam pour télécharger le logiciel.
À l'invite, connectez le câble USB de votre webcam à l'ordinateur.
Suivez les instructions à l'écran pour terminer l'installation.
Utilisation de votre Live! Cam
Description
Composant
Description
• Capture still pictures and start/stop video recording.
Bouton de contacts
1
• Capturez des images fixes et démarrez/arrêtez l'enregistrement
• Launch a list of your frequently called online contacts
Instantané/Live!
vidéo.
(Windows Live Messenger only).
• Lancez une liste de vos contacts en ligne fréquemment appelés
(uniquement avec Windows Live Messenger).
Lights up when powered on and turns off after five seconds
when not in use. Also lights up when performing video or
2
Voyant
S'allume lorsqu'il est mis sous tension et se met hors tension
audio streaming/recording.
d'alimentation jaune
après cinq secondes d'inutilisation. S'allume également lors
d'une diffusion/d'un enregistrement vidéo ou audio.
Captures audio clearly during video chats.
3
Micro suppresseur
Capture un son clair pendant les conversations vidéo.
de bruit
Mounts your Live! Cam securely on desktop and notebook
LCD displays.
4
Levier à détente
Permet de monter votre Live! Cam en toute sécurité sur les
Connect to your computer's USB port.
écrans LCD de votre ordinateur de bureau ou portable.
5
Câble USB
Se connecte au port USB de votre ordinateur
Pour lancer Live! Central 3
Creative Live! Cam
Live! Central 3
Double-cliquez sur l'icône Live! Central 3 dans votre barre des tâches. Vous pouvez
aussi cliquer depuis le bureau sur Démarrer Tous les programmes
Creative Live! Cam Live! Central 3.
Base de connaissances Creative
Vous pouvez accéder, 24 heures sur 24, à la base de connaissances d'auto-consultation
de Creative pour obtenir des solutions à vos problèmes techniques ou de dépannage.
Accédez au site www.creative.com, sélectionnez la région où vous résidez, puis
sélectionnez Support.
Enregistrement du produit
L'enregistrement du produit vous permet de recevoir les services et l'assistance
technique les plus appropriés. Vous pouvez enregistrer votre produit durant
l'installation ou sur le site www.creative.com/register.
Notez que vos droits de garantie ne dépendent pas de l'enregistrement.
Informations complémentaires
Découvrez comment utiliser pleinement votre Live! Cam en consultant
www.mylivecam.com.
Vous pouvez obtenir les derniers conseils et astuces, ainsi que des tutoriels sur
l'utilisation d'un grand nombre de fonctionnalités logicielles.
Conservez ce document pour pouvoir vous y référer
ultérieurement.
Copyright © 2010 Creative Technology Ltd. Tous droits réservés. Le logo Creative et Live! sont des marques déposées de Creative Technology Ltd. aux Etats-Unis et/ou
dans d'autres pays. Microsoft, Windows et le logo Windows sont des marques déposées de Microsoft Corporation.
Ihre Webcam ist Plug & Chat-fähig, daher ist keine Softwareinstallation
nötig. Durch das Installieren von Software erschließen Sie sich allerdings
erst den vollen Funktionsumfang Ihrer Webcam.
Software und Treiber installieren (optional, nur Windows-Kompatible)
1) Öffnen Sie die Webseite www.creative.com/support/downloads/.
2) Wählen Sie Ihre Webcam aus.
3) Klicken Sie auf Live! Cam Starter Pack, um die Software herunterzuladen.
Schließen Sie nach Aufforderung das USB-Kabel der Webcam an den
Computer an.
Folgen Sie den Anweisungen auf dem Bildschirm, um die Installation abzuschließen.
Wie Sie Ihre Live! Cam benutzen
Komponente
Beschreibung
1
Schnappschuss/Live!
• Fotos anfertigen und Videoaufnahme starten/stoppen.
Kontakt-Taste
• Eine Liste häufig angerufener Online-Kontakte aufrufen (nur
Windows Live Messenger).
2
Gelbe Strom-LED
Leuchtet beim Einschalten auf und erlischt nach fünf Sekunden,
wenn das Gerät nicht benutzt wird. Leuchtet bei Video-
Wiedergabe oder Audio-Streaming/Aufnahmen ebenfalls auf.
3
Noise-Cancelling-
Nimmt den Ton beiVideo-Chats deutlich auf.
Mikrofon
4
Scharnierhebel
Zur sicheren Befestigung Ihrer Live! Cam am LCD-Bildschirm
eines Desktop-PCs oder Notebooks.
5
USB-Kabel
Zum Anschluss an den USB-Port Ihres PCs.
So starten Sie Live! Central 3
Doppelklicken Sie auf das Live! Central 3-Symbol in der Taskleiste. Sie können auch
auf dem Desktop auf Start Alle Programme Creative Creative Live! Cam
Live! Central 3 klicken.
Creative
Creative Knowledge Base
Mit der rund um die Uhr verfügbaren Knowledge Base von Creative lassen sich
zahlreiche technische Fragen und Probleme in Selbsthilfe klären. Besuchen Sie
unsere Website unter www.creative.com, wählen Sie Ihre Region und
anschließend Kundendienst.
Produktregistrierung
Wenn Sie Ihr Produkt registrieren, erhalten Sie den bestmöglichen Kundendienst und
Produktsupport. Sie können Ihr Produkt während der Installation oder jederzeit später
unter www.creative.com/register registrieren.
Ihre Gewährleistungsansprüche sind jedoch nicht von einer Registrierung abhängig.
Weitere Informationen
Auf www.mylivecam.com erfahren Sie, wie Sie Ihre Live! Cam voll ausreizen können.
Hier finden Sie die aktuellsten Tipps und Tricks, sowie Tutorien zur Nutzung der vielen
Softwaremöglichkeiten.
Bewahren Sie dieses Dokument für den künftigen
Gebrauch auf.
Copyright © 2010, Creative Technology Ltd. Alle Rechte vorbehalten. Das Creative-Logo und Live! sind eingetragene Marken der Creative Technology Ltd. in den USA
und/oder anderen Ländern. Microsoft, Windows und das Windows-Logo sind eingetragene Marken der Microsoft Corporation.
Su webcam tiene funcionalidad Plug & Chat, por lo que no es necesario
La webcam acquistata è Plug & Chat, quindi non è richiesta l'installazione
instalar ningún software. De cualquier forma, la instalación de software le
di alcun software. Tuttavia, installando il software sarà possibile provare
permitirá disfrutar al máximo de las prestaciones de su webcam.
completamente tutte le funzionalità della webcam.
Instalación del software y los controladores (opcional,
Installare software e driver (opzionale, compatibile solo con
compatible sólo con Windows)
Windows)
1) Visite la página www.creative.com/support/downloads/.
1) Visita il sito www.creative.com/support/downloads/.
2) Seleccione la webcam.
2) Seleziona la tua webcam.
3) Fai clic su Live! Cam Starter Pack per scaricare il software.
3) Haga clic en Paquete de inicio de Live! Cam para descargar el software.
Quando richiesto, collegare il cavo USB della webcam al computer.
Cuando se le indique, conecte al ordenador el cable USB de la cámara.
Per completare l'installazione seguire il resto delle istruzioni visualizzate sullo
Siga las instrucciones que aparecen en pantalla para realizar la instalación.
schermo.
Uso di Live! Cam
Utilizar su Live! Cam
Componente
Componente
Descripción
Pulsante
Botón Contactos,
1
1
• Captura de fotos e inicio y detención de grabación de vídeo.
istantanea/contatti
Instantáneo/Live!
• Ejecute una lista de sus contactos en línea a los que llame con
más frecuencia (sólo para Windows Live Messenger)
Live!
2
Diodo emisor de luz
Se enciende cuando conectado y se apaga cuando no es utilizado
2
LED di
durante cinco segundos. También se enciende durante la
(LED) de encendido
alimentazione
realización de una secuencia/grabación de vídeo o audio.
amarillo
gialla
3
Micrófono con
Captura audio de forma clara durante las conversaciones por vídeo.
3
Microfono con
silenciamiento de
cancellazione del
ruido
rumore
Soporta de forma segura su Live! en pantallas LCD de ordenadores
4
Palanca articulada
4
Leva incernierata
de sobremesa y portátiles.
Cable USB
Se conecta al puerto USB del ordenador.
5
5
Cavo USB
Para iniciar Live! Central 3
Per avviare Live! Central 3
Haga doble clic en el icono Live! Central 3 de la barra de tareas. También, si lo prefiere,
Fare doppio clic sull'icona di Live! 3 Central sulla barra delle applicazioni. In alternativa,
en el escritorio puede hacer clic en Inicio Todos los programas Creative
dal desktop fare clic su Start Tutti i programmi Creative Creative Live! Cam
Creative Live! Cam
Live! Central 3.
Live! Central 3.
Base de conocimientos de Creative
Knowledge Base di Creative
Puede encontrar información y solucionar problemas técnicos en la Base de
Strumento di autoconsultazione di Creative utile per l'individuazione e la risoluzione in
conocimientos de autoayuda de Creative, disponible las 24 horas del día. Acceda a
linea dei problemi tecnici, attivo 24 ore su 24. Visitare il sito www.creative.com,
www.creative.com, seleccione su región y, a continuación, seleccione Soporte.
selezionare la propria regione, quindi selezionare Assistenza.
Registro del producto
Registrazione del prodotto
Al registrar su producto, se asegura de que recibirá el servicio y asistencia al producto
La registrazione del prodotto consente di ricevere il servizio e l'assistenza sul prodotto
más apropiados. Puede registrar el producto durante la instalación o en la página
più adatti al caso. È possibile registrare il prodotto durante l'installazione o all'indirizzo
www.creative.com/register.
www.creative.com/register.
Tenga en cuenta que los derechos de la garantía son independientes del registro.
I diritti di garanzia non dipendono dalla registrazione.
Más información
Altre fonti di informazione
Per imparare come utilizzare in tutte le sue funzionalità Live! Cam, visitare
Aprenda a sacarle a la Live! Cam el mayor partido posible, consulte la página
www.mylivecam.com.
www.mylivecam.com.
È possibile ottenere suggerimenti e trucchi, oltre a tutorial su come utilizzare le molte
Puede obtener información sobre los consejos y "trucos" más recientes, además de
funzioni software.
tutoriales que le enseñan como utilizar las múltiples prestaciones que ofrece el
software.
Conservare il presente documento per farvi riferimento in
Guarde este documento para futuras referencias.
Copyright © 2010 Creative Technology Ltd. Reservados todos los derechos. El logotipo de Creative y Live! son marcas comerciales registradas de Creative Technology
Copyright © 2010 Creative Technology Ltd. Tutti i diritti riservati. Il logo Creative e Live! sono marchi registrati di Creative Technology Ltd. negli Stati Uniti e/o in altri
Ltd. en los EE. UU. y en otros países. Microsoft, Windows y el logotipo de Windows son marcas comerciales registradas de Microsoft Corporation.
Descrizione
• Acquisire immagini fisse e avviare/interrompere registrazioni di
video.
• Aprire un elenco di contatti online chiamati frequentemente (solo
Windows Live Messenger).
Si illumina all'accensione e si spegne dopo 5 secondi di inattività.
Si illumina inoltre durante la riproduzione in
streaming/registrazione di un video o audio.
Cattura l'audio in modo chiaro durante le chat video.
Si monta sulla Live! Cam per il fissaggio sui display LCD di PC
fissi e notebook.
Collegamento alla porta USB del computer.
futuro.
paesi. Microsoft, Windows e il logo Windows sono marchi registrati di Microsoft Corporation.
Advertisement


Need help?
Do you have a question about the Live! Cam and is the answer not in the manual?
Questions and answers