Air Lift LoadLifter 5000 Ultimate Installation Manual
Hide thumbs
Also See for LoadLifter 5000 Ultimate:
- Installation manual ,
- Installation manual (20 pages) ,
- Installation manual (20 pages)
Table of Contents
Advertisement
Quick Links
Download this manual
See also:
Installation Manual
A D J U S TA B L E A I R H E L P E R S P R I N G S
TOW AND HAUL WITH SAFETY AND COMFORT
Kit Number
88291
INSTALLATION GUIDE
For maximum effectiveness and
safety, please read these instructions
completely before proceeding with
installation.
Failure to read these instructions can result in an
incorrect installation.
MN-833 • (031403) • ECR 7916
TM
Advertisement
Table of Contents

Related Manuals for Air Lift LoadLifter 5000 Ultimate


Summary of Contents for Air Lift LoadLifter 5000 Ultimate
-
Page 1: Installation Guide
A D J U S TA B L E A I R H E L P E R S P R I N G S TOW AND HAUL WITH SAFETY AND COMFORT Kit Number 88291 INSTALLATION GUIDE For maximum effectiveness and safety, please read these instructions completely before proceeding with installation. -
Page 2: Table Of Contents
Tools List . . . . . . . . . . . . . . . . . . . . . . . . . . . . . . . . . . . . . . . . . . . . . . . . . . . . . . . . . . . . 4 Installing the LoadLifter 5000 Ultimate System . . . . . . . . . . . . . . . 4 Getting Started . -
Page 3: Introduction
. The internal jounce bumper replaces the factory bumper and allows the air springs to safely be run at zero air pressure . LoadLifter 5000 Ultimate kits are recommended for most ¾ and 1 ton pickups and SUVs with leaf springs and provide up to 5,000 lbs . -
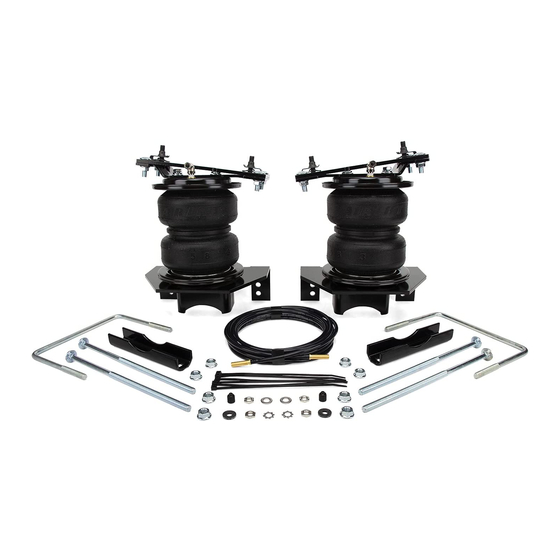
Page 4: Installation Diagram
LoadLifter 5000 Ultimate Installation Diagram fig. 1 HARDWARE LIST Item Part # Description ....... .Qty 58496 Air spring . -
Page 5: Tools List
LoadLifter 5000 Ultimate TOOLS LIST Description ..........Qty Description . -
Page 6: Assembling The Air Spring Unit
LoadLifter 5000 Ultimate 2 . On 2005 models it will be necessary to remove the top rear shock bracket rivet (on the passenger side only) to mount the upper bracket (fig. 5). 3 . With the B&W hitch bracket in the position described in step 1, proceed with the air spring installations . -
Page 7: Removing The Passenger Side Shock Bracket Rivet
LoadLifter 5000 Ultimate REMOVING THE PASSENGER SIDE SHOCK BRACKET RIVET 1 . Remove the rear, top shock mounting rivet on the passenger side of the vehicle to provide a mounting hole for the upper bracket (see fig. 5). ATTACHING THE LOWER BRACKET 1. -
Page 8: Installing The Air Lines
LoadLifter 5000 Ultimate INSTALLING THE AIR LINES 1. Choose a convenient location for mounting the inflation valves. Popular locations for the inflation valve are: a. The wheel well flanges. b . License plate recess in bumper . c . Under the gas cap access door . -
Page 9: Securing The Emergency Brake Cable
LoadLifter 5000 Ultimate 7 . Cut off air line leaving approximately 12” of extra air line . A clean square cut will ensure against leaks (see fig. 11). Insert the air line into the air fitting. This is a push to connect fitting. -
Page 10: Before Operating
LoadLifter 5000 Ultimate Before Operating INSTALLATION CHECKLIST (To be completed by installer) Clearance test — Inflate the air springs to 60 PSI and ensure there is at least ½” clearance around each bellow, away from anything that might rub against them . Be sure to check the tire, brake drum, frame, shock absorbers and brake cables . -
Page 11: Product Use, Maintenance And Servicing
The required air pressure will vary depending on the state of the original suspension . Operating the vehicle below the minimum air spring pressure will void the Air Lift warranty . 5 . When increasing load, always adjust the air pressure to maintain the normal ride height . -
Page 12: Frequently Asked Questions
No . Adding air springs will not change the weight ratings (GAWR, GCWR and/or GVWR) of a vehicle . Exceeding the GVWR is dangerous and voids the Air Lift warranty . Q . Is it necessary to keep air in the air springs at all times and how much pressure... -
Page 13: Guidelines For Adding Air
LoadLifter 5000 Ultimate GUIDELINES FOR ADDING AIR 1 . Start with the vehicle level or slightly above . 2 . When in doubt, always add air . 3 . If the front of the vehicle dives while braking, increase the pressure in the front air bags, if equipped . -
Page 14: Choosing The Right On-Board Air Compressor System
— from inside or outside of the vehicle . • For convenient, on-the-go control of your air springs, add an Air Lift on-board air compressor system . • Air Lift on-board air compressor systems eliminate the search for gas stations that have a working compressor, saving you time, energy and money .
Need help?
Do you have a question about the LoadLifter 5000 Ultimate and is the answer not in the manual?
Questions and answers