Table of Contents
Advertisement
Quick Links
Advertisement
Table of Contents

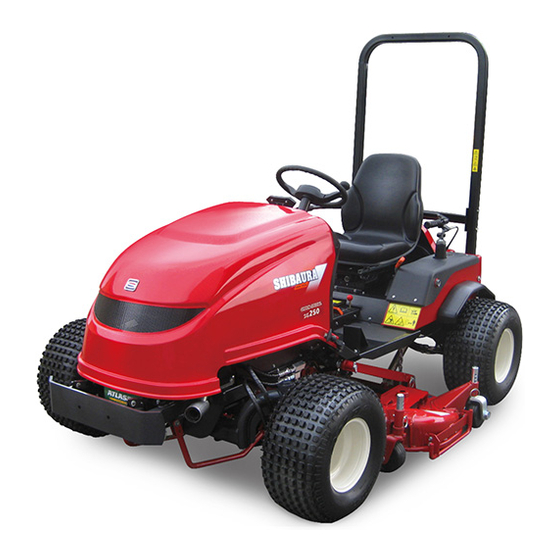
Related Manuals for Shibaura SG250


Summary of Contents for Shibaura SG250
- Page 1 OPERATOR’S MANUAL 取扱説明書 SG250...
- Page 30 INTERNATIONAL SYMBOLS...
- Page 47 45 45...
- Page 63 110±9 ( 1120±90) 110±9 ( 1120±90)...
-
Page 81: Preface
Be sure to read this Instruction Manual before starting operation of the mower. Thank you for your purchase of SHIBAURA Riding Reel Mower. This Instruction Manual describes how to handle the mower and precautions to be observed when operating it. -
Page 82: Meaning Of Symbols (Danger, Warning, Caution, Caution For Handling, Reference)
Meaning of symbols Means that, if you do not observe Danger the warning, death or serious injury will result. Means that, if you do not observe Warning the warning, death or serious injury may result. Means that, if you do not observe Caution the caution, you may be injured. -
Page 83: Outline Of Manual
Outline of manual Describes important safety precautions for major work Section Be sure to observe items. Refer to respective item for required operation. for safe operation. Also describes details and location of each safety nameplate. Section Service and warranty Describes the warranty form and after-sale services. Section Name of components Describes names of parts which are often used. -
Page 84: Table Of Contents
CONTENTS Preface Cautions ············································································································ 1 Notice················································································································ 1 Meaning of symbols (Danger, Warning, Caution, Caution for handling, Reference) ············ 2 Object of mower ·································································································· 2 Outline of manual ································································································ 3 Section 1 Be sure to observe for safe operation 1. General precautions ························································································ 7 2. - Page 85 CONTENTS Section 6 Operation and works 1. Break-in Operation (first 50 hours) ···································································· 36 2. Starting and stopping the engine ······································································ 36 3. Raising and Lowering the Mid Mower ································································ 37 4. Starting, Turning and Stopping Method ······························································ 38 5. Work Operation ···························································································· 38 6.
- Page 86 CONTENTS 14. Cleaning the radiator ······················································································ 60 15. Inspection and replacement of Fuse and Slow blow fuse ······································· 61 16. Inspecting the tire ·························································································· 61 17. Color of exhaust gas ······················································································ 61 18. Inspection and adjustment of brake ··································································· 62 19.
-
Page 87: Be Sure To Observe For Safe Operation
Section 1 Be sure to observe for safe operation Cautions described here are vital for your safety. You should observe these cautions without fail. If you do not observe these cautions, death, injuries, accidents, or damages of the machine may be caused. Depending on the model you purchase, some descriptions in the manual may not be different from actual condition. -
Page 88: Before Starting Operation
Section 1 Be sure to observe for safe operation 2. Before starting operation Warning Do not allow anybody other than the operator to get on the machine. Passenger capacity of this machine is one. Do not allow anybody other than the operator to get on it. -
Page 89: Inspections And Services Before And After Operation
Section 1 Be sure to observe for safe operation Inspections and services before and after operation Danger Supply or replenish the oil when the engine is cold. Never supply or replenish the oil while the engine is running or hot. [If you do not observe these cautions:] The fuel may ignite and cause a fire hazard. - Page 90 Section 1 Be sure to observe for safe operation Warning Remove dust around the muffler and engine. Inspect around the muffler and engine to see grass, debris or fuel attached every day before starting the operation. [If you do not observe these cautions:] A fire may be caused.
- Page 91 Section 1 Be sure to observe for safe operation Caution Install or remove the battery in a correct procedure. Connect the positive (+) terminal of the battery first and remove the negative ( ) terminal first. [If you do not observe these cautions:] Short circuit, burnt or fire may result.
-
Page 92: Transporting The Machine
Section 1 Be sure to observe for safe operation 4. Transporting the machine Warning Do not operate the machine by inertia on the footboards. Operate the machine on a slope or footboards carefully. Avoid operate it by inertia with the speed change lever at the neutral position. -
Page 93: When Traveling Or Going Into Or Out Of A Field
Section 1 Be sure to observe for safe operation 5. When traveling or going into or out of a field Warning Prohibited traveling on general roads This machine has not acquired a sanction as a special-purpose car and cannot travel on general roads. -
Page 94: Operation
Section 1 Be sure to observe for safe operation 6. Operation Warning Install or remove the implements on a flat surface. Install or remove the implements on a flat and stable surface. Illuminate properly in the night. [If you do not observe these cautions:] Accident may arise. - Page 95 Section 1 Be sure to observe for safe operation Warning Do not get under the implement or tread the foot under the implement. Do not go or put out you foot underneath the implement. [If you do not observe these cautions:] When the implement lowers, you may be injured.
- Page 96 Section 1 Be sure to observe for safe operation Warning When leaving the machine, stop the machine on a flat surface and stop the engine. When leaving the machine, stop it on a flat and stable surface, stop the engine, and be sure to apply the parking brake and a choke.
-
Page 97: After Completion Of Operation Or When Storing The Machine
Section 1 Be sure to observe for safe operation 7. After completion of operation or when storing the machine Danger Supply oil after the engine has cooled. Never supply oil while the engine is running or hot. [If you do not observe these cautions:] The fuel may catch fire and a fire hazard may arise. - Page 98 Section 1 Be sure to observe for safe operation Caution Be careful for high-pressure oil. Constantly check the hydraulic joints and hoses for looseness or damages. Before removing the joints or hoses, release the pressure in the hydraulic circuit. [If you do not observe these cautions:] High-pressure oil may break your skin, leading to an injury.
-
Page 99: Location To Stick Safety Nameplate
Section 1 Be sure to observe for safe operation 8. Location to stick safety nameplate Safety nameplates are attached to the machine as shown below to secure safe operation. Keep the safety nameplate unstained or broken. If broken or lost, replace with new ones. Parts No. - Page 100 Section 1 Be sure to observe for safe operation Parts No. Name Parts No. Name 690360330 CAUTION PLATE 690360340 CAUTION PLATE...
- Page 101 Section 1 Be sure to observe for safe operation SAFETY DECALS...
- Page 102 Section 1 Be sure to observe for safe operation...
- Page 103 Section 1 Be sure to observe for safe operation...
-
Page 104: Service And Warranty
Section 2 Service and warranty 1. Please keep the guarantee carefully. A "guarantee" is needed when a visitor can receive warranty repair. Please keep it carefully after reading. (The guarantee is attached to this book last page with the "safe explanation check card") In addition, please do not hesitate to ask a purchase place or our office (refer to this description reverse side) about an accident in... -
Page 105: Names Of Components
Section 3 Names of components 1. Vehicle... -
Page 106: Operation System
Section 3 Names of components 2. Operation System... -
Page 107: Mower Unit
Section 3 Names of components... -
Page 108: Functions Of Operating Components
Section 4 Functions of operating components INTERNATIONAL SYMBOLS The operation currently used for this machine and the mark of equipment are as follows. -
Page 109: Steering Wheel And Seat Systems
Section 4 Functions of operating components 1. Steering Wheel and Seat Systems Rolling seat Seat angle can be adjusted when you operate on Steering wheel a slopes. Angle of the steering wheel can be adjusted. Position of the steering wheel can be adjusted by pulling the tilt lever. -
Page 110: Engine Control System
Section 4 Functions of operating components Meters and Pilot Lamp While the machine is not in service, be sure to pull out the key and store it in a safe storage place. If not, some accident may be caused. The key is used to start the engine. If you release your hand from the Charge lamp key at the position to preheat the combustion... - Page 111 Section 4 Functions of operating components When the main switch is While engine turned running, its number of position, the lamp lights revolutions is indicated by up. When the engine the pointer. The elapsed starts operation, the lamp goes out. If the lamp time integrator indicates lights up while the engine the time by a number for...
-
Page 112: Traveling And Mower Clutch System
Section 4 Functions of operating components 3. Traveling and Mower Clutch System Gear shift lever Used to change the traveling speed. By pressing the brake pedal fully and pulling up the lever, the parking brake is applied. To release the brake, press the brake pedal and Vehicle speed can be selected from L (low release the brake pedal while pushing down the speed) (4 WD) and H (high speed) (2 WD). -
Page 113: Hydraulic System
Section 4 Functions of operating components 4. Hydraulic System PTO clutch lever Mid mower lifting lever Lever to engage to the mower and rotate the Used to lift or lower the mower. blades. By pushing down the lever rearward, the mower By moving the PTO clutch lever to ON , the rises. -
Page 114: Inspections Before Operation And Work
Section 5 Inspections before operation and work Danger Caution Always stop the engine and apply the Carry out inspections and services after the parking brake before starting inspections, heated muffler, engine and other parts have services or adjustment. completely cooled down. If not, you may be While the engine is running or hot, never burnt. -
Page 115: Inspections Method
Section 5 Inspections before operation and work 2. Inspection Method Users of this machine should perform start-up inspection before starting operation every day to ensure safe and comfortable operation, according to the procedure below. Correct extraordinary conditions, if any, immediately. If any problems are felt during operation, inspect and repair without delay. Reference page Go around the machine to see: Air pressure, wear and damage of tires ··················································... -
Page 116: Operation And Works
Section 6 Operation and works 1. Break-in Operation (first 50 hours) 2. Starting and Stopping the Engine Handling of a new vehicle in the initial 50 hours Warning is very important. Break-in operation greatly influences the life and performance of machines. Handle the When starting the engine, sit down on the machine correctly paying attention to the... -
Page 117: Raising And Lowering The Mid Mower
Section 6 Operation and works [Reference:] Starting the engine This machine is hydraulically operated. If you The starter consumes large current. Never do not carry out the warming-up operation, the operate it continuously for more than 10 hydraulic system may fail and may cause seconds. -
Page 118: Starting, Turning And Stopping Method
Section 6 Operation and works 4. Starting, Turning and Stopping Method Stopping and Parking Warning Warning When starting the vehicle, check for people When you leave the vehicle, park it on solid, around the vehicle, confirm safety in the flat and stable ground. surrounding areas and start the vehicle If you are required to park the vehicle on a slowly avoiding an abrupt start. - Page 119 Section 6 Operation and works If the engine revolving speed is too low, Caution for mower operation mower operation cannot be started. Operate (1) If you operate a mower for the first time or the engine at full throttle for mowing. are not familiar with machines, learn how to When the mower clutch lever is set to OFF , operate...
- Page 120 Section 6 Operation and works Discharge of grass Points of issues and solution Uneven mowing Warning Uncut turf remains in rows because of wear or deformation of the blade or too low engine Grass clippings are forcefully discharged. speed. Check the blade for length, wear or For safety, keep the discharge outlet cover deformation, or engine speed and operation always in position.
-
Page 121: Loading On And Unloading From Truck
Section 6 Operation and works (3) Operate the steering wheel carefully so not to 6. Loading onto and Unloading from Truck allow the wheels from coming off the ramps. (4) After completion of loading, lower the cutter Warning deck until it comes into contact with the bed of the vehicle, turn OFF the main switch and When loading... -
Page 122: Power Steering
Section 6 Operation and works 7. Power Steering 8. Front Weight Optional front weight is available for this machine. Please attach front weight according to Caution the work machine with which it equips. While the engine is running, the steering wheel can be operated very lightly. -
Page 123: Towing When Self-Propelled Running Is Impossible
Section 6 Operation and works 9. Towing when self-propelled running is impossible If the vehicle becomes unable to be driven because of failure of the hydraulic system or for other reason, it is possible to move the vehicle by opening the hydraulic circuit so that the wheels can rotate and allow the vehicle to move. -
Page 124: Maintenance After The Work
Section 7 Maintenance after the work 3. Cleaning the Radiator 1. Maintenance Services after Operation Grass attached to the dashboard or radiator screen may cause overheat. Before starting and Danger after completing operation, always check and Before covering the vehicle with a sheet, clean the screen and check it during operation stop the engine and wait for the engine and depending on the operation conditions. -
Page 125: Care When Not Using It For A Long Time
Section 7 Maintenance after the work 4. Services when not using for long time Warning When storing the vehicle, remove the battery and pull out the key and store it. If not, an accident may be caused. If the vehicle is not used for a long time (more than 1 month), service it as follows before storing it. -
Page 126: Handling Of A Mower
Section 8 Handling of a mower (3) Detach front links 1. DETACHING MOWER WARNING To avoid personal injury, lower Mower to the ground, turn engine off and remove key before performing any maintenance. To avoid personal injury, Mower attachment and detachment shall be done at flat ground under daylight or good artificial light. -
Page 127: Adjustment Of Mower
Section 8 Handling of a mower (6) A front bumper is lifted by a hoist etc. A 2. ADJUSTMENT OF MOWER mower is pulled out where the front wheel of vehicles is floated. WARNING Before starting adjustment, be sure to stop the engine and make sure that the cutting blade has stopped rotating. -
Page 128: Adjustment Of Height Of Cut
Section 8 Handling of a mower 3. ADJUSUTMENT OF HEIGHT OF CUT ADJUSTMENT OF ANTI-SCALP ROLLER This Mower can be adjusted to height of cut In some cases the Mower may scalp while from 25 mm to 110 mm. Cutting height cutting grass on rough ground at low cutting changes with the kinds and cultivated lands height. - Page 129 Section 8 Handling of a mower Adjustment of an internal anti scalp roller Cutting height : 25 mm or less When cutting height is 34 mm or more, please fix When you set cutting height as 25 mm or a bracket in a lower position. (Initial attachment less, please fix with an attached bolt nut in position) the hole of the bracket bottom, and the hole...
-
Page 130: Periodical Inspections And Services
Section 9 Periodical inspections and services Warning Carry out inspections and maintenance services in a flat and stable place where there is no traffic danger or the machine may not fall over or move, applying a car lock. If these precautions are not observed, the machine may fall over or other accident may happen. -
Page 131: Periodical Inspection List
Section 9 Periodical inspections and services 1. Periodical Inspection List Vehicle Inspection Replacement Time on hour meter Referenc e page Item Inspect every 5 hours after the start of operation. Engine oil HST oil Engine oil element HST oil filter Fuel filter Discharge the fuel from the filter every 50 hours (element) -
Page 132: Oil, Grease And Antifreeze Solution
10W-30 (API class, CC and CD grade) Engine oil (E.O.) SAE90 Mower gear oil (G.O.) Shibaura HST oil (ISO VG46) Hydraulic oil (H.O.) Antifreeze liquid, Castrol LLC-95 Cooling water (Mixing ratio of antifreeze liquid at the time of shipment is outside temperature 30°C... -
Page 133: Fuel Inspection And Oiling
Section 9 Periodical inspections and services 4. Fuel Inspection and Oiling 5. Check and Oil Exchange of Each Part Danger Danger Never top up the oil while the engine is smoking naked flames when running or hot. If not, a fire or burn injury may supplying fuel. - Page 134 Section 9 Periodical inspections and services [Caution for Handling] Check the oil level before starting the engine or while the engine is cold. To check the oil level, place the vehicle on a horizontal place and check while the oil surface is horizontal.
-
Page 135: Replacing Filters
Section 9 Periodical inspections and services (1) After discharging the hydraulic oil, turn the The filter is of the cartridge type. Replace the filter counterclockwise to remove. filter initially after 50 hours and then every (2) Coat the rubber ring at the bottom of a new 200 hours of operation. -
Page 136: Inspecting And Changing The Cooling Water
Section 9 Periodical inspections and services Fuel Filter . 7. Exchanging the Cooling Water Cleaning and Replacement (1) Turn the fuel tap to the (closed) Danger position. (2) Remove the filter cup and remove the Do not open the radiator cap while the engine water and dust in the filter cup. -
Page 137: Cleaning And Replacing The Air Cleaner Element
Section 9 Periodical inspections and services (2) Wash inside of the radiator with water until 8. Cleaning and Replacing the Air Cleaner no dust or rust comes out. By supplying water containing radiator The air cleaner removes dust contained in cleaning agent, running the engine for supplied air to protect the cylinder and piston more than 15 minutes and discharging... -
Page 138: Inspecting The Battery
Section 9 Periodical inspections and services 9. Inspecting the battery Warning The battery of this vehicle has no vent plug and When connecting the battery, connect the does not need be replenished with water. (The battery is sealed type without the necessity to (+) side first and, when disconnecting it, replenish water in the overall life.) remove the (-) side first. -
Page 139: Inspecting The Electric Wiring
Section 9 Periodical inspections and services 11. Inspecting Electric Wires Warning Check the code for contact with other parts, separation sheathing, loosened connections every day before operation. Remove grass or dust attached to the battery or wiring cleanly before and after operation. -
Page 140: Inspecting And Adjusting The Fan Belt
Section 9 Periodical inspections and services 13. Inspecting and Adjusting the Fan Bel Caution Be sure to stop the engine. Inspect and adjust the fan belt after the engine has completely cooled down. If not, you may get burnt. Open the bonnet, push an intermediate point of the fan belt by a force of about 100N (10kgf) and check that the deflection of the belt is about 10 to 15mm and check for... -
Page 141: Inspection And Replacement Of Fuse And Slow Blow Fuse
Section 9 Section 9 Periodical inspections and services Periodical inspections and services 16. Inspecting the Tire 16. Inspecting the Tire 15. Inspection and Replacement of Fuse 15. Inspection and Replacement of Fuse Inspection of Tire Inspection of Tire and Slow Blow Fuse and Slow Blow Fuse Check the tires of the front and rear wheels for Check the tires of the front and rear wheels for... -
Page 142: Inspection And Adjustment Of Brake
Section 9 Periodical inspections and services 18. Inspection and Adjustment of Brake Warning Check the brake for correct operation. If not, an accident may be caused. Press the brake pedal and check for specified allowance (5 10mm) and same functioning on the right and left sides. -
Page 143: Inspection And Adjustment Of Clutch Belt
Section 9 Periodical inspections and services 19. Inspection and Adjustment of Clutch Belt Warning Before starting inspection adjustment, be sure to stop the engine, apply the parking brake, pull out the key and set the mower clutch lever to OFF . If not, you may be injured. -
Page 144: Maintenance Of Mower
Section 9 Periodical inspections and services 20. Maintenance of Mower Lubrication fittings General maintenance Supply grease to each grease nipple every 50 Check the blade bolts, blades and discharge hours of operation. Clean the grease nipple deflector daily for damage or looseness; before supplying the grease. - Page 145 Section 9 Periodical inspections and services Belt maintenance Caution The belt is located under the belt shield at upper side of the Mower. Please check before commencing slack of the Check the belt after first 25 hours operation grade and bolt of the existence and wear of and every 100 hours or when the belt begins damage, etc.
- Page 146 Section 9 Periodical inspections and services Install the blade Warning When you exchange blade, please stop an engine, and use a strong glove not injured. The crowded work under which it goes below a mower is very dangerous. Please do not make it absolute. Sharpen the blade (1) As shown in the following figure, grind the angle of the edge of a blade.
-
Page 147: Diagnosis
Section 10 Diagnosis Warning Refer to following chart if you find the machine not working correctly. Stop the engine first before start inspection. 1. Engine related condition Condition Check Point Remedy Set the PTO lever to OFF , release your foot from the traveling pedal, and Safety switch may be functioning. -
Page 148: Brake System
Section 10 Diagnosis Condition Inspection Point Remedy Clogging of air cleaner Inspect and clean the air cleaner. Seized nozzle Engine is running with Insufficient compression pressure low power. Subject to repair by a service plant. Improperly adjusted valve clearance Excessive engine oil Discharge excessive oil. -
Page 149: Electric System
Section 10 Diagnosis Electric System Condition Inspection Point Remedy Burnt-out light bulb Replace the light bulb. Blown fuse Replace the fuse. Improper connection of wiring Inspect and connect firmly. Lamp does not light Failed switch Replace the switch. Tighten the earth wire firmly to the Improper earthing main body. -
Page 150: Others
Section 11 Others 1. Main consumable parts Engine system Part code Name Q ty/unit Remarks 08010 9061 Fan belt Type A, 36.5 inches 14051 7020 Engine oil filter 36072 0130 Fuel filter Hydraulic, air cleaner and belt related parts Part code Name Q ty/unit Remarks... -
Page 151: Specifications
Section 11 Others 3. Specifications Vehicle Model SG250 Overall length 2495 Overall width 1590 1730 Overall height Tread 1500 Front wheel 1310 Rear wheel 1310 Ground clearance Reference clearance 140 (lower side of mower deck) Front wheel size 21×11.00×10 4PLY Rear wheel size 21×11.00×10 4PLY... -
Page 153: Tightening Torques
Section 11 Others 5. Tightening Torque List [Bolt and Nat] Coarse screw thread Fine screw thread Nominal Strength Tightening torque Tightening torque size of division of Pitch Pitch thread bolts (Nm) (kgf cm) (Nm) (kgf cm) 1.5 2.1 15 21 4T, 4.8 2.6 3.6 27 37... - Page 154 Section 11 Others [Hydraulic Hose and Pipe] Tightening hose union nut tightening torque Adaptor (with O-ring) lock nut tightening torque Nominal size G1/4 G3/8 G1/2 Nominal size G1/4 G3/8 G1/2 N·m 24.5 58.8 N·m 39.2 58.8 kgf·m kgf·m R screw tightening torque Nominal size N·m 21.6...
- Page 156 〒390-8714 長野県松本市石芝1丁目1番1号 TEL ( 0263) 88-0200 FAX (0263) 27-0380 URL : www.ihi.co.jp/iat/ 1-1-1, Ishishiba, Matsumoto-shi, Nagano, 390-8714, Japan SG250 A00810811 01180002-0004 URL : www.ihi.co.jp/iat/en/...
Need help?
Do you have a question about the SG250 and is the answer not in the manual?
Questions and answers