Leckey squiggles User Instructions
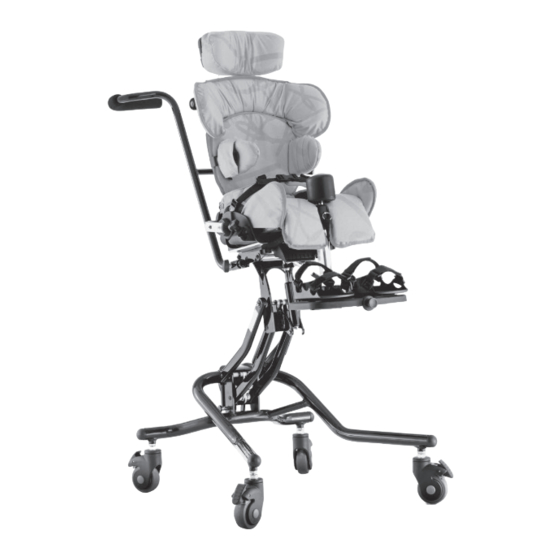
Seating system
Hide thumbs
Also See for squiggles:
- User instructions (194 pages) ,
- User instructions (18 pages) ,
- User instructions (194 pages)
Table of Contents
Advertisement
Advertisement
Table of Contents

Subscribe to Our Youtube Channel
Related Manuals for Leckey squiggles


Summary of Contents for Leckey squiggles
- Page 1 Squiggles Seating System User Instructions...
-
Page 2: Table Of Contents
The Squiggles Seating System has been designed to offer a high level of postural positioning while enabling function and mobility. This manual shows how you can quickly, easily and safely make use of all the functions. The instructions on safety and maintenance will ensure that you will enjoy the use of this product for a long time. -
Page 3: Intended Use
Leckey product or if any equipment. All due care and attention sections of this user manual by a... -
Page 4: How To Unpack And Assemble The Seating System
Squiggles Seating System - Crash Test unpack and 6.13 Leckey products comply with fire The Leckey Squiggles Seating System has safety regulations in accordance with been crash tested and passed for use in vehicles. It has been tested in its complete EN12182. - Page 5 Raise it into the vertical position the size of the Squiggles seat. Remove bags with each one clearly labelled. be provided with the interface plate. Once and, while doing so, slide the inner tube (A) the headrest bracket.
- Page 6 7.3 Attaching the 7.4 Attaching the seating system to footrest the Hi-Low or the Easy Chassis. To attach the footrest to the seat base, Adjust the height of the chassis to its remove the bolt and nut from the metal maximum to reduce risk of back strain stem on the footrest.
- Page 7 The Whitmyer Lynx headsupport protraction pads. accidentally removed. poppers protrude from the other end of is attached in the same way as the Leckey the receiving tubes. headrest. To attach Whitmyer Pro-Series headsupports remove the spacer collar from Always remove the pommel before placing...
- Page 8 7.9 Inserting Attachment 7.10 Attaching the 7.11 Attaching the bolts on sandals sandals ankle huggers Insert the required attachment bolt (a) Place the sandal so that the attachment Slide the webbing through the slot in the along with the retention plate (b). Place a bolt goes through the slot in the footplate.
- Page 9 7.12 Assemble the 7.13 Attaching the 7.14 Attaching the grab 7.15 Attaching the Long tray tray rail Sitting Support To attach the arms to the tray brackets, The tray is attached to the seat by To attach the grab rail, insert the receiving First attach the receiving brackets (A) to loosen the ratchet handle (A), place the inserting the tubes into the receiving...
- Page 10 Interface “A” attachment to 12” wide mobility base the seat. The universal interface has been designed to enable the Squiggles Seat to be attached to any standard 12” (305mm) wide mobility Always refer to the mobility base base that has been constructed from 1”...
-
Page 11: The Back Pack
The back pack Back pack contents The back pack contains small components The back pack contains Squiggles colouring which could present a choking hazard to cards, Leckey colouring pencils, Squiggles small children. Always check that the zip is user manual and a Leckey multi-tool. -
Page 12: Fitting The Cushions
Fitting 9.1 Femoral cushion the cushions It is easier to fit the femoral cushion if you first slide the femoral guide forward. (See section 10 on how to adjust seat depth) Slide the femoral cushion over the femoral guides. The femoral cushion goes under the It is advisable to fit the cushions in the one piece seat base cushion. - Page 13 9.2 One Piece Seat cushion 9.3 Sacral cushion 9.4 Pelvic harness It is easier if you angle the back rest forward Align the sacral cushion with the lower The Pelvic Harness is attached by sliding the before fitting the seat base cushion (see backrest and press down to locate the hip guides into the pockets (A) on the outer section 10).
- Page 14 9.5 Trunk harness With the small or medium trunk harness, you will receive four connecting straps, brackets, bolts, washers and locking nuts. Fix the connecting straps to the backrest or shoulder support assembly before attaching the trunk harness. To attach the connecting straps to the back rest, slide the bracket into the slot and set at the desired height using the bolts and washers provided.
- Page 15 9.6 Backrest cushion 9.7 Lateral support padded 9.8 Shoulder Support 9.9 Chest harness cushions Cushion (if applicable) If you have lateral supports fitted to your To attach the lateral support padded If you have a shoulder support section, slide The chest harness can be attached by chair, adjust them to their maximum width cushions, simply slide the cushions on, with the cushion over the assembly and secure...
-
Page 16: Clinical Setup For Postural Management
Leckey recommend a written record is maintained of all clinical setups for this product. Set the back height, seat depth and footplate height before placing the child in the seat. - Page 17 10.1 Pelvic harness 10.2 Pelvic harness spacer 10.3 Seat depth 10.4 Backrest height and hip guides pads To set the width of the hip guides loosen The pelvic harness spacer pads can be To adjust the seat depth simply loosen the The overall height of the backrest can be the screws (A), adjust to the desired width used to reduce the width between the hip...
- Page 18 10.5 Backrest angle 10.6 Footplate height 10.7 Sacral pad and lumbar 10.8 Lateral supports/ support protraction pads The backrest can be angled by loosening To set the height of the footplate loosen the There is a velcro panel provided in the lower Loosen the screw (A) to adjust the width, the ratchet handle (A) on the backrest pivot screw (A) on the front of the calf support...
- Page 19 10.9 Shoulder support 10.10 Chest harness 10.11 Trunk harness laterals To change the angle of the shoulder To change the width of the chest harness, Before placing the child in the seating support laterals, loosen the screws (A), lift the front cover, adjust the velcro system open the trunk harness on one side adjust to the required angle and retighten.
- Page 20 10.12 Footplate angle 10.13 Sandals 10.14 Contoured 10.15 Flat headrest adjustment headsupport with lateral supports To set the angle to accommodate To position the user’s feet in the sandals To adjust the height, depth and angle of the To adjust the height, depth and angle of the plantarflexion or dorsiflexion, simply secure the Velcro straps provided so the contoured headrest, loosen the hand knobs...
-
Page 21: Frequent Adjustments For Daily Use
Leckey recommend that a written record is maintained of all parent Do not place hot objects, greater than 40 and carers who have been trained in the use of this product. - Page 22 Hi-Low chassis Before transferring the child into the seat The correct positioning and tensioning The Squiggles Seat is designed to fit You can carry out this adjustment with the carry out the daily product inspection as of the pelvic harness is key to a child’s onto a range of chassis.
- Page 23 11.5 Height adjustment - 11.6 Tilt in space 11.7 Chest and trunk Easy chassis Harness adjustment The height of the Easy chassis should be The tilt in space can be angled while the If the child requires chest support as part set before putting the child in the seat.
- Page 24 11.8 Sandals 11.9 Tray adjustment To position the user’s feet in the sandals The activity tray can be used for a range of Always use caution to ensure the child’s secure the Velcro straps provided so the functions and its position can be fine tuned hands or arms do not become trapped foot is held in place.
-
Page 25: Cleaning & Care Information
6 Always ensure the product is dry If in any doubt to the continued safe before use. use of your Leckey product or if any parts should fail, please cease using the Metal and plastic components product and contact our Customer 1. -
Page 26: Annual Product Inspection
If in any doubt to the continued safe Please refer to section 14 for the required > Backrest height and angle use of your Leckey product or if any checks to be carried out. adjustments bolts. parts should fail, please cease using the >... -
Page 27: Product Servicing
16 Product Servicing 17 Technical Information Servicing of all Leckey products should Product & Accessory codes only be carried out by technically 120-610 Seat shell competent persons who have been trained 120-710-01 Seat covers - green in the use of the product. - Page 28 Squiggles seat dimensions Backrest Height Ages 1 - 5 (approx) (Sitting shoulder height) Min 320mm / 12.6 inches Max 380mm / 15 inches Max User Weight 22kg / 48.4lbs Backrest Angle User Height Prone 10° Recline 25° Min 750mm / 29.5 inches Max 1100mm / 43.3 inches...
- Page 29 VIDA Global 19C Ballinderry Road, Lisburn, BT28 2SA Northern Ireland, United Kingdom T: 028 9260 0750 F: 028 9260 0799 E: info@vidaglobal.co.uk W: vidaglobal.co.uk 24 hour postural care for babies, kids & adults. Sleeping, Sitting, Standing, Walking, Moving, Bathing, Toileting. LS170-09...
Need help?
Do you have a question about the squiggles and is the answer not in the manual?
Questions and answers