Table of Contents
Advertisement
Advertisement
Table of Contents

Subscribe to Our Youtube Channel
Related Manuals for horiba D-73


Summary of Contents for horiba D-73
- Page 1 Portable pH/ORP/Ion Meter D-73 Instruction Manual CODE:GZ0000333606A...
- Page 3 HORIBA, Ltd. warrants that the Product shall be free from defects in material and workmanship and agrees to repair or replace free of charge, at option of HORIBA, Ltd., any malfunctioned or damaged Product attributable to responsibility of HORIBA, Ltd. for a period of one (1) year from the delivery unless otherwise agreed with a written agreement.
-
Page 4: Items In Package
Check items Items in package ■ After opening the package, check for damage on the instrument and that the standard accessories (see below) all exist. If damage or defects are found on the product, contact your dealer. Instruction manual Instrument (this book) Quick-start Manual AAA alkaline batteries... - Page 5 Regulations ■ Conformable directive This equipment conforms to the following directives and standards: Directives: The EMC Directive 2004/108/EC The Low Voltage Directive 2006/95/EC The RoHS Directive 2011/65/EU Standards: [the EMC Directive] EN61326-1:2006 Class B, Basic requirements [the Low Voltage Directive] EN61010-1:2010(Ed.3.0) [the RoHS Directive] EN50581:2012 Category: 9.
- Page 6 Regulations ■ FCC rules Any changes or modifications not expressly approved by the party responsible for compliance shall void the user's authority to operate the equipment. ●WARNING This equipment has been tested and found to comply with the limits for a Class A digital device, pursuant to part 15 of the FCC Rules.
-
Page 7: Hazard Classification And Warning Symbols
For your safety Hazard classification and warning symbols ■ Warning messages are described in the following manner. Read the messages and follow the instructions carefully. ●Hazard classification This indicates an imminently hazardous situation which, if not avoided, will result in death or serious injury. This is to be limited to the most extreme situations. -
Page 8: Safety Precautions
For your safety Safety precautions ■ This section provides precautions for using the product safely and correctly and to prevent injury and damage. The terms of DANGER, WARNING, and CAUTION indicate the degree of imminency and hazardous situation. Read the precautions carefully as it contains important safety messages. - Page 9 For your safety ●Battery WARNING Keep batteries out of reach of children. If someone accidentally swallows a battery, consult a doctor immediately. If alkaline fluid from a battery gets into the eyes, do not rub the eyes, rinse with clean water immediately and then consult a doctor. Contact with alkaline fluid could cause blindness.
-
Page 10: Product Handling Information
For your safety Product handling information ■ ●Operational precautions (instrument) ・Do not drop, crash, or give any physical impact on the instrument. ・The instrument is made of solvent-resistant materials but that does not mean it is resistant to all chemicals. Do not dip the instrument in strong acid or alkali solution, or wipe with such solution. - Page 11 For your safety ●Operational precautions (battery) ・Do not short-circuit a battery. ・Set the + and side of the battery correctly. ・When the battery has run out or the instrument will not be used for a long time, remove the batteries. ・Of the specified battery types, make sure to use two batteries of the same type.
-
Page 12: Manual Information
For your safety Manual information ■ ●Description in this manual Note This interprets the necessary points for correct operation and notifies the important points for handling the product. Reference This indicates the part where to refer for information. This indicates reference information. -
Page 13: Table Of Contents
Contents Preface ................... I ■ Items in package..............II ■ Hazard classification and warning symbols ....V ■ Safety precautions ............VI ■ Product handling information ........VIII ■ Manual information ............X Part names and basic operation......... 1 ■ Names of each part .............2 ●... - Page 14 Contents ■ mV, ORP measurement .............28 ● Setting the instrument.............. 28 ● Switching between absolute value and relative value ..29 ● Performing measurement ............30 ■ Ion concentration measurement ........31 ● Setting the instrument.............. 31 ● Performing calibration ............. 35 ●...
- Page 15 Contents ● Checking the state of the ORP electrode........66 ● Maintenance and storage of the ion electrode.......67 How to resolve errors or troubles ........69 ■ When an error message appears ........69 ● ERR No.0001 Memory error ...........69 ● ERR No.0002 Empty battery level .........70 ●...
- Page 16 Contents ● pH measurement (glass electrode) ......... 81 ● pH standard solutions at various temperatures ....82 ● ORP measurement..............83 ● Ion concentration measurement ..........84 ■ For more information ............85 ■ Options ................86...
-
Page 17: Part Names And Basic Operation
● Operation key ..................5 ■ Basic operation ................6 ● Changing the operation mode ............. 6 ● Switching the display................7 ● Changing the measurement parameter..........8 ● Using the backlight ................8 ● Entering numeric values............... 9 D-73... -
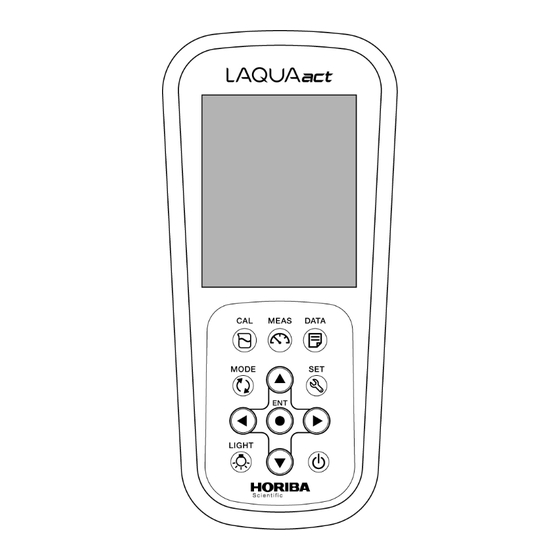
Page 18: Names Of Each Part
Battery cover Set batteries inside. Electrode hook Attach the electrode hook to carry with instrument. attachment section Strap attachment section Attach a strap. Serial connector Connects the serial cable and printer cable. AC power connector Connects an optional AC adapter. HORIBA... -
Page 19: Display
MTC icon This is displayed in the main screen and the sub screen, respectively. Displays the measured value and the set value. Measured value, set item This is displayed in the main screen and the sub display area screen, respectively. D-73... -
Page 20: Battery Level Display
•Battery level display Battery level is high. Battery level is a little lower. Battery level is low. The backlight may become unavailable. Battery has run out. Replace the batteries. "ERR No. 0002" is displayed and operation is disabled. HORIBA... -
Page 21: Operation Key
UP key the main screen and the sub screen. Changes the selected item. Changes the number of the selected digit when entering DOWN key numbers. LEFT key Changes the selected item. Changes the selected digit when entering numbers. RIGHT key D-73... -
Page 22: Basic Operation
Measurement mode Performs measurement. Calibration mode Performs calibration. Saves data in the internal memory. Displays the saved Data mode data, the calibration history and the inspection history. Setting mode Performs various settings. Measurement mode Calibration mode Data mode Setting mode HORIBA... -
Page 23: Switching The Displays
When performing calibration or setting, switch the display to show the desired channel (measurement parameter) on the main screen. The channel 1 and channel 2 of this instrument can be used for the same measurement parameter, but calibration and setting must be performed for each channel respectively. D-73... -
Page 24: Changing The Measurement Parameter
If the backlight is not operated for 5 minutes, it automatically turns off. To turn it off manually, press the key again while the backlight is on. Note ・ Turning on the backlight consumes energy and shortens battery life. ・ The backlight becomes unavailable when the battery level becomes low. HORIBA... -
Page 25: Entering Numeric Values
Basic operation ● Entering numeric values When entering numeric values to make various settings and set a calibration value, you can change the selected digit using the keys and increment or decrement the value (0 to 9) using the keys. D-73... - Page 26 M E M O HORIBA...
-
Page 27: Measurement
• Setting the temperature display (default: ATC) ........... 31 • Setting the ion concentration unit (default: g/L) ........... 33 • Setting the ion valency of sample (default: 1) ............. 34 ● Performing calibration ................ 35 ● Performing measurement..............38 D-73... -
Page 28: Preparation
measurement while always paying attention to safety. ・ Are there any devices that can be a source of noise? ⇒ Measured values could be affected. Do not use the instrument near such devices. Always ground devices operated by AC power. HORIBA... -
Page 29: Turning On The Instrument
・ Of the specified battery types, make sure to use two batteries of the same type. ・ Do not use a new battery together with a used battery. ・ When using the NiMH batteries, do not use a fully charged battery together with an insufficiently-charged battery. D-73... -
Page 30: Using The Ac Adapter (Option)
1 second later Note ・ Do not hold down the key after the power of the instrument is turned ON. ・ Do not use the tip of nail or an object with a sharp end to press keys. HORIBA... -
Page 31: Setting The Date And Time
4. Enter the "YEAR" (current year) and press the key. 5. In the same way, set the "DATE" (month and date) and "TIME" (hour and minute), in that order. To return to the setting mode, press the key. D-73... -
Page 32: Connecting An Electrode
4. Insert the temperature connector into the jack socket on the instrument (only when using a combination electrode equipped Temperature connector with a temperature sensor). Preparation for measurement is complete. For details of the measurement operation, refer to the following pages. HORIBA... -
Page 33: Ph Measurement
By doing so, you can obtain the correct measurement value without being affected by sensitivity variation caused by temperature. 1. Press the key to enter the setting mode. 2. Press the keys to select the "TEMP" (temperature setting) and then press key. D-73... -
Page 34: Setting The Standard Solution Used For Calibration (Default: Nist)
2. Select the "BUFFER" (pH standard solution setting) and then press the key. 3. Press the keys to select "NIST", "USA", or "CUST" according to the standard solution to be used and then press the key. HORIBA... -
Page 35: Standard Solution Type
Set to use the standard solution of an optional specification. CUST (custom specification) Standard solution icon Note The calibration value of the pH 7 standard solution differs between NIST and USA. NIST: pH 6.865 (at 25°C) USA: pH 7.000 (at 25°C) D-73... -
Page 36: Performing Calibration
4. Perform the 1st point calibration. Immerse at least 3 cm from the tip of the pH electrode in the pH 7 standard solution. In order to flow the internal solution into the standard solution, immerse the liquid junction in the standard solution surely. HORIBA... - Page 37 3rd and subsequent points after the 2nd point calibration. You can calibrate up to five points. Also, you can inspect repeatability using the pH 7 standard solution. About the repeatability inspection procedure, refer to “ Inspecting repeatability ” (page 23). D-73...
- Page 38 The asymmetry potential is out of the setting range ERR No.0004 that allows proper measurement. P. 70 Maintain or replace the electrode. The sensitivity is out of the setting range that allows ERR No.0005 proper measurement. P. 71 Maintain or replace the electrode. HORIBA...
-
Page 39: Inspecting Repeatability
Stabilization judgment starts and the HOLD icon blinks. When the value is stabilized, the HOLD icon changes from the blinking state to the lit state and the display is fixed to the measured value at the stable time. Stabilized Note Repeatability inspection can be performed only once for one calibration. D-73... -
Page 40: Ph Standard Solution Setting Is Cust
3 cm from the tip of the pH electrode in standard solution of the value entered in step In order to flow the internal solution into the standard solution, immerse the liquid junction in the standard solution surely. HORIBA... - Page 41 "2" lights, indicating that the 2nd point calibration is complete. Stabilized Two-point calibration is complete. When calibrating three points or more, use the same procedure to continue calibrating the 3rd and subsequent points after the 2nd calibration. You can calibrate up to five points. D-73...
- Page 42 The asymmetry potential is out of the setting range ERR No.0004 that allows proper measurement. P. 70 Maintain or replace the electrode. The sensitivity is out of the setting range that allows ERR No.0005 proper measurement. P. 71 Maintain or replace the electrode. HORIBA...
-
Page 43: Performing Measurement
Stabilized Note The criteria of stability judgment in the automatic hold measurement are as follows. Potential variation for 10 seconds is less than 1 mV (0.015 pH equivalent) and temperature variation is less than 2.0°C D-73... -
Page 44: Mv, Orp Measurement
This cannot be set separately from the automatic temperature compensation setting for pH and the automatic temperature measurement setting for ion concentration. 1. Press the key to enter the setting mode. 2. Press the keys to select the "TEMP" (temperature setting) and then press key. HORIBA... -
Page 45: Switching Between Absolute Value And Relative Value
The default mode is the absolute value measurement mode. Pressing the switches to the relative value measurement mode. Pressing the key again returns to the absolute value measurement mode. D-73... -
Page 46: Performing Measurement
(such as tap water, well water, or water treated with purifying equipment), there may be less responsiveness and repeatability in general. ・ If alkaline water is left, its ORP value changes considerably. Always measure alkaline Ion water promptly. HORIBA... -
Page 47: Ion Concentration Measurement
(ORP). 1. Press the key to enter the setting mode. 2. Press the keys to select the "TEMP" (temperature setting) and then press key. D-73... - Page 48 "ATC" (automatic temperature measurement) or the "MTC" (manual temperature display) and then press the key. 4. If you select the "MTC", enter the temperature to be displayed and then press key. < When MTC is set > HORIBA...
-
Page 49: Setting The Ion Concentration Unit (Default: G/L)
If not, incorrect measurement values may result. After changing the unit or ion valency of the sample, change the setting as appropriate for the ion valency of the sample and recalibrate prior to performing measurement. D-73... -
Page 50: Setting The Ion Valency Of Sample (Default: 1)
If not, incorrect measurement values may result. After changing the unit or ion valency of the sample, change the setting as appropriate for the ion valency of the sample and recalibrate prior to performing measurement. HORIBA... -
Page 51: Performing Calibration
4. Perform the 1st point calibration. Immerse at least 3 cm from the tip of the ion electrode in the standard solution of the value entered in step 1. Make sure that the responsive membrane is immersed. D-73... - Page 52 "2" lights, indicating that 2nd point calibration is complete. Stabilized Two-point calibration is complete. When calibrating three points or more, use the same procedure to continue calibrating the 3rd and subsequent points after the 2nd point calibration. You can calibrate up to five points. HORIBA...
- Page 53 Incorrect ion valency setting, or sensitivity setting of out of the measurable range. ERR No.0005 Set the correct ion valency. If the setting is correct but P. 71 an error still occurs, perform electrode maintenance or replace the electrode. D-73...
-
Page 54: Performing Measurement
Make sure to keep the port open during calibration. 3. Immerse at least 3 cm from the tip of the ion electrode in the sample solution Make sure that the responsive membrane is immersed. HORIBA... - Page 55 Stabilized Note The criteria of stability judgment in the automatic hold measurement are as follows. Potential variation for 10 seconds is less than 1 mV and temperature variation is less than 2.0°C D-73...
- Page 56 M E M O HORIBA...
-
Page 57: Using Various Functions
● Using the calibration interval alarm (default: OFF)......58 ● Calibrating temperature sensor ............59 ● Changing the automatic power off setting (default: OFF) ....60 ● Performing test printing of the printer unit........61 ● Resetting to factory default settings ..........62 D-73... -
Page 58: Saving Measurement Data In The Internal Memory
If 1000 data items have already been saved, an error occurs and "ERR No. 0010" is displayed. Copy or transfer necessary data to a PC and delete the data from the memory (“ Deleting all saved data ” (page 44)). HORIBA... -
Page 59: Displaying Saved Data
2. Press the keys to select "OUT" (display saved data) and then press the key. Press the keys to change the measurement data and press the keys to change the display between date and data number/sample ID. D-73... -
Page 60: Deleting All Saved Data
4. Select "YES" to delete the saved data, or select "NO" to cancel deleting it. And then press the key. When "YES" is selected, "END" appears after deletes saved data. Press the key. To return to the setting mode, press the key. Selected "YES" and press the HORIBA... -
Page 61: Displaying The Latest Calibration And Inspection Data
The electrode status based on the calibration result is displayed. You can change the display item between the asymmetry potential and the sensitivity (the asymmetry potential can be displayed only for pH calibration data). Electrode status display Asymmetry potential display Sensitivity display D-73... -
Page 62: Displaying The Latest Inspection Data
1. Press the key to enter the data mode. 2. Press the keys to select "CHECK" (display inspection data) and then press key. Displays the repeatability value (the absolute value of the difference between the measured value and standard solution value). HORIBA... -
Page 63: Deleting Calibration Data
5. Select "YES" to delete the calibration data, or select "NO" to cancel deleting it. And then press the key. When "YES" is selected, "END" appears after deletes calibration data. Press the key. To return to the setting mode, press the key. Selected "YES" and press the D-73... -
Page 64: Printing Measured Values And Calibration Data
“ Displaying saved data ” (page 43) “ Displaying the latest calibration and inspection data ” (page 45) The format of the printout is shown on the next page when using pH (two point calibration) and ion concentration (two point calibration). HORIBA... - Page 65 Temperature value and temperature setting Temperature : 25.5°C ATC Sample ID number Sample : 0000 Instrument model Inst. model : D-73 Instrument serial number Inst. SN : KL1TSE10 Electrode status based on calibration result Elect. status : GOOD Asymmetry potential of calibration data Offset :...
- Page 66 Temperature value and temperature setting Temperature : 25.0°C MTC Sample ID number Sample : 0000 Instrument model Inst. model : D-73 Instrument serial number Inst. SN : KL1TSE10 Electrode status based on calibration result Elect. status : GOOD Data number Memory Num :...
- Page 67 Printing measured values and calibration data < Calibration data (pH, inspection was performed) > Printout format Description Instrument model Inst. model : D-73 Instrument serial number Inst. SN : KL1TSE10 Electrode status based on calibration result Elect. status : GOOD...
- Page 68 Printing measured values and calibration data < Inspection data (pH) > Printout format Description Instrument model Inst. model : D-73 Instrument serial number Inst. SN : KL1TSE10 Calibration data Calibration date Date : 2013/09/01 Calibration time Time : 09 : 00...
-
Page 69: Transferring Saved Data To A Pc
・ If you are not using the RS-232C communication, close the connector cover tightly. ・ While using the RS-232C communication, the instrument is not dust-proof or waterproof. Do not use the RS-232C communication in a dusty place or with wet hands. D-73... -
Page 70: Operating The Instrument From An External Device
・ If you are not using the RS-232C communication, close the connector cover tightly. ・ While using the RS-232C communication, the instrument is not dust-proof or waterproof. Do not use the RS-232C communication in a dusty place or with wet hands. HORIBA... -
Page 71: Using The Automatic Data Save (Default: Off)
3. Select "ON" to use this function, or select "OFF" not to use it. And then press key. When "ON" is selected, enter the period setting of seconds, hours, and minutes, in that order and press the key. The setting range is 2 seconds to 24 hours. Selected "ON" and press the D-73... - Page 72 When more than 1000 data items are saved, "ERR No. 0010" is displayed and data saving is stopped. When you delete the data, the error is cleared (“ Deleting all saved data ” (page 44)). When data is saved HORIBA...
-
Page 73: Setting The Id Number (Default: 000)
2. Press the keys to select the "ID" (ID number setting) and then press the key. 3. Enter the ID number to set and press the key. The setting range is 000 to 2999. D-73... -
Page 74: Using The Calibration Interval Alarm (Default: Off)
3. Select "ON" to use this function, or select "OFF" not to use it. And then press key. When "ON" is selected, enter the setting period of the calibration interval alarm and then press the key. The setting range is 1 day to 400 days. Selected "ON" and press the HORIBA... -
Page 75: Calibrating Temperature Sensor
When initializing temperature calibration data, all settings need to be initialized. Perform initialization by referring to “ Resetting to factory default settings ” (page 62). When initialization is performed, all saved data is deleted. Copy or transfer necessary data to a PC for storage. D-73... -
Page 76: Changing The Automatic Power Off Setting (Default: Off)
4. Select "ON" to use this function, or select "OFF" not to use it. And then press key. When "ON" is selected, enter the automatic power off time and press the key. The setting range is 1 min to 30 min. To return to the setting mode, press the key. Selected "ON" and press the HORIBA... -
Page 77: Performing Test Printing Of The Printer Unit
"PRINT" (test print) and then press the key. Printing starts automatically. The printer icon blinks during printing. When printing ends, the printer icon lights and "END" appears. Press the key. To return to the setting mode, press the key. Printed D-73... -
Page 78: Resetting To Factory Default Settings
4. Select "YES" to initialize the settings to the factory default settings, or select "NO" to cancel initialization. And then press the key. When "YES" is selected, "END" appears after the settings are initialized. Press the key. To return to the setting mode, press the key. Selected "YES" and press the HORIBA... -
Page 79: Maintenance
Humidity: under 80% in relative humidity and free from condensation Avoid the following conditions. ・ Dusty place ・ Strong vibration ・ Direct sunlight ・ Corrosive gas environment ・ Close to an air-conditioner ・ Direct wind D-73... -
Page 80: Maintenance And Storage Of The Ph Electrode
To store the electrode for a long period, follow the electrode storage procedure above, and in addition, use a dropper or similar tool to replace the reference electrode internal solution (model 300) with new solution. Replace once every three to six months. HORIBA... -
Page 81: Maintenance And Storage Of The Orp Electrode
To store the electrode for a long period, follow the electrode storage procedure above, and in addition, use a dropper or similar tool to replace the reference electrode internal solution (model 300) with new solution. Replace once every three to six months. D-73... -
Page 82: Checking The State Of The Orp Electrode
ORP standard solution can be used to check the state of the ORP electrode. This solution is only used to check the state of the ORP electrode; it is not used to calibrate the instrument. The procedure for checking the electrode using HORIBA ORP standard solution powder 160-22 or 160-51 is explained below. -
Page 83: Maintenance And Storage Of The Ion Electrode
2. Put the protective cap on the electrode. Be sure to keep the protective cap dry. 3. Store both the electrode tip and the electrode in a dry place. Note Before reuse, condition the electrode as indicated in “ Ion concentration measurement ” (page 31). D-73... - Page 84 M E M O HORIBA...
-
Page 85: How To Resolve Errors Or Troubles
How to solve problem The instrument does not start Remove the batteries, disconnect the AC adapter, and properly due to noise or other at then press the key. power ON. The defect of the internal IC Contact your dealer for repair. D-73... -
Page 86: Err No.0002 Empty Battery Level
The electrode must be immersed up to the liquid junction. Electrode is not immersed As a guide, immerse to at least 3 cm from the tip of the enough to cover liquid junction. electrode. There is a problem with the Use new standard solution. standard solution. HORIBA... -
Page 87: Err No.0005 Electrode Sensitivity Error
Replace the internal solution in the reference electrode. concentration is fluctuating. The electrode must be immersed up to the liquid junction. Electrode is not immersed As a guide, immerse to at least 3 cm from the tip of the enough to cover liquid junction. electrode. D-73... -
Page 88: Err No.0008 Calibration Interval Error
The maximum number of savable items of data is 1000. Saving more than 1000 items of Copy or transfer necessary data to a PC and delete the data is attempted. data from the memory (“ Deleting all saved data ” (page 44)). HORIBA... -
Page 89: Troubleshooting
Consult your dealer. To confirm an The stability of electrode is electrode that is appropriate for the sample, check the pH affected by the sample solution. electrode selection guide in our catalogue, or refer to our website. D-73... -
Page 90: The Response Is Slow
The electrode is not connected Connect the electrode correctly. correctly. Turn off the power, remove the batteries, and then turn Keys are locked. on the power again. The instrument is in HOLD state. Cancel the HOLD state. Instrument defect Consult your dealer. HORIBA... -
Page 91: The Measured Value Blinks
Change the setting to ATC. MTC. Recalibrate using a solution of known temperature, or Operation is incorrect during return to the factory setting (“ Resetting to factory default temperature calibration. settings ” (page 62)). Instrument defect Consult your dealer. D-73... -
Page 92: Repeatability Of The Measured Value Is Poor
AC adapter cover. After opening, correctly close the sea level. cover to maintain dust and water proofing. Instrument defect Consult your dealer. HORIBA... -
Page 93: Part Of The Display Is Missing
3. Press the keys to select the "LCD" (full screen display) and then press the key. The display changes to full screen display. Check if part of the display is missing. To return to the setting mode, press the key. D-73... - Page 94 M E M O HORIBA...
-
Page 95: Appendix
Options for the instrument are also described. Main specifications ■ Item Contents Model D-73 Measurement pH, mV (ORP), ion concentration, temperature parameters Operating ambient 0°C to 45°C temperature, humidity 80% or less in relative humidity (no condensation) AAA alkaline batteries (LR03) or AAA NiMH rechargeable... -
Page 96: Instrument Default Settings
Auto data memory ON/OFF Auto data memory time 2 seconds to 24 hours 2 seconds Standard solution NIST/USA/CUST NIST Calibration interval ON/OFF alarm Calibration interval 1 day to 400 days 1 day 2/ 1/ +1/ +2 Ion valency Unit g/L、 mol/L HORIBA... -
Page 97: Technical Note
In other words, a glass electrode is devised to generate accurate electromotive force due to the difference in pH. And a reference electrode is devised not to cause electromotive force due to a difference in pH. Electrode 1 Electrode 2 Liquid of known pH Sample The glass membrane D-73... -
Page 98: Ph Standard Solutions At Various Temperatures
The differences between NIST and USA standard solutions are a different pH 7 value, and the use of pH 10 standard solution instead of pH 9 standard solution in USA. Note Calibration is performed using Nernst's equation with the above values. HORIBA... -
Page 99: Orp Measurement
ORP is effective in sterilization, or that drinking water that has a low ORP reduces the chance of illness by reacting with the activated oxygen in the cells of the body. ORP is used as an index for alkaline drinking water. Potentiometer D-73... -
Page 100: Ion Concentration Measurement
Conducting quantitative analysis using an Ion electrode requires either an Ion meter that has an antilog calculation function or the creation of a calibration curve using semilog graph paper. Calibration curve for univalent positive Ion electrode Potential slope Ion concentration (mg/L) HORIBA... -
Page 101: For More Information
By registering as a user, you can download sample software, refer to technical documents and receive the newsletter each of which contains useful information on water quality measurement. We look forward to your registration. D-73... -
Page 102: Options
3014030148 1.5 m printer Roll paper 3014030149 20 rolls/set Ink ribbon 3014030150 5 pcs/set Serial cable 3014030151 Electrode stand 3200528474 (model DP-70S) Electrode hook attachment 3200528475 Electrode cleaning solution for low conductivity water or tap water 3200530494 (model 230) HORIBA... - Page 103 2 Miyanohigashi, Kisshoin Minami-ku, Kyoto 601-8510 Japan http://www.horiba.com...
Need help?
Do you have a question about the D-73 and is the answer not in the manual?
Questions and answers