
Related Manuals for Harman RMBK-1001


Summary of Contents for Harman RMBK-1001
- Page 1 IN STR U CT IO N MAN U AL A M X R O O M B O O K S C H EDU LI N G TO U C H PA N E L S RMBK- 10 01, R MBK-7 01...
-
Page 2: Copyright Notice
IMPORTANT SAFETY INSTRUCTIONS READ these instructions. KEEP these instructions. HEED all warnings. FOLLOW all instructions. DO NOT use this apparatus near water. CLEAN ONLY with dry cloth. DO NOT block any ventilation openings. Install in accordance with the manufacturer's instructions. DO NOT install near any heat sources such as radiators, heat registers, stoves, or other apparatus (including amplifiers) that produce heat. - Page 3 ESD WARNING To avoid ESD (Electrostatic Discharge) damage to sensitive components, make sure you are properly grounded before touching any internal materials. When working with any equipment manufactured with electronic devices, proper ESD grounding procedures must be followed to make sure people, products, and tools are as free of static charges as possible. Grounding straps, conductive smocks, and conductive work mats are specifically designed for this purpose.
-
Page 4: Table Of Contents
STEP 3: Secure the Touch Panel To the Backbox ................. 18 UPPER TABS FIRST ............................. 18 LOWER TABS - Gently Snap Into Place ....................... 18 Removing the RMBK-1001/701 Panel from the Backbox ..............19 Installation Dimensions........................20 RMBK-1001 Dimensions ..........................20 RMBK-701 Dimensions ............................ - Page 5 Table of Contents Setup Wizard: Step 5 - GROUP..................29 Creating a Scheduling Group ....................... 30 Configuring the Master Panel..........................30 Configuring Member Panels ..........................30 Setup Wizard: Step 6 - ROOM..................31 Changing the Logo Image ........................31 Setup Wizard: Step 7 - SECURITY ................... 33 Changing the Administrator Password on the Panel ................
- Page 6 Table of Contents MISC ...................................... 43 INFO - Maintenance......................44 Rebooting the Panel ..........................44 Shutting Down the Panel ........................44 DEVICE - Sound ......................45 SOUND ....................................45 SYSTEM SOUNDS ................................... 45 Adjusting Volumes ..........................45 Selecting a Default Notification Sound ....................45 DEVICE - Display ......................
- Page 7 Table of Contents Enable/Disable Web Services ....................... 61 Firmware Manager..........................61 Reverting to Factory-Installed Firmware ......................62 Installing New Firmware From An External USB Stick ..................62 Install Firmware From Web ..........................63 Using AMX System Recovery ........................ 64 SYSTEM - Diagnostics ..................... 64 Acendo Book Scheduling Panels - User Guide ..........65 Overview ..........................
- Page 8 Table of Contents 3) Share Service Calendars With Room Manager Account ..........80 4) Ensure Calendar Is Set To Deny Conflicts ..............81 Appendix D: Troubleshooting .................82 Overview .......................... 82 Problem: NO CALENDAR SERVER CONNECTION DETECTED - Username and Password ..................... 82 Possible Solutions..........................
-
Page 9: Amx Roombook Scheduling Touch Panels
Panels include SmoothTouch™ Technology, a brilliant full-color high-resolution display, wide viewing angle of screen and availability bar LEDs, and a low profile design for a subtle aesthetic. The RMBK-1001/701 can be mounted on any flat surface, including glass or stone, inside or outside a conference room or classroom. - Page 10 AMX RoomBook Scheduling Touch Panels RMBK-1001 Product Specif ications (Cont.) TOUCH SCREEN DISPLAY • Display Type: TFT Active Matrix Color LCD with Fringe Field Switching (FFS) - Wide Viewing Angle Technology • Display Size (WH): Landscape: 9.1" x 5.9" (230 mm x 149 mm), 10.8" (274 mm) diagonal •...
-
Page 11: Rmbk-701
AMX RoomBook Scheduling Touch Panels RMBK-701 The RMBK-701, 7” AMX RoomBook Scheduling Touch Panel is shown in FIG. 2: Pushbutton Room Status Room Status RMBK-701, 7” AMX RoomBook Scheduling Touch Panel FIG. 2 RMBK-701 Product Specif ications DIMENSIONS (HWD): 4 7/8" x 7 3/8" x 2 1/4" (123.9 mm x 187.5 mm x 58 mm) WEIGHT: •... -
Page 12: Supported Scheduling Systems
AMX RoomBook Scheduling Touch Panels RMBK-701 Product Specif ications (Cont.) CERTIFICATIONS • FCC Part 15 Class A • C-Tick CISPR 22 Class A • CE EN 55022 Class A and EN 55024 • IEC/EN-60950 • UL 60950-1 • RoHS/WEEE compliant OPTIONAL ACCESSORIES •... -
Page 13: Accessing The Settings Window
AMX RoomBook Scheduling Touch Panels Accessing the SETTINGS Window Scheduler Settings and Advanced Settings are both accessed via the SETTINGS window on the Acendo Book panel. To invoke the SETTINGS window, use a paper-clip or similar tool to press and hold the recessed Settings pushbutton located on the top edge of the panel (left side - see FIG. -
Page 14: Installation
Acendo BookInstallation Installation Overview Acendo Book Scheduling (wall mount) Touch Panels can be installed via several mounting options: Use the included clear plastic Backbox to attach the panel to most standard wall materials. Other optional AMX mounting solutions include the MSA-MMK-xx Multi Mount Kit, the MSA-AMK-xx Any Mount Kit, and the ... -
Page 15: Installation Recommendations
Use these mounting holes to install the Backbox into thin walls (less than 0.5” thick) or solid surfaces Mounting holes (X4) for installing the Backbox into a Rough-In Box (screws not included) RMBK-1001 Backbox (Front View) FIG. 8 Locking Tab (X2) Locking Tab screw (x2) -
Page 16: Step 1: Install The Plastic Backbox
Acendo BookInstallation NOTE: For typical mounting surfaces, such as drywall, use the locking tabs as the primary method for securing the Backbox to the surface. For thin walls or solid surfaces, use mounting screws (not included). STEP 1: Install the Plastic Backbox Use the included Installation Template to determine the placement of the Backbox in the mounting surface. - Page 17 .875 inches (2.22cm). The mounting surface should also be smooth and flat. For thin walls or solid surfaces, use mounting screws (not included) - see FIG. 8. Extend the Locking Tabs by tightening the Locking Tab screws until snug. FIG. 12 and FIG. 13 show the Locking Tabs on the RMBK-1001 and RMBK-701 Backboxes: Locking Tab...
-
Page 18: Step 2: Insert Connectors On The Touch Panel
Backbox to latch the top of the touch panel into place Plastic Backbox RMBK-1001 Touch Panel Engaging the top edge of the panel with the top hooks on the Backbox FIG. 14 Gently press the top edge of the touch panel into place to engage the panel’s notches and the top-hooks on the Backbox. -
Page 19: Removing The Rmbk-1001/701 Panel From The Backbox
Removing the RMBK-1001/701 Panel from the Backbox The tabs on the bottom edge of the Backbox lock down the RMBK-1001 and must be unlatched in order to remove the touch panel from the Backbox. To do this, you ll need a thin probe such as an straightened paper clip, or the (optional) MXSA-REM-TL Bezel Removal Tool: NOTE: The (optional) MXSA-REM-TL, Bezel Removal Tool (FG5968-99) provides a convenient method to release these clips. -
Page 20: Installation Dimensions
NOTE: Always pull on the frame of the touch panel. NEVER pull on the glass edge. With the bottom edge of the panel free, carefully lift up and out to release the tabs on the top edge of the panel. Installation Dimensions RMBK-1001 Dimensions USB port Ethernet port... -
Page 21: Rmbk-701 Dimensions
Acendo BookInstallation RMBK-701 Dimensions USB port Ethernet port Notes: Dimensions in parenthesis are in millimeters Additional detailed installation and product drawings are available to view/download at www.amx.com RMBK-701 FIG. 20 Detailed specifications drawings for the RMBK-701 are available to download from www.amx.com. ... -
Page 22: Using The Scheduling Panel Setup Wizard
Using the Scheduling Panel Setup Wizard Using the Scheduling Panel Setup Wizard Overview Acendo Book Scheduling Panels are easy to set up using the Scheduling Panel Setup Wizard - a one-time, panel-based configuration wizard to get the panels operational in a matter of minutes with minimal training. The Scheduling Panel Setup Wizard is automatically launched the first time the Acendo Book panel is powered on. -
Page 23: Setup Wizard: Step 2 - Network
Using the Scheduling Panel Setup Wizard Note that if the selected field requires numeric entry, the on-screen keypad is opened instead. The example in FIG. 23 shows the cursor in the IP Address field, and the on-screen keypad displayed: Press move the cursor to the next editable field Press to close the on-screen keypad On-Board Keypad (Network page) -
Page 24: Setup Wizard: Step 3 - Calendar
Using the Scheduling Panel Setup Wizard Fill in these fields and press Next to proceed (press Back to return to the OVERVIEW page). NOTE: These settings can be changed later if necessary, via the NETWORK Settings page (see Viewing/Editing Network Settings on page 36). -
Page 25: Office 365
Using the Scheduling Panel Setup Wizard Microsoft Exchange Calendar Conf iguration Settings Server URL Enter the full URL for the scheduling server. Example syntax: https://<EXCHANGE_SERVER_HOSTNAME>/EWS/Exchange.asmx Username Enter the Username (including domain) required to login to the scheduling server (as required). Example: "JaneDoe@acme.onmicrosoft.com". -
Page 26: Google Calendar
Using the Scheduling Panel Setup Wizard Google Calendar To use Google calendar with Acendo Book, a Google Services account must be available. Refer to the Appendix C: Conf iguring Google Resources on page 77 for details. To configure the Acendo Book Panel for use with Google calendar: In the Setup Wizard: Step 3 - Calendar page, Select Google Calendar (FIG. - Page 27 Using the Scheduling Panel Setup Wizard SELECT CALENDAR Window indicating a sample list of Calendars/Rooms FIG. 32 This selection closes the SELECT CALENDAR window, and displays an updated CALENDAR page, indicating the current Google Username and the Calendar/Room associated with this panel (FIG. 33): CALENDAR Page indicating Google Username and selected Calendar FIG.
-
Page 28: Setup Wizard: Step 4 - Localization
Using the Scheduling Panel Setup Wizard Setup Wizard: Step 4 - LOCALIZATION Use the options in the LOCALIZATION pages to select a language and time zone to be displayed on this panel (FIG. 34): Setup Wizard: Step 4 - LOCALIZATION FIG. -
Page 29: Setup Wizard: Step 5 - Group
Using the Scheduling Panel Setup Wizard NOTE: These settings can be changed later if necessary, via the LOCALIZATION Settings page (see Viewing/Editing Localization Settings on page 38). Setup Wizard: Step 5 - GROUP Acendo Book touch panels can be configured either as a Master or a Member of a Scheduling Panel Group. Members of a Group communicate with the Master panel, which enables panels to browse the schedules of all Member panels in the same Group. -
Page 30: Creating A Scheduling Group
Using the Scheduling Panel Setup Wizard Setup Wizard - GROUP page options Member Conf iguration With Member selected, the following Member Configuration options are presented: Master IP/Hostname Enter the Master IP/Hostname of the Master panel for the Group to which this Member panel belongs. Username Enter the Username associated with the Master panel for this panel’s Group. -
Page 31: Setup Wizard: Step 6 - Room
Using the Scheduling Panel Setup Wizard Setup Wizard: Step 6 - ROOM Use the options in the ROOM pages to set room-level options for this panel (FIG. 39): Setup Wizard: Step 6 - ROOM page FIG. 39 Setup Wizard - ROOM page options Room Name Enter the room name as it will appear on this panel. - Page 32 Using the Scheduling Panel Setup Wizard Setup Wizard: Step 6 - Room page (LOGO IMAGE PREVIEW window showing an example logo image) FIG. 41 Press Add to upload the specified image. Note that if the image file fails to load, the panel will prompt you to verify that the image URL is correct (FIG. 42): Setup Wizard: Step 6 - Room page (LOGO IMAGE PREVIEW window showing an example logo image) FIG.
-
Page 33: Setup Wizard: Step 7 - Security
Using the Scheduling Panel Setup Wizard Setup Wizard: Step 7 - SECURITY Use the options in the SECURITY page to configure the security settings for this panel (FIG. 45): Press to close the Scheduling Panel Setup Wizard Setup Wizard: Step 7 - SECURITY page FIG. -
Page 34: Privacy Mode
Using the Scheduling Panel Setup Wizard The keypad automatically closes when 4 digits are entered. Privacy Mode When the Acendo Book panel is in Privacy Mode, information considered to be private is hidden (and immutable) on the Acendo Book panel’s interface. Note that Privacy Mode works differently when displaying meetings that were booked from an Acendo Book panel, versus meetings booked outside of an Acendo Book panel (i.e directly via the scheduling system’s Mail/Web client software): Privacy Mode: Meetings Scheduled from an Acendo Book Panel... -
Page 35: Scheduler Settings
Scheduler Settings Scheduler Settings Overview Most of the settings made in the Scheduling Panel Setup Wizard (see page 22) can be viewed and edited via the Scheduler Settings options, as described below. NOTE: Refer to the Advanced Settings section on page 42 for information on viewing/edit touch panel-specif ic options. Accessing the Scheduler Settings Pages Press and hold the pushbutton on the top of the touch panel for 5 seconds to invoke the SETTINGS window (FIG. -
Page 36: Viewing/Editing Network Settings
Scheduler Settings Press any of the buttons along the top of the page to access each Settings page. Viewing/Editing Network Settings Press Network to view the current Network settings for this panel (FIG. 52): SETTINGS Page - Network FIG. 52 Press Edit to open the NETWORK Settings page, to edit the current settings as required (FIG. -
Page 37: Proxy Setup
Scheduler Settings Proxy Setup Press the Proxy Setup button on the NETWORK Settings page (see FIG. 53 on page 36) to access the Proxy Settings page (FIG. 54): Press to enable/disable a proxy connection on this panel Scroll down to see all menu items Return icon - press to close the Proxy Settings page Proxy Settings page... -
Page 38: Viewing/Editing Calendar Settings
Scheduler Settings Viewing/Editing Calendar Settings In any SETTINGS page, press Calendar to view the current Calendar settings for this panel (FIG. 55): SETTINGS Page - Calendar FIG. 55 Press Edit to open the CALENDAR Settings page, to edit the current settings as required (FIG. 56). CALENDAR Settings page FIG. -
Page 39: Changing The Language Displayed On The Acendo Panel
Scheduler Settings Changing the Language Displayed On the Acendo Panel Open the SCHEDULER SETTINGS - Localization Page. Press Edit to access the LOCALIZATION Settings page. Press the Edit button next to Language to access a listing of all languages that can displayed on this Acendo panel, in the SELECT LANGUAGE window (FIG. -
Page 40: Changing The Default Meeting Length Displayed On The Acendo Panel
Scheduler Settings Press Save in the LOCALIZATION Settings page to save this change. Changing the Default Meeting Length Displayed On the Acendo Panel Open the SCHEDULER SETTINGS - Localization Page. Press Edit to access the LOCALIZATION Settings page. Next to Default Meeting Length, press to select 15 mins, 30 mins (default setting) or 60 mins. Press Save in the LOCALIZATION Settings page to save this change. -
Page 41: Viewing/Editing Room Settings
Scheduler Settings Viewing/Editing Room Settings In any SETTINGS page, press Room to view the current Room settings for this panel (FIG. 61): SETTINGS Page - Room FIG. 63 Press Edit to open the ROOM Settings page, to edit the current settings as required (FIG. 62). ROOM Settings page FIG. -
Page 42: Advanced Settings
Advanced Settings Advanced Settings Overview Acendo Book panels present all panel configuration information via the touch panel’s on-board Advanced Settings menu. Select Advanced Settings in the Settings menu to access the Advanced Settings menu. NOTE: Refer to the Scheduler Settings section on page 35 for information on viewing/editing Scheduler-specif ic options. Accessing the Advanced Settings Pages Press and hold the pushbutton on the top of the touch panel for 5 seconds (see FIG. -
Page 43: Opening Advanced Settings Pages
Advanced Settings NOTE: The DEVICE, CONNECTIONS, ACCOUNTS, and SYSTEM pages are password-protected. The default Administrator password is "1988", and can be changed via the options in the SECURITY page - see Changing the Administrator Password on the Panel on page 33 for details. Opening Advanced Settings pages Select the appropriate page from the Advanced Settings menu. -
Page 44: Info - Maintenance
Advanced Settings INFO - Maintenance The INFO - Maintenance page (FIG. 69) provides control of basic panel functions, including rebooting or shutting down the panel. Return icon - press to jump to the previous view INFO - Maintenance page FIG. 69 INFO - Maintenance page options Reboot: Select this entry to open the Reboot window. -
Page 45: Device - Sound
Advanced Settings DEVICE - Sound The Sound page (FIG. 72) allows adjustment of volume levels and panel sounds settings. Return icon - press to jump to the previous view DEVICE - Sound page FIG. 72 Sound page options SOUND Volumes Press to open the Volumes window, which provides options to adjust volume for Music, video, games and other media as well as Notifications and Alarms. -
Page 46: Device - Display
Advanced Settings Default Notification Sound window FIG. 74 To return to the Sound page without making any changes, press Cancel (or press outside the Default Notif ication Sound window). DEVICE - Display The Display page (FIG. 75) controls the basic functions of the panel display, including the panel brightness, display timeout settings and touch calibration. -
Page 47: Adjusting Display Timeout
Advanced Settings Brightness window FIG. 76 Press OK to save changes and close this window. To return to the Display page without making any changes, press Cancel (or press outside the Brightness window). Adjusting Display Timeout In the Display page, select Display Timeout to open the Display Timeout window (FIG. 77). Display Timeout window FIG. -
Page 48: Calibrate
Advanced Settings Calibration Test Options window FIG. 79 When finished with the calibration test, select Exit to return to the Display page. Calibrate To manually calibrate the panel: Select Calibrate to open the Calibrate window. Follow the on-screen instructions. DEVICE - VNC An on-board VNC (Virtual Network Computing) server allows the panel to connect to any remote PC running a VNC client. -
Page 49: Configuring Vnc Access
Advanced Settings Conf iguring VNC Access In the VNC page, use the options under VNC SERVER to configure various aspects of VNC access on the panel: Press Timeout to specify a timeout period for VNC connections, in the Timeout window. Press OK to save changes. ... -
Page 50: Setting Static Ip Information
Advanced Settings Setting Static IP Information When using DHCP settings for a panel, the DHCP server will automatically populate almost all of the Ethernet page fields, with the exception of Hostname. When setting the panel for Static, however, this information must be entered manually. To enter the network connection information: Press DHCP/Static to access the DHCP/Static options window (FIG. -
Page 51: System - Date & Time
Advanced Settings SYSTEM - Date & Time The Date & Time page (FIG. 85) allows setting and adjusting the NTP/time and date information on the panel. Return icon - press to jump to the previous view SYSTEM - Date & Time page FIG. -
Page 52: Manually Setting The Time Zone
Advanced Settings Manually Setting the Time Zone Press Select Time Zone to open the Select Time Zone window (FIG. 88). Scroll down to see all menu items Select Time Zone window FIG. 88 Select the time zone desired. The window will automatically close and return to the Date & Time page. SYSTEM - Language &... -
Page 53: Selecting The Panel's Language
Advanced Settings Language & Input page options (Cont.) MOUSE/TRACKPAD Pointer Speed: Provides the ability to adjust the speed of the cursor on the panel. Refer to Changing the Pointer Speed on page 55 for details. Selecting the Panel’s Language English is the default language for Acendo Book panels , but this may be changed at any time through the Language & Input page. To change the panel’s language: In the Language &... -
Page 54: Changing Input Methods
Advanced Settings To add a shortcut for long or complex words, enter it in the Shortcut field. If the word you add is in a language other than English, select the arrow in the lower right corner of the window to open the ... -
Page 55: Changing The Pointer Speed
Advanced Settings Scroll down to see all menu items Return icon - press to save selections and open the Choose keyboard layout window Keyboard Layout window (indicating three layouts selected) FIG. 97 Select the desired keyboard layout(s). The selected layouts will be available for selection via the Choose Input Method window (select Default under KEYBOARD & INPUT METHODS to access). -
Page 56: System - Security
Advanced Settings SYSTEM - Security The Security page (FIG. 100) sets the admin password for this panel, and allows for the management of CA certificates. Return icon - press to close the Advanced Settings menu Security page FIG. 100 Security page options PASSWORDS Set Password: Specify the default admin password for this panel. -
Page 57: Viewing Trusted Ca Certificates (System/User)
Advanced Settings Viewing Trusted CA Certif icates (System/User) In the Security page, under CREDENTIAL STORAGE, press Trusted Credentials to invoke the Trusted Credentials page (FIG. 101): Scroll down to see all list items Trusted Credentials page - SYSTEM list FIG. 102 The listing of trusted CA certificates is separated into two categories: System and User. -
Page 58: Disabling And Enabling Trusted Ca Certificates
Advanced Settings Disabling and Enabling Trusted CA Certif icates System certificates that are currently enabled are indicated with a blue checkmark. Note that by default, all installed certificates are enabled, as indicated in FIG. 104: Enable/Disable security certificates System CA Certificates list - indicating all security certificates are enabled FIG. -
Page 59: Installing Certificates
Advanced Settings NOTE: Disabled system certif icates can be enabled later; disabled system certif icates are not cleared from the panel (see the Clearing Credentials section on page 59). To enable a system certificate, select a disabled system certificate. This invokes the Security certif icate details dialog for the selected certificate. -
Page 60: System - Reset And Update
Advanced Settings Verify Clearing Credentials from this panel FIG. 111 Press OK to proceed (or press Cancel to return to the Security page without clearing credentials. SYSTEM - Reset and Update The Reset and Update page (FIG. 112) allows resetting and updating of panel settings and firmware, including installation of new firmware from an external drive. -
Page 61: Reset Settings
Advanced Settings Factory Data Reset window FIG. 113 To return to the Reset and Update page without making any changes, press Reset and Update. To erase all data from the panel, press Reset Device. NOTE: The Scheduling Panel Setup Wizard will be launched again if a Factory Data Reset is performed on the panel (see page 22). Reset Settings To reset the Settings values to their default values: Under DEVICE RESET, press Reset Settings. -
Page 62: Reverting To Factory-Installed Firmware
Advanced Settings Reverting to Factory-Installed Firmware In certain circumstances, it may be necessary to uninstall the current firmware on a panel and return it to the original factory default firmware. To reset the panel to its original factory firmware: From the Firmware Manager window, select UPDATE next to Revert to Factory Firmware (FIG. 117): Firmware Manager - Revert To Factory Firmware FIG. -
Page 63: Install Firmware From Web
Advanced Settings The panel will upload the new firmware (FIG. 122) and then reboot. Update Progress display FIG. 122 Install Firmware From Web This option provides the ability to download new panel firmware from AMX, and install it on the Acendo Book panel. If a firmware update is available for the panel, the Install Firmware From Web option is presented on the Firmware Manager page (see FIG. -
Page 64: Using Amx System Recovery
Advanced Settings Firmware Update - reboot and complete firmware update FIG. 127 Using AMX System Recovery During a normal firmware upgrade, if a Acendo Book panel is unable to boot all the way, AMX System Recovery can be used to try to reset system data or re-install firmware. -
Page 65: Acendo Book Scheduling Panels - User Guide
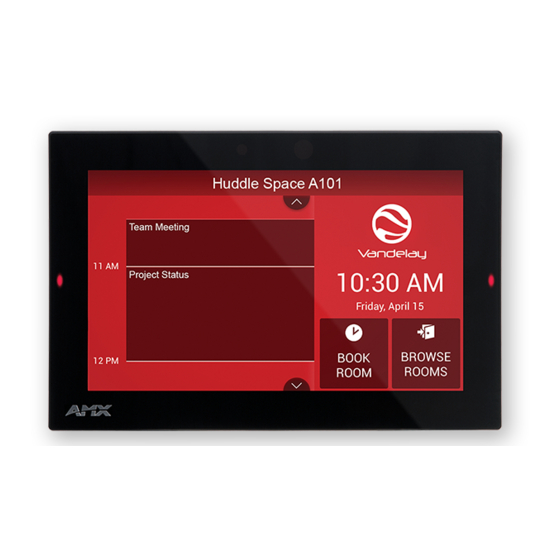
Acendo Book Scheduling Panels - User Guide Acendo Book Scheduling Panels - User Guide Overview This section describes using Acendo Book Touch Panels that have been installed and configured. In this section, "Room" refers to the Room associated with a Acendo Book panel. Room Available Page If the Room is currently available, the Room Available page is displayed (FIG. -
Page 66: Scheduling An Ad-Hoc Meeting
Acendo Book Scheduling Panels - User Guide Scheduling an Ad-Hoc Meeting If the room is available, an ad-hoc meeting can be scheduled to start immediately: In the Room Available page, press BOOK ROOM (FIG. 131): BOOK ROOM button FIG. 131 This invokes the BOOK ROOM page. -
Page 67: Scheduling A Meeting For Later
Acendo Book Scheduling Panels - User Guide Room page (OCCUPIED) FIG. 134 Scheduling a Meeting for Later To schedule a meeting for later in the day: In the Room page, press BOOK ROOM (FIG. 135): BOOK ROOM button FIG. 135 NOTE: Meetings can be scheduled for a later time, regardless of whether the room is currently AVAILABLE or OCCUPIED. -
Page 68: Browse Rooms For Scheduling
Acendo Book Scheduling Panels - User Guide If prompted. enter the Meeting PIN Code (FIG. 138): Note: The Meeting PIN Code is only required if the "Meeting PIN Code" option is enabled in the Security setup page. The Meeting PIN Code is set on the Security Setup page as well (see page 33 for details). - Page 69 Acendo Book Scheduling Panels - User Guide NOTE: Rooms in the Scheduling Group that are not available for booking at the current time will not show up in the AVAILABLE ROOMS list, even though they may be available later. The example in FIG. 141 shows that there are two other Acendo Book panels in the group available for booking right now: BROWSE ROOMS button FIG.
-
Page 70: Viewing/Editing Meeting Details
Acendo Book Scheduling Panels - User Guide Viewing/Editing Meeting Details Press on any scheduled meeting on the Room Page to open the MEETING DETAILS page for the selected meeting (FIG. 144): Meeting Organizer Subject Start/End Time Comments MEETING DETAILS page FIG. -
Page 71: Editing Meeting Times
Acendo Book Scheduling Panels - User Guide Note: The Meeting PIN Code is only required if the "Meeting PIN Code" option is enabled in the Security setup page. The Meeting PIN Code is set on the Security Setup page as well (see page 33 for details). ENTER PIN CODE page FIG. -
Page 72: Deleting A Meeting From The Calendar
Acendo Book Scheduling Panels - User Guide Deleting a Meeting From the Calendar In the MEETING DETAILS page, press Delete to open the DELETE MEETING (FIG. 149): DELETE MEETING page FIG. 149 Press OK to proceed. If prompted, enter the Meeting PIN Code in the ENTER PIN CODE page (FIG. 150): Note: The Meeting PIN Code is only required if the "Meeting PIN Code"... -
Page 73: Appendix A: Configuring Roombook Panels For Microsoft Exchange & Office 365
Appendix A: Configuring RoomBook Panels for Microsoft Exchange & Office 365 Appendix A: Conf iguring RoomBook Panels for Microsoft Exchange & Off ice 365 Overview This section provides information regarding setting up RoomBook panels to communicate with Exchange 2010/2103/2016 or Office 365 Servers. -
Page 74: Microsoft Exchange / Office 365: Certificate Validation
Appendix A: Configuring RoomBook Panels for Microsoft Exchange & Office 365 Microsoft Exchange / Off ice 365: Certif icate Validation The Exchange 2010/2103/2016 or Office 365 Server has a unique User Name for each user and a unique Calendar Email ID for each room. -
Page 75: Appendix B: Creating Room Mailboxes
Appendix B: Creating Room Mailboxes Appendix B: Creating Room Mailboxes Overview Exchange 2010, 2013, 2016 and Office 365 use Room Mailboxes to manage meeting room schedules. Each RoomBook location (meeting room) that will synchronize with the Microsoft scheduling application (Exchange / Office 365) must be represented by a Room Mailbox. -
Page 76: Additional Documentation
Appendix B: Creating Room Mailboxes Additional Documentation For more detailed information on creating a room mailbox, creating a room list and changing room mailbox properties in Exchange ® 2013, refer to the Microsoft article "Create and manage room mailboxes": http://technet.microsoft.com/en-us/library/jj215781%28v=exchg.150%29.aspx For more detailed information on creating a room mailbox, creating a room list and changing room mailbox properties in Exchange ®... -
Page 77: Appendix C: Configuring Google Resources
Appendix C: Configuring Google Resources Appendix C: Conf iguring Google Resources Overview This section provides instructions for configuring Google resources to work correctly with Acendo Book panels. These instructions make the following assumptions: A Google Business Service account is available ... - Page 78 Appendix C: Configuring Google Resources In the Google Apps page, select Calendar (FIG. 156): Google Admin Console - Google Apps Page (detail) FIG. 156 In the Calendar page, select Resources (FIG. 157): Google Admin Console - Calendar Page (detail) FIG. 157 In the Resources pane, select Create a new resource (FIG.
-
Page 79: Share Resource Calendars With Administrator
Appendix C: Configuring Google Resources Save changes. 2) Share Resource Calendars With Administrator From the Resources list, select the resource just created and copy the resource email address (FIG. 160): Google Admin Console - Calendar Page - Resources Pane (Copy new resource email address) FIG. -
Page 80: Share Service Calendars With Room Manager Account
Appendix C: Configuring Google Resources Add a Coworkers Calendar - Contact Email FIG. 164 The resource calendar should now show up in the list of calendars under My Calendars (see "Room 101" in FIG. 165): Google Calendar indicating new Calendar ("Rom 101") FIG. -
Page 81: Ensure Calendar Is Set To Deny Conflicts
Appendix C: Configuring Google Resources Select Add Person (FIG. 169): Google Calendar > Room Details > Share This Calendar > Permission Settings > Add Person FIG. 169 Click Save. At this point, Google will prompt you to verify these changes. Select OK to proceed (FIG. 170): Google Calendar - Message From Webpage FIG. -
Page 82: Appendix D: Troubleshooting
Appendix D: Troubleshooting Appendix D: Troubleshooting Overview This section provides information to help address several potential issues relative to Acendo Book Scheduling panels and supported Scheduling services. Please check these topics before contacting AMX Technical Support. Problem: NO CALENDAR SERVER CONNECTION DETECTED - Username and Password No Calendar Server Connection Detected - Please Check Username and Password FIG. -
Page 83: Problem (Exchange): Meeting Reservation Not Indicated On The Panel (No Error Message)
Appendix D: Troubleshooting Problem (Exchange): Meeting Reservation Not Indicated on the Panel (No Error Message) When reserving a meeting (in Exchange), the meeting never shows up on the RoomBook Scheduling Panel, and the panel is not indicating an error. Possible Solution The Exchange Administrator should create a Service Account and Room Delegate, and enable "Auto Accept"... -
Page 84: Using Exchange Admin Center (Emc)
Appendix D: Troubleshooting Delegates also need Editor access to the calendar and free/busy folder of the mailbox itself so that they can manage meeting requests. There are two ways to achieve this: Option 1: Grant an administrator Full Access Permissions to the Room Mailbox, open it in Outlook, and edit the Calendar ... -
Page 85: Problem (Exchange/Office 365): Conflicting Meetings Indicated At Incorrect Time
Appendix D: Troubleshooting Problem (Exchange/Off ice 365): Conflicting Meetings Indicated at Incorrect Time If a meeting is scheduled for a time that has already been reserved for a given room, it is a Conflicting Meeting. If conflicts are allowed (in Exchange/Office 365), then conflicting meetings may be indicated at a time other than what was requested by the user (FIG. -
Page 86: Problem (Google): Meetings Are Not Indicated On Room Page
Appendix D: Troubleshooting Problem (Google): Meetings Are Not Indicated on Room Page Possible Solutions Verify that the Auto-accept invitations that do not conflict property is selected for the room with which the Acendo Book panel is associated. See Appendix C: Conf iguring Google Resources on page 77 for details. Problem: "Browse Rooms"... - Page 87 © 2017 Harman. All rights reserved. SmoothTouch, AMX, Acendo Book, AV FOR AN IT WORLD, and HARMAN, and their respective logos are registered Last Revised: trademarks of HARMAN. Oracle, Java and any other company or brand name referenced may be trademarks/registered trademarks of their respective 1/23/2017 companies.
Need help?
Do you have a question about the RMBK-1001 and is the answer not in the manual?
Questions and answers