Table of Contents
Advertisement
Advertisement
Table of Contents

Related Manuals for Juguetronica BRICK DRONE


Summary of Contents for Juguetronica BRICK DRONE
- Page 1 Age: +8 MANUAL DE INSTRUCCIONES BRICK DRONE Thank you for purchasing our Brick Drone. Please read the instructions carefully to be fully familiar with the features and functioning of the drone so as to fly it safely. Save this instruction manual for future reference.
-
Page 2: Table Of Contents
Battery charging Movement Control Flight speeds Acrobatic mode Trimming Functions of the Brick Drone Pictures and videos with your Brick Drone App download and features Accesories and spare parts Model 1. Assembly instructions Model 2. Assembly instructions Model 3. Assembly instructions Model 4. -
Page 3: Warnings
Flying in areas where conduct flights with other low-altitude aircraft (paragliding, parachuting, heliports, etc). Do not expose others to danger. For more information visit: www.seguridadaerea.gob.es BOX CONTENT x1 Brick Drone x2 Batteries x4 Propellers x4 Replacement propellers x1 Controller 2,4Ghz... -
Page 4: List Of Parts
LIST OF PARTS BRICK DRONE ACCESSORIES... -
Page 5: Brick Drone General Assembly Steps
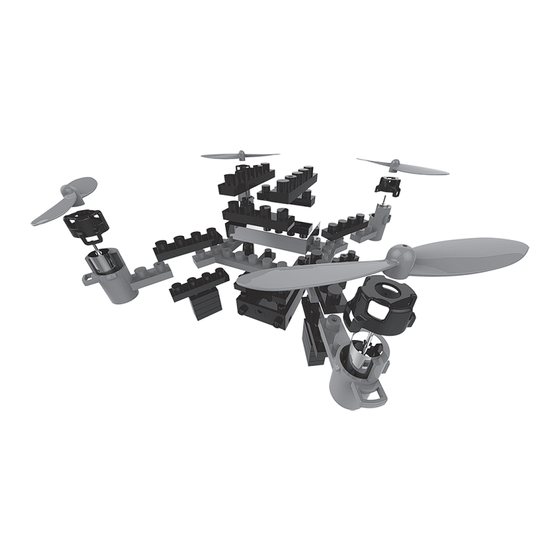
BRICK DRONE GENERAL ASSEMBLY STEPS... - Page 6 WIRING PLACEMENT ENGINE WITH RED/BLUE WIRES ENGINE WITH WHITE/BLACK WIRES ENGINE WITH WHITE/BLACK WIRES BATTERY ENGINE WITH CABLE RED/BLUE WIRES MODELO FINALIZADO...
-
Page 7: Parts Of The Controller
PARTS OF THE CONTROLLER On / Off Speeds Acrobatics Throttle stick/ Direction stick rotation Headless Mode Trimming Forwards Reset Light Control Trimming Right Trimming Displacement turn left Trimming Backwards Back Home Trimming Left Trimming Displacement turn right Indicator BATTERIES INSTALLATION IN THE CONTROLLER Remove the battery cover unscrew the screws. -
Page 8: Departure
TIP: Posición Make sure your Brick Drone is on a flat horizontal surface during horizontal the synchronisation procedure, so the flight is stable. WARNING 1. If the transmitter's LED stays on but the drone LED is flashing slowly, synchronisation has not been performed correctly. -
Page 9: Carga De La Batería Del Drone
BATTERY CHARGING Remove the battery from the drone. Connect the battery to the USB cable and then plug it into the charging port. The USB cable indicator will light up while charging and it will turn off once the battery is fully charged. CHARGING TIMES The battery takes about 60 minutes to be fully charged. -
Page 10: Movement Control
FLIGHT SPEEDS The Brick Drone has a 4-speed selector so you can increase the level of difficulty as you get familiar with controlling the drone. -
Page 11: Trimming
If it DISPLACEMENT tends to move right, do the same with the left movement trim. When the Brick Drone tends to turn to the left under sta- tionary flight conditions, press the right turn trim button TRIMMING OF TURNS as many times as necessary until is corrected. -
Page 12: Functions Of The Brick Drone
FUNCTIONS OF THE BRICK DRONE OVERCURRENT PROTECTION When the drone of propellers collide against an object or lock, the power control system momentarily paralyzes the engines, reactivating when the propeller is released. LIGHTS CONTROL The LEd lights drone can be activated or deactivated by pressing the control of top courses as shown in the side image. -
Page 13: Pictures And Videos With Your Brick Drone
The letters marked on each propeller must match to the following scheme, otherwise the drone will not fly normally. PICTURES AND VIDEOS WITH YOUR BRICK DRONE On the smartphone app you will find an icon for taking pictures and another icon for recording videos. -
Page 14: App Download And Features
MODE GYROSCOPE CALI- 360º FLIP RETURN BRATE REVERSE CA- SHOW / HIDE GALLERY MERA INTERFACE PREVIEW AT 720P 3D VIEW HELP ACCESSORIES AND SPARE PARTS Spare parts and/or accessories you can purchase to complete your Brick Drone. Propellers Batteries Charger... -
Page 15: Model 1. Assembly Instructions
MODEL 1. ASSEMBLY INSTRUCTIONS Black STEP 1-6 GENERIC ASSEMBLY (PAGS. 5-6) FINISHED MODEL... -
Page 16: Model 2. Assembly Instructions
MODEL 2. ASSEMBLY INSTRUCTIONS 45º... - Page 17 STEPS 1-8 GENERAL ASSEMBLY (PAG. 6) 180º FINISHED MODEL...
-
Page 18: Model 3. Assembly Instructions
MODEL 3. ASSEMBLY INSTRUCTIONS... - Page 19 STEPS 1-8 GENERAL ASSEMBLY (PAG. 5) FINISHED MODEL...
-
Page 20: Model 4. Assembly Instructions
MODEL 4. ASSEMBLY INSTRUCTIONS STEPS 1-8 GENERAL ASSEMBLY (PAG. 6) FINISHED MODEL... -
Page 21: Model 5. Assembly Instructions
MODEL 5. ASSEMBLY INSTRUCTIONS Black ATTENTION! This model is not based on the generic assembly, it is a variant. Red x1 Black x4 FINISHED MODEL... -
Page 22: Troubleshootings
2. Remove the other radio-frequency to commands or 2. There is another radio- equipment from the drone coverage responds with frequency equipment nearby area. difficulty. with the same control frequency. DOWNLOAD THE ASSEMBLY GUIDE FOR FIVE ADDITIONAL MODELS https://www.juguetronica.com/extras/brickdrone... - Page 23 DESING YOUR OWN DRONE...
- Page 24 JUGUETRÓNICA, SL - NIF: B83788414 Thank you for purchasing this product. Shop: C/ Alberto Aguilera, 1 - 28015 Madrid - España Domestic Warranty and Technical Support The crossed-out wheeled bin icon indicates that products and batteries should not be disposed of as organic waste, as they contain substances that are harmful to the environment.
Need help?
Do you have a question about the BRICK DRONE and is the answer not in the manual?
Questions and answers