Advertisement
Quick Links
Solar Powered Wireless Wi-Fi Weather Station
TP3000WC Operation Manual
About this manual
Thank you and congratulations on selecting this professional weather station! We are sure you
will enjoy the benefits of accurate weather readings and the precise network time information
that this weather station offers. This manual will guide you step-by-step through setting up your
device. Use this manual to become familiar with your ProWeatherStation, and save it for future
reference.
Glossary of Common Terms
LCD
"LCD" is an acronym for "Liquid Crystal Display". This is a common type of display screen
used in televisions, computers, watches, and digital clocks.
BAROMETER & BAROMETRIC PRESSURE
A barometer is a device that measures the pressure of the air pushing on it—this
measurement is called the barometric pressure. We don't actually feel the barometric
pressure because the air pressure is pushing equally in every direction.
RELATIVE AIR PRESSURE
Relative air pressure is the same as the barometric pressure. The calculation of relative air
pressure is a combination of the absolute air pressure and the altitude.
ABSOLUTE AIR PRESSURE
Absolute air pressure is the actual air pressure on the barometer without regard to altitude.
INCHES OF MERCURY (inHg)
Inches of Mercury is the common unit of measurement for air pressure in the United States.
HECTOPASCALS (hPa)
Hectopascals are the common units of measurement for air pressure in the International
System (SI) of measurement. The hectopascal holds the same value
Important Note:
The ProWeatherStation TP3000WC comes fully assembled for ease of use. The Outdoor
Sensor array runs mainly on solar power which charges a super capacitor located inside the
unit, but has 2 AA batteries for backup power when needed (ie; solar panel shaded or covered
with snow). The outdoor sensor array communicates with the display console over a 433Mhz
RF signal which sends the data to the display console about every 48 seconds. The display
console can be run on batteries to just display the weather readings or it can be powered using
the included 5V adapter to enable the WiFi capabilities of the display console. Once the unit is
connected to a local WiFi network the display console can upload data automatically to
Weather Underground without the need for a PC and can also be accessed from a PC running
the WeatherSmart Wifi software.
8000060 Rev 1 23-Feb-18
1
Advertisement

Summary of Contents for Tycon Systems ProWeatherStation TP3000WC
-
Page 1: About This Manual
System (SI) of measurement. The hectopascal holds the same value Important Note: The ProWeatherStation TP3000WC comes fully assembled for ease of use. The Outdoor Sensor array runs mainly on solar power which charges a super capacitor located inside the unit, but has 2 AA batteries for backup power when needed (ie; solar panel shaded or covered with snow). -
Page 2: Display Console
OVERVIEW Display console 5VDC connector Item Display Console with Wifi connectivity and Temp/Humidity/Barometric Pressure sensors. Outdoor sensor (Temp/Humidity / Rain Gauge / Wind Speed Sensor/ Wind Direction/ Light-UV Sensor) U-bolts (Qty 2) with mounting plate 120/220VAC 5V 500mA Adapter (required for WiFi communications) Weathersmart WiFi PC Software on CD-Rom User Manual Features... - Page 3 Proweatherstation Setup Warning: Any metal object may attract a lightning strike, including your weather station mounting pole. Never install the weather station during a storm. Warning: Installing your weather station in a high location may result in injury or death. Perform as much of the initial checkout and assembly on the ground, preferaby inside a building or home.
- Page 4 9. U-Bolts 10. Battery compartment 11. Reset button 12. LED Indicator: light is on for 4s if the unit powers up. Then the LED will flash once every 48 seconds (the sensor transmission update period). 2. Install Batteries The sensor array is powered by the solar panel which charges a super capacitor, but batteries are required as a backup power source.
- Page 5 reset button, located on the bottom of the outdoor sensor array, for 3 seconds. If still a problem, remove the batteries from the outdoor sensor array, cover the solar panel, wait at least 60 seconds and then replace the batteries. Do not press any key on the display console before outdoor sensor data is received, otherwise the outdoor sensor sync mode will be terminated.
- Page 6 With an open ended paperclip, press and hold the RESET BUTTON for three seconds to completely discharge the voltage. If still an issue, remove the batteries from the senor array and cover the solar panel for at least one minute. Put batteries back in and resynchronize with display console by powering down and up the display console with the sensor array about 3 meter away.
-
Page 7: Table Of Contents
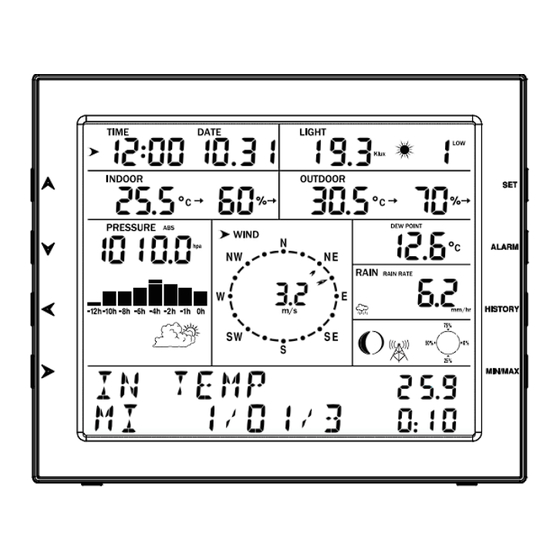
Medium RF Signal Strength Reduction Glass (untreated) 5-15% Plastics 10-15% Wood 10-40% Brick 10-40% Concrete 40-80% Metal 90-100% 7. Display Unit Setup 1. Display Console Layout: 1.Time 2.Indoor Temperature & 3.Indoor Humidity 4.Barometric Pressure 5. Barometric Pressure graph 6.Weather icon 7. - Page 8 17.Light 18.Date 2. Initial Display Console Set Up 1.The unit will turn on all segments of the LCD for 3 seconds after power on. Then the unit will start to register the outdoor sensor array which takes 3 minutes. 2. Full display 3.Key function SET: Enter the setting mode...
-
Page 9: Console Operation
Console Operation Note: Many display console settings can be set in the Weathersmart WiFi PC software. In order to do this, the software needs to be installed on a PC and the display console needs to be connected to your WiFi network. Instructions are located later in this user guide. - Page 10 2. Display Console Settings Time and date If the arrow symbol “ ” is in this segment, following information will appear on message board: Year, Weekday Alarm time and status of the alarm(on/off) Moon phase. (Reference Section Other Console Functions/Moon phase for detail) ...
- Page 11 Indoor temperature If the arrow symbol “ ” is in this segment, following information with time stamp will appear on message board: Max indoor temperature value of the current day. Min indoor temperature value of the current day. Max indoor temperature value since the last reset Min indoor temperature value since the last reset Max indoor humidity value of the current day.
- Page 12 If the arrow symbol “ ” is in this segment, following information with time stamp will appear on message board: Max relatively barometric pressure of the current day Min relatively barometric pressure of the current day Max relatively barometric pressure since the last reset Min relatively barometric pressure since the last reset Max absolute barometric pressure of the current day Min absolute barometric pressure of the current day...
-
Page 13: Rain Fall
If the arrow symbol “ ” is in this segment, following information with time stamp will appear on message board: Min wind chill temperature of the current day Min wind chill temperature since the last reset Max dew point temperature of the current day Min dew point temperature of the current day Max dew point temperature since the last reset Min dew point temperature since the last reset... - Page 14 When the desired setting function is displayed, press the ” ” key to start the associated setting menu. Change a setting with the key .Hold the key for 2 seconds will increase/decrease digits in great steps. Press HISTORY key or wait for 30 seconds at any time, device will return to normal mode.
-
Page 15: Outdoor Temperature
PRESSURE SETTING Under setting mode, the first setting function appear on message board is ”TIME ”button repeatedly to switch to “BAROMETRIC SETTING” display. SETTING”. Press” Then press the ” ” button to select the desired sub functions: CURRENT WEATHER: Press buttons to adjust the weather forecast icon on display. -
Page 16: Barometric Pressure
ABS PRESS OFFSET Offset for absolute barometric pressure. REL PRESS OFFSET Offset for relatively barometric pressure. WIND DIR OFFSET Wind direction can be adjusted by 0-359°.For southern hemisphere installations, the wind direction need to change by 180°. WIND FACTOR Wind speed calibration coefficient: default 1 (range is Range is 0.1-2.5) RAIN FACTOR Rain factor calibration coefficient: default 1 (range is Range is 0.1-2.5) RAIN DAY CALIBRATION... -
Page 17: Outdoor Humidity
UVI HIGH ALARM --Set UVI high alarm In TEMP HIGH ALARM --Set indoor temperature high alarm In HUMI HIGH ALARM --Set indoor humidity high alarm Out TEMP HIGH ALARM Set outdoor temperature high alarm Out HUMI HIGH ALARM Set outdoor humidity high alarm ABS BARO HIGH ALARM --Set absolute barometric pressure high alarm REL BARO HIGH ALARM --Set relatively barometric pressure high alarm WIND HIGH ALARM --Set wind speed high alarm... - Page 18 TODAY MAX—The maximum values during current day HISTORY MAX –The maximum values since last reset TODAY MIN --The minimum values during current day HISTORY MIN --The minimum values since last reset Press button to switch among max/min records of different parameter, together with the time and date stamp.
- Page 19 within 30 minutes 30 minutes Falling rate >= 10% Falling >= 1℃ within 30 Falling within 30 minutes minutes Moon Phases Icon: Northern Hemisphere Moon Phase Description Icon: Southern Hemisphere NEW MOON WAXING CRESCENT MOON FIRST QUARTER MOON WAXING GIBBOUS MOON FULL MOON WANING GIBBOUS MOON LAST QUARTER MOON...
- Page 20 Live Internet Publishing This weather station can send data to Weather Underground, a free weather hosting service, using your household WiFi connection. The weather station can also operate as a standalone weather station showing weather data on the display console and computer only, as long as the weather station console and computer are connected to the same WiFi.
- Page 21 7. Once the console has connected to your WiFi network, the devices Mac address and IP address will be displayed, as shown in below figure. Select the device to configure it for connection with Weather Underground. Note: If the device connection times out without finding the proweatherstation, check to make sure that your mobile device is connected to the 2.4GHz WiFi network.
- Page 22 Now your weather station is connected to the Weather Underground weather server. Please note that “WS Tool” is only used for setup of the weather station and linking to Weather Underground. The readings showing on the WS Tool app are not accurate. Download the “Weather Underground: Forecasts”...
- Page 23 Specification Outdoor data Transmission distance in open field : 100m(300 feet) Frequency 433 MHz Temperature range -40˚C--60˚C (-40℉ to +140℉) Accuracy + / - 1 °C Resolution 0.1˚C Measuring range rel. humidity 10%~99% Accuracy +/- 5% 0 – 9999mm (show --- if outside range) Rain volume display Accuracy + / - 10%...
-
Page 24: Troubleshooting Guide
Troubleshooting Guide Installing the wind vane (Note: The sensor array comes fully assembled, these instructions are only needed if replacing broken parts) Push the wind vane into the shaft. as shown in figure 1. Make sure the wind vane spins freely. - Page 25 Tighten the set screw with as shown in figure 3. Make sure the wind speed cups spins freely. Figure3 Problem Solution Wireless sensor array (outdoor unit) Check the outdoor sensor array LED for flashing. It not synching to display console. should flash every 48 seconds.
- Page 26 Problem Solution than 5’), move the sensor assembly away from the display console. 4. Make sure the remote sensors are not transmitting through solid metal like aluminum siding (acts as an RF shield), or earth barrier (through a hill). 5. Move the display console away from electrical noise generating devices, such as computers, TVs and other wireless transmitters or receivers.
- Page 27 Problem Solution 48 hours, and varies from location to location. The tendency is simply a tool for projecting weather conditions and is never to be relied upon as an accurate method to predict the weather. Moon phase is not correct Check your calendar date and make sure it is correct Display console contrast is weak...
- Page 28 Problem Solution and it is a dual band router, you will need to disable the 5 GHz band, and enable the 2.4 GHz band. 5. The console does not support guest networks. The rain gauge isn’t reading rainfall 1. Remove the black plastic collector bowl from the rain gauge by turning it counterclockwise.
Need help?
Do you have a question about the ProWeatherStation TP3000WC and is the answer not in the manual?
Questions and answers