
Related Manuals for Lindy 38161


Summary of Contents for Lindy 38161
- Page 1 Flexible Video Wall Scaler User Manual Eng lis h No. 38161 lindy.com Tested to Comply with FCC Standards For Commercial use only! © LINDY Group - FIRST EDITION (January 2018)
- Page 3 Thank you for purchasing the Lindy Flexible Video Wall Scaler. This product has been designed to provide trouble free, reliable operation. It benefits from both a Lindy 2 year warranty and free lifetime technical support. To ensure correct use, please read this manual carefully and retain it for future reference.
- Page 4 ▪ We recommend using high quality shielded cables with this Scaler, to achieve longer distances please use an extender from Lindy’s AV extender range. ▪ If the video wall aspect ratio is not the same as the signal source, it will create an abnormal aspect ratio. Please select the correct EDID.
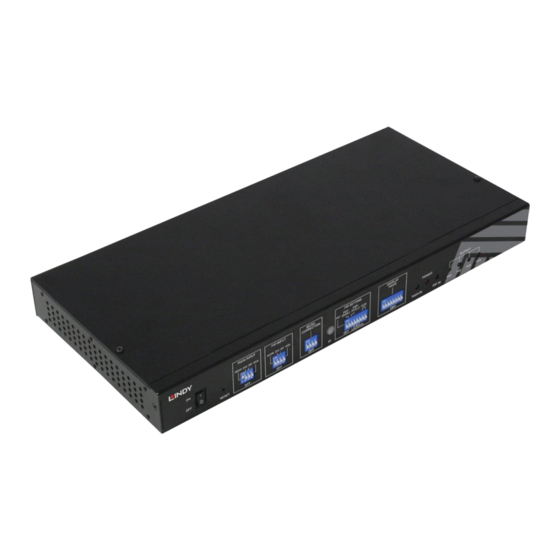
- Page 5 User Manual English Unit Overview Front 1. Power Switch: Power the Scaler on/off 2. Reset: Recessed button to return the Scaler to factory defaults 3. Main Input: Dip-switches to allow the selection of the primary video source, only a single selection may be made at any time 4.
- Page 6 User Manual English Remote Control Load Profile System Setting Information Channel Selection Manual display mode selection: IDX-1: Mode #1 IDX-2: Mode #2 IDX-3: Mode #3 OTH: Mode #4 – 10 circulated Controls Hold for 5 seconds to lock the OSD. Hold for another 5 seconds to unlock the OSD Input Selection.
-
Page 7: [Image Setup] For Vga Input
User Manual English OSD Menu and functions Important notice: ▪ Please set all Dip switches on [Main Input] at OFF position to assign control to the OSD menu so that OSD settings will be executed when the system is powered ON. ▪... -
Page 8: Input Signal
User Manual English Colour [Colour]: Menu: Preset modes colour temperature selection. [Custom]: Independent RGB colour adjustment. Input Signal [Input Signal]: Switch between DVI, HDMI, VGA and DisplayPort video input signals. Scaling [Full Screen]: To fit the source image for full screen display [Original AR]: Maintain source image aspect ratio This setting will also affect POP image display with full... -
Page 9: Pip Setting
User Manual English The Picture in Picture (PiP) function is used to display (2) images from one scaler. The maximum size of the sub- image (PiP) is 1080p. The input source for the PiP is selectable and can be from any input port. The location of the PiP image can be controlled by the OSD menu at any location inside the main image. -
Page 10: Image Orientation
User Manual English Image Orientation This image orientation function will be applied to all outputs. Its main purpose is to create more Display modes based on Pre-defined Display Modes whilst providing more flexibility multiple cascade applications [Video Wall] Video Wall Settings are used to select output mode, custom mode creation and the cascading multiple scalers to become one video wall display. - Page 11 User Manual English Select the custom display mode store location. ▪ Under [Manual Mode], there are 10 [Mode] options and [Loop]. ▪ Each [Mode] represents one display configuration. ▪ Different input sources and resolutions can be chosen without affecting other display configuration settings.
- Page 12 User Manual English To adjust custom mode aspect ratio and position Five sub menus under [Manual Mode] > Mode #: - [Ratio] - [Position] - [Zoom] - [Pan] - [Overlap] Note: It is also possible to adjust image aspect ratio for the entire video wall in [Overlap] settings. Horizontal and Vertical [Ratio] adjustment ▪...
- Page 13 User Manual English LCD burn-in mark protection. You can create different display modes at a slight position shift and apply the looping playback function to prevent a burn-in mark on the LCD to extend its life. This is important for a display with still images in the content. ▪...
- Page 14 User Manual English Zoom Split image for each scaler in a cascade application ▪ You can set both Horizontal and Vertical Zoom values based on the array of the Display Units. ▪ In the below example, each number refers to one Display Unit (4 LCDs) and also one scaler setup.
- Page 15 User Manual English Overlap Bezel compensation and position shift ▪ [Overlap] is to align the location of each scaler unit ▪ You can adjust the image location in both H&V position up to ±900 pixels. ▪ Through [Overlap] adjustment, you can align each scaler into the correct position in the video wall using cascading.
- Page 16 User Manual English Miscellaneous OSD Functions Five sub menus under [Options]: - [Information] - [Language] - [Reset] - [Accessibility] - [Setting] Information [Information] menu shows the following information from the Scaler, such as Input mode, output mode, Network status, Model name and Firmware version. Language Three OSD menu languages can be selected: ▪...
-
Page 17: Button Repeat Rate
User Manual English Accessibility Four sub menus under [Accessibility]: ▪ OSD [Button Repeat Rate] ▪ OSD [Menu Time out] ▪ No signal input [Standby time out] ▪ OSD [Black Screen] Button Repeat Rate OSD [Button Repeat Rate]: This controls the OSD button response speed while pressing a button continuously. -
Page 18: Standby Time Out
User Manual English Standby Time Out The default setting for [Standby Time Out] is “0” seconds. If the time is set to “60”, then the scaler will turn off the output signal after 60 seconds when no input signal is detected. This feature is ideal if your LCDs also have a similar power down feature, as you can simply remove power from your source device, then the scaler and LCDs will automatically power... -
Page 19: Profile Setting
User Manual English Box ID [Box ID] is an identification # in each scaler for individual RS232 or IR remote controls. ▪ ID No is from 0-99 ▪ After setting Box ID, you can control each scaler individually via IR Remote or RS232 ▪... - Page 20 User Manual English Creating Custom Video Walls Collecting coordinates from a digital drawing ▪ First convert your design drawings into 1920x1080 resolution with a 16:9 aspect ratio and pick up the coordinates at the Top Left and Top Right corners in each active LCD display region, then input these in to the scaler via the OSD or PC tool (GAlign).
- Page 21 User Manual English Example: 6x LCD video wall with two scalers. 1. Open the photo in Paint 2. Resize the image to 1080 pixel height or 1920 pixel width and maintain aspect ratio...
- Page 22 User Manual English 3. Open File Properties and resize the image to 1920x1080 resolution 4. Select [All], then move the image to the center of the 1920x1080 coordinates...
- Page 23 User Manual English 5. Click the Top Left and Top Right corner for each LCD to collect the coordinates for each LCD. You can zoom the canvas to get a more accurate result. 6. Use the GAlign PC tool or the OSD to input coordinates for each scaler 7.
- Page 24 User Manual English Below is a picture to show a video wall designed with 4x scalers together with 15x 55” LCDs. You can take pictures after the LCD installation, then to collect two coordinates for each LCD and input the data in to each scaler by using the GAlign PC tool.
- Page 25 User Manual English EDID Setup Selective EDID settings are available on the scaler. The scaler can support a large range of input signal timings—from SVGA up to 4K. In order to get the best video performance, the correct EDID information needs to be configured; the aspect ratio in particular needs to be taken in to account.
- Page 26 User Manual English Bezel Correction for Preset Display Modes Bezel Correction The Scaler features four preset bezel correction settings; Off, 3.5mm, 4.9mm and 1.5%, whilst there is also the option to create a custom bezel via the custom display mode option. ▪...
- Page 27 User Manual English Mode 01 – 2x2 (Ratio 16:9) Bezel off: no correction Bezel on: 3.5mm bezel to bezel Mode 02 – 2x2 (Ratio 16:9) Bezel off: 4.9mm bezel to bezel Bezel on: 1.5% bezel correction Mode 03 – 2x2 with top TV upside down (Ratio 16:9) Bezel off: no bezel correction Bezel on: 1.5% bezel correction Mode 04–...
- Page 28 User Manual English Mode 04A – 1x4 Please apply 90 adjustment to the signal source or rotate image 90 to get the correct viewing angle. Bezel off: no bezel correction Bezel on: 3.5mm bezel to bezel Mode 05A – 4x1 (Ratio 2.25) Please apply 90 adjustment to the signal source or rotate image 90 to get the correct...
- Page 29 User Manual English Mode 06A – 3x1 (Ratio 1.69) Display 4 will operate separately as a full screen in this configuration. Please apply 90 adjustment to the signal source or rotate image 90 to get the correct viewing angle. Bezel off: no bezel correction Bezel on: 3.5mm bezel to bezel Mode 12A –...
- Page 30 User Manual English Mode 15 – 2x2 with clockwise 15〫rotation and TV1 & TV2 at upside down position (Ratio 1.7) Bezel off: no correction Bezel on: 1.5% bezel correction Mode 16 – 2x2 with TV2 & TV4 shift down 1/2 panel height (Ratio 1.42) Bezel off: no correction Bezel on: 3.5mm bezel to bezel...
- Page 31 User Manual English Mode 26 – (Ratio 1.89) Bezel off: no correction Bezel on: 3.5mm bezel to bezel Mode 34 – (Ratio 1.89) Bezel off: 4.9mm bezel to bezel Bezel on: 1.5% bezel correction Mode 35 – (Ratio 5.33) for 3x3 application Bezel off: no correction Bezel on: 3.5mm bezel to bezel Mode 36 –...
- Page 32 User Manual English Mode 56 – TV4 Down shift 1/4 panel height (Ratio 1.8) Bezel off: no correction Bezel on: 3.5mm bezel to bezel Mode 123 – TV4 Down shift 1/4 panel height (Ratio 1.8) Bezel off: 4.9mm bezel to bezel Bezel on: 1.5% bezel correction Mode 124 –...
- Page 33 User Manual English Mode 134 – 48.37〫counterclockwise rotation (Ratio 1.03) Bezel off: 4.9mm bezel to bezel Bezel on: 1.5% bezel correction Mode 135 – 45〫clockwise rotation (Ratio 1.33) Bezel off: no correction Bezel on: 3.5mm bezel to bezel Mode 136 – 45〫clockwise rotation (Ratio 1.33) Bezel off: 4.9mm bezel to bezel Bezel on: 1.5% bezel correction Mode 145 –...
- Page 34 User Manual English Mode 156 (Ratio 1) Bezel off: no correction Bezel on: 3.5mm bezel to bezel Mode 234 – (Ratio 1) Bezel off: 4.9mm bezel to bezel Bezel on: 1.5% bezel correction...
- Page 35 User Manual English Multiple Scaler Cascading Multiple Scaler units can be cascaded up to a maximum of 15x15. Below are the procedures for creating a cascade: • Connect the source input signal to the first Scaler, then daisy chain via the single HDMI loop out port of the first scaler to the HDMI input port of the next scaler.
- Page 36 User Manual English 2x Mode 06/12, recommended signal source resolution: 1920x2160 2x Mode 56/123, recommended signal source resolution: 1920x2160...
- Page 37 User Manual English 4x Mode 45/46, recommended signal source resolution: 3840x2160 2x Mode 145/146, recommended signal source resolution: 3840x1080...
- Page 38 User Manual English 2x Mode 126/134, recommended signal source resolution: 3840*1080 2x Mode 156/234, recommended signal source resolution: 3840x1080...
- Page 39 User Manual English GAlign Tool 1. First connect to the scaler using RS-232 (Serial), this can be done using a direct cable or alternatively using a USB to serial adapter. Once connected please choose the correct COM port and press connect. 2.
- Page 40 LINDY Herstellergarantie – Hinweis für Kunden in Deutschland LINDY gewährt für dieses Produkt über die gesetzliche Regelung in Deutschland hinaus eine zweijährige Hersteller- garantie ab Kaufdatum. Die detaillierten Bedingungen dieser Garantie finden Sie auf der LINDY Website aufgelistet bei den AGBs.
-
Page 41: Recycling Information
Geräte müssen den Sammel- und Rückgabesystemen zugeführt werden! Dort werden sie kostenlos entgegen genommen. Die Kosten für den weiteren Recyclingprozess übernehmen die Gerätehersteller. LINDY bietet deutschen Endverbrauchern ein kostenloses Rücknahmesystem an, beachten Sie bitte, dass Batterien und Akkus den Produkten vor der Rückgabe an das Rücknahmesystem entnommen werden müssen und über die Sammel- und Rückgabesysteme für Batterien separat entsorgt werden müssen.
Need help?
Do you have a question about the 38161 and is the answer not in the manual?
Questions and answers