Table of Contents
Advertisement
Available languages
Available languages
Pipette Controller
Instruction Manual........................ 2
Manuel d'instructions ................. 18
Manual de Instrucciones ............ 34
Bedienungsanleitung ................. 50
®
HEATHROW SCIENTIFIC
, LLC
620 Lakeview Parkway • Vernon Hills, IL 60061 • USA
Phone: +1-847-816-5070 • Fax: +1- 847-816-5072
Email: info@heathrowscientific.com
www.heathrowscientific.com
Advertisement
Chapters
Table of Contents

Related Manuals for Heathrow Scientific RF3000


Summary of Contents for Heathrow Scientific RF3000
- Page 1 Pipette Controller Instruction Manual......2 Manuel d’instructions ....18 Manual de Instrucciones .... 34 Bedienungsanleitung ....50 ® HEATHROW SCIENTIFIC , LLC 620 Lakeview Parkway • Vernon Hills, IL 60061 • USA Phone: +1-847-816-5070 • Fax: +1- 847-816-5072 Email: info@heathrowscientific.com www.heathrowscientific.com...
-
Page 2: Table Of Contents
Contents Safety Precautions ................3-4 Product Description ................4 Components ...................5 Technical Data ..................6-7 Getting Started Charging the battery ................8 Mounting the holder ................9 Using the stand ...................9 Pipetting Attaching the pipette ................10 Filling the pipette ................10 Dispensing ..................11 Maintenance Cleaning the pipette adapter and replacing the filter .....12 Checking for leaks ................12 Recharging the battery ..............13... -
Page 3: Safety Precautions
16. Opening the instrument or improper use of the instrument voids the warranty. If there is a failure during the warranty period, contact ® Heathrow Scientific for warranty service. (See warranty section) Warning! If the unit is not used as recommended by the manufacturer, the... -
Page 4: Product Description
17. Instrument must only be used with original manufacturer’s battery. 18. Battery must be completely discharged before disposal. Disposal should be performed in accordance with all governmental regulations. Warning! Check MSDS, wear required Personal Protective Equipment, and observe all applicable local and national regulations before dispensing and disposing of hazardous sample. -
Page 5: Components
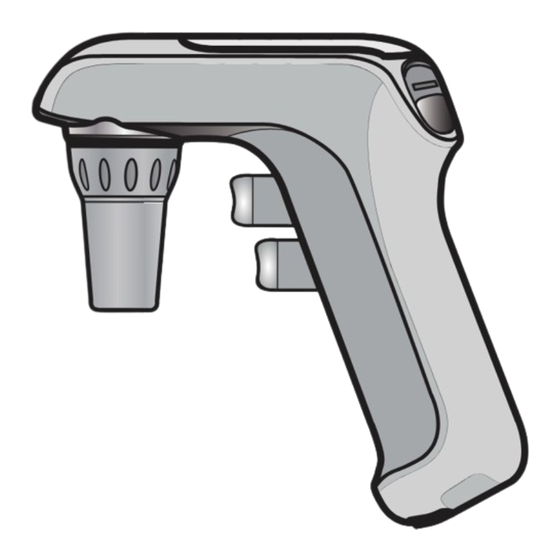
Components 1. Micro USB Connector and Adapter 2. Pump speed mode button 3. Mode indicator light 4. Charge indicator light 5. Low-battery indicator light 6. Aspirating button 7. Dispensing button Micro USB 8. Filter adapter Connector Type 9. Filter 10. Pipette holder 11. -
Page 6: Technical Data
Technical Data Pipettes: 1 to 100 mL pipettes, glass or plastic Operating Conditions: Electrical: 100-240~, 50/60 Hz, 0.25 Amps Ambient temperature: 5°C to 40°C Altitude: up to 2,000m Relative humidity: ≤80% noncondensing Storage Conditions: Storage temperature: 20°C to 55°C Relative humidity: ≤90% noncondensing Battery: One replaceable Li-lon;... - Page 7 Address: 620 Lakeview Parkway • Vernon Hills, IL 60061 USA European Contact: Emergo Europe Prinsessegracht 20, 2514 AP The Hague, The Netherlands Model: RF3000, HS3000 This unit has been constructed and conforms to the following: Safety Standards: IEC/EN61010-1:ed. 3.1, 2017 UL Std.
-
Page 8: Getting Started
Getting Started Remove the contents from the package, examining them carefully for breakage, defects, or shortages. Save the packaging. Charging the Battery For transport safety reasons, the instrument is shipped with minimal battery charge. The battery must be charged before initial use. Warning! Use original battery charger only! The use of a different charger could damage the battery or... -
Page 9: Mounting The Holder
Changing the AC Adapter Plug Type Remove Press Press tab Mounting the Holder For storage, insert the Pipette Controller in the wall holder. Mounting options: 1. The magnetized holder will grip a metal surface to provide support for the instrument. 2. -
Page 10: Pipetting
Pipetting Attaching the Pipette Prior to attaching the pipette, inspect the pipette’s top end for damage. A chipped pipette may damage the silicone pipette adapter. Holding the pipette as near to the top as possible, carefully push it into the nozzle for a secure fit. -
Page 11: Dispensing
Wipe the outer surface of the pipette tip to remove residual liquid. Place the tip of the pipette against the side wall of the container. Slowly press the dispensing button (lower pipetting button) until the meniscus is exactly level with the desired volume. Caution! Take care to avoid aspirating the liquid into the Pipette Controller which can impair performance. -
Page 12: Maintenance
Maintenance The Pipette Controller is normally maintenance-free. When necessary, the housing can be wiped occasionally using a damp cloth. Cleaning the Pipette Adapter and Replacing the Filter Caution! When cleaning and exchanging the filter, wear protective gloves and safety goggles to avoid the risk of splashes and contamination. -
Page 13: Recharging The Battery
Recharging the Battery One full charge of the battery allows approximately 20 hours of continuous pipetting. Decreasing motor power and or a lit red “Low- Battery Indicator” LED, indicate the need for recharging. For environmental reasons, the Pipette Controller is powered by a rechargeable battery, which does not contain Cadmium or Mercury. -
Page 14: Replacing The Battery
To Insert Connector into Bench Top Stand. 1. Place the Micro USB connector into the stand as shown. Make sure USB symbol on connector and stand are adjacent when USB slot on unit is facing user. To Insert Pipette Controller into Stand. 1. -
Page 15: Trouble Shooting
— Contact Heathrow operating time — Instrument or AC Scientific if in warranty ® with fully- adapter failed — Contact Heathrow charged battery Scientific if in warranty ® If the above recommendations do not solve current problems, contact Heathrow Scientific directly. ®... -
Page 16: Ordering Information
Pipette Controller that is not Heathrow Scientific appropriately cleaned and decontaminated. In the unlikely event of the unit needing repair, or where damage to Heathrow Scientific ® the unit necessitates return, contact and obtain return authorization before sending your instrument for service. - Page 17 CONTROLLER IS DESIGNED FOR USE ONLY BY TRAINED LABORATORY TECHNICIANS. USE BY ANYONE ELSE WILL VOID THIS WARRANTY.) ® • ANY PRODUCT THAT HAS BEEN, IN HEATHROW SCIENTIFIC ’S SOLE JUDGEMENT, TAMPERED WITH, ALTERED, OR REPAIRED ® BY ANYONE OTHER THAN HEATHROW SCIENTIFIC •...
- Page 18 Table des matières Précautions de sécurité ............... 19-20 Description du produit ................20 Composants ....................21 Données techniques ................22-23 Mise en fonctionnement Chargement des battery .................24 Montage du support mural ..............25 Utilisation du socle .................25 Pipetage Fixation de la pipette ................26 Remplissage de la pipette ..............26 Dispensation ..................27 Entretien...
-
Page 19: Précautions De Sécurité
17. Ouvrir l’enveloppe de l’appareil ou utiliser l’appareil à mauvais escient annule la garantie. En cas de défaillance pendant la période de garantie, contactez Heathrow Scientific ® pour réclamer un service de garantie (reportez-vous à la section « Garantie »). -
Page 20: Description Du Produit
18. L’appareil doit seulement être utilisé avec les battery d’origine du fabricant. 19. Les battery doivent être entièrement déchargées avant leur mise au rebut. La mise au rebut être conforme à tous les règlements gouvernementaux. Avertissement! Si vous n’utilisez pas l’appareil selon les recommandations du fabricant, vous en compromettez la sécurité. -
Page 21: Composants
Composantes Adapteur CA Bouton « Mode de vitesse » de la pompe Témoin de l’état des modes Témoin du niveau de la charge 5. Témoin de batterie faible Bouton « Aspiration » Type de Connecteur Bouton « Dispensation « Micro USB Adaptateur du filtre Filtre 10. -
Page 22: Données Techniques
Données techniques Pipettes : contenance de 1 à 100 mL, pipettes en verre ou en plastique Conditions de fonctionnement : Électricité : 100-240~, 50/60 Hz, 0,25 A Température ambiante : de 5°C à 40°C Altitude: up to 2,000m Humidité relative : ≤ 80 % sans condensation Conditions d'entreposage : Température d’entreposage : de 20 °C à... - Page 23 Adresse: 620 Lakeview Parkway • Vernon Hills, IL 60061 USA Point de contact en Europe: Emergo Europe Prinsessegracht 20, 2514 AP The Hague, The Netherlands Modèle: RF3000, HS3000 Cet appareil a été construit conformément aux normes suivantes: Normes de sécurité: IEC/EN61010-1:ed. 3.1, 2017 UL Std.
-
Page 24: Mise En Fonctionnement
Mise en fonctionnement Retirez le contenu de l’emballage et vérifiez soigneusement qu’il n’y a pas de signes de bris, de défauts ou de pièces manquantes. Conservez l’emballage. Chargement des battery Pour des raisons de sécurité lors du transport, le contrôleur de pipette est livré... -
Page 25: Montage Du Support Mural
Changement du type de fiche de l’adaptateur CA Montage du support mural Pour ranger le contrôleur de pipette, insérez-le dans son support mural. Options de montage : 1. Le support mural doté d’un aimant fournira une prise sur une surface métallique afin de soutenir le contrôleur de pipette. -
Page 26: Pipetage
Pipetage Fixation de la pipette Avant de fixer la pipette, vérifiez que la partie supérieure de la pipette n’est pas endommagée. Une pipette ébréchée risque d’endommager l’adaptateur de la pipette en silicone. En maintenant la pipette aussi près que possible du haut, introduisez-la soigneusement dans l’embout conique tout en veillant à... -
Page 27: Dispensation
Immergez la pointe de la pipette dans le liquide. Appuyez lentement sur le bouton « Aspiration » (bouton de pipetage du haut). La vitesse de l’aspiration dépend de l’importance de la pression sur ce bouton. Remplissez la pipette de sorte que le ménisque soit juste au-dessus du volume désiré. Nettoyez la surface extérieure de la pointe de la pipette pour retirer le liquide résiduel. -
Page 28: Entretien
Entretien Le contrôleur de pipette ne nécessite en principe aucun entretien. Si cela devait être nécessaire, nettoyez le boîtier occasionnellement avec un chiffon humide. Nettoyage de l’adaptateur de la pipette et remplacement du filtre Attention! Lorsque vous nettoyez ou remplacez le filtre, portez des gants et des lunettes de sécurité... -
Page 29: Rechargement Des Battery
Rechargement des battery Une charge complète des battery permet environ 20 heures de pipetage continu. Une baisse de puissance du moteur ou l’allumage du témoin DEL rouge de batterie faible indiquent que les battery doivent être rechargées. Pour des raisons environnementaux, le contrôleur de pipette fonctionne sur une batterie rechargeable qui est exempte de cadmium et de mercure. -
Page 30: Remplacement Des Battery
Insertion du connecteur dans le socle sur la table de laboratoire. Insérez le connecteur dans le socle comme illustré. Assure-toi que symbole USB sur le connecteur et le support sont adjacents lorsque l'emplacement USB L'appareil est confronté à l'utilisateur. Insertion du contrôleur de pipette dans le socle. Insérez le connecteur dans le socle comme illustré. -
Page 31: Dépannage
CA — Communiquer avec Heathrow ment chargées est défectueux Scientific ® si la garantie est toujours en vigueur Si les recommandations précédentes ne règlent pas les problèmes, veuillez communiquer directement avec Heathrow Scientific ®... -
Page 32: Renseignements Relatifs Aux Commandes
Dans la faible éventualité d’une réparation ou si l’appareil doit être ® retourné pour cause de dommages, contactez Heathrow Scientific et obtenez une autorisation de retour de marchandise avant d’expédier le contrôleur de pipette en vue d’un service de réparation. - Page 33 ® inspection, elle confirme la présence d’un défaut pendant que la période de garantie est toujours en cours, Heathrow Scientific ® s’engage, à sa seule discrétion, à réparer, à modifier ou à remplacer le produit sans frais.
- Page 34 Índice Precauciones de seguridad ..............35-36 Descripción del producto ................36 Componentes .....................37 Datos técnicos ..................38-39 Cómo comenzar Carga de batería ..................40 Montaje del soporte ................41 Uso de la base ..................41 Pipetas Conexión de la pipeta ................42 Llenado de la pipeta ................42 Suministro....................43 Mantenimiento Limpieza del adaptador de pipeta y cambio de filtro ......44...
-
Page 35: Precauciones De Seguridad
16. La apertura del instrumento o el uso inadecuado de él anulará la garantía. En caso de fallas durante el período de garantía, comuníquese con Heathrow Scientific para el servicio técnico de ® garantía (consulte la sección Garantía). -
Page 36: Descripción Del Producto
17. Sólo se usará el instrumento con batería del fabricante original. 18. Descargue las batería completamente antes de disponer de ellas; lo cual deberá realizarse de conformidad con todas las reglamentaciones gubernamentales. Avertissement! Si la unidad no se utiliza según lo recomendado por el fabricante, quedará... -
Page 37: Componentes
Componentes 1. Conector Micro USB 2. Botón de modo de velocidad de la bomba 3. Luz del indicador de modo 4. Luz del indicador de carga 5. Luz del indicador de poca batería 6. Botón de aspiración Tipo de Conector 7. -
Page 38: Datos Técnicos
Datos técnicos Pipetas: Pipetas (de vidrio o plástico) de 1 a 100 mL Condiciones operativas: Eléctricas: 100-240~, 50/60 Hz, 0,25 Amps Temperatura ambiente: de 5ºC a 40ºC Altitude: up to 2,000m Humedad relativa: < 80% sin condensar Condiciones de almacenamiento: Temperatura de almacenamiento: de 20ºC a 55ºC Humedad relativa: <... - Page 39 Domicilio: 620 Lakeview Parkway • Vernon Hills, IL 60061 USA Contacto Europeo: Emergo Europe Prinsessegracht 20, 2514 AP The Hague, The Netherlands Modelo: RF3000, HS3000 Esta unidad ha sido construida y cumple con las siguientes normas: Normas de seguridad: IEC/EN61010-1:ed. 3.1, 2017 UL Std.
-
Page 40: Cómo Comenzar
Cómo comenzar Retire el contenido del paquete; revise bien las piezas a fin de controlar que no estén rotas, defectuosas o faltantes. Guarde el embalaje. Carga de batería Por razones de seguridad de transporte, el controlador de pipeta se envía con una carga mínima de batería. Cargue éstas antes de usar el instrumento por primera vez. -
Page 41: Montaje Del Soporte
Cambio del tipo de enchufe del adaptador de CA Montaje del soporte Para almacenamiento, inserte el controlador de pipeta, en el soporte de pared. Opciones de montaje: 1. El soporte imantado sujetará una superficie de metal para sostener al controlador de pipeta. 2. -
Page 42: Conexión De La Pipeta
Pipeteado Conexión de la pipeta Antes de conectar la pipeta, inspeccione el extremo superior de ésta a fin de verificar que no esté dañada. Una pipeta astillada puede dañar el adaptador de pipetas de silicona. Sosteniendo la pipeta tan cerca como se pueda de la parte superior, empújela con cuidado para encajarla bien en la boca. -
Page 43: Suministro
Sumerja la punta de la pipeta en el líquido. Presione lentamente el botón de aspiración (el botón de pipeteado superior). La velocidad de aspiración depende de cuánto presione el botón. Llene la pipeta para que el menisco quede inmediatamente por encima del volumen deseado. Limpie la superficie exterior de la punta de la pipeta para quitar el líquido residual. -
Page 44: Mantenimiento
“Control de pérdidas” (más abajo). Notas — No todos los filtros de membrana son adecuados para uso con el RF3000™. — Para un desempeño adecuado, utilice sólo los filtros de reemplazo recomendados por el fabricante. — El adaptador de pipeta, la boca y el adaptador de filtro deben ser esterilizados al vapor a 121ºC durante 20 minutos. -
Page 45: Recarga De Batería
Deje cargar el instrumento por un máximo de 6 horas hasta que esté completamente cargado. La luz verde parpadeará durante la carga. El RF3000™ estará completamente cargado cuando la luz verde permanezca encendida. Notas — Cuando está completamente cargado, el controlador de pipeta puede funcionar 20 horas aproximadamente. -
Page 46: Cambio De Batería
Para insertar el conector en la base de mesada: Coloque el conector micro USB en el soporte como se muestra. Asegúrarse de que símbolo USB en el conector y el soporte son adyacentes cuando la ranura micro USB en la unidad se enfrenta al usuario. -
Page 47: Diagnóstico Y Solución De Problemas
— Comuníquese con Heathrow ® completamente adaptador de CA Scientific si el equipo está en cargadas garantía Si las recomendaciones antes enumeradas no resuelven los problemas actuales, póngase en contacto directo con Heathrow Scientific ®... -
Page 48: Información Para Hacer Pedidos
Si usted considera que el producto es defectuoso, deberá, durante ® el período de garantía, notificar a Heathrow Scientific , proporcionar ® evidencia de compra y devolver el producto a Heathrow Scientific con el formulario de Autorización de devolución. Para obtenerlo, llame al 1-847-816-5070. - Page 49 CONDICIONES ANORMALES DE TEMPERATURA, SUCIEDAD O CORROSIÓN, O USO CON MATERIALES ABRASIVOS O CORROSIVOS. • PIEZAS ACCESORIAS TALES COMO PIEZAS DE GOMA QUE SE DAÑEN POR LÍQUIDOS O MAL USO. EN NINGÚN CASO LA OLIGACIÓN DE HEATHROW SCIENTIFIC ® EXCEDERÁ EL PRECIO DEL PRODUCTO.
- Page 50 Inhaltsverzeichnis Sicherheitsmaßnahmen ............... 51-52 Produktbeschreibung ................52 Komponenten .....................53 Technische Daten ................54-55 Erste Schritte Batterie laden ..................56 Halterung montieren ................57 Ständer benutzen ...................57 Pipettieren Pipette anbringen ...................58 Pipette füllen ...................58 Entleeren ....................59 Wartung Pipetten-Adapter reinigen und Filter ersetzen ........60 Lecks suchen ..................60 Batterie wiederaufladen ..............
-
Page 51: Sicherheitsmaßnahmen
15. Reparaturen dürfen nur von geschultem und autorisiertem Kundendienstpersonal durchgeführt werden. 16. Durch Öffnen oder unsachgemäße Handhabung des Geräts erlischt die Garantie. Falls während der Garantiezeit ein Fehler auftritt, kontaktieren Sie Heathrow Scientific LLC für Garantieleistungen ® (siehe Abschnitt zur Gewährleistung). -
Page 52: Produktbeschreibung
17. Das Gerät darf nur mit Originalbatterie betrieben werden. 18. Vor der Entsorgung müssen die Batterie vollständig entladen sein. Die Entsorgung hat in Übereinstimmung mit allen Regierungsvorschriften zu erfolgen. Achtung! Wenn das Gerät nicht in Übereinstimmung mit den Empfehlungen des Herstellers verwendet wird, kann die Sicherheit beeinträchtigt werden. -
Page 53: Komponenten
Komponenten 1. Anschlusskabel Mikro-USB 2. Pumpengeschwindigkeitsregler 3. Modusanzeige 4. Ladeanzeige 5. Ladewarnungsanzeige Batterie 6. Ansaugknopf Mikro-USB 7. Entleerungsknopf Anschluss Typ 8. Filteradapter 9. Filter 10. Pipettenhalter 11. Pipetten-Führungsadapter... -
Page 54: Technische Daten
Technische Daten Pipetten: 1 bis 100 ml Pipetten, Glas oder Plastik Betriebsvoraussetzungen: Anschlusswert: 100-240~, 50/60 Hz, 0,25 A Raumtemperatur: 5°C bis 40°C Altitude: up to 2,000m Relative Luftfeuchtigkeit: ≤ 80 %, nicht kondensierend Lagerbedingungen: Lagertemperatur: 20° C - 55° C Relative Luftfeuchtigkeit: ≤... - Page 55 Adresse: 620 Lakeview Parkway • Vernon Hills, IL 60061 USA Kontakt in Europa: Emergo Europe Prinsessegracht 20, 2514 AP The Hague, The Netherlands Modell: RF3000, HS3000 Dieses Gerät entspricht in Herstellung und Funktion den folgenden Standards: Sicherheitsstandards: IEC/EN61010-1:ed. 3.1, 2017 UL Std.
-
Page 56: Erste Schritte
Erste Schritte Nehmen Sie den Inhalt aus der Verpackung und prüfen Sie ihn sorgfältig auf Brüche, Beschädigungen oder fehlende Teile. Bewahren Sie die Verpackung auf. Batterie laden Aus Sicherheitsgründen wird der Pipette Controller mit minimaler Batterieladung geliefert. Vor dem ersten Gebrauch müssen die Batterie geladen werden. -
Page 57: Halterung Montieren
Netzteilsteckertyp auswechseln Halterung montieren Zur Aufbewahrung den Pipette Controller im Wandhalter platzieren. Montageoptionen: 1. Die magnetische Halterung gibt dem Pipette Controller an einer Metallfläche Halt. 2. Halterung mit Schrauben an der Wand befestigen. Ständer benutzen Der Pipette Controller zum Aufladen in den Ständer legen, wobei das Kabel am Ständer angeschlossen sein muss. -
Page 58: Pipettieren
Pipettieren Pipette einsetzen Vor dem Einsetzen einer Pipette deren oberes Ende auf Schäden überprüfen. Eine beschädigte Pipette kann den Pipetten- Adapter aus Silikon beschädigen. Die Pipette so nahe am oberen Ende halten wie möglich und vorsichtig bis zum sicheren Halt in die Öffnung schieben. Bei Verwendung einer 1 ml Pipette diese mit dem mitgelieferten Adapter stabilisieren. -
Page 59: Entleeren
Pipettenspitze in die Flüssigkeit tauchen. Den Ansaugknopf langsam drücken (oberer Pipettierungsknopf). Die Ansauggeschwindigkeit hängt davon ab, wie stark der Ansaugknopf gedrückt wird. Füllen Sie die Pipette bis sich der Meniskus genau über dem gewünschten Volumen befindet. Die Pipette außen abwischen um Restflüssigkeit zu entfernen. Mit der Pipettenspitze die Seitenwand des Behälters berühren. -
Page 60: Wartung
Wartung Der Pipette Controller ist normalerweise wartungsfrei. Falls nötig, können das Gehäuse und der Rotor mit einem feuchten Tuch und einem milden, nicht ätzenden Reiniger abgewischt werden. Pipetten-Adapter reinigen und Filter ersetzen Achtung! Beim Reinigen und Ersetzen des Filters Schutzhandschuhe und Schutzbrille tragen, um Spritzer und Verunreinigungen zu vermeiden. -
Page 61: Batterie Wiederaufladen
Batterie wiederaufladen Mit vollständig geladenen Batterie kann der Pipette Controller etwa 20 Stunden lang betrieben werden. Abnehmende Motorstärke und/oder eine rote Ladeanzeige signalisieren, dass die Batterie wieder aufgeladen werden müssen. Zum Umweltschutz wird der Pipette Controller von einer wieder aufladbaren Batterie betrieben, die weder Cadmium noch Quecksilber enthält. -
Page 62: Batterie Ersetzen
Zum Anschließen des Stromkabel in den Tischständer: Den Mikro USB-Stecker wie dargestellt in den Ständer anstecken. Vergewissern Sie sich, dass das USB-Symbol am Stecker und am Stand anliegt, wenn der Mikro USB-Steckplatz am Gerät dem Benutzer zugewandt ist. Den Pipette Controller in den Ständer einsetzen Das Stromkabel wie dargestellt an den Ständer anstecken. -
Page 63: Fehlerbehebung
— Geräte- oder row Scientific ladener Batterie Netzteilversagen — Wenden Sie sich innerhalb der Gewährleistungszeit an Heath- ® row Scientific Falls die o.g. Empfehlungen die aktuellen Probleme nicht lösen, wenden Sie sich bitte direkt an Heathrow Scientific ®... -
Page 64: Bestellinformation
In dem unwahrscheinlichen Fall, dass dieses Gerät repariert oder wegen einer Beschädigung zurückgeschickt werden muss, wenden ® Sie sich an Heathrow Scientific LLC und beantragen Sie eine Rücksendegenehmigung, bevor Sie Ihren Pipette Controller zum Kundendienst schicken. - Page 65 VERSCHMUTZUNGEN ODER KORROSION, ODER VERWENDUNG VON ÄTZENDEN REINIGERN ODER SCHEUERMITTELN. • ZUBEHÖRTEILE, WIE ZUM BEISPIEL TEILE AUS GUMMI, DIE DURCH FLÜSSIGKEITEN ODER UNSACHGEMÄSSEN GEBRAUCH BESCHÄDIGT WURDEN. ® EN NINGÚN CASO LA OLIGACIÓN DE HEATHROW SCIENTIFIC EXCEDERÁ EL PRECIO DEL PRODUCTO.
- Page 66 RF3000v1 09/2017 All rights reserved. Printed in China. Tous droits réservés. Imprimé en China. Todos los derechos reservados. Impreso en China. Alle Rechte vorbehalten. Gedruckt in China.
Need help?
Do you have a question about the RF3000 and is the answer not in the manual?
Questions and answers